


Introduction
This guide is intended to provide a comprehensive description of the encounter with Warlord Zon'ozz in Dragon Soul. It is targeted at anyone who desires to understand the fight mechanics.
This guide is updated for World of Warcraft WoD 6.1.2.
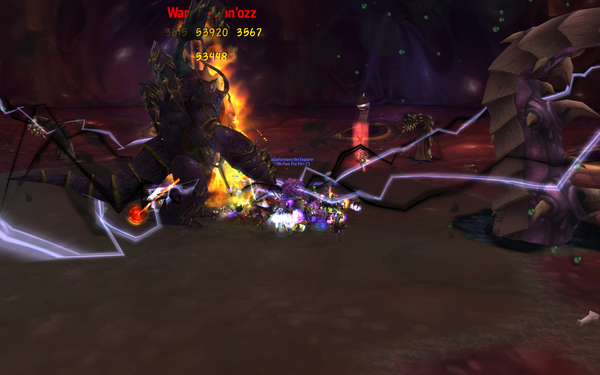
Warlord Zon'ozz is one of the two bosses that are unlocked after defeating Morchok, in the Dragon Soul raid. He is a Faceless One that your raid will face in one of two very similar Old God themed rooms, outside of Wyrmrest Temple.
The encounter will require good awareness and teamwork from your raid, as well as strong healing, but it is not overly difficult.
General Information
Health Pool
| Difficulty | Zon'ozz | Claw of Go'rath | Eye of Go'rath | Flail of Go'rath |
|---|---|---|---|---|
| 10-man | 68M | |||
| 10-man Heroic | 86M | 1.8M | 710k | 310k |
| 25-man | 204M | |||
| 25-man Heroic | 260M | 2.3M | 1.1M | 400k |
| LFR | 70M |
Enrage Timer
The Warlord Zon'ozz encounter has a 6-minute enrage timer in all difficulties.
Raid Composition
| Difficulty | Tanks | Healers | DPS |
|---|---|---|---|
| 10-man | 1 | 2-3 | 6-7 |
| 10-man Heroic | 1 | 3 | 6 |
| 25-man | 1 | 5-6 | 18-19 |
| 25-man Heroic | 1 | 6 | 18 |
| LFR | 1 | 5-6 | 18-19 |
Loot
Tier 13 Tokens
| Item Name | Slot | Classes |
|---|---|---|
| Gauntlets of the Corrupted Conqueror (LFR, Heroic) | Hands | Paladin, Priest, Warlock |
| Gauntlets of the Corrupted Protector (LFR, Heroic) | Hands | Warrior, Hunter, Shaman |
| Gauntlets of the Corrupted Vanquisher (LFR, Heroic) | Hands | Rogue, Death Knight, Mage, Druid |
Armor
| Item Name | Armor | Slot | Main Stats |
|---|---|---|---|
| Cord of the Slain Champion (LFR, Heroic) | Cloth | Waist | Intellect |
| Belt of Flayed Skin (LFR, Heroic) | Leather | Waist | Agility |
| Grotesquely Writhing Bracers (LFR, Heroic) | Wrists | Intellect/Spirit | |
| Graveheart Bracers (LFR, Heroic) | Plate | Wrists | Strength/Dodge |
| Treads of Crushed Flesh (LFR, Heroic) | Plate | Feet | Strength/Mastery |
Weapons
| Item Name | Type | Main Stats |
|---|---|---|
| Horrifying Horn Arbalest (LFR, Heroic) | Crossbow | Agility |
| Finger of Zon'ozz (LFR, Heroic) | Wand | Intellect |
Rings and Trinkets
| Item Name | Type | Main Stats/Effect |
|---|---|---|
| Signet of Suturing (LFR, Heroic) | Ring | Intellect/Spirit |
| Infinite Loop (LFR, Heroic) | Ring | Intellect/Hit |
| Seal of Primordial Shadow (LFR, Heroic) | Ring | Agility |
| Breathstealer Band (LFR, Heroic) | Ring | Strength/Mastery |
| Hardheart Ring (LFR, Heroic) | Ring | Strength/Parry |
| Windward Heart (LFR, Heroic) | Trinket | Intellect/Additional Heal |
| Seal of the Seven Signs (LFR, Heroic) | Trinket | Intellect/Haste on Heal |
| Cunning of the Cruel (LFR, Heroic) | Trinket | Intellect/AoE Damage |
| Vial of Shadows (LFR, Heroic) | Trinket | Agility/Additional Damage |
| Bone-Link Fetish (LFR, Heroic) | Trinket | Strength/AoE Damage |
| Indomitable Pride (LFR, Heroic) | Trinket | Stamina/Shield |
Overview of the Fight
Zon'ozz is a relatively simple encounter made up of two alternating phases. Your raid's actions will determine when the boss enters the second phase in the cycle:
-
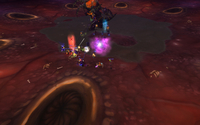 The Ping Pong Phase, during which the raid must bounce a purple Ball
(a damage-immune enemy NPC) between themselves, by blocking its traveling path,
before finally hitting the boss with it. During this phase, the raid must
also:
The Ping Pong Phase, during which the raid must bounce a purple Ball
(a damage-immune enemy NPC) between themselves, by blocking its traveling path,
before finally hitting the boss with it. During this phase, the raid must
also:- endure a stacking self-buff that the boss uses to enrage himself progressively;
- dispel a harmful magic debuff.
-
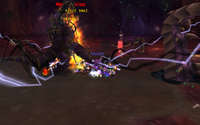 The Black Phase, which lasts 30 seconds, is triggered whenever Zon'ozz
is touched by the Ball (this removes his stacking self-buff).
During this phase, the raid must stack together to deal with very heavy AoE damage.
The Black Phase, which lasts 30 seconds, is triggered whenever Zon'ozz
is touched by the Ball (this removes his stacking self-buff).
During this phase, the raid must stack together to deal with very heavy AoE damage.

This alternation of phases continues until Warlord Zon'ozz is dead.
Also, each bounce that the ball makes during the Ping Pong Phase increases the damage that Zon'ozz takes by 5%, as explained in the next section.
Damage Done on Zon'ozz Keeps Increasing
If your raid executes the fight properly, Zon'ozz will take increasing damage as the fight goes on. Indeed, every time you hit Zon'ozz with the Ball, each bounce the Ball made during the Ping Pong Phase will make him take 5% increased damage. For example, if the Ball bounced 7 times, Zon'ozz will take 35% increased damage.
This debuff (![]() Void Diffusion) lasts 2 minutes. Therefore, if your
raid does not let too much time elapse between each Black Phase, you can keep
increasing the stacks of this debuff. For example, if the Ball bounced 7 times in
the first Ping Pong Phase and 8 times during the second Ping Pong Phase, when the
second Black Phase begins, Zon'ozz will have 15 stacks of the debuff and will take
75% increased damage.
Void Diffusion) lasts 2 minutes. Therefore, if your
raid does not let too much time elapse between each Black Phase, you can keep
increasing the stacks of this debuff. For example, if the Ball bounced 7 times in
the first Ping Pong Phase and 8 times during the second Ping Pong Phase, when the
second Black Phase begins, Zon'ozz will have 15 stacks of the debuff and will take
75% increased damage.
Ping Pong Phase
The Ping Pong Phase is the main phase of the fight, during which your raid will mostly perform two tasks:
- deal damage to Zon'ozz;
- control the Ball so that it does not touch the walls of the room and so that it touches the boss at the correct time.
The phase ends when the Ball touches the boss. Your raid will choose for this to happen after a certain amount of time, as this resets Zon'ozz' stacking enrage and makes him take increased damage for the rest of the fight.
Abilities
During the Ping Pong Phase, Zon'ozz has the following abilities:
 Focused Anger is a stacking buff that Zon'ozz applies to himself,
roughly once every 6 seconds. It increases his attack speed and damage dealt
by 10% per stack.
Focused Anger is a stacking buff that Zon'ozz applies to himself,
roughly once every 6 seconds. It increases his attack speed and damage dealt
by 10% per stack. Psychic Drain: a frontal cone attack that deals a high amount of
Shadow damage (90,000 in LFR and 120,000 in 10 and 25-man difficulty) to every
enemy in front Zon'ozz and heals the boss for 10 times the amount of damage
dealt. Zon'ozz casts this ability every 20 seconds.
Psychic Drain: a frontal cone attack that deals a high amount of
Shadow damage (90,000 in LFR and 120,000 in 10 and 25-man difficulty) to every
enemy in front Zon'ozz and heals the boss for 10 times the amount of damage
dealt. Zon'ozz casts this ability every 20 seconds.-
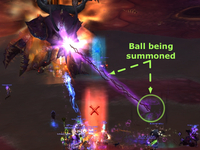 Void of the Unmaking (which we refer to as the Ball) is an NPC that Zon'ozz
summons at the start of the fight, and after each Black Phase. The boss will
summon the Ball directly in front of him. It is immune to damage, and slowly
moves around the room.
Void of the Unmaking (which we refer to as the Ball) is an NPC that Zon'ozz
summons at the start of the fight, and after each Black Phase. The boss will
summon the Ball directly in front of him. It is immune to damage, and slowly
moves around the room.- If the Ball comes in contact with a player, it bounces back in the
opposite direction. When this happens, the Ball also deals a large amount of
damage through
 Void Diffusion. The damage is split between all players
within a small area (in
LFR, the area is very large). Additionally, each time the Ball touches a
player, it stacks two buffs on itself:
Void Diffusion. The damage is split between all players
within a small area (in
LFR, the area is very large). Additionally, each time the Ball touches a
player, it stacks two buffs on itself:- Void Diffusion, a buff that increases the damage that it deals
when it comes in contact with a player, by 20% for each stack;
- a stacking buff that causes your raid to deal 5% increased damage per stack to Zon'ozz (the buff only becomes effective when the Ball comes in contact with Zon'ozz).
- If the Ball comes in contact with Zon'ozz, it forces him to enter the Black Phase, resetting his stacks of Focused Anger and causing him to take 5% increased damage for each stack of the aforementioned buff that the Ball had at the time.
- If the Ball comes in contact with one of the walls of the
room, the entire raid is damaged by
 Black Blood Eruption.
- If the Ball comes in contact with a player, it bounces back in the
opposite direction. When this happens, the Ball also deals a large amount of
damage through
 Disrupting Shadows is a DoT that Zon'ozz casts on a number of
random players (3 in 10-man, between 7 and 10 in 25-man difficulty and LFR).
This DoT deals Shadow damage (22,500 in LFR and 30,000 in 10
and 25-man difficulty) every 2 seconds for 20 seconds. Zon'ozz casts this
ability every 20 seconds. It can be dispelled, and when dispelled, the target
takes a moderate amount of Shadow damage (60,000 in 10-man and 70,000 in
25-man difficulty) and is knocked back. In LFR, dispelling the DoT has no
negative effects.
Disrupting Shadows is a DoT that Zon'ozz casts on a number of
random players (3 in 10-man, between 7 and 10 in 25-man difficulty and LFR).
This DoT deals Shadow damage (22,500 in LFR and 30,000 in 10
and 25-man difficulty) every 2 seconds for 20 seconds. Zon'ozz casts this
ability every 20 seconds. It can be dispelled, and when dispelled, the target
takes a moderate amount of Shadow damage (60,000 in 10-man and 70,000 in
25-man difficulty) and is knocked back. In LFR, dispelling the DoT has no
negative effects.

Strategy
The strategy for the Ping Pong Phase revolves around bouncing the
Ball (Void of the Unmaking) between raid members and then finally hitting
Zon'ozz with it, in order to trigger the Black Phase (the more bounces before
Zon'ozz is hit by the Ball, the more damage he will take for the rest of the fight).
![]() Disrupting Shadows must also be dispelled.
Disrupting Shadows must also be dispelled.
Finally, players should simply deal as much damage as possible to Warlord Zon'ozz.
Ping Ponging the Ball in LFR Difficulty
In LFR difficulty, this aspect of the fight is practically irrelevant.
The Ball is unable to ever touch the walls of the room (thus
![]() Black Blood Eruption is not a concern) and it will automatically hit the
boss, triggering a Black Phase, when the boss reaches 11 stacks of
Black Blood Eruption is not a concern) and it will automatically hit the
boss, triggering a Black Phase, when the boss reaches 11 stacks of
![]() Focused Anger.
Focused Anger.
As a result, the Ball can be ignored in this difficulty setting. Even the
damage from ![]() Void Diffusion is easy to deal with and should never cause any
deaths.
Void Diffusion is easy to deal with and should never cause any
deaths.
Ping Ponging the Ball in 10-man/25-man Difficulty
The most important part of the Ping Pong Phase is, as the name suggests, properly controlling the movement of the Ball (Void of the Unmaking). There are a few things to keep in mind when doing this:
- the Ball must be soaked by a group of players (as otherwise, the damage that it deals when it reaches a player would kill that player);
- the more times the Ball is bounced around between players, the more damage Zon'ozz will take for the rest of the fight (5% damage taken increase per bounce);
- the more times the Ball is bounced around between players, the more damage each bounce will do (20% damage done increase per bounce);
- the visual effect of the Ball might not be obvious to melee players, especially since they will not be facing it, so they need to be very cautious not to move towards the ball when they move out to let the it hit the boss.
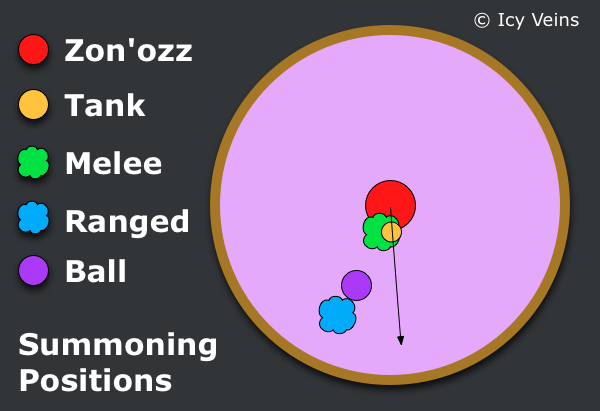 With that in mind, the first thing to do is to deal with Zon'ozz summoning
the Ball, something that happens a few seconds after the fight begins. The
idea is to have the Ranged group stack about 20 yards from the boss and
the Melee group (tank included) run to the boss. The exact positioning of
the Melee group does not really matter at this stage, only that the tank
must make the boss face slightly away from the Ranged group.
With that in mind, the first thing to do is to deal with Zon'ozz summoning
the Ball, something that happens a few seconds after the fight begins. The
idea is to have the Ranged group stack about 20 yards from the boss and
the Melee group (tank included) run to the boss. The exact positioning of
the Melee group does not really matter at this stage, only that the tank
must make the boss face slightly away from the Ranged group.
The boss usually summons the
Ball before the first ![]() Psychic Drain, but we have seen occurrences where
the first Psychic Drain came before the Ball. So the raid needs to prepare for
this possibility. This is the reason for making the boss face slightly away
from the Ranged Group.
Psychic Drain, but we have seen occurrences where
the first Psychic Drain came before the Ball. So the raid needs to prepare for
this possibility. This is the reason for making the boss face slightly away
from the Ranged Group.
When the ball is summoned, the Ranged group will have to move slightly, to
intercept the Ball, while the tank should proceed to face the boss entirely
away from them (due to ![]() Psychic Drain). The ping pong part begins as soon
as the Ball collides with the Ranged group.
Psychic Drain). The ping pong part begins as soon
as the Ball collides with the Ranged group.
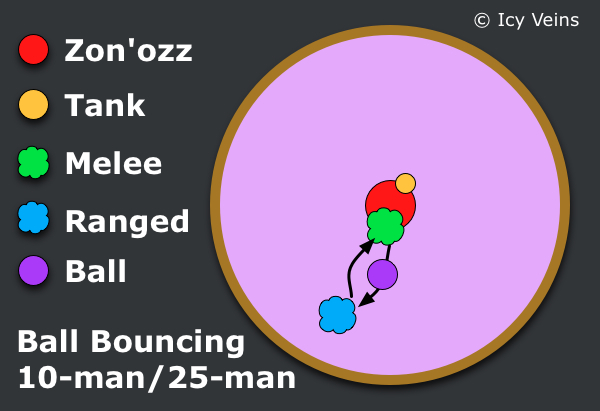 Next, the bouncing will begin between the Ranged group and the Melee group.
When it is time for the Black Phase to start
(see section below), simply have all the players from the Melee group
move out of the path of the Ball so that it can hit the boss.
Next, the bouncing will begin between the Ranged group and the Melee group.
When it is time for the Black Phase to start
(see section below), simply have all the players from the Melee group
move out of the path of the Ball so that it can hit the boss.
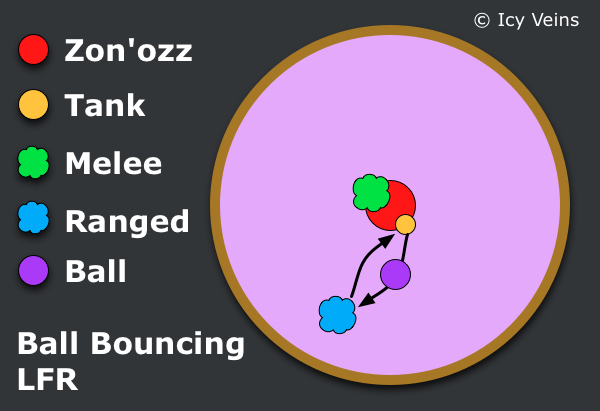 In LFR difficulty, it might be hard to get everyone from the melee group
to move out from the Ball's path at the same time (so that it hits
Zon'ozz). Fortunately, in LFR difficulty, the
damage from the Ball touching a player is split over a very large area.
This enables the tank to bounce the Ball alone (the damage will spread
to the melee group, even if they are standing on the other side of the
boss). When the time for the Black Phase comes, it is much easier to
have only one player move away from the Ball's path (rather than a
group of players).
In LFR difficulty, it might be hard to get everyone from the melee group
to move out from the Ball's path at the same time (so that it hits
Zon'ozz). Fortunately, in LFR difficulty, the
damage from the Ball touching a player is split over a very large area.
This enables the tank to bounce the Ball alone (the damage will spread
to the melee group, even if they are standing on the other side of the
boss). When the time for the Black Phase comes, it is much easier to
have only one player move away from the Ball's path (rather than a
group of players).
Timing for Triggering the Black Phase
One important thing to keep in mind is that after he spawned a Ball, Zon'ozz will wait at least 90 seconds before spawning a new one. For example, if you spend 40 seconds in the first Ping Pong phase, you will need to wait 20 seconds in the second Ping Pong Phase before getting a new Ball (the duration of the Black Phase always being 30 seconds).
The longer you wait before getting a new Ball, the less you can bounce it
around before the damage on the tank from ![]() Focused Anger forces you to
trigger a new Black Phase.
Focused Anger forces you to
trigger a new Black Phase.
Therefore, you need to spend approximately one minute in each Ping Pong
Phase, so that you get a new Ball at the beginning of the following
Ping Pong Phase. At the same time, you need to aim at bouncing the ball
between 5 and 10 times, so that the damage from ![]() Void Diffusion
remain manageable.
Void Diffusion
remain manageable.
Also, you do not want to remain more than 90 seconds in each Ping Pong
Phase. Indeed, ![]() Void Diffusion, the debuff that keeps stacking
on Zon'ozz at the beginning of each Black Phase (the number of stacks
depends on the number of bounces of the Ball) lasts only two minutes.
Spending more than 90 seconds in a Ping Pong Phase will cause the debuff
to drop (adding the 30 seconds of the Black Phase to those 90 seconds
makes it 2 minutes).
Void Diffusion, the debuff that keeps stacking
on Zon'ozz at the beginning of each Black Phase (the number of stacks
depends on the number of bounces of the Ball) lasts only two minutes.
Spending more than 90 seconds in a Ping Pong Phase will cause the debuff
to drop (adding the 30 seconds of the Black Phase to those 90 seconds
makes it 2 minutes).
Note that, in LFR difficulty, the ball will automatically hit Zon'ozz after a few bounces (usually between 5 or 7).
Disrupting Shadows
Players affected by ![]() Disrupting Shadows should always be dispelled. In
10 and 25-man difficulty, dispelling should be done carefully:
Disrupting Shadows should always be dispelled. In
10 and 25-man difficulty, dispelling should be done carefully:
- Players should only be dispelled when they have enough health to survive the roughly 60,000 damage they will take (and any subsequent damage they may take from the Ball);
- When dispelling, it is important that the player does not get knocked into the Ball (thus dying to unsoaked damage) or away from the group when the Ball is about to hit it (thus not soaking the damage, causing the rest of the group to take more damage).
For these reasons, it is best to have one healer assigned to dispelling in 10-man, and one or two healers in 25-man, thus avoiding confusion.
If the raid is topped off when Disrupting Shadows is cast, Priests can use
![]() Mass Dispel.
Mass Dispel.
In LFR difficulty, players should be dispelled immediately (minimising the damage that they take from the DoT), as there are no negative effects to being dispelled.
Black Phase
After spending a period of time in the Ping Pong Phase, your raid will wish
to trigger the Black Phase, by having the boss come in contact with the
Ball (Void of the Unmaking). This will reset the boss' stacks of ![]() Focused Anger
and cause him to take increased damage. This phase lasts for exactly 30
seconds, during which time your raid must only heal a large amount of raid-wide
damage and DPS the boss. After 30 seconds, the Ping Pong Phase restarts.
Focused Anger
and cause him to take increased damage. This phase lasts for exactly 30
seconds, during which time your raid must only heal a large amount of raid-wide
damage and DPS the boss. After 30 seconds, the Ping Pong Phase restarts.
Abilities
During the Black Phase, your raid will take unavoidable, raid-wide damage from two abilities:
 Black Blood of Go'rath: this is a debuff that Zon'ozz places on every
raid member. It lasts for 30 seconds and deals Shadow damage every second
(7,500 in LFR and 10,000 in 10 and 25-man difficulty).
Black Blood of Go'rath: this is a debuff that Zon'ozz places on every
raid member. It lasts for 30 seconds and deals Shadow damage every second
(7,500 in LFR and 10,000 in 10 and 25-man difficulty).- Zon'ozz spawns several Eyes of Go'rath. These NPCs cannot be tanked or
attacked, and they deal damage to random raid members (
 Shadow Gaze).
Period Without Melee Damage
From the moment Zon'ozz is hit by the Ball to approximately 15 seconds
after ![]() Black Blood of Go'rath starts, Zon'ozz will not perform melee attacks.
Black Blood of Go'rath starts, Zon'ozz will not perform melee attacks.
Strategy
The strategy for the Black Phase is extremely simple. Just have your entire raid stack up on Warlord Zon'ozz and heal the damage.
After exiting the Black Phase, Warlord Zon'ozz will, normally, first summon
another Ball, and 5 seconds later he will start casting ![]() Psychic Drain.
However, in case the previous Ping Pong Phase lasted less than one minute,
the boss is likely to cast Psychic Drain before summoning the Ball. For this
reason, it is advisable that the tank faces the boss at a 30 degree angle from
the ranged group. As soon as the Ball has been summoned, the tank should face
the boss completely away from the raid.
Psychic Drain.
However, in case the previous Ping Pong Phase lasted less than one minute,
the boss is likely to cast Psychic Drain before summoning the Ball. For this
reason, it is advisable that the tank faces the boss at a 30 degree angle from
the ranged group. As soon as the Ball has been summoned, the tank should face
the boss completely away from the raid.
Tips
Using Bloodlust/Heroism/Time Warp
The ideal time to use ![]() Bloodlust,
Bloodlust, ![]() Heroism, or
Heroism, or ![]() Time Warp
is during the last Black Phase of the fight. There are two reasons to this:
Time Warp
is during the last Black Phase of the fight. There are two reasons to this:
- DPS players will be able to deal the most damage to Zon'ozz (they are stationary for the entire Black Phase and Zon'ozz increased damage taken debuff will be at its maximum).
- Healers will have an easier time coping with the raid-wide damage.
Minimising Healing from Psychic Drain
Keep in mind that ![]() Psychic Drain heals Zon'ozz for 10 times the amount
of damage that it deals each time it is cast. There are two ways to
minimise the amount of healing the boss receives:
Psychic Drain heals Zon'ozz for 10 times the amount
of damage that it deals each time it is cast. There are two ways to
minimise the amount of healing the boss receives:
- Use healing reduction debuffs on Zon'ozz (
 Mortal Strike for
Warriors,
Mortal Strike for
Warriors,  Wound Poison for Rogues, etc.);
 - Minimise the amount of damage that the tank takes from Psychic Drain by
pre-casting
 Power Word: Shield on him, or by having the tank use minor
defensive cooldowns for Psychic Drain.
Power Word: Shield on him, or by having the tank use minor
defensive cooldowns for Psychic Drain.
Needless to say, no one other than the tank should ever be in front of Zon'ozz and thus hittable by Psychic Drain.
Learning the Fight
The most important thing to do when learning and practicing the Warlord Zon'ozz encounter is having the entire raid aware of their positions and managing the bounces of the Ball (Void of the Unmaking). By doing this proficiently and ensuring a good alternation between the Ping Pong Phase and the Black Phase, the encounter becomes almost trivial.
Heroic Mode
The heroic mode of Warlord Zon'ozz is a very difficult encounter, with a high healing and DPS requirement. The Ping Pong Phase is almost identical to the normal mode version, while the Black Phase is significantly changed.
The fight has a very strict enrage timer that will require your raid to optimise DPS and make use of certain tricks.
Differences from Normal Mode
The differences from the normal mode version are:
- Disrupting Shadows now deals higher damage than in normal mode,
with every tick. When dispelled, however, it deals damage not only to the
affected player, but also to all raid members within 10 yards, also knocking
them back.
- Focused Anger now causes Zon'ozz to deal 20% extra damage (up from 10%)
and attack 5% faster (down from 10%) with each stack.
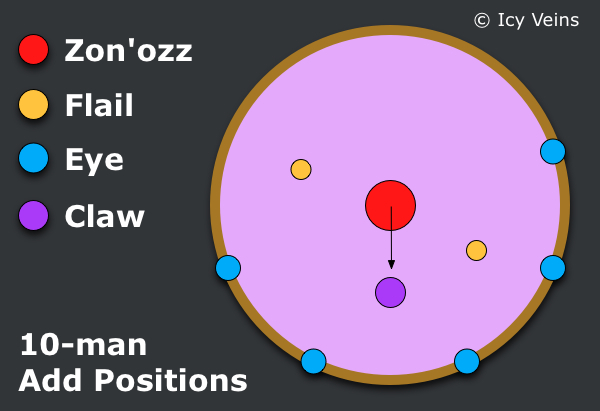
- During the Black Phase, three types of Old God tentacles will spawn,
causing the raid to take massive amounts of damage:
- Claw of Go'rath is a large tentacle that must be tanked. If not tanked, this tentacle will deal massive amounts of damage to the raid, causing a fast wipe. 1 Claw spawns in 10-man difficulty and 2 spawn in 25-man difficulty. The Claw of Go'rath deals very low damage, and does not need a proper tank. Plate wearing DPS players and Feral Druids can perform this task.
- Flail of Go'rath is a small tentacle with little health. It deals damage to random raid members and performs a knockback on players within 15 yards of it. 2 Flails spawns in 10-man difficulty and 4 spawn in 25-man difficulty.
- Eye of Go'rath simply deals damage to random raid members. 5 Eyes spawn in 10-man difficulty and 8 spawn in 25-man difficulty.
Additionally, Zon'ozz' abilities deal more damage, and he has more health.
Strategy
The Ping Pong Phase remains largely unchanged, with a small difference in
how ![]() Disrupting Shadows should be handled. The Black Blood Phase is
changed more considerably. We will cover all the important aspects below.
Disrupting Shadows should be handled. The Black Blood Phase is
changed more considerably. We will cover all the important aspects below.
Ping Pong Phase
During the Ping Pong Phase, the only important difference is that players
affected by ![]() Disrupting Shadows can no longer be safely dispelled, unless
they are far away from any other raid members. As a result, in most cases, the
damage from DoT must simply be healed through.
Disrupting Shadows can no longer be safely dispelled, unless
they are far away from any other raid members. As a result, in most cases, the
damage from DoT must simply be healed through.
Black Phase
The ![]() Black Blood of Go'rath debuff that exists in normal mode works
slightly differently. In heroic mode, this debuff gains stacks, and deals
damage to the raid based on the amount of stacks it has (around 4,000 Shadow
damage per second per stack). Each tentacle that is alive (Claw, Flail and Eye)
applies one stack of the debuff. Killing the tentacles is required in order
to lessen the raid-wide damage.
Black Blood of Go'rath debuff that exists in normal mode works
slightly differently. In heroic mode, this debuff gains stacks, and deals
damage to the raid based on the amount of stacks it has (around 4,000 Shadow
damage per second per stack). Each tentacle that is alive (Claw, Flail and Eye)
applies one stack of the debuff. Killing the tentacles is required in order
to lessen the raid-wide damage.
The strategy for this phase is very simple, although there are certain tricks you should employ in order to beat the very punishing hard enrage timer.
The idea of the strategy is to make sure that:
- The Claws of Go'rath are tanked (so they do not wipe the raid);
- The tentacles are killed quickly, in order to lessen the raid damage, starting with the Flails, as these have the lowest health, followed by the Eyes. Finally, the Claw of Go'rath should be killed.
It is likely that several tentacles will still be alive after the Black Phase ends. In this case, simply have your ranged DPS players finish them off before switching back to Zon'ozz.
Below, you will find diagrams with the approximate spawning positions of the tentacles:

Keep in mind that the Eyes of Go'rath can be interrupted when they are casting Shadow Gaze, thus reducing the raid damage. There is no cast bar for this spell, however, and you will have to interrupt blindly.
Beating the Enrage Timer
There are a few things you can do to improve your raid's DPS. We will cover all of them in this section.
Maximising DPS on Tentacles
Firstly, the boss will be in the same location as the Claw of Go'rath (or one of the two Claws, in 25-man difficulty), since the tank will have to move to the Claw and the boss will follow him. As such, classes that can do cleave or splash damage should take advantage of this situation, spreading their damage to Zon'ozz while attacking the Claw.
In 25-man difficulty, the second Claw should be tanked by any plate-wearing DPS player or even a Feral Druid (in Bear Form). Because it does not melee hard, these players should have no problem surviving. This second Claw should be killed by ranged DPS players.
Secondly, you should make sure that melee DPS players only attack the tentacles that are closest to the boss (Flails and Claw), while ranged DPS should work on the Eyes, which are typically farther away. This will reduce the travel times of melee DPS players, allowing for more up-time on Warlord Zon'ozz.
Ignoring Tentacles
In order to make your raid's DPS as efficient as possible, you should not kill all the tentacles after the third Black Phase. A few Eyes and even a Claw can be left alive, and your raid can just continue burning Zon'ozz while your healers cover the (high) damage. Following this, there are two possible outcomes:
- Your raid will kill Zon'ozz before the next (fourth) Black Phase;
- Your raid will trigger a fourth Black Phase. In this case, the damage during this phase will be higher than ever before, as the tentacles that you have left alive will add additional stacks to the debuff. Your raid will continue burning Zon'ozz at this time, ignoring all of the tentacles. Your healers should expend all their mana and cooldowns to keep the raid alive.
Achievement: Ping Pong Champion
The ![]() Ping Pong Champion achievement is part of the
Ping Pong Champion achievement is part of the
![]() Glory of the Dragon Soul Raider meta-achievement. It requires your raid
to bounce the Ball at least 10 times before triggering a Black Phase. Just to
clarify, the Ball touching the boss cannot be the 10th bounce, it must be at
least the 11th.
Glory of the Dragon Soul Raider meta-achievement. It requires your raid
to bounce the Ball at least 10 times before triggering a Black Phase. Just to
clarify, the Ball touching the boss cannot be the 10th bounce, it must be at
least the 11th.
The achievement requires a large amount of healing, as the boss' stacks
of ![]() Focused Anger as well as the damage from the
Focused Anger as well as the damage from the ![]() Void Diffusion will
put a great strain on your raid.
Void Diffusion will
put a great strain on your raid.
You can utilise a trick to make this easier: have the entire raid stacked
in melee range of the boss, and have certain players with specific abilities
bounce the Ball from the location of the Ranged group. Mages with
![]() Cauterize and Shadow Priests with
Cauterize and Shadow Priests with ![]() Dispersion are the only classes
that are confirmed to be able to do this, although
Dispersion are the only classes
that are confirmed to be able to do this, although ![]() Cloak of Shadows
may also work. This means that when the Ball touches the Melee group, the
large amount of damage will be split between a much higher number of
players.
Cloak of Shadows
may also work. This means that when the Ball touches the Melee group, the
large amount of damage will be split between a much higher number of
players.
Final Considerations
This concludes the strategy guide for Warlord Zon'ozz. Overall, this fight is not difficult (in normal mode), but it does present an interesting, new mechanic that has not really been used before and that may challenge raids trying to learn the encounter.