Yor'sahj the Unsleeping Detailed Strategy Guide (Heroic Mode included)
Table of Contents
Introduction
This guide is intended to provide a comprehensive description of the encounter with Yor'sahj the Unsleeping in Dragon Soul. It is targeted at anyone who desires to understand the fight mechanics.
This guide is updated for World of Warcraft WoD 6.1.2.
Yor'sahj the Unsleeping is one of the two bosses that are unlocked after defeating Morchok, in the Dragon Soul raid. He is a Faceless One that your raid will fight in one of two very similar Old God themed rooms, outside of Wyrmrest Temple.
The encounter mechanics present a great deal of originality. The raid leader will be doing most of the job by giving the raid the right instructions. Then, the fight will be most taxing for DPS players and healers.
General Information
Health Pool
| Difficulty | Yor'sahj | Oozes | Mana Void | Forgotten Ones |
|---|---|---|---|---|
| 10-man | 47M | 1.8M | 1.5M | 490k |
| 10-man Heroic | 90M | 2.5M | 2M | 830k |
| 25-man | 142M | 5.4M | 5M | 1.5M |
| 25-man Heroic | 232M | 8.2M | 6.5M | 2.7M |
| LFR | 106M | 4.1M | 3.8M | 1.1M |
Enrage Timer
Yor'sahj the Unsleeping has a 10 minute enrage timer in all difficulties.
Raid Composition
| Difficulty | Tanks | Healers | DPS |
|---|---|---|---|
| 10-man | 1 | 2-3 | 6-7 |
| 10-man Heroic | 1 | 2-3 | 6-7 |
| 25-man | 1-2 | 5-6 | 17-19 |
| 25-man Heroic | 2 | 5-6 | 17-18 |
| LFR | 1-2 | 5-6 | 17-19 |
Loot
Tier 13 Tokens
| Item Name | Slot | Classes |
|---|---|---|
| Leggings of the Corrupted Conqueror (LFR, Heroic) | Legs | Paladin, Priest, Warlock |
| Leggings of the Corrupted Protector (LFR, Heroic) | Legs | Warrior, Hunter, Shaman |
| Leggings of the Corrupted Vanquisher (LFR, Heroic) | Legs | Rogue, Death Knight, Mage, Druid |
Armor
| Item Name | Armor | Slot | Main Stats |
|---|---|---|---|
| Interrogator's Bloody Footpads (LFR, Heroic) | Leather | Feet | Agility |
| Mindstrainer Treads (LFR, Heroic) | Feet | Intellect/Spirit | |
| Heartblood Wristplates (LFR, Heroic) | Plate | Wrists | Intellect/Spirit |
Weapons
| Item Name | Type | Main Stats |
|---|---|---|
| Experimental Specimen Slicer (LFR, Heroic) | Two-Handed Axe | Strength/Mastery |
| Spire of Coagulated Globules (LFR, Heroic) | Staff | Agility |
| Scalpel of Unrelenting Agony (LFR, Heroic) | Dagger | Intellect/Spirit |
Rings and Trinkets
| Item Name | Type | Main Stats/Effect |
|---|---|---|
| Signet of Suturing (LFR, Heroic) | Ring | Intellect/Spirit |
| Infinite Loop (LFR, Heroic) | Ring | Intellect/Hit |
| Seal of Primordial Shadow (LFR, Heroic) | Ring | Agility |
| Breathstealer Band (LFR, Heroic) | Ring | Strength/Mastery |
| Hardheart Ring (LFR, Heroic) | Ring | Strength/Parry |
| Windward Heart (LFR, Heroic) | Trinket | Intellect/Additional Heal |
| Cunning of the Cruel (LFR, Heroic) | Trinket | Intellect/AoE Damage |
| Insignia of the Corrupted Mind (LFR, Heroic) | Trinket | Intellect/Haste on Damage |
| Vial of Shadows (LFR, Heroic) | Trinket | Agility/Additional Damage |
| Bone-Link Fetish (LFR, Heroic) | Trinket | Strength/AoE Damage |
| Indomitable Pride (LFR, Heroic) | Trinket | Stamina/Shield |
| Soulshifter Vortex (LFR, Heroic) | Trinket | Stamina/Mastery |
Overview of the Fight
The Yor'sahj encounter is essentially a single phase fight. The encounter is unique, in the sense that Yor'sahj has only one ability, which he casts with regularity.
In addition, approximately every 75 seconds, Yor'sahj will summon 3 random oozes of a different type (out of 6 possible types). Upon reaching the boss, each ooze buffs the boss, granting him a specific ability that is temporary and lasts 60 seconds. When there are 15 seconds left on his buffs, the boss begins summoning the next set of 3 oozes.
Your raid can only kill one of the three oozes each time (as soon as one dies, the other two become immune), so the challenge comes from choosing which ooze to kill so that your raid is faced with the least damaging combination of abilities.
Raid Leader's Role
In this fight, the raid leader plays a preponderant role. Ordering the raid to kill the right ooze and then giving the proper strategy for the remaining two oozes is what the fight is really all about.
There is a lot of room for error, and killing the wrong ooze can be easily recovered from if the right strategy is subsequently applied for the remaining oozes.
Yor'sahj
Abilities
![]() Void Bolt is Yor'sahj's only ability. This does a large amount of
Shadow damage to the tank, in addition to leaving a stacking Shadow damage
DoT. Yor'sahj uses this ability with a rather unpredictable frequency (on
average, every 5 seconds). The DoT deals damage (5,000 in 10-man difficulty
and 30,000 in 25-man difficulty) every 2 seconds, requiring two tanks
to swap the boss among themselves in 25-man difficulty. In 10-man, the damage
is easily healable.
Void Bolt is Yor'sahj's only ability. This does a large amount of
Shadow damage to the tank, in addition to leaving a stacking Shadow damage
DoT. Yor'sahj uses this ability with a rather unpredictable frequency (on
average, every 5 seconds). The DoT deals damage (5,000 in 10-man difficulty
and 30,000 in 25-man difficulty) every 2 seconds, requiring two tanks
to swap the boss among themselves in 25-man difficulty. In 10-man, the damage
is easily healable.
Every 2.5 seconds, Yor'sahj also deals a moderate amount of damage with his melee attack.
Summoning Oozes
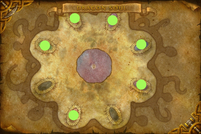 Roughly every 75 seconds, Yor'sahj will summon 3 oozes of a different type
(out of 6 possible types) that slowly move towards him, doing nothing else. They
cannot be stunned or slowed. Upon reaching Yor'sahj, each one grants him a
different ability.
While the oozes are being summoned and while they are moving towards him, Yor'sahj is immobile in the center of the room and does nothing, although he can still be attacked.
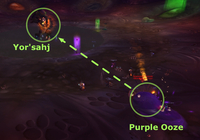 Each ooze (also called globule) has a specific name. We will list these
names once (in the titles of the sections below), but we will refer to them by
their colour, as this is how the in-game emotes refer to them.
Your raid needs to kill one of the 3 oozes (doing so renders the other 2 immune to damage). This means that your raid will have to properly deal with the buffs granted to Yor'sahj by the remaining 2 oozes. Failure to kill one of the oozes will, most likely, result in a wipe.
Oozes: Abilities and How to Deal With Them
We will now present the oozes, ranking them according to the buff that they give to Yor'sahj, from the most deadly to the least deadly.
Purple (Shadowed Globule)
This buff is not deadly on its own, but it creates a lot of confusion and complicates the fight. Most raids will prefer the simpler strategy (even at the cost of more raid-wide damage) that killing the purple ooze leads to.
The purple ooze grants Yor'sahj ![]() Deep Corruption. This ability does
a large amount of raid-wide Shadow damage (50,000 in 10-man, 55,000 in 25-man,
and 35,750 in LFR) for each fifth heal or absorb effect
that a player receives.
Deep Corruption. This ability does
a large amount of raid-wide Shadow damage (50,000 in 10-man, 55,000 in 25-man,
and 35,750 in LFR) for each fifth heal or absorb effect
that a player receives.
In case you encounter a combination with purple, the best way to deal with Deep Corruption is to assign specific healers to heal the damage. One healer (a Holy Paladin, preferably) should be assigned to healing the tank, and other specific healers should be assigned to healing damaged raid members (in the event that the other ooze is red or green).
The aim is to keep the raid alive while casting as few heals as possible, thus not triggering any damage from Deep Corruption.
It is interesting to note that certain heals do not trigger this effect. We cannot provide a comprehensive list, but we will list those that we are aware of:
 Lay on Hands,
  Word of Glory and any healing transfered through
 Beacon of Light;
 Prayer of Mending;
 Death Strike and the absorb from
  Mastery: Blood Shield;
- on-proc effects (Maw of the Dragonlord, trinkets procs, etc).
We do not want to reinvent the wheel or take credit for a list we did not compile ourselves. For more complete listings, we refer you to the Official WoW Forums and to the Deep Corruption page at Wowhead.
Green (Acidic Globule)
In LFR, the buff given by the green ooze is considerably lessened, making it one of the least dangerous. In 10-man and 25-man difficulties, however, this ooze becomes much more problematic.
The green ooze grants Yor'sahj ![]() Digestive Acid. This causes Yor'sahj to
occasionally damage a random raid member and all allies within 4 yards of them
for a moderate amount of Nature damage (60,000 in 10-man and 25-man, and
39,000 in LFR). In LFR difficulty, the ability does not have an AoE
component.
Digestive Acid. This causes Yor'sahj to
occasionally damage a random raid member and all allies within 4 yards of them
for a moderate amount of Nature damage (60,000 in 10-man and 25-man, and
39,000 in LFR). In LFR difficulty, the ability does not have an AoE
component.
Just like with the purple ooze, the buff given by the green ooze is not deadly on its own, but it requires the raid to spread out when almost all the other buffs require that the raid stacks.
The easiest way to deal with Digestive Acid is to have the raid spread out at least 4 yards apart. This is generally not difficult, but may be somewhat problematic when green is combined with another ooze that requires the raid to stack, in which case you will need to carefully spread out around the stacking location (the boss, most of the time).
In LFR, spreading out is not necessary, and you can simply stack up and heal any players damaged by Digestive Acid.
Yellow (Glowing Globule)
The yellow ooze grants Yor'sahj ![]() Glowing Blood of Shu'ma. This buffs
Yor'sahj, causing him to attack 50% faster and to use
Glowing Blood of Shu'ma. This buffs
Yor'sahj, causing him to attack 50% faster and to use ![]() Void Bolt twice
as often. Additionally, it causes Void Bolt to have an AoE effect that hits
everyone in the raid (the DoT, however, is still only applied to the
tank).
Void Bolt twice
as often. Additionally, it causes Void Bolt to have an AoE effect that hits
everyone in the raid (the DoT, however, is still only applied to the
tank).
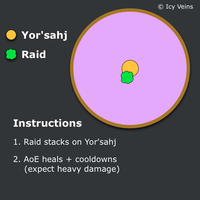
In case your entire raid needs to stack together while the Glowing Blood of Shu'ma is active (if you have red or black as the other ooze), you should simply AoE heal the entire raid, and use damage reduction cooldowns to facilitate this.
Black (Dark Globule)
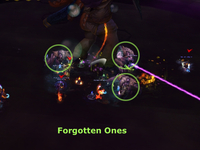 The black ooze causes Yor'sahj to spawn a large number of adds, called
Forgotten Ones. These adds fixate on random raid members and regularly
cast
 ![]() Psychic Slice on them, which deals Shadow damage (35,000 in 10-man
and 25-man, 22,750 in LFR).
Psychic Slice on them, which deals Shadow damage (35,000 in 10-man
and 25-man, 22,750 in LFR).
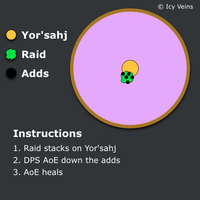
The best way to deal with the Forgotten Ones is to simply stack up and AoE down the adds while healers use AoE heals to keep the raid alive.
Red (Crimson Globule)
The red ooze grants Yor'sahj the ![]() Searing Blood ability. This causes
Yor'sahj to damage a number of random players (3 in LFR and 10-man difficulty
and 8 in 25-man difficulty) for an amount of damage that is larger the farther
away from the boss these players are.
Searing Blood ability. This causes
Yor'sahj to damage a number of random players (3 in LFR and 10-man difficulty
and 8 in 25-man difficulty) for an amount of damage that is larger the farther
away from the boss these players are.
Note that Searing Blood appears to exclusively target those players who are farthest away from Yor'sahj (and thus who take the highest damage).
The best way to deal with Searing Blood is to have everyone as close as possible to the boss (practically stacking on top of the boss). In case red is paired with green (except in LFR), you will need to spread out 4 yards apart around the boss.
Blue (Cobalt Globule)
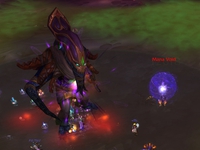 The blue ooze creates a Mana Void. When this hostile unit spawns, it drains
the entire mana pool from all the casters in the raid. As it only drains mana once,
casters will start regenerating mana as normal and will still be able to cast
some spells. When the Mana Void is killed, it releases all the mana that it had
drained, distributing it evenly between all mana users within 30 yards (100
yards in LFR) of its location.
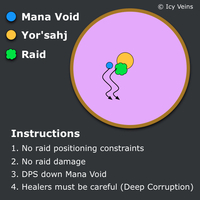
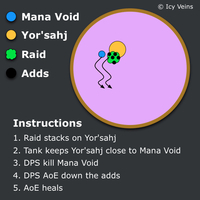
Dealing with the Mana Void is quite easy. Simply have all of your DPS players switch to the Mana Void as soon as it is alive, killing it quickly. This will restore mana back to all the casters, and from then on you can continue the fight normally.
Note that Death Knights can ![]() Death Grip the Mana Void.
Death Grip the Mana Void.
Strategy
In this section, we will provide you with all the relevant information for succeeding in defeating Yor'sahj: which ooze to kill and how to deal with the combinations of remaining oozes.
Start of the Fight
When Yor'sahj is not empowered by the abilities of any oozes, the encounter
is basically tank and spank. Healers must only be prepared to heal tank damage
(from melee swings and ![]() Void Bolt). This initial phase only lasts for 20
seconds.
Void Bolt). This initial phase only lasts for 20
seconds.
The rest of the time, Yor'sahj will either be summoning the oozes and doing nothing or be empowered with two additional abilities (or three, if you failed to kill any of the oozes).
6 Possible Ooze Combinations
While there are a total of 20 possible combinations, so far, only 6 have ever been witnessed. So it is safe to assume that these are the only 6 combinations that the game will face your raid with:
- black — blue — yellow;
- black — green — red;
- black — purple — red;
- blue — green — purple;
- blue — purple — yellow;
- green — red — yellow;
Ooze Priority
Given that there are only 6 ooze combinations, the kill orders are slightly different than what they would be if all 20 possible combinations were present:
- 10-man/25-man: green > yellow > purple;
- LFR: yellow > purple > black.
The kill priority specific to LFR difficulty comes from the fact that
the green ooze is almost harmless in LFR difficulty (due to
![]() Digestive Acid not splashing to nearby allies).
Digestive Acid not splashing to nearby allies).
Ooze Priority Addon
One of our readers had the great idea to write an addon called Yor'sahj Automatic RaidWarnings. This addon will give automatic raid warnings indicating which add should be killed, using the kill order we gave in this guide. Note that the addon is currently giving the LFR kill order by default, but this can be changed very easily by modifying the Yorsahj Automatic Raidwarnings.lua file (simply open it, the author left a lot of indications to help you modify the addon to fit your needs).
How to Deal With Ooze Combinations?
This section is not meant to be learnt by heart. By respecting the kill priority, the strategy for handling the remaining two oozes can easily be guessed from the buffs that they grant to Yor'sahj. This section should mainly serve you when you are unsure about how to handle a specific combination.
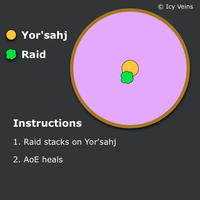
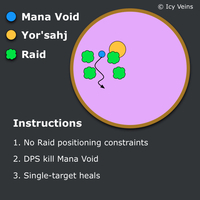
Combinations that cannot occur with our kill priorities are not detailed. The first section details combinations with the same strategies in all difficulties. The second section details how to deal with combinations specific to 10-man/25-man difficulties. The third section details how to deal with combinations specific to LFR difficulties.
Combinations With Common Strategies for All Difficulties
| Black — Red | Blue — Purple | Black — Blue |
|---|---|---|
|
|
|
Red/Yellow in 10-man/25-man Difficulties
| Red — Yellow |
|---|
|
Green/Red and Blue/Green in LFR Difficulty
| Green — Red | Blue — Green |
|---|---|
|
|
Tips
Tank Swap
Due to the high damage of the DoT left by ![]() Void Bolt in 25-man
difficulty (30,000 every 2 seconds, which, at high stacks can amount to as
much as 270,000 Shadow damage every 2 seconds), it is highly recommended that
you use two tanks. They should swap the boss among themselves whenever the
current tank has roughly 4 stacks of the DoT.
Void Bolt in 25-man
difficulty (30,000 every 2 seconds, which, at high stacks can amount to as
much as 270,000 Shadow damage every 2 seconds), it is highly recommended that
you use two tanks. They should swap the boss among themselves whenever the
current tank has roughly 4 stacks of the DoT.
In 10-man and LFR difficulty, the damage of the DoT is much lower, so using 1 tank is entirely feasible (although it may be safer still to use 2 in LFR).
Keep in mind that the DoT will stack fast when the boss has consumed the Yellow ooze, when tank damage can sky-rocket.
Ooze Spawn Locations
The ooze spawn locations are fixed. They look like slightly elevated mounds, found around the room, close to the wall. To have the highest uptime possible on the ooze (thus ensuring that the designated ooze will die before reaching the boss), players should run to the ooze spawn location as soon as the boss begins channeling the new oozes.
Each ooze spawns from a mound that is (relatively) of the same color as the ooze itself, making it easy to tell where to go. Note that the in-game map of the room is misleading in this regard, and should not be used to determine where each ooze spawns.
In order to make it easiest for DPS (especially melee) to run to the correct ooze spawn point, the raid leader should set appropriately colored raid markers, close to the center of the room, marking the directions of the three oozes most likely to be killed by the raid (based on the above priorities).
Using Heroism/Bloodlust
![]() Heroism/
Heroism/![]() Bloodlust/
Bloodlust/![]() Time Warp should be used when the raid
can freely DPS the boss for a long time (such as after the Mana Void has
been killed in combinations that do not contain black).
Time Warp should be used when the raid
can freely DPS the boss for a long time (such as after the Mana Void has
been killed in combinations that do not contain black).
Learning the Fight
The Yor'sahj encounter can be mastered rather easily, as long as the raid leader is able to reliably call the correct ooze to be killed. The most important piece of advice we can offer your raid is, thus, that you familiarise yourself with the proper tactics.
Once the kill order is properly determined, your raid will only need to execute some rather simple tasks (spread out, stack or DPS adds), that should not pose any problems.
Heroic Mode
The only significant difference between the Heroic mode and the Normal mode is that Yor'sahj will spawn 4 oozes instead of 3. Since you can only kill one, it means that you will always have to deal with Yor'sahj being empowered with the abilities of 3 oozes, instead of 2.
Other than this, all abilities deal more damage and all units (Yor'sahj, oozes, adds, and Mana Void) have more health.
6 Possible Ooze Combinations (Again!)
There is a total of 15 possible combinations. However, just like in Normal mode, Blizzard made it so that we would only see 6 combinations:
- black — blue — green — purple;
- black — blue — green — red;
- black — blue — purple — yellow;
- black — green — red — yellow;
- black — purple — red — yellow;
- blue — green — purple — yellow.
Ooze Priority
The general ooze priority is yellow > green.
We believe that there should be two exceptions to it:
- black — purple — red — yellow: kill purple instead of yellow,
this will enable you to heal through the extreme damage — though, with
a healing setup comprising several paladins (many of their spells do not
trigger
 Deep Corruption), it might be better to kill yellow and deal
with purple;
 - black — green — red — yellow; kill green instead of yellow, this will enable you to stack up on the boss and efficiently heal the extreme damage.
Additionally, for the black — blue — green — purple
combination, you can kill black instead of green. This will make your raid gain
precious DPS by not having to take down the adds, but your raid will have to
be properly positioned (otherwise, the healers might panic trying to heal
![]() Digestive Acid, causing them to trigger Deep Corruption explosions).
Digestive Acid, causing them to trigger Deep Corruption explosions).
Strategy
If you are attempting the Heroic version of this fight, then you should be
familiar with what the oozes do and how to deal with them. The fact that the
boss is buffed by 3 oozes does not add complexity to the fight. It looks as if
the possible combinations were carefully chosen so that you would have to
perform exactly the same variety of tasks as in normal mode: stack on the boss,
spread out, handle ![]() Deep Corruption, DPS the Mana Void, and DPS the
Forgotten Ones. What the third ooze invariably adds is more raid damage.
Deep Corruption, DPS the Mana Void, and DPS the
Forgotten Ones. What the third ooze invariably adds is more raid damage.
In any case, we will not delve further into the strategy part, as it is really the same as in normal mode. The key to winning the fight is to properly handle several things:
- heal the extreme damage caused by having black, red, and yellow at the same time;
- have the healers not blow the raid up when purple is up;
- strike a balance between attacking the boss and killing the various adds (oozes, Forgotten Ones, and Mana Void), as we explain below.
Black, Red, and Yellow
This combination of oozes will be the hardest to heal. Fortunately, since the
raid will be stacked up on the boss, AoE healing cooldowns should be kept and
used for this combination: ![]() Power Word: Barrier,
Power Word: Barrier, ![]() Spirit Link Totem,
Spirit Link Totem,
![]() Devotion Aura, etc.
Devotion Aura, etc.
Note that this combination can come twice or thrice in a row, meaning that your raid should try to use AoE healing cooldowns sparingly, only when necessary. This will enable you to survive the bad odds that come with getting this combination several times in the fight.
Deep Corruption
Your raid will have to deal with purple
in half of the possible combinations (using our kill priority). This means that,
unlike in Normal mode, properly handling ![]() Deep Corruption is no longer
optional.
Deep Corruption is no longer
optional.
This debuff will stack on players every time they get a heal or receive an absorb effect. At 5 stacks, the player will explode and deal a massive amount of raid-wide damage.
To properly handle this debuff, healers must have it show in their raid frame addons (the spell ID is 105171 and its name is Deep Corruption).
Also, purple is always up in combination with blue, which deals no damage, and either of black or green, which deal very moderate damage. As you can see, purple is never combined with a highly damaging ooze that would cause the healers to panic, so they should be able to easily keep every player in the raid alive, without having to heal them more than 4 times.
Beating the Enrage Timer
Most guilds progressing on Yor'sahj Heroic will find the 10-minute enrage timer to be very tight. As we will explain in this section, precious seconds can be saved in the way you will handle the oozes, the Forgotten Ones, and the Mana Void.
Killing the oozes might not require the entire contingent of DPS. The idea is to kill the ooze close to the boss, and not half-way through (which would mean that some DPS that were sent to kill it would have been better employed on the boss).
It takes the oozes approximately 23 seconds to reach the boss, from the moment that they spawn. This means that you need about 110k DPS on the ooze in 10-man difficulty and 360k DPS in 25-man difficulty. These values should be used to determine exactly how many DPS should be sent to kill the ooze (some classes can do high burst damage, take it into account).
When the Forgotten Ones spawn (something that happens in all combinations,
save one), DPS players should not specifically AoE them down. Rather, only
classes that can spread their damage on the boss to the adds (for example, Combat Rogues
with ![]() Blade Flurry, Fire Mages with Inferno Blast and
Blade Flurry, Fire Mages with Inferno Blast and ![]() Combustion)
or that can spread their damage on the adds to the boss (Enhancement Shamans with
Combustion)
or that can spread their damage on the adds to the boss (Enhancement Shamans with
![]() Lava Lash,
Flame Shock, and Fire Nova) should bother with the Forgotten Ones.
Lava Lash,
Flame Shock, and Fire Nova) should bother with the Forgotten Ones.
Dealing with the Forgotten Ones in this way means that they will remain alive longer, which increases raid damage (or tank damage, if the tank managed to taunt them before they fixated on someone).
The idea is to survive with rather low mana for one phase or two, until you get a second Mana Void (something that should happen quickly enough as 4 of the 6 combinations have blue). Then, as soon as the second Mana Void has depleted all casters of their mana, the first Mana Void should be killed. Hopefully it will be on low health, after taking a bit of damage now and then.
After that, you should keep the second Mana Void as a means of re-filling your raid's mana after the third Mana Void spawns and so on. All in all, this will save you the trouble of killing one Mana Void. Since they have a significant health pool, this will prevent you from wiping to the enrage timer at 2% health.
Achievement: Taste the Rainbow
The ![]() Taste the Rainbow! achievement is part of the
Taste the Rainbow! achievement is part of the
![]() Glory of the Dragon Soul Raider meta-achievement. It requires your raid to
defeat Yor'sahj after he has been empowered by the following combinations of
oozes:
Glory of the Dragon Soul Raider meta-achievement. It requires your raid to
defeat Yor'sahj after he has been empowered by the following combinations of
oozes:
- Black and Blue;
- Red and Green;
- Black and Yellow;
- Purple and Yellow.
Keep in mind that your raid can complete this achievement over the course of several kills, as you do not need to experience all 4 combinations in a single attempt.
From a strategy point of view, there is nothing complicated. Clearly, whenever combinations arise where 2 of the 3 colors are a requirement for the achievement, you will have to kill the 3rd color and survive the needed 2. In the case of Black and Blue, this is not problematic and you should use the strategy listed above, in the relevant section.
For the other 3 combinations, we will provide summarised strategies.
Red and Green
For this combination, you must simply have the raid as close to the boss
as possible in order to take as little damage as possible from
![]() Searing Blood, but at the same time be spread out at least 4 yards
apart.
Searing Blood, but at the same time be spread out at least 4 yards
apart.
This is not always easy, especially in 25-man difficulty. If faced with a conflict, always prioritise spreading out over being slightly closer to the boss.
Black and Yellow
This combination simply requires a lot of healing. Your raid should stack up and AoE down the adds while healing through all the damage.
Purple and Yellow
This combination is arguably the most difficult. It requires your raid to survive the rather massive amount of damage from Yellow, while healing as little as possible, due to Purple.
You should stack up next to the boss, and make use of as many damage
reduction cooldowns as possible (such as ![]() Power Word: Barrier
or
Power Word: Barrier
or ![]() Devotion Aura).
Devotion Aura).
You should also make sure that healing is kept to an absolute minimum, in order to trigger as few explosions from Deep Corruption as possible. Players should use any personal damage reduction cooldowns that they have.
Concluding Remarks
This concludes the encounter guide for Yor'sahj the Unsleeping. We hope you will have fun performing this creative encounter. As long as you follow the raid leader's instructions, the boss should not be too difficult to overcome.
- WoW Players Finally Won’t Need to Hide Weapons Indoors in 12.0.7 Player Housing
- Explore the Entire World of Azeroth in 3D With This WoW Tool
- Players Were Timing 96% of Their +10s in Week 6, But One Dungeon Keeps Falling Behind
- Players Are Abandoning These 3 WoW Classes in Midnight Patch 12.0.5
- More Heroic World Tier Details in Patch 12.0.7 – How to Unlock and More
- Class, Raid, and Dungeon Fixes: Midnight 12.0.5 Hotfixes, May 8th
- WoW Tank Changes Incoming—Passive Mitigation and Cooldowns Getting Major Buffs
- WoW Weekly Is Back: MDI Begins, TBC Classic Sale Live, and Final Chance for Roofus