The Beginner's Guide to Brighter Shores
Welcome to our Brighter Shores Beginner Guide! The purpose of this page is to direct new players towards the proper resource on Icy Veins that they're looking for, and to provide early game tips that will help with time efficiency in the long run.
Brighter Shores Beginners Guide
Welcome to the ultimate beginner's guide for Brighter Shores! Whether you're a new adventurer or a seasoned player, this guide is designed to help you navigate every corner of the expansive world that Brighter Shores has to offer.
In this guide, we'll cover everything from core gameplay mechanics and skills to advanced strategies for mining, crafting, and combat. With detailed insights into professions like Alchemist, Chef, and Woodcutter, as well as faction-specific crafting and resource gathering, you'll find all the tools you need to succeed.
Our leveling tips, XP guides, and specialized strategies are here to support you in every step of your journey in Brighter Shores, so you can make the most of your time in the game and rise to greatness. Let's dive in!
Getting Started
You start your Brighter Shores journey at Hopeport. Upon arrival, you will be given the ability to start leveling your first five Professions available to you in Episode 1. These are:
To unlock more Professions you must advance your Main Story Quest. This is how you will progress through Episodes, and also how you will begin to unlock content in Brighter Shores. A list of the remaining Professions, along with their unlock requirements, are listed below.
- Scout — Episode 2, Hopeforest
- Gatherer — Episode 2, Hopeforest
- Woodcutter — Episode 2, Hopeforest
- Carpenter — Episode 2, Hopeforest
- Miner — Episode 3, Mine of Mantuban
- Minefighter — Episode 3, Mine of Mantuban
- Blacksmith — Episode 3, Mine of Mantuban
- Bonewright — Episode 3, Mine of Mantuban
- Stonemason — Episode 3, Mine of Mantuban
- Leatherworker — Episode 4, Crenopolis
- Merchant — Episode 4, Crenopolis
- Detective — Episode 4, Crenopolis
- Watchperson — Episode 4, Crenopolis
Setup your UI & Controls
By clicking the arrows on the sides of the game, you can expand out a panel window to keep things such as your bags, professions window and whatever you choose open. The arrow at the bottom of the screen will open the chat.
Each icon can be individually dragged to whichever corner of the screen you prefer.
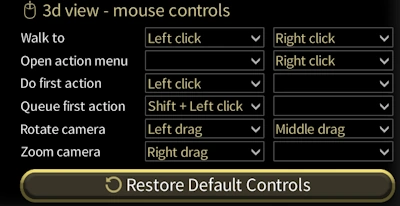
In the Settings > Controls screen you can configure various keybinds and what your mouse controls do. We highly recommend you change your 'Do first action' to Left click.

You can also change your 'Queue first action' to a preferred bind. This allows you to queue up to 9 actions in sequence, such as fishing and foraging an entire room.

Discover the World
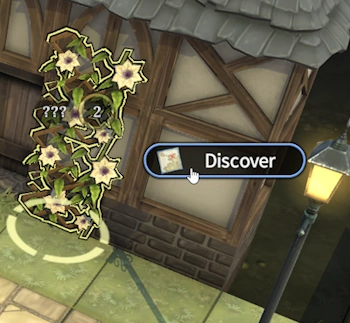
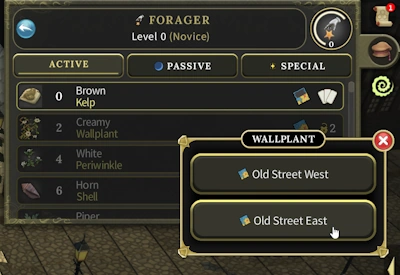
Before you jump right into grinding, explore around the region of Hopeport and Discover all of the resource nodes and enemies around you.

This will help you navigate in the future, and help you as you level up various Professions by being able to quickly locate where you need to go next in the Professions tab.

We recommend this every time you unlock a new episode for the first time, as getting your bearings will help with completing any quests and grinds in the area.
Questing
Questing in Brighter Shores is the best way to advance through the game. Unlike traditional MMOs, the intended path through the game is to finish the Main Story questline, unlocking all the game has to offer, before returning to previous episodes and doing sidequests
Most quests - other than The Obelisk - have a higher level requirement than the main quest and can take many hours to get unlocked.
Some players stop in Hopeforest and complete the Spider's Nest quest which has a very powerful quality of life reward, opening storage rifts to deposit items all around the world.
For more details on quest requirements, their rewards, and a list of priorities, check out our quest list guide.
Early Money
When starting out in Brighter Shores, you will find out pretty quickly that the tools you need to buy are very expensive as a new player.
For example, to start training Fisher, you need
12 to get a fishing spear. And to effectively train Forager
you need 60
 by level 6.
As such, the best way to get some early income is by starting the Chef profession. The level 0, 4, 8 and 12 recipes are all profitable to do and have no requirements or purchases necessary. Get started by buying the ingredients from Kevin outside the Delectable Dab Kitchen on Stone Street.
Further details can be found in the Chef profession guide:
Factions

During the main quest in Episode 2 you will soon be asked to choose a Faction. You will have these three options to choose from. Each Faction comes with its own strengths and weaknesses.
Cryoknight weapons are only able to be crafted by the Blacksmithing Profession. These weapons focus on dealing Cryonae damage, which is shown in blue.
Guardian weapons are only able to be crafted by the Bonewright Profession. These weapons focus on dealing Arborae damage, which is shown in green.
Hammermage weapons are only able to be crafted by the Stonemason Profession. These weapons focus on dealing Tempestae damage, which is shown in yellow.
Spells
The list below contains all of the available spells in game.
- Sense — Shows you every node in the room with you; very helpful for discovering new nodes, finding quest items, discovering new enemies, and just exploring new areas.
- Quartermaster — Opens a portal with the Quartermaster, allowing you to deposit and withdraw weapons and armor from him remotely. Unlocked by talking to the Quartermaster.
- Teleport — Allows you to teleport to any Portal Stone you have activated.
- Immunity — Grants you immunity for 30 seconds after a 6 second cast.
- Storage Rift — Allows you to deposit resources remotely at strange stone locations. Aqcuired from Completing the Spider's Nest quest in Episode 2 (Requires level 32 Carpentry).
- Detect Aura — Acquired at level 46 Detective in Episode 4.
Further Reading
The best way to learn the game next will be to continue the main story and keep playing! Here are some more guides that may be helpful to you as you get further in the game.
Changelog
- 20 Mar. 2025: Updated guide to be more in line with current state of the game. Added controls and other helpful beginner info.
- 07 Nov. 2024: Fixes, Adding Profession Info
- 06 Nov. 2024: Added Guard Profession and Edited Beginners Guide with Faction Picture and Video
- 05 Nov. 2024: Guide added for Early Access.
Teloril is a long-time MMO player, and has been using his experience to theorycraft, guidewrite and create videos on his YouTube for Brighter Shores.
- Brighter Shores Easter Egg Hunt Is Live – Here Is How to Join
- March 10 Patch Notes: QoL Updates, Shield Price Fix, and More
- Brighter Shores – Combat Beta Update 2: What Is New?
- Brighter Shores: New Combat Beta Now Live – Join the Test!
- New Combat System in Brighter Shores: Biggest Update Yet?
- February 11 Patch Notes: Smarter Pathfinding and Bug Fixes
- Forget Leeks, Mushroom Monsters Are Coming to Brighter Shores!
- Dev Update: Combat Changes and New Side Quests Incoming!