Zul'Aman Dungeon Guide
Zul'Aman was originally introduced in the Burning Crusade as a 10-man catch-up raid. With phase two of Cataclysm, it has been re-vamped from a raid, down into a 5-man heroic only dungeon. While much of the instance maintains the original Zul'Aman theme, this dungeon comes with a handful of fun new challenges for players to overcome!
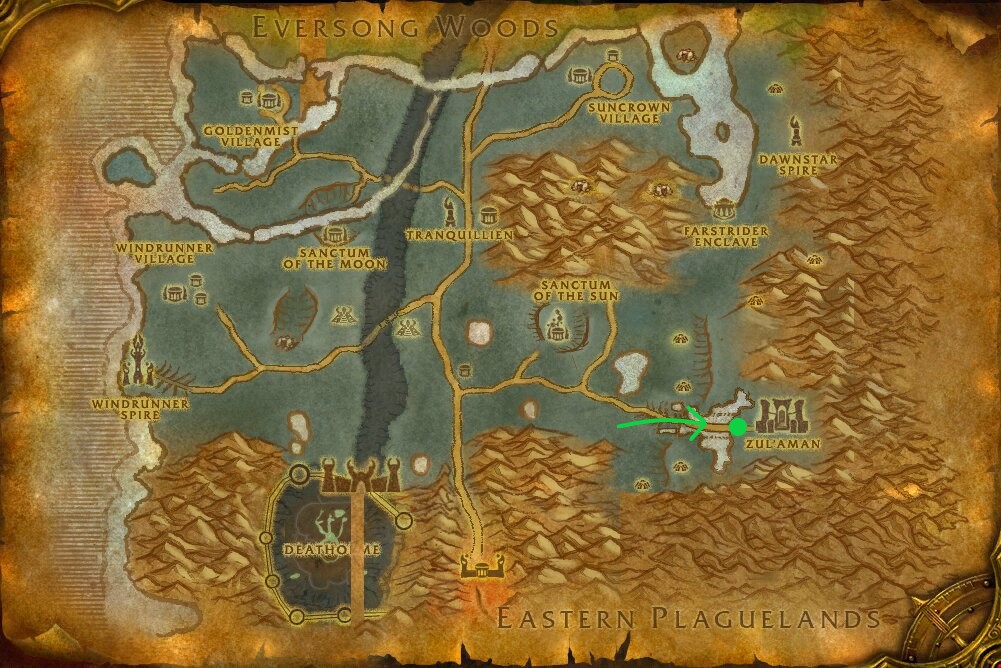
Zul'Aman Entrance Location
Zul'Aman is still located on the Eastern outskirts of Ghostlands. Similar to TBC, outside of the instance will be a summoning stone, as well as a small camp with helpful NPCs.
Akil'zon
-

 Static Disruption
  Call Lightning
- Amani Kidnapper
- Soaring Eagle
 Electrical Storm

Spread out to avoid the ![]() Static Disruption from hitting multiple
targets and spreading the debuff around. Akil'zon will summon in
waves of Soaring Eagles to deal damage to random targets, as well as a
Amani Kidnapper every so often, which stuns and lifts a player while
slowly flying away from the battlefield; the Amani Kidnapper must be
quickly killed before the affected player dies. Lastly, Akil'zon
will target a random player with
Static Disruption from hitting multiple
targets and spreading the debuff around. Akil'zon will summon in
waves of Soaring Eagles to deal damage to random targets, as well as a
Amani Kidnapper every so often, which stuns and lifts a player while
slowly flying away from the battlefield; the Amani Kidnapper must be
quickly killed before the affected player dies. Lastly, Akil'zon
will target a random player with ![]() Electrical Storm, throwing them
into the air and dealing Lightning damage to all players not directly beneath
the player targeted by
Electrical Storm, throwing them
into the air and dealing Lightning damage to all players not directly beneath
the player targeted by ![]() Electrical Storm; simply stack up quickly
once this spell goes out.
Electrical Storm; simply stack up quickly
once this spell goes out.
Akil'zon Loot
| Item |
|---|
Nalorakk
-

 Brutal Strike
  Surge
Surge Lacerating Slash
 Rend Flesh
 Deafening Roar

Nalorakk is a two phase fight where he will alternate between
human and bear forms, alternating his abilities and the strategy required. While
in his troll form, Nalorakk will periodically deal high damage to
the tank with ![]() Brutal Strike. He will also charge the player that
is furthest away from him with
Brutal Strike. He will also charge the player that
is furthest away from him with ![]() Surge, dealing moderate Physical
damage and increasing their Physical damage taken by 500% for 20 seconds.
The debuff from
Surge, dealing moderate Physical
damage and increasing their Physical damage taken by 500% for 20 seconds.
The debuff from ![]() Surge requires that you have 3 players swapping
back and forth to each soak only 1 stack of
Surge requires that you have 3 players swapping
back and forth to each soak only 1 stack of ![]() Surge, therefore
spreading the damage out and preventing anyone from dying due to the 500%
increased Physical damage taken. Simply have the first player soak the first
Surge, therefore
spreading the damage out and preventing anyone from dying due to the 500%
increased Physical damage taken. Simply have the first player soak the first
![]() Surge charge, then swap out with the next and keep alternating
until Nalorakk returns to his humanoid form.
Surge charge, then swap out with the next and keep alternating
until Nalorakk returns to his humanoid form.
While in bear form, Nalorakk will periodically silence the
party with ![]() Deafening Roar; be sure the tank is healed full as
often as possible during the bear phase to avoid a death during this silence,
especially as they will have strong bleed DoTs on them while Nalorakk
is in his bear form.
Deafening Roar; be sure the tank is healed full as
often as possible during the bear phase to avoid a death during this silence,
especially as they will have strong bleed DoTs on them while Nalorakk
is in his bear form.
Nalorakk Loot
| Item |
|---|
Jan'alai
-
 Flame Breath
  Fire Bomb
 Frenzy
- Amani'shi Hatcher
- Amani Dragonhawk Hatchling
 Flame Buffet
- Hatch All Eggs

Jan'alai is engaged on a small platform, where players will
need to avoid multiple Fire based attacks. ![]() Flame Breath will target
a random player, causing Jan'alai to turn around and face them,
dealing moderate Fire damage to the target and all nearby allies; simply spread
around the area evenly to avoid too many players being hit by one breath.
Periodically, Jan'alai will teleport to the center of his platform
and cover random areas with
Flame Breath will target
a random player, causing Jan'alai to turn around and face them,
dealing moderate Fire damage to the target and all nearby allies; simply spread
around the area evenly to avoid too many players being hit by one breath.
Periodically, Jan'alai will teleport to the center of his platform
and cover random areas with ![]() Fire Bombs, which will explode after 5
seconds, killing any nearby players. Lastly, Jan'alais will enter
a
Fire Bombs, which will explode after 5
seconds, killing any nearby players. Lastly, Jan'alais will enter
a ![]() Frenzy upon reaching 20% health, increasing his damage
and attack speed by 50%; keep the tank alive during this part with any
available cooldowns.
Frenzy upon reaching 20% health, increasing his damage
and attack speed by 50%; keep the tank alive during this part with any
available cooldowns.
Jan'alai Loot
| Item |
|---|
Halazzi
-
 Water Totem
 - Corrupted Lightning Totem
- Enrage
 Earth Shock
 Lightning Totem
- Spirit of the Lynx

Halazzi is the fourth boss of Zul'Aman, and is the last boss
needed to complete the timed run. This encounter is a two phase fight, alternating
between Halazzis troll form and his empowered lynx form. In the
troll phase, Halazzi will frequently drop ![]() Water Totems,
which heal him quickly overtime they are nearby. Simply drag Halazzi
away from any
Water Totems,
which heal him quickly overtime they are nearby. Simply drag Halazzi
away from any ![]() Water Totems that spawn to prevent them from healing
him.
Water Totems that spawn to prevent them from healing
him.
At both 66% and 33% health, Halazzi will heal to full health and summon the Spirit of the Lynx to aid him. The Spirit of the Lynx must be prioritized and killed quickly to force Halazzi back into his troll form and end the phase. The Spirit of the Lynx does not have an aggro table and will attack random targets; be ready with quick heals or defensive cooldowns if it targets a squishy player, such as a cloth wearer. Halazzi will also constantly drop Corrupted Lightning Totems, which must be quickly killed as they deal high damage to the party. This phase will repeat every 33% health until Halazzi is defeated.
Halazzi Loot
| Item |
|---|
Hex Lord Malacrass
-

 Spirit Bolts
  Drain Power
 Siphon Soul

Hex Lord Malacrass starts the fight off with two random adds at his
side; these should either be crowd controlled and ignored, or focused down quickly
to remove them from the encounter. Hex Lord Malacrass will periodically
cast ![]() Spirit Bolts, dealing high Shadow damage to the party over
time; when this finishes he will cast
Spirit Bolts, dealing high Shadow damage to the party over
time; when this finishes he will cast ![]() Drain Power, draining the
strength from all players and increasing his own damage dealt by the same amount
drained.
Drain Power, draining the
strength from all players and increasing his own damage dealt by the same amount
drained.
The main ability of this encounter is ![]() Siphon Soul; with this,
Hex Lord Malacrass will copy the soul of a random player, gaining abilities
based on the affected class. These temporary spells should be dealt with
appropriately, move out of AoE spells, dispell debuffs, interrupt casts and so
on; remember that
Siphon Soul; with this,
Hex Lord Malacrass will copy the soul of a random player, gaining abilities
based on the affected class. These temporary spells should be dealt with
appropriately, move out of AoE spells, dispell debuffs, interrupt casts and so
on; remember that ![]() Siphon Soul as well as
Siphon Soul as well as ![]() Drain Power
both amplify the damage that these temporary spells will do, making them
extremely dangerous.
Drain Power
both amplify the damage that these temporary spells will do, making them
extremely dangerous.
Hex Lord Malacrass Loot
| Item |
|---|
Daakara
-
 Phase One
 Grievous Throw
 Whirlwind
- Phase Two
 Shape of the Bear
 Creeping Paralysis
- Surge
 Nearly Overpowered Blow
 Shape of the Lynx
- Amani Lynx
 Feral Swipe
 Claw Rage
 Lynx Rush
- Phase Three
- Shape of the Dragonhawk
- Flame Breath
 Pillar of Fire
- Flame Whirl
 Shape of the Eagle
- Lightning Totem
- Feather Vortex
- Storm
 Zap
Zap
 Sweeping Winds

Daakara is the only new boss in the dungeon, taking over as the
new leader of the Amani tribe. This is a three phase fight in which players will
deal with some of the mechanics from each of the previous bosses as
Daakara draws his power from the animal spirits that each of boss
represents. In phase one players will face Daakara in his troll form;
here he only has two abilities to worry about, ![]() Grievous Throw and
Grievous Throw and
![]() Whirlwind. Simply move away from Daakara when he uses
Whirlwind. Simply move away from Daakara when he uses
![]() Whirlwind, and quickly heal the player targeted by
Whirlwind, and quickly heal the player targeted by
![]() Grievous Throw to full health as the DoT bleed debuff can only
be removed by reaching 100% health.
Grievous Throw to full health as the DoT bleed debuff can only
be removed by reaching 100% health.
At 80% health Daakara will absorb the essence of either the
bear or lynx, granting him a new form based on whichever essence he chose. If
using ![]() Shape of the Bear, Daakara will use
Shape of the Bear, Daakara will use ![]() Surge
on the furthest away player, similar to Nalorakk. He will also
periodically cast
Surge
on the furthest away player, similar to Nalorakk. He will also
periodically cast ![]() Creeping Paralysis on the party, stunning everyone
after 6 seconds if the debuff is not dispelled. If using
Creeping Paralysis on the party, stunning everyone
after 6 seconds if the debuff is not dispelled. If using
![]() Shape of the Lynx, Daakara will summon two
Amani Lynx which should be quickly killed; he will also attack
random players with
Shape of the Lynx, Daakara will summon two
Amani Lynx which should be quickly killed; he will also attack
random players with ![]() Lynx Rush, dealing moderate damage and causing
targets to bleed over time. Lastly he will use
Lynx Rush, dealing moderate damage and causing
targets to bleed over time. Lastly he will use ![]() Claw Rage on a
random target, attacking the player multiple times in a row, dealing more and
more damage with each attack.
Claw Rage on a
random target, attacking the player multiple times in a row, dealing more and
more damage with each attack.
At 40% health Daakara will enter the final phase, choosing
to absorb the essence of the eagle or dragonhawk spirits. If using
![]() Shape of the Dragonhawk Daakara will become a large
dragonhawk, attacking the raid with multiple fire attacks such as
Shape of the Dragonhawk Daakara will become a large
dragonhawk, attacking the raid with multiple fire attacks such as
![]() Flame Breath,
Flame Breath, ![]() Flame Whirl, and
Flame Whirl, and ![]() Pillar of Fire;
simply spread out around the room to avoid multiple players being hit by the
same spells. If using
Pillar of Fire;
simply spread out around the room to avoid multiple players being hit by the
same spells. If using ![]() Shape of the Eagle, Daakara will
run to the center of the room and transform into a giant eagle, covering the
room with multiple Feather Vortex tornadoes.
Shape of the Eagle, Daakara will
run to the center of the room and transform into a giant eagle, covering the
room with multiple Feather Vortex tornadoes. ![]() Lightning Totems
will spawn frequently in random places, simply kill these quickly. The main
threat of this phase are the Feather Vortexs around the room; these will
Lightning Totems
will spawn frequently in random places, simply kill these quickly. The main
threat of this phase are the Feather Vortexs around the room; these will
![]() Zap nearby players every time they cast, as well as deal moderate
damage and knockback anyone that they touch. Kite the Feather Vortexs
around the room after Daakara uses
Zap nearby players every time they cast, as well as deal moderate
damage and knockback anyone that they touch. Kite the Feather Vortexs
around the room after Daakara uses ![]() Sweeping Winds, as
this will cause each vortex to chase a random player for a short while.
Sweeping Winds, as
this will cause each vortex to chase a random player for a short while.
Daakara Loot
| Item |
|---|
Zul'Aman Quests
- The Captive Scouts
- The Hex Lord's Fetish
- Warlord of the Amani
Zul'Aman Achievements in Cataclysm
| Achievement | Description |
|---|---|
| Defeat Daakara in Zul'Aman on Heroic Difficulty. | |
| Defeat Daakara in Zul'Aman on Heroic difficulty while in a guild group. | |
| Save all four prisoners before they are sacrificed in Zul'Aman on Heroic Difficulty. | |
| Un-hex all of the potential hex victims in Zul'Aman on Heroic Difficulty. | |
| Defeat Daakara in Zul'Aman on Heroic Difficulty without any player leaving the rectangular turquoise stonework inscribed on the floor in the center of his area. | |
| Defeat Halazzi in Zul'Aman on Heroic Difficulty without killing any of his totems. |
Changelog
- 30 Jul. 2024: Page added.
This guide has been written by Abide, TBC veteran for nearly a decade. Abide is a Warrior tank and multi-class expert currently playing on Faerlina as Horde. You can find him in the the Icy Veins Discord. You can also see him live on Twitch.
- Could WoW Be Added to Xbox Game Pass Ultimate?
- MoP Classic Escalation PTR Update Details New Content
- TBC Classic Players Are Earning Arena Points Differently Now
- Population Density Adjustments Coming to Burning Crusade Classic Zones
- Blizzard Are Fixing the Incorrect Armor Values in BCC!
- WoW Players Were Already Arguing About This on Launch Day
- Burning Crusade Classic Hotfixes, February 4th
- Free Riding Skill Fix: Burning Crusade Classic Hotfixes, February 3rd