


Gauntlet Build Introduction
This is the Gauntlet version of our Dust Devil Double Swing Barbarian. While it is functionally the same, as the build is already very fast with tons of screen clear, it does includes a few minor tweaks to optimize for the Gauntlet. Let’s dive in.
Strengths and Weaknesses
- High mobility
- High burst damage
- High Unstoppable uptime
- Simple rotation
- Charge requires cooldown management
- Shouts need to be timed correctly
- Positional gameplay
To see how this build compares to the other builds on our site, you can check out our build tier lists.
Build Requirements
The Gauntlet setup for this build uses a very specific combination of skills to achieve little to no cooldown on our ![]() Charge skill. This is extremely important to master and keep available at all times.
Charge skill. This is extremely important to master and keep available at all times.
 Windlasher Aspect
 Aspect of Giant StridesBold Chieftain’s Aspect
Skill Tree Points and Skill Bar
 Double Swing
  Wrath of the Berserker
  Rallying Cry
  Challenging Shout
  War Cry
  Leap
Leap Arsenal System and Weapon Selection
For this ![]() Double Swing build, we will be using 2-Handed Axe expertise for its bonus to Vulnerable damage. This was slightly reduced in Patch 1.4.0, but is still our best option for this build.
Double Swing build, we will be using 2-Handed Axe expertise for its bonus to Vulnerable damage. This was slightly reduced in Patch 1.4.0, but is still our best option for this build.
For this build, we do not have to worry about weapon selection assignment. ![]() Double Swing must use your Dual-Wield weapons.
Double Swing must use your Dual-Wield weapons. ![]() Leap is not a core damaging skill for this build and is used almost entirely for mobility and to escape dangerous areas. Our other skills,
Leap is not a core damaging skill for this build and is used almost entirely for mobility and to escape dangerous areas. Our other skills, ![]() Wrath of the Berserker,
Wrath of the Berserker, ![]() Rallying Cry,
Rallying Cry, ![]() Challenging Shout, and
Challenging Shout, and ![]() War Cry do not have weapon assignments. As such you can largely ignore this mechanic for this build, but do keep it in mind for other builds you may want to try!
War Cry do not have weapon assignments. As such you can largely ignore this mechanic for this build, but do keep it in mind for other builds you may want to try!
Paragon Points
We recommend using these Legendary Nodes and Rare Glyphs to truly take this build into the endgame. Note that each Rare Glyph’s information listed below is for the Level 21 version.
Starting Board

Warbringer
Rotate this board three times before attaching it

Carnage
Rotate this board twice before attaching it.

Decimator
Attach this board to the Eastern gate of the Carnage board. Rotate this board three times before attaching it.

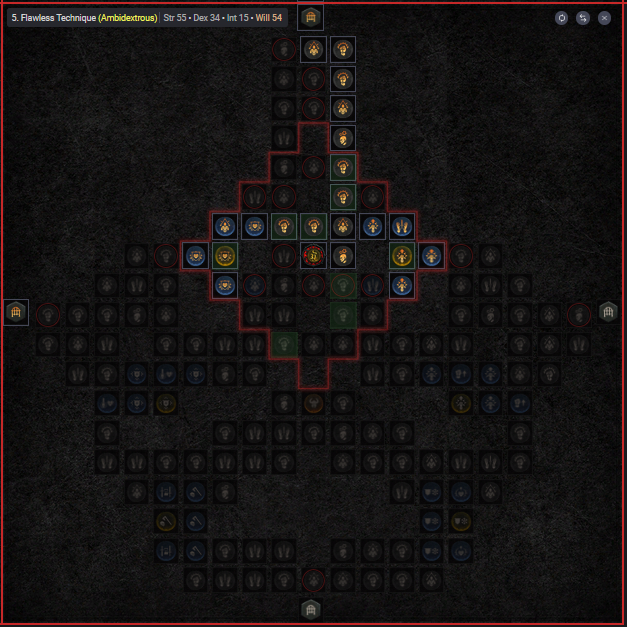
Flawless Technique
Attach this board to the Southern gate of the Carnage board. Rotate this board twice before attaching it.
Blood Rage
Attach this board to the Northern gate of the Carnage board. Do not rotate this board when attaching it.

To view the Paragon Boards in their entirely CLICK HERE
Gear, Gems, Elixirs, and Stats
The Season of Loot Reborn brought us an incredible shift in how gear and itemization are done. It is a major change and will affect the game beyond Season 4’s confines. For further details, make sure to read our Tempering and Masterworking section below.
Legendary Aspects
Below you will find all of the best-in-slot Aspects found on Legendary items that are important for this build. Remember that with Patch 1.4.0 all Legendary powers can be added into your Codex once you salvage or extract the item. You can still find some aspects through dungeons as you could in previous seasons but now you have the option to upgrade these affixes if you find a higher roll of that affix. Let us go over what aspects you will need.
| Slot | Gems | Legendary Aspects / Uniques | Aspect / Unique Power |
| Helm |  Aspect of Numbing Wrath Aspect of Numbing Wrath | – Each point of Fury generated while at Maximum Fury grants [X] Fortify | |
| Chest | Undying Aspect | – When you cast a Skill, you heal for [0.5-2.0%] Life. Double this bonus while below 50% life. | |
| Gloves | N/A | Accelerating Aspect | – Critical Strikes with Core Skills increase your Attack Sped by [10-25%] for 5 seconds |
| Pants | | – You deal [10-20%] increased damage while Unstoppable and for 5 seconds after. When you become Unstoppable, gain 50 of your Primary Resource | |
| Boots | N/A |  Relentless Berserker’s Aspect Relentless Berserker’s Aspect | – Lucky Hit: Damaging an Enemy with a Core Skill has up to a [22-40%] chance to extend the duration of Berserking by 2 seconds. Double this duration if it was a Critical Strike |
| Amulet | Windlasher Aspect | – Casting | |
| Ring 1 | Bold Chieftain’s Aspect | – Whenever you cast a Shout Skill, its Cooldown is reduced by [1.0-2.0] seconds per nearby enemy, up to a maximum of 6 seconds | |
| Ring 2 | Aspect of Giant Strides | – Reduces the Cooldown of | |
| 2H Bludgeoning Weapon | Aspect of Fierce Winds | – Your Shout Skills create 3 Dust Devils that deal damage to enemies along their path. Your Dust Devils are [5-20%] bigger and deal 1% increased damage for each 1% their size is increased | |
| 2H Slashing Weapon | Devilish Aspect | – After generating 100 Fury, your next direct damage creates 3 Dust Devils that deal [X] damage to enemies in their path | |
| Dual Wield 1 | – Skills using this weapon deal [0.2-0.5%] increased damage per point of Fury you have, but you lose 10 Fury every second | ||
| Dual Wield 2 | Aspect of Inner Calm | – You deal [5-20%] increased damage. Triple this bonus after standing still for 3 seconds. |
Gems
Listed below are the best gems to socket into your items for each slot type
| Weapon Gems | Armor Gems | Jewelry Gems |
For your jewelry it may be necessary to change the ![]() Royal Diamond for another gem for a specific type such as
Royal Diamond for another gem for a specific type such as ![]() Royal Sapphire to ensure all of your resistances are capped at 70%
Royal Sapphire to ensure all of your resistances are capped at 70%
Which Elixirs Should You Use?
When in town you can visit the Alchemist to craft helpful elixirs which will provide a special effect and increase your experience gain. Crafting has been simplified in Patch 1.4.0, and there are fewer specific flowers to harvest; instead, almost all herbs in the world drop as Bundles of Dried Herbs, allowing you to craft the Elixirs you want. Some Elixirs cannot be crafted and only drop from things like Helltides or Nightmare Dungeons.
For this Dust Devil build, we recommend Elixir of Advantage for the increased Attack Speed to spam more ![]() Double Swing and conjure even more Dust Devils to fill our screen, mopping up every demon in sight. Craft the highest value Elixir of Advantage you can to get the most attack speed possible.
Double Swing and conjure even more Dust Devils to fill our screen, mopping up every demon in sight. Craft the highest value Elixir of Advantage you can to get the most attack speed possible.
Stat Priority and Tempering Affixes
Below are the affixes to prioritize on gear. Each line of affixes is listed in order of importance. Tempering Manuals and their recommended affixes are provided in the second column, and the bolded yellow affixes are the most important targets for Masterworking upgrades. To masterwork, you will need rare materials that only drop from The Pit. Be sure to check our Tempering guide, our Masterworking guide, as well as our guide about The Pit for more details about these topics.
| Slot | Gear Affixes | Tempering Affixes |
| Helm | 1. Cooldown Reduction 2. Maximum Life 3. Maximum Resource | 1. Challenging Shout Cooldown Reduction 2. Crowd Control Duration |
| Chest | 1. Maximum Life 2. Strength 3. Needed Resistance | 1. Challenging Shout Cooldown Reduction 2. Crowd Control Duration |
| Pants | 1. Maximum Life 2. Strength 3. Needed Resistance | 1. Challenging Shout Cooldown Reduction 2. Stun Duration |
| Glove | 1. Critical Strike Chance 2. Attack Speed 3. Strength | 1. Damage while Berserking 2. Stun Duration |
| Boots | 1. Maximum Life 2. Strength 3. Needed Resistance | 1. Mobility Cooldown Reduction 2. Stun Duration |
| Amulet | 1. Cooldown Reduction 2. Critical Strike Chance 3. Maximum Resource | 1. Resource Generation with Dual-Wield Weapons 2. Damage while Berserking |
| Rings | 1. Critical Strike Chance 2. Attack Speed 3. Fury on Kill 4. Needed Resistance bonus on ring implicit | 1. Damage while Berserking 2. Resource Generation with Dual-Wield Weapons |
| 2H Bludgeoning Weapon | 1. Strength 2. Maximum LIfe 3. Fury on Kill | 1. Dust Devil Size 2. Damage to Close Enemies |
| 2H Slashing Weapon | 1. Strength 2. Maximum Life 3. Fury on Kill | 1. Chance for Dust Devils to Cast Twice 2. Damage to Close Enemies |
| Dual Wield Weapon 1 | 1. Strength 2. Critical Strike Damage 3. Attack Speed | 1. Dust Devil Size 2. Damage While Berserking |
| Dual Wield Weapon 2 | 1. Strength 2. Critical Strike Damage 3. Attack Speed | 1. Chance for Dust Devils to Cast Twice 2. Damage While Berserking |
Uniques and Mythic Uniques
Below you will find information on Uniques and Mythic Uniques that are useful for this build. Moreover, if you are interested in target farming Mythic Uniques, check out our How to Farm Mythic Uniques guide.
Unique Items
Below you will find the useful uniques for this build. As a reminder, beyond ![]() Ramaladni’s Magnum Opus there are not many useful uniques to this setup as most of our power comes from the tempering affixes. This may change in the future and this guide will be updated if it does.
Ramaladni’s Magnum Opus there are not many useful uniques to this setup as most of our power comes from the tempering affixes. This may change in the future and this guide will be updated if it does.
 Tuskhelm of Joritz the Mighty – Similar to Tibault’s, we only equip this if we’re going for an offensive setup at the cost of some toughness since we’ll lose a solid source of Fortify in Aspect of Numbing Wrath
Mythic Uniques
Here are the useful Mythic Uniques for this build. If a Mythic Unique is NOT listed, it is not used by this build in any meaningful capacity.
 Ring of Starless Skies – Our Mythic Unique of choice should you be lucky enough to find one. If you do find it, you will replace the ring that uses Aspect of Giant Strides.
  The Grandfather – A powerful Mythic Unique two-handed sword. This will replace your two-handed slashing weapon. If you find one, move Devilish Aspect to your Dual-Wield weapon and replace Aspect of Inner Calm.
  Harlequin Crest – If you are fortunate enough to find one of these, you simply replace your helm with Aspect of Numbing Wrath and use the built-in damage and cooldown reduction as well as numerous ranks to all your skills for more power and survival.
Season 5: Season of the Infernal Hordes
The biggest new activity in Season 5 is, of course, the titular Infernal Hordes. A new endgame activity where you can earn powerful rewards for surviving waves of enemies and defeating a new boss, The Fell Council, at the end of these waves. There will also be a reputation to be gained with the season which provides numerous rewards and even a Resplendent Spark at maximum reputation! Below, you will find the changes in Patch 1.5.0 that affect this build.
 Tactical Challenging Shout fury gain increased from 3 to 6
 Imposing Presence health bonus reduced from 6/12/18% to 5/10/15%
 Unconstrained damage bonus reduced from 100% to 35%
Advanced Information
Below you will find every additional piece of information you need to know for a more in-depth look at this build
Build Mechanics
This build uses ![]() Leap to jump into the fray and begin spamming
Leap to jump into the fray and begin spamming ![]() Double Swing which will spawn a myriad of Dust Devils thanks to our aspects such as Windlasher Aspect, Devilish Aspect, Aspect of Fierce Winds, and our Tempered affixes. We use our
Double Swing which will spawn a myriad of Dust Devils thanks to our aspects such as Windlasher Aspect, Devilish Aspect, Aspect of Fierce Winds, and our Tempered affixes. We use our ![]() Challenging Shout and
Challenging Shout and ![]() Wrath of the Berserker as survival cooldowns and use
Wrath of the Berserker as survival cooldowns and use ![]() War Cry to gain Unstoppable and avoid crowd control.
War Cry to gain Unstoppable and avoid crowd control.
Berserking
Berserking is a way for us to gain damage, damage reduction, and resource generation. This is something we will be able to maintain an extremely high uptime on thanks to ![]() Battle Fervor in combination with
Battle Fervor in combination with ![]() Leap, as well as our key passive
Leap, as well as our key passive ![]() Unconstrained. Always keep in mind, that if you need to enter the Berserking state and don’t have Leap off cooldown, you can trigger it on demand via
Unconstrained. Always keep in mind, that if you need to enter the Berserking state and don’t have Leap off cooldown, you can trigger it on demand via ![]() Wrath of the Berserker, which is our ultimate of choice.
Wrath of the Berserker, which is our ultimate of choice.
Defensive Aspects
Our main defensive aspect is Aspect of Bul-Kathos since we will be leaping everywhere into packs and standing still to start swinging and generating our dust devils. Juggernaut’s Aspect is an amazing defensive option that provides us with all the armor we will need, and finally, we have high fortify through Aspect of Numbing Wrath as well as our damage reduction passive ![]() Aggressive Resistance while we’re Berserking.
Aggressive Resistance while we’re Berserking.
Paragon
We recommend using these Legendary Nodes and Rare Glyphs to truly take this build into the endgame and further into The Pit. Note that each Glyph listed below is a max Level 21 version.
| Rare Glyphs and Legendary Nodes | Effect |
| – For every 5 Dexterity purchased within range, you deal + [3.85%] increased damage to Vulnerable targets. – Additional bonus unlocked after 25 Dexterity points are purchased in the glyph’s range: When an enemy is damaged by you, they become Vulnerable for 3 seconds. This cannot happen more than once every 20 seconds per enemy. | |
| – For every 5 Dexterity purchased within range, you deal + [15%] increased Critical Strike Damage. – Additional bonus unlocked after 25 Dexterity points are purchased in the glyph’s range: Skills that Critically Strike generate 3 Fury. | |
| – For every 5 Strength purchased within range, your Dust Devils deal + [39.6%] increased damage. – Additional bonus unlocked after 40 Strength points are purchased in the glyph’s range: You deal x13% increased damage for 4 seconds after creating a Dust Devil | |
| – Grants + [125%] bonus to all Magic nodes within range. – Additional bonus unlocked after 40 Strength points are purchased in the glyph’s range: After casting a Shout Skill, the active Cooldown of every other non-Shout Skill is reduced by 2 seconds. | |
| – For every 5 Strength purchased within range, you deal + [5.3%] increased damage while Berserking. – Additional bonus unlocked after 40 Strength points are purchased in the glyph’s range: While Berserking you take 10% reduced damage from Elites. | |
| – Grants + [125%] bonus to all Magic nodes within range. – Additional bonus unlocked after 40 Strength points are purchased in the glyph’s range: You deal x8% increased damage while wielding One-Handed Weapons | |
| While Berserking, Critical Strikes increase your Attack Speed by +2% up to +16% for 6 seconds. | |
| Each time you make an enemy Vulnerable, your damage is increased by 10% for 5 seconds. Overpowering a Vulnerable enemy grants an additional x10% bonus for 5 seconds. | |
| Killing a Bleeding enemy has a 10% chance to grant Berserking for 5 seconds. Your damage is increased by x25% of your Damage While Berserking bonus. |
Let’s break down each of these glyphs and nodes and where our Paragon Points are positioned in each of the boards we use. This part of the build is presented in order of importance. If you do not have enough Paragon Points for use in your Paragon Tree, just slowly work your way towards each step shown below.
Starting Board
- We start by heading left to grab
 Tenacity and then heading up to unlock the glyph socket and slotting in
  Exploit.
 - From here we will grab all the dexterity nodes to acquire the bonus and snag the rare node
 Raw Power and then head back to the start of the tree and grab Brawn and its surrounding rare nodes.
 - Finally we head out towards the top and connect the Warbringer board.
Warbringer
- We start by moving left and grabbing
 Hungering Fury and its rare nodes for more maxium resource and Fury on Kill for sustain.
 - We head back right and grab the glyph socket and slot in Wrath and grab enough dexterity nodes to unlock the bonus. We pick up
 Conditioned for toughness and Raw Power for more damage.
 - We head up from the glyph radius and grab Core Reserve and its surrounding rare nodes for more life and resource.
- Finally we complete the board and head right connecting the Carnage board.
Carnage
- Perhaps the most important board and the most complex we start by rushing to the glyph socket and slotting in
 Twister.
 - We grab as many strength nodes as possible including the rare nodes
 Brash and
  Fierce to increase the power of our Dust Devils.
 - Next we will grab the board’s namesake and make our way to the
 Carnage node.
 - Now we will head north of the glyph radius and grab Enraged and its surrounding rare nodes before connecting the Blood Rage board at the top.
- Once we’ve finished Blood Rage we will come back here and head from Carnage to grab Berserker and connect the Decimator board.
- After finishing Decimator we will finish the Carnage board by running the points south and connecting the Flawless Technique board.
Blood Rage
- We rush straight northward and grab
 Revel and unlock the socket slotting in Marshal
 - We grab enough strength nodes to unlock the secondary effect of our glyph and then we head north to grab Grit.
- Finally we wrap around and grab the board’s namesake Blood Rage and then head back to the Carnage board.
Decimator
- We rush towards the glyph socket and slot in Ire once its unlocked.
- We want as many strength nodes for Ire as possible so we grab all of them in the radius and the rare nodes
 Arrogance and Demolish.
 - We exit the radius right and grab the board’s namesake Decimator and then head back to the Carnage board.
Flawless Technique
- We rush down to the glyph socket and unlock it slotting in Ambidextrous.
- We snag enough strength including the rare nodes
 Heavy Blows and Brash and their surrounding rare nodes for stats. With that this rather simple board is finish and we are done with our Paragon Boards.
Obol Gambling
A final point on acquiring gear in Season 4 and beyond is using your Obols to target farm specific slots instead of randomly spending them on random drops. Similar to Kadala in Diablo 3, you can use Obol vendors in town to try and get what you’re missing. With Patch 1.4.0 when a level 100 Character spends Obols, all gear from that vendor will be 925 item power, the highest in the game, allowing you to fill out gear with the affixes or Legendary Aspects you need.
Check out our Obol Gambling Tool HERE!
Changelog
- August 5th 2024: Build updated for season 5 and patch 1.5.0
- May 13 2024: Build updated for season 4
- March 10th 2024: Build Creation.
