This is a legacy build that is not competitive for the current version of Diablo 4 and which we do not recommend using. It only exists for documentation purposes and will not receive further updates.
Last Updated for Season 7.
Build Introduction
This addition to the Necromancer endgame builds is the Blood Spirit, most commonly known as Spirit Wave Necromancer, and comes in the form of you casting your Ultimate ![]() Blood Wave to generate Blood Orbs, which will automatically trigger the cast of
Blood Wave to generate Blood Orbs, which will automatically trigger the cast of ![]() Bone Spirit thanks to
Bone Spirit thanks to ![]() Blood Artisan’s Cuirass, creating an extremely smooth and effective playstyle whilst dealing crazy damage.
Blood Artisan’s Cuirass, creating an extremely smooth and effective playstyle whilst dealing crazy damage.
Do keep in mind that for this build to even function, the body armor is mandatory, and the numerical modifier stating how many Blood Orbs are required to consume before a Bone Spirit is spawned needs to be 3 or at worst 4 or this build is not to be recommended!
This build is a variant of the self-cast version of Bone Spirit Necromancer Endgame Build.
Have questions or feedback on this guide? Join the livestream and ask me!
Strengths and Weaknesses
- Incredibly safe
- Capable of Tier 100 Nightmare Dungeons
- High ceiling of upgrades
- Playstyle revolves around set-up to deal damage
- Requires unique item to be played
To see how this build compares to the other builds on our site, you can check out our build tier lists.
Build Requirements
 Fastblood Aspect
 Aspect of Gore Quills
The build simply won’t function without that body armor. The amount of Blood Orbs required to be consumed before a Bone Spirit is spawned needs to be 3 or at the very worst: 4. Before you get this the build is not to be recommended.
Skill Bar and Skill Tree Points
Follow the points allocated in the Skill Tree above for the complete 71-point build. The additional 12 skill points are completed using the Renown system.
Book of the Dead
Since we are focusing entirely on dealing brutal damage on our own, we have no interest in bothering with using our minions, so they will all be sacrificed in the name of Lilith.
- Melee Skeletons: Defenders – These are sacrificed for a great amount of extra resistances to help alleviate that from our gear.
- Mage Skeletons: Cold Mages – This provides increased damage against Vulnerable targets.
- Golem: Iron – Increases critical strike damage output.
Mercenary
Mercenaries provide a nice extra layer of power to your character and mostly comes down to preferential decision. Below you’ll see the set-up I personally would run for this build which is having Subo as the Mercenary and for reinforcement I’d use Varyana!
Subo Skill Tree choices:
Varyana Reinforcement choices:
- Opportunity Skill: Skill Cast – Whenever the player casts any skill in combat.
- Reinforcement Skill:
 Bloodthirst
Witchpowers
In Season 7 we will have access to Witchpowers granting some absolutely crazy abilities that we’ll utilize to enhance our builds power. Below, you’ll find a list of the recommended powers we use for this build.
Red Power (Unique):
Purple Powers:
Paragon Board
Below you’ll find the entire end-game paragon board set-up for this build in detail!
Gear, Gems, Elixirs, and Stats
The following sections cover the important systems that are essential to improving the power of your character in the endgame of Diablo 4.
Legendary Aspects
Each aspect is listed with its matching gear slot. Do your best to keep each aspect in the assigned slot. Additionally, if you are trying to farm a specific item, we recommend using your Obols to target farm them!
| Gear Slot | Gems | Aspect / Unique | Legendary Aspect / Unique Power |
|---|---|---|---|
| Helm | Succumb to hatred and earn Mother’s Favor, increasing your damage dealt by x60%. Briefly steal Mother’s Favor from Nearby allies by slaughtering enemies. This can easily be replaced by  Aspect of Disobedience to help with armor during progression before you get this Mythic Unique. Aspect of Disobedience to help with armor during progression before you get this Mythic Unique. | ||
| Chest | When you pick up 10-3 Blood Orbs, a free Bone Spirit is spawned, dealing bonus damage based on your current life percent. | ||
| Gloves | N/A |  Aspect of Gore Quills Aspect of Gore Quills | Casting Blood Lance will consume Blood Orbs to also conjure lances from them. Each additional Blood Lance deals x% of normal damage and prioritizes targeting un-lanced enemies. |
| Pants |  Aspect of Hardened Bones Aspect of Hardened Bones | You gain x% increased Damage Reduction. | |
| Boots | N/A |  Aspect of the Cursed Aura Aspect of the Cursed Aura | A dark aura surrounds you, inflict Decrepify and Iron Maiden on enemies who touch it. Curses inflicted this way spread to surrounding targets every 2.5-0.3 seconds and last 4 seconds outside the aura. |
| Weapon 1H (Sword) |  Aspect of Rathma’s Chosen Aspect of Rathma’s Chosen | Whenever your Blood Skills Overpower you gain x% Attack Speed for 4 seconds. | |
| Off-hand |  Tidal Aspect Tidal Aspect | Blood Wave fires two additional waves, each dealing x% of normal damage. | |
| Amulet (50% Scaling) | Resistance Or Occult Gem |  Fastblood Aspect Fastblood Aspect | Blood Orbs reduce your Ultimate Cooldown by 1-3 seconds. |
| Ring | Resistance Or Occult Gem |  Aspect of Serration Aspect of Serration | The Ossified Essence Key Passive also increases the Critical Strike Damage of your Bone Skills by x1% per Essence above 50, up to x25-45%. |
| Ring | Resistance Or Occult Gem |  Sacrificial Aspect Sacrificial Aspect | Your Sacrifice bonuses are increased by x35-55%. |
Gems and Runewords
See below for a more detailed explanation of the best Gems to socket into your gear for each category.
| Weapon Gems | Armor Gems | Jewelry Gems |
|---|---|---|
For Crit Damage. | For increased Intelligence. |
The following Runewords are recommend to be used for this build.
| Runeword Combination | Effect |
| Gain 25 Offering when casting a non-Channeled Core Skill. Gain 20% Maximum Life for 6 seconds which requires 200 Offering. | |
| Gain 150 Offering when casting an Ultimate Skill. For 600 Offering you’ll evoke the Barbarian’s |
In Season 7 we’ll have access to Occult Gems, below you’ll find the list of these gems we want to use for this build.
Which Elixirs Should You Use?
Visit the Alchemist and craft an Elixir providing any Resistance you need most, or the ![]() Elixir of Advantage to increase Attack Speed. Some Elixirs cannot be crafted and only drop from things like Helltides or Nightmare Dungeons. Additionally, make sure to keep your health potion upgraded!
Elixir of Advantage to increase Attack Speed. Some Elixirs cannot be crafted and only drop from things like Helltides or Nightmare Dungeons. Additionally, make sure to keep your health potion upgraded!
Stat Priority and Tempering Affixes
Below are the affixes to prioritize on gear. Each line of affixes is listed in order of importance. Tempering Manuals and their recommended affixes are provided in the second column, and the bolded affixes are the most important targets for Masterworking upgrades. Be sure to check our Tempering and Masterworking guides for more details about these topics.
| Slot | Targeted Gear Affixes | Tempering Affixes |
|---|---|---|
| Gloves | 1. Maximum Life 2. Ranks to Core Skill 3. Attack Speed | |
| Pants | 1. Maximum Life 2. Armor 3. Resistance to all elements | |
| Boots | 1. Movement Speed 2. Maximum Life 3. Ranks to Bone Spirit | |
| Amulet | 1. #% Increased Intelligence 2. Ranks to Evulsion 3. Ranks to Amplify Damage | |
| Ring #1 | 1. Maximum Life 2. Intelligence 3. Lucky Hit: Up to X% chance to make enemies vulnerable for 2 seconds. | |
| Ring #2 | 1. Maximum Life 2. Intelligence 3. Attack Speed | |
| 1H-Weapon (Sword) | 1. Maximum Life 2. Critical Strike Damage 3. Intelligence | |
| Off-hand (Focus) | 1. Lucky Hit Chance 2. Critical Strike Chance 3. Cooldown Reduction |
Keep in mind that the maximum Resistance is 70% by default for each element and can be increased to 85% by various sources.
Rotation and Playstyle
The playstyle is all about generating Blood Orbs which we do via both ![]() Corpse Tendrils and
Corpse Tendrils and ![]() Blood Wave. We then consume these via the Legendary Aspect
Blood Wave. We then consume these via the Legendary Aspect  Aspect of Gore Quills by casting
 ![]() Blood Lance, this entire combination will let
Blood Lance, this entire combination will let ![]() Blood Artisan’s Cuirass shoot out
Blood Artisan’s Cuirass shoot out ![]() Bone Spirit to blow up any threats!
Bone Spirit to blow up any threats!
In order of action the rotation would look like this:
 Corpse Tendrils If there’s a corpse nearby to group enemies together.
 Blight to make them take more damage.
 Blood Wave to generate Blood Orbs.
 Blood Lance to consume said Blood Orbs which will pop
  Bone Spirit.
 Decrepify is only used if you are not in range of the enemies to let your aura version of it affect them.
 Blood Mist is your panic button to save you from dying.
Uniques and Mythic Uniques
Below you will find information on Uniques and Mythic Uniques that are useful for this build. Moreover, if you are interested in target farming Mythic Uniques, check out our How to Farm Mythic Uniques guide.
Uniques
Listed below are the recommended and optional Unique Items for this build.
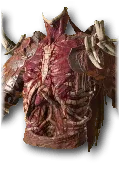 Blood Artisan’s Cuirass – Mandatory for the build to even function.
 Heir of Perdition – Can be replaced by
  Aspect of Disobedience to help with armor cap (1000) during progression till you find this Mythic Unique!
 Doombringer – This is without a doubt the best weapon you can use for the build and it would just straight up replace the
  Aspect of Rathma’s Chosen Aspect.
Advanced Information
Below, you will find every additional piece of information you need to know for a more in-depth look at this build.
Build Mechanics
It’s important to not use ![]() Blood Wave into a wall, but rather make sure you target an open area or you won’t get enough Blood Orbs to let you continuously repeat the set-up combo. Outside of this, the build is very straight forward mechanically and deals crazy damage!
Blood Wave into a wall, but rather make sure you target an open area or you won’t get enough Blood Orbs to let you continuously repeat the set-up combo. Outside of this, the build is very straight forward mechanically and deals crazy damage!
Defenses
Since we benefit so much damage from scaling Life we simply double-dip our defensive stats making it the most important modifier to pick up on your gear and Paragon Board. ![]() Blood Mist is your panic button and you’ll consistently provide yourself with both fortification and a barrier thanks to lucky hit modifiers from the skill-tree.
Blood Mist is your panic button and you’ll consistently provide yourself with both fortification and a barrier thanks to lucky hit modifiers from the skill-tree.
Offenses
The build deals damage through high critical strikes in a very smooth playstyle approach by repeatedly casting the Ultimate skill ![]() Blood Wave followed up with
Blood Wave followed up with ![]() Blood Lance to consume Blood Orbs from a distance. The damage
Blood Lance to consume Blood Orbs from a distance. The damage ![]() Bone Spirit is dishing out is absolutely absurd and should not be underestimated.
Bone Spirit is dishing out is absolutely absurd and should not be underestimated.
Obol Gambling
Obol gambling is a great way to potentially find item upgrades or items missing from your build. Check out the new tool guide from Icy Veins for gambling Obols in the link below:
Changelog
- January 19th, 2025: Build updated for Season 7.
- October 12th, 2024: New Paragon tool added.
- October 7th, 2024: Guide created for Season 6, Vessel of Hatred.
