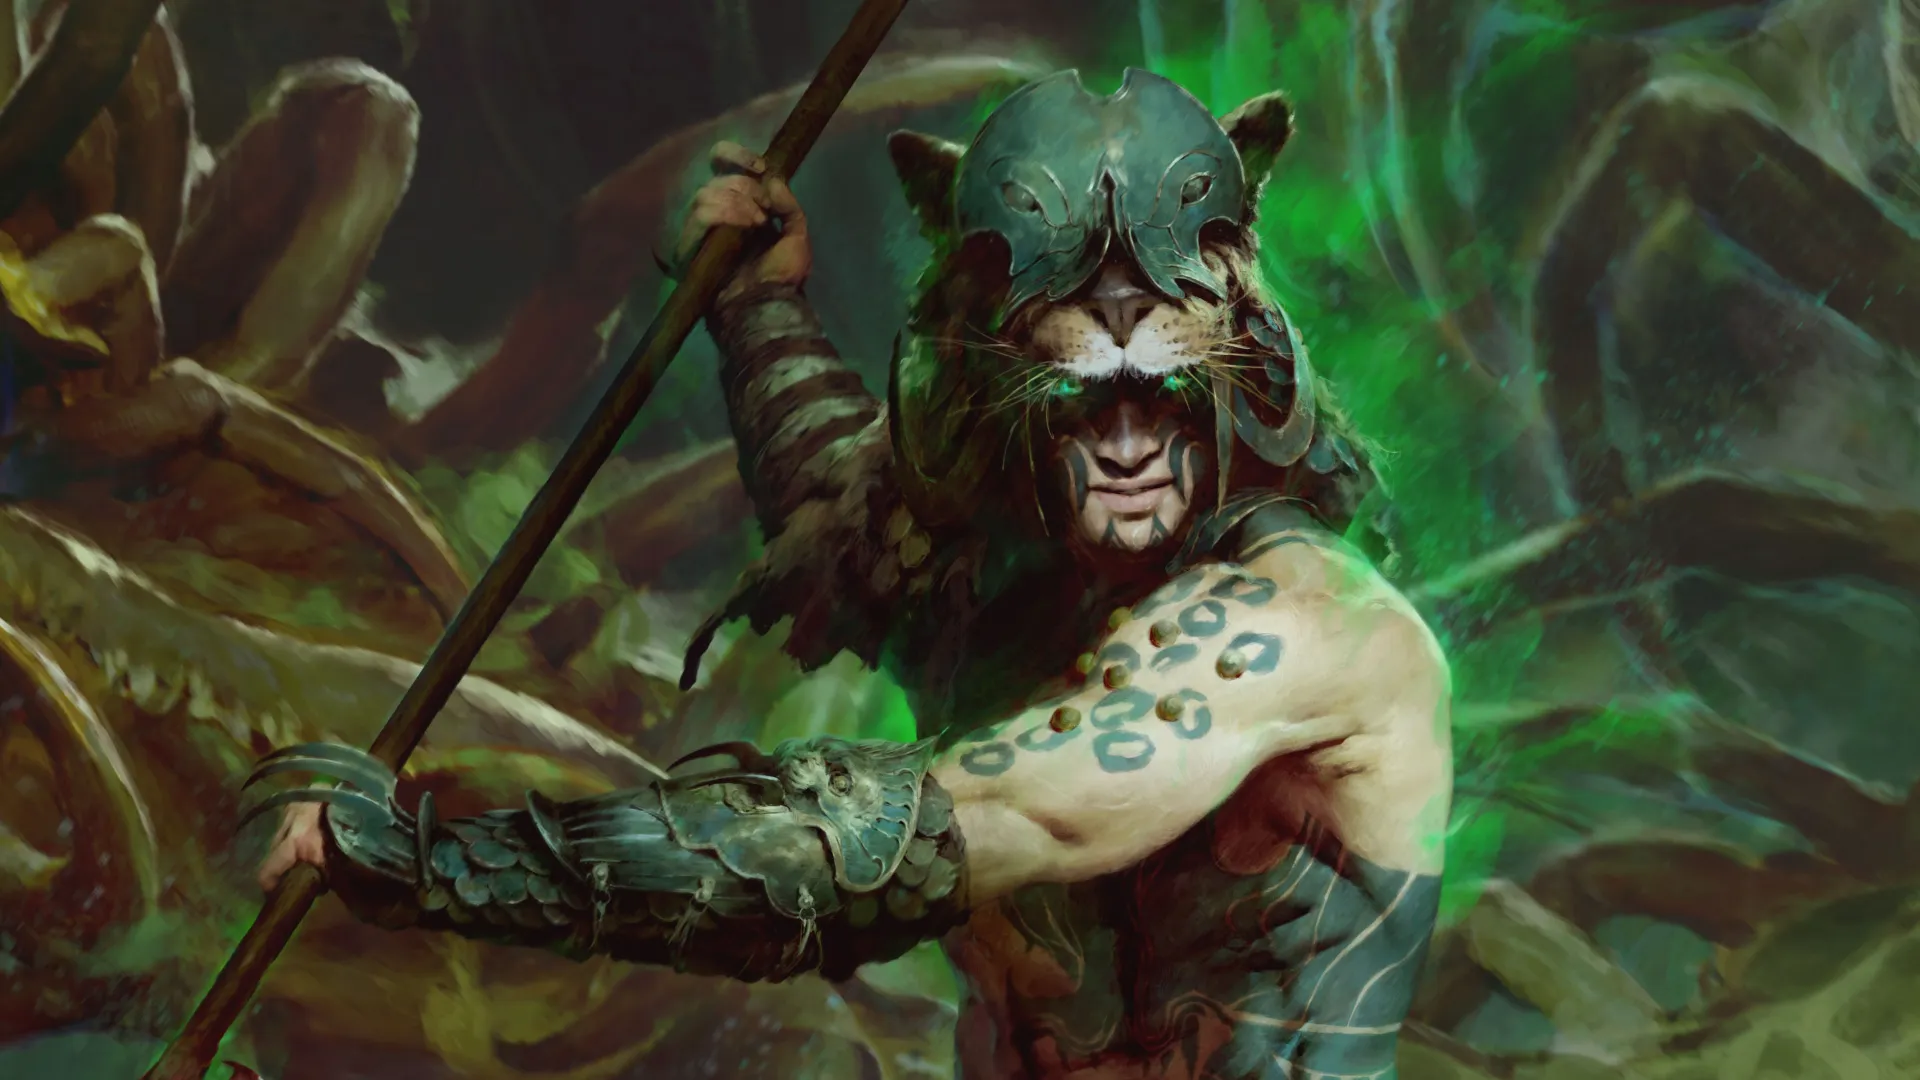


Build Introduction
This Eagle ![]() Quill Volley build is the best-performing leveling build for the Spiritborn in Diablo 4 and a great pick for anyone looking for a leveling build that is fast, efficient, and fun!
Quill Volley build is the best-performing leveling build for the Spiritborn in Diablo 4 and a great pick for anyone looking for a leveling build that is fast, efficient, and fun!
This Spiritborn leveling build is split into two stages. You will be using ![]() Thunderspike and
Thunderspike and ![]() Quill Volley to build and then spend Vigor and deal your damage. Several utility skills will provide powerful combat buffs, granting increased block from
Quill Volley to build and then spend Vigor and deal your damage. Several utility skills will provide powerful combat buffs, granting increased block from ![]() Armored Hide, more Attack Speed and Cooldown Recovery from
Armored Hide, more Attack Speed and Cooldown Recovery from ![]() Ravager, and Damage over Time and healing from
Ravager, and Damage over Time and healing from ![]() Scourge.
Scourge.
To find out more general information about leveling as a Spiritborn in Diablo 4, you can check out our main Spiritborn Leveling Guide.
Have questions or feedback about this guide? Join Cashlarond’s livestream and ask him!
Check our Leveling Tier List to see how this build compares to others.
Quick Navigation
Want to skip ahead? Use the table below to jump to the sections you are looking for.
Skill Bar and Skill Tree Points
Before Level 38
If you are unsure how to use these skills, read the Build Mechanics section after setting up your skill bar.
Wondering what comes after Level 70 or which Paragon boards to pick? Head to the Spiritborn Builds page and choose an endgame build to continue progressing your character even further.
Spiritborn Class Mechanic — Spirit Hall
The Specialization of the Spiritborn Class becomes available at Level 15. It is recommended to complete the “Sacred Hunt“ questline in Kehjistan as soon as possible. The quest is given by Tarka.
The Spirit Hall system allows you to choose two animal spirits as protective guardians to receive powerful passive bonuses. The first primary Spirit Guardian can be selected at Level 15, after completing the quest, followed by the secondary Spirit Guardian at Level 30. Each Guardian has a different primary and secondary bonus ability, and you do not have to pick the same Guardian twice!
The Spirit Hall allows you to combine two different Spirit Guardians or stick with just one.
- Primary Spirit Guardian: Eagle
- Casting an Eagle Skill or Evading shoots 6 Storm Feathers, each dealing 140% Lightning damage and applying Vulnerable for 5 seconds. The Storm Feathers Movement Speed bonus is doubled and always active. All Skills are now also Eagle Skills.
- Secondary Spirit Guardian: Eagle
- Every other Cast is a guaranteed Critical Strike that grants you a 20% Vulnerable Damage bonus for 5 seconds.
For this build you will be taking the Eagle for both of your Guardians. This is a high damage focus approach, and the Primary Hall Storm Feathers will become the focus of your damage.
Keep in mind that if you select the Eagle as your primary guardian, all of your skills will be considered Eagle skills as well. This means that any + Rank to Eagle skills on your gear or items will increase the rank of all your skills.
Gear, Stats, Gems, and Runes
When picking your gear, higher Item Power generally indicates stronger gear, but you should also consider the affixes and effects that are relevant to your class and build. When making gear decisions, keep an eye on both Item Power and the specific attributes that complement the build.
Legendary Aspects
For general information on how to unlock the Codex of Power, head to our dedicated Aspects and Codex of Power guide. You can imprint Aspects onto items by visiting the Occultist.
Listed below are all the Aspects that are important for this Quill Volley Spiritborn leveling build. You can equip any aspect from this list in the slot it drops for, as they are all useful while leveling.
For best results, combine these Aspects with the right stat/affix priorities.
| Aspect Name | Legendary Aspect Power | Source |
|---|---|---|
 Aspect of Tenacity Aspect of Tenacity | You gain Resolve for each [40 – 20] Vigor you gain while at maximum Vigor. This Resolve can overfill your maximum Resolve stacks by 5. | Random Drop |
| Aspect of Interdiction | Gain [1 – 15%] Block Chance per Resolve stack. | Random Drop |
 Aspect of Redirected Force Aspect of Redirected Force | Gain increased Critical Strike Damage equal [30 – 70%] of your Block Chance. Blocking doubles this bonus for 10 seconds. | Random Drop |
| Aspect of Might | Basic Skills grant [20 – 30%] Damage Reduction for 4 seconds. | Dark Ravine in Dry Steppes |
| Blood Boiling Aspect | When your Core Skills Overpower an enemy, you spawn 3 Volatile Blood Drops. Collecting a Volatile Blood Drop causes it to explode, dealing [X] Physical damage around you. | Random Drop |
 Aspect of Adaptability Aspect of Adaptability | Basic Skills generate 5 additional Primary Resource, once per Skill. Basic Skills deal x [0.4 – 0.6%] increased damage for each point of Primary Resource you have. | Random Drop |
 Aspect of Haste Aspect of Haste | Every second while moving gain + [10 – 30%] Bonus Movement Speed for 2 seconds, up to + [30 – 90%]. | Random Drop |
| Ghostwalker Aspect | While Unstoppable and for 4 seconds after, you gain [10 – 30%] increased Movement Speed and are Unhindered. | Broken Bulwark in Scosglen |
Stat Priority and Tempering Affixes
During your leveling journey, you may stumble across items with very good affixes. Tempering these items can provide you with a significant boost in character power, so make sure you understand how it works.
Tempering is only possible if you have already found a few Tempering Manuals while leveling!
Keep an eye out for the following stats and modifiers that are particularly beneficial for this build (listed in order of importance):
| Gear Slot | Important Affixes (ranked by priority) | Tempering Recipes and Affixes |
|---|---|---|
| Helm | 1. Dexterity 2. Armor 3. Maximum Life 4. Vigor Generation/Vigor Regeneration | |
| Chest | 1. Dexterity 2. Armor 3. Maximum Life 4. Vigor Generation/Vigor Regeneration | |
| Gloves | 1. Attack Speed 2. Dexterity 3. All Damage Multiplier 4. Vulnerable Damage Multiplier | |
| Pants | 1. Dexterity 2. Armor 3. Maximum Life 4. Vigor Generation/Vigor Regeneration | |
| Boots | 1. Dexterity 2. Movement Speed 3. Maximum Life 4. Armor | |
| Amulet | 1. Attack Speed 2. Movement Speed 3. Critical Strike Chance 4. Vulnerability Damage Multiplier | |
| Rings | 1. Dexterity 2. Vulnerability Damage Multiplier 3. Critical Strike Damage Multiplier 3. Resistance Needed | |
| Weapon | 1. Weapon Damage 2. Vulnerable Damage Multiplier 3. Critical Strike Damage Multiplier 4. Dexterity |
Want to jump back up to the gear table?
Gems and Runewords
Listed below are the best Gems to socket into gear for each item type.
Gems
| Weapon Gems | Armor Gems | Jewelry Gems |
|---|---|---|
For More Damage | For more Dexterity | For more Physical Resist |
Runewords
If you find one of the Runes listed below, you can equip them as a Runeword on your Chest or Pants.
Runewords are unlocked during the Vessel of Hatred campaign and replace gems in gear. Improve your build by combining a trigger Rune of Ritual and an effect Rune of Invocation. You can equip up to two Runeword pairs (four Runes) at a time. For a detailed guide on Runewords, check out our Runewords Guide!
| Runeword Combination | Runeword Effects |
|---|---|
| Poc Que | |
| PocKry |
Paragon starts at Level 70. So, once you reach this level, switch to one of our Endgame Builds here.
Season 13 Mechanics
Season 13 sees the launch of the long awaited Lord of Hatred Expansion. While there are no specific Seasonal Mechanics, there plenty of new systems to explore, including War Plans, Talismans, the Horadric Cube and more!
Talismans
The Lord of Hatred Expansion introduced a new gear system with the Talisman System. Talismans consist of a Horadric Seal which provides up to 6 total Charm Slots that can be socketed with Charms that provide useful stats, or can even provide Unique Bonuses or powerful Set Effects for socketing multiple Charms from specific sets.
While leveling you should focus on finding a Seal with the highest possible number of Charm Slots, and then filling those Charm Slots with any Charms that speed up your leveling process. Here is a tiered list of statistics to keep an eye out for
- Level of Eagle/Jaguar/Core/Potency/Basic Skills, Increased Experience Gain, Movement Speed
- Increased Critical Strike Damage, Increased Vulnerability Damage, Increased Attack Speed
- Increased Maximum Life, Armor or Resistances
Mercenaries
During the Vessel of Hatred campaign, you will unlock Mercenaries to assist you. While you can choose freely early on, we recommend Subo as your main companion, for extra movement speed and crowd control, and Raheir as Reinforcement.
Subo Skill Tree choices:
- Core Skill:
 Wire Trap
 - Core Passive:
 Ready At Hand
 - Iconic Skill:
 Trip Mines
 - Iconic Passive:
 Loaded Munitions
Raheir Reinforcement choices:
- Opportunity Skill: Pick “Injured” as opportunity skill. (Injured will automatically trigger when you become Injured).
- Reinforcement Skill:
 Provoke
Build Mechanics
Rotation and Playstyle
The primary damage-dealing skill in this build is ![]() Quill Volley. While leveling you will need to weave in multiple
Quill Volley. While leveling you will need to weave in multiple ![]() Thunderspike casts to generate the Vigor necessary to use it.
Thunderspike casts to generate the Vigor necessary to use it.
Most of your other abilities will be used on cooldown to maintain several powerful combat buff effects, with ![]() Ravager,
Ravager, ![]() Armored Hide, and
Armored Hide, and ![]() Scourge improving both your defensive and offensive capabilities.
Scourge improving both your defensive and offensive capabilities.
Let’s see how this build will look in action:
- Use
 Ravager on cooldown to deal additional damage and gain additional Cooldown Reduction.
 - Use
 Scourge on cooldown to fear nearby enemies and gain additional Damage Reduction.
 - Use
 Armored Hide on cooldown to gain a large amount of Block Chance, and additional Resolve
 - Use
 The Seeker on cooldown for a large damage burst, and to gain additional Ferocity
 - Use
 Thunderspike to generate Vigor to fund your Quill Volley casts.
 - Spam
 Quill Volley whenever possible to deal damage.
Season 13 Updates
For a full overview of what is new in Season 13, please take a look at our comprehensive season hub. Here is a quick overview of seasonal changes relevant to this build.
- Season 13 overhauls the Skill Tree and adds the new Talisman system, as well as adding several new core systems, such as the War Plans endgame system and the Horadric Cube.
Difficulty and Endgame
Once you hit Level 70 with this build, you will be ready to tackle harder difficulties as you transition into more challenging endgame content. Make sure to pick one of our recommended endgame builds to continue your journey! Additionally, keep your Obols until you reach maximum Level (70), then spend them on a weapon to kickstart your preferred endgame build.
Changelog
- April 28th, 2026: Added New Skill Tree Support
- April 26th, 2026: Preliminary Guide Update for Lord of Hatred Season 13
- March 17th, 2026: Added Bloodied Items for Season 12.
- December 8th, 2025: Added Divine Gifts for Season 11.
- September 20th, 2025: Added Chaos Perks for Season 10.
- June 28th, 2025: Added Horadric Spell for Season 9.
- April 19th, 2025: Switched Duelist’s Aspect with Aspect of Haste. Added Boss Powers for Season 8.
- January 23rd, 2025: Removed Lost Witchcraft Powers and replaced them with Vengeful Spirit and Hex of Shattering.
- January 18th, 2025: Added Witchcraft Powers and Occult Gems for Season 7.
