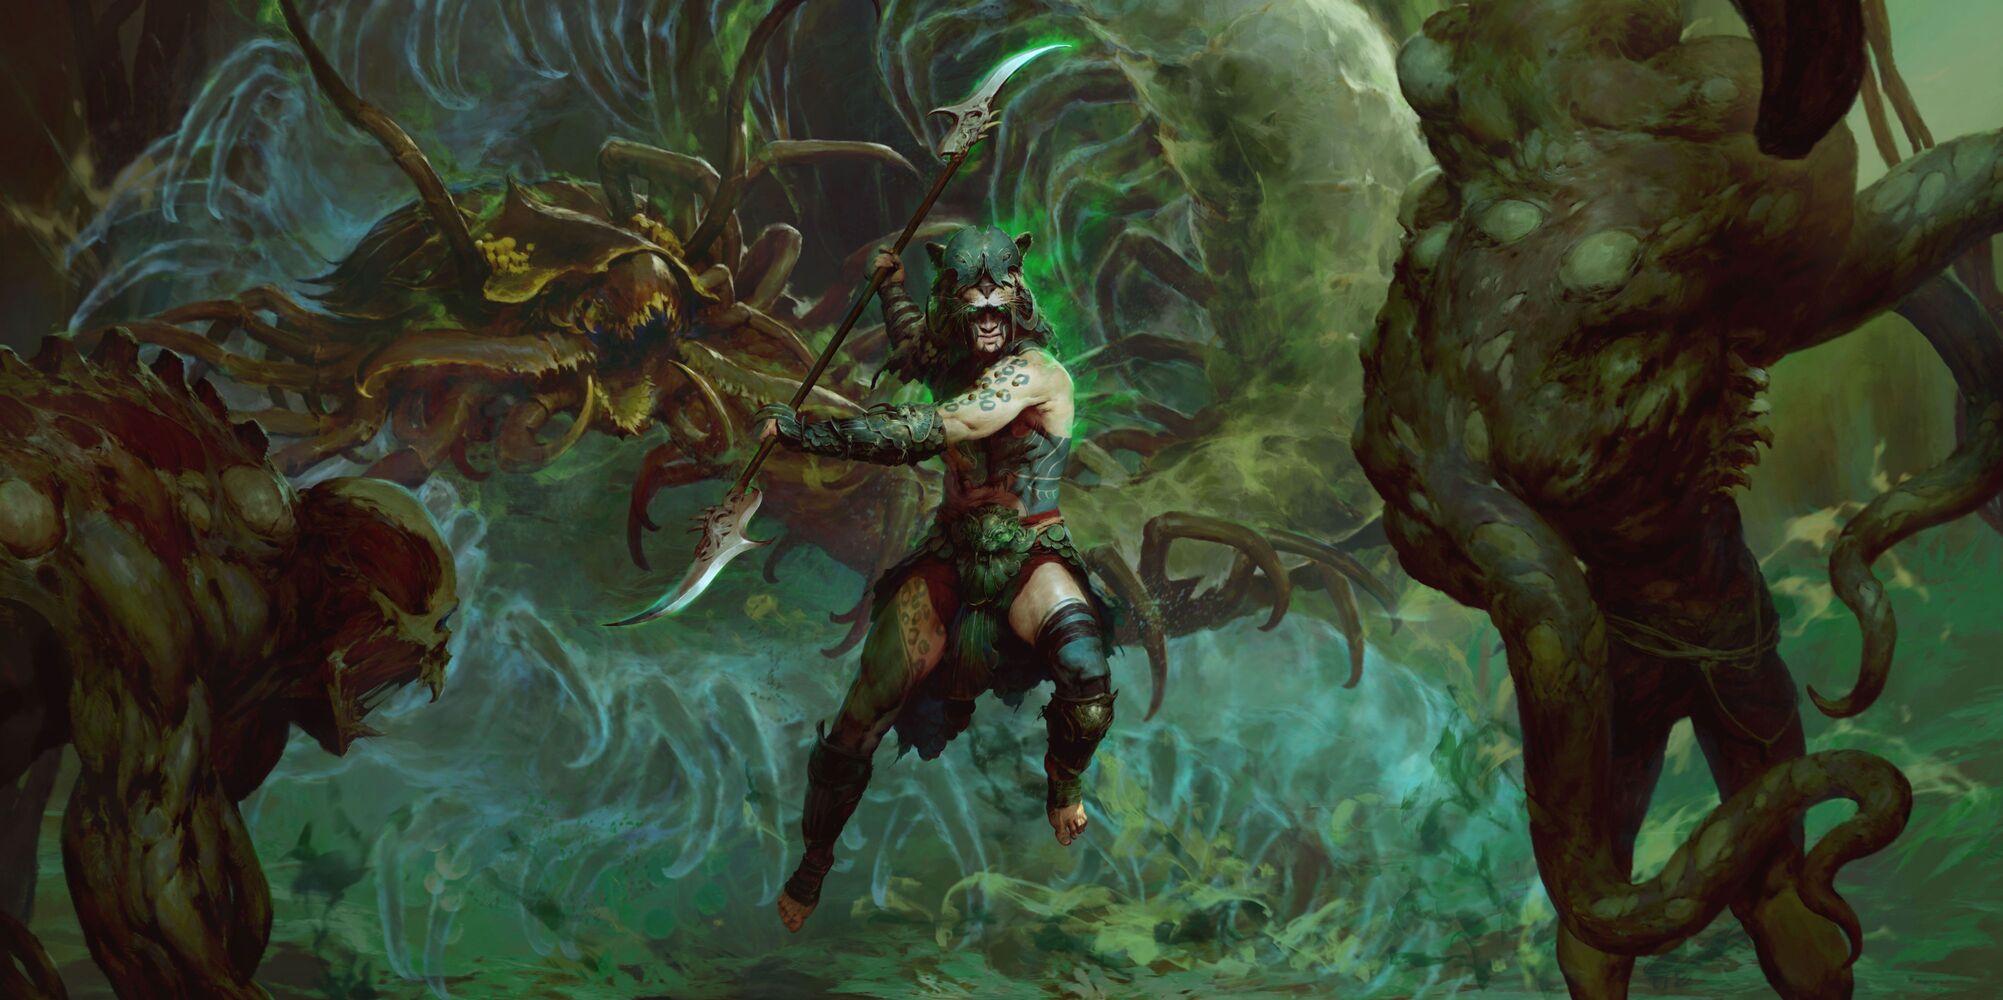


Build Introduction
This endgame build focuses on  Aspect of Endless Talons and the Quarterstaff
 ![]() Sunstained War-Crozier, giving a boost to
Sunstained War-Crozier, giving a boost to ![]() Razor Wings gameplay. In short, this gameplay is built around the
Razor Wings gameplay. In short, this gameplay is built around the ![]() Intricacy passive and
Intricacy passive and ![]() The Hunter charges to let you cast free Razor Wings. With strong barrier generation, a powerful ultimate, and the synergies increasing your critical hits, it offers a high-impact playstyle. Though this build requires specific gear and aspects, it is an excellent pick for players who are looking for a rewarding and dynamic playstyle.
The Hunter charges to let you cast free Razor Wings. With strong barrier generation, a powerful ultimate, and the synergies increasing your critical hits, it offers a high-impact playstyle. Though this build requires specific gear and aspects, it is an excellent pick for players who are looking for a rewarding and dynamic playstyle.
Starting new? Begin with our Quill Volley Leveling Build and switch to this one at Level 60.
Have questions or feedback about this guide? Join Ghazzy’s livestream and ask him!
Strengths and Weaknesses
- Fast gameplay style
- Easy to Play
- Heavy Damage
- Scales with Armor.
- Needs the right gear.
Build Requirements
Aspect of Unyielding HitsWant to know more about the Uniques supporting this setup? Jump to the Uniques section.
Quick Navigation
Want to skip ahead? Use the table below to jump to the sections you are looking for.
Skill Bar and Skill Tree Points
Wondering what comes after Level 60? Head to the Paragon Board section to power up the build even further.
And if you want to see how everything plays out in combat, check out the Rotation and Playstyle section for a quick breakdown. If you are missing skill points, complete Renown Tier 1-3 in every zone.
Spiritborn Class Mechanic – Spirit Hall Choice
The Spirit Hall allows you to combine two different Spirit Guardians or stick with just one. For this endgame build, we use the Jaguar for increased damage.
- Primary: Jaguar
- Every 15th time you deal direct damage to an enemy with a Jaguar Skill, unleash an additional strike dealing 15% of the damage you have dealt to them in the last 0.5 seconds. All Skills are now also Jaguar Skills.
- Secondary: Jaguar
- Maximum Ferocity is increased by 1. Gain 1 stack of Ferocity whenever you kill an enemy or damage a Boss.
Gear, Stats, Gems, and Runes
The following sections cover all systems that are important if you want to improve the power of your character in the endgame of Diablo 4.
Legendary Aspects
Each Aspect is listed with its matching gear slot. Do your best to keep each Aspect in the assigned slot. Remember to salvage Legendary Items with higher Aspect values to unlock them in the Codex of Power, and then imprint them onto gear pieces with the preferred affixes. For best results, combine these Aspects with the right stat priorities.
| Gear Slot | Gems/Runes | Aspect / Unique | Legendary Aspect / Unique Power |
|---|---|---|---|
| Helm |  Aspect of Layered Wards Aspect of Layered Wardsor | Your Block Reduction is increased by {x}% while you have a Barrier. | |
| Chest | Aspect of Disobedience or | You gain {x}% increased Armor for 4 seconds when you deal any form of damage stacking up to {x}%. | |
| Gloves | Fell Soothsayer’s Aspect | When you cast an Incarnate Skill enemies around you become Vulnerable for 5 seconds. Killing a Vulnerable enemy echoas {x}% of the killing blow’s Base damage to another Nearby enemy. | |
| Pants | Aspect of Interdiction | Gain {x}% Block Chance per Resolve stack. | |
| Boots | Casting a skill has a {x}% chance to cast a Non-Mobility, Non-ultimate Skill that is currently on cooldown. Can only occur once every 8 seconds. | ||
| Amulets(50% bonus) | Aspect of Unyielding Hits | Casting a Gorilla Skill increases your Weapon Damage by {x}% of your Armor for 3 seconds. | |
| Ring | Aspect of Plains Power | Casting a Gorilla Skill increases your Weapon Damage by {x}% of your Armor for 3 seconds. Maximum 1500 bonus Weapon Damage. | |
| Ring |  Aspect of Apprehension Aspect of Apprehension | Once an enemy is Slowed by at least 80%, they also become Feared for 3 seconds. You deal x{x}% increased damage to Feared enemies. | |
| Weapon (200% bonus) | Aspect of Redirected Force | Gain increased Critical Strike Damage equal {x}% of your Block Chance. Blocking doubles this bonus for 10 seconds. |
You can replace the Helm and Chest aspects with Mythic Uniques, which will amplify the build. Respectively you can use the ![]() Harlequin Crest and
Harlequin Crest and ![]() Shroud of False Death.
Shroud of False Death.
Curious how this build compares to other endgame options? Take a look at our Endgame Build Tier List.
Stat Priority and Tempering Affixes
Affixes on the same line are considered to be equally important. Bolded affixes are the most important targets for Masterworking upgrades. Be sure to check our Tempering and Masterworking guides for more details about these topics. Want to jump back up to the gear table?
| Slot | Targeted Gear Affix | Tempering Affixes |
|---|---|---|
| Helm | 1. Cooldown Reduction 2. Dexterity 3. Maximum Life | |
| Chest | 1. Armor 2. Dexterity 3. Maximum Life | |
| Gloves | 1. Attack Speed 2. Armor 3. Critical Strike Chance | |
| Pants | 1. Armor 2. Dexterity 3. Maximum Life | |
| Boots | 1. Movement Speed 2. All Stats 3. % Dexterity 4. Total Armor | N/A |
| Amulet | 1. Critical Strike Chance 2. % Dexterity 3. Total Armor | |
| Rings | 1. Critical Strike Chance 2. Attack Speed 3. Dexterity or Maximum Life | |
| Weapon | Polearm: Vulnerable Damage 1. Critical Strike Damage 2. Dexterity 3. Maximum Life |
Prioritize capping all of your Resistances, and make sure to reach the Armor Cap of 1,000. However, as this builds scales with armor, we benefit from having more than the minimum. This applies to any build using the Aspect of Unyielding Hits, where higher armor increases overall damage. Furthermore, in higher difficulties, there will be a penalty to armor and resistance, so you will need a higher amount to compensate for the loss.
Looking for progression beyond gear? See our Paragon recommendations or Runewords Synergy next.
Uniques and Mythic Uniques
Below you will find information on Uniques and Mythic Uniques that are useful and recommended for this build. Moreover, if you are interested in target farming Mythic Uniques, check out our How to Farm Mythic Uniques guide.
If a Unique or Mythic Unique is not listed here, it is NOT recommended and won’t benefit this specific build in any way.
Uniques
Listed below are the recommended and optional Unique Items for this build.
 Yen’s Blessing (required): Casting a skill has a [40-60%] chance to cast a Non-Mobility, Non-ultimate Skill that is currently on cooldown. Can only occur once every 8 seconds.
Mythic Uniques
The Razor Wings Spiritborn does not require any Mythic Uniques. However if you do happen to find the following, we recommend using them to make this build optimal:
 Shroud of False Death (recommended): If you haven’t dealt damage in the last 2 seconds, gain Stealth and +40% Movement Speed.
 Harlequin Crest (recommended): Gain 20% Damage Reduction. In addition, gain +4 Ranks to all Skills.
If you are interested in target farming Mythic Uniques, check out our How to Farm Mythic Uniques guide. Or you can return to the Build Requirements.
Gems and Runewords
Listed below are the recommended Gems and Runewords to socket into your gear.
Gems
| Weapon Gems | Armor Gems | Jewelry Gems |
|---|---|---|
For Dexterity | For more Armor or For more Resistance |
Runewords
Runewords are unlocked during the Vessel of Hatred campaign and replace gems in gear. Improve your build by combining a trigger Rune of Ritual and an effect Rune of Invocation. You can equip up to two Runeword pairs (four Runes) at a time. For a detailed guide on Runewords, check out our Runewords Guide!
The following are recommended Runeword combination options for the ![]() Razor Wings endgame build of the Spiritborn:
Razor Wings endgame build of the Spiritborn:
| Runeword Combination | Runeword Effects |
|---|---|
| Xol Gar | |
| Yul Que |
Paragon Board
Paragon unlocks at Level 60 and plays a big role in endgame progression. The following Legendary Nodes and Glyphs are recommended for this build. Keep in mind that each Glyph’s information and radius listed below is for the Level 46 version.
Need a refresher on how the skills are set up? Click here to return to the Skill Tree section.
Boss Powers (Season 8)
During Season 8, you can unlock and rank up Boss Powers using Spectral Ash earned from Apparition Incursions, which provide powerful bonuses to support your build as you level.
| Slot | Boss Power & Drop Location | Effect |
|---|---|---|
| Main Power | After damaging a Vulnerable enemy, shoot piercing projectiles that last 1.3 seconds, dealing 250% Fire damage and applying Vulnerable. Deals 40%[x] increased damage to Vulnerable enemies. | |
| Modifier | Hitting an Elite enemy with a Main Boss Power creates an inert Blister Clone with 10% of their Maximum Life for 15 seconds. Killing the Blister removes 5.25% of the Elite’s Life. An Elite can have up to 1 Blister active at once, and a Boss can have up to 2 Blisters. Enemies with Resilience cannot spawn Blisters. | |
| Modifier | Gain 5%[x] increased damage to all Elements. For each 1% of an Element’s Resistance from bonuses, gain 0.2%[x] increased damage for that Element, up to a maximum of 15.5%[x]. | |
| Modifier | Gain +5% Critical Strike Chance, increased by +0.5% for each 1% of Shadow Resistance you have, up to a maximum of +70%. |
Mercenaries
During the Vessel of Hatred campaign, you will unlock Mercenaries to assist you. While you can choose freely early on, we recommend Raheir as your main companion, and Varyana as Reinforcement.
Raheir Skill Tree choices:
- Core Skill:
 Ground Slam
 - Core Passive:
 Raheir’s Aegis
 - Iconic Skill:
 Bastion
 - Iconic Passive:
 Inspiration
Varyana Reinforcement choices:
- Opportunity Skill: Any Skill
- Reinforcement Skill:
 Bloodthirst
Build Mechanics
Rotation and Playstyle
This build focuses on getting as much ![]() Razor Wings damage as possible while still having crowd control and survivability. Manage your Razor Wings charges carefully, the extra charges from your Ring Tempers are important. Aspect of Unyielding Hits will ensure that your build scales with your armor.
Razor Wings damage as possible while still having crowd control and survivability. Manage your Razor Wings charges carefully, the extra charges from your Ring Tempers are important. Aspect of Unyielding Hits will ensure that your build scales with your armor.
![]() Vortex pulls enemies in,
Vortex pulls enemies in, ![]() Scourge slows and poisons them, setting up for Razor Wings hits. Use Evade often to trigger
Scourge slows and poisons them, setting up for Razor Wings hits. Use Evade often to trigger ![]() Acceleration for a quick Razor Wings damage boost.
Acceleration for a quick Razor Wings damage boost. ![]() The Hunter will also boost your overall damage, so you can use it on cooldown.
The Hunter will also boost your overall damage, so you can use it on cooldown.
![]() Armored Hide increases your block chance and triggers Aspect of Redirected Force, increasing your critical hits. Always keep
Armored Hide increases your block chance and triggers Aspect of Redirected Force, increasing your critical hits. Always keep ![]() Ravager active to increase your damage.
Ravager active to increase your damage.
Thanks to ![]() Invasive Razor Wings, your attack will last longer and spin outwards, hitting more targets. The build also boosts your Mystic Circle bonuses, ramping up your Ferocity and Jaguar skills (including Razor Wings).
Invasive Razor Wings, your attack will last longer and spin outwards, hitting more targets. The build also boosts your Mystic Circle bonuses, ramping up your Ferocity and Jaguar skills (including Razor Wings).
Finally, ![]() Yen’s Blessing gives free Razor Wings casts when you use other skills, and your Ultimate skill
Yen’s Blessing gives free Razor Wings casts when you use other skills, and your Ultimate skill ![]() The Hunter pushes your Razor Wings damage even higher with
The Hunter pushes your Razor Wings damage even higher with ![]() Supremacy.
Supremacy.
- Engage with
 Vortex, gather enemies around you.
 - Apply
 Scourge.
 - Activate
 Armored Hide for survivability and block chance, triggering the Aspect of Redirected Force for more critical strike damage.
  Ravager to increase overall damage.
 - Evade to activate
 Acceleration, which increases Razor Wings damage.
 - Spam
 Razor Wings
 - Use
 The Hunter whenever it is ready.
 - Cast Razor Wings.
Runewords Synergy
- Yul Que:
 Yul gives you 50 Offering every time you cast a skill with a cooldown.
  Que uses 300 Offering to trigger
  Earthen Bulwark, giving you a strong Barrier. This combo is a great way to constantly refresh your shields during fights, especially as you naturally use a lot of cooldown skills in this build.
 - Xol Gar:
 Xol gives you 150 Offering every time you evoke a power from another Class (ie. everytime your other runeword triggers).
  Gar then spends only 25 Offering to boost your Critical Strike Chance by 2.5% for 5 seconds, stacking up to 25%. This combo allows you to build up a big Critical Chance bonus.
Which Elixirs Should You Use?
Visit the Alchemist and craft an Elixir providing any Resistance you need most, or the Assault Elixir to increase Attack Speed. Some Elixirs cannot be crafted and only drop from activities like Helltides or Nightmare Dungeons. Additionally, make sure to keep your health potion upgraded!
The following Elixirs are useful for most Spiritborn builds:
 Elixir of Precision provides the highest damage output increase.
 Elixir of Advantage increases your attack speed
 Elixir of Fortitude for additional survivability
Season 8 Updates
For a full overview of what is new in Season 8, please take a look at our comprehensive season hub.
Here is a quick overview of seasonal changes relevant to this build:
- Aspect of Plains Power: Legendary ranks increased from 8 to 21. Damage increase per stack of Ferocity increased from 2.0-4.1% to 2.0-5.0%.
- Fixed an issue that allowed for snapshotting of the
 Resilient Passive.
 - Fixed an issue where Resource Generation stats for other classes would display in character stats for Spiritborn Players.
- Fixed an issue where casting The Hunter could cause the Wanderer to get partially stuck under the ground.
- Fixed an issue where Replenishing Ravager was not correctly triggering from Life on Kill bonuses.
- Fixed an issue where some of the text on the Que rune was displaying in the incorrect font style.
- Fixed an issue where Shroud of False Death could appear to grant a Skill Point to all Spiritborn Key Passives.
Obol Gambling
Similar to Kadala in Diablo 3, the Purveyor of Curiosities lets you gamble your Obols for 750 item power gear at Level 60, making them a great way to fill in missing affixes, Aspects, or upgrades. There is also a small chance to receive an Ancestral piece with item power 800.
Changelog
- April 26th, 2025: Updated for Season 8. New Skill Tree, Paragon, Gear Requirements, Mercenaries. Adjusted Build Mechanics section. Added Boss Powers for this season.
- January 19th, 2025: Guide revamped for Season 7.
- New Skill Tree and Paragon boards.
- Changed Aspects, Gear Requirements, and Runewords.
- Adjusted Gameplay and Rotation explanations.
- Added Witchcraft Powers and Occult Gems.
- October 13th, 2024: Guide created for Vessel of Hatred, Season 6.
