


Blizzard has posted an official preview of the Season of Hatred Rising. Find out what to expect from the world event starting on October 7!
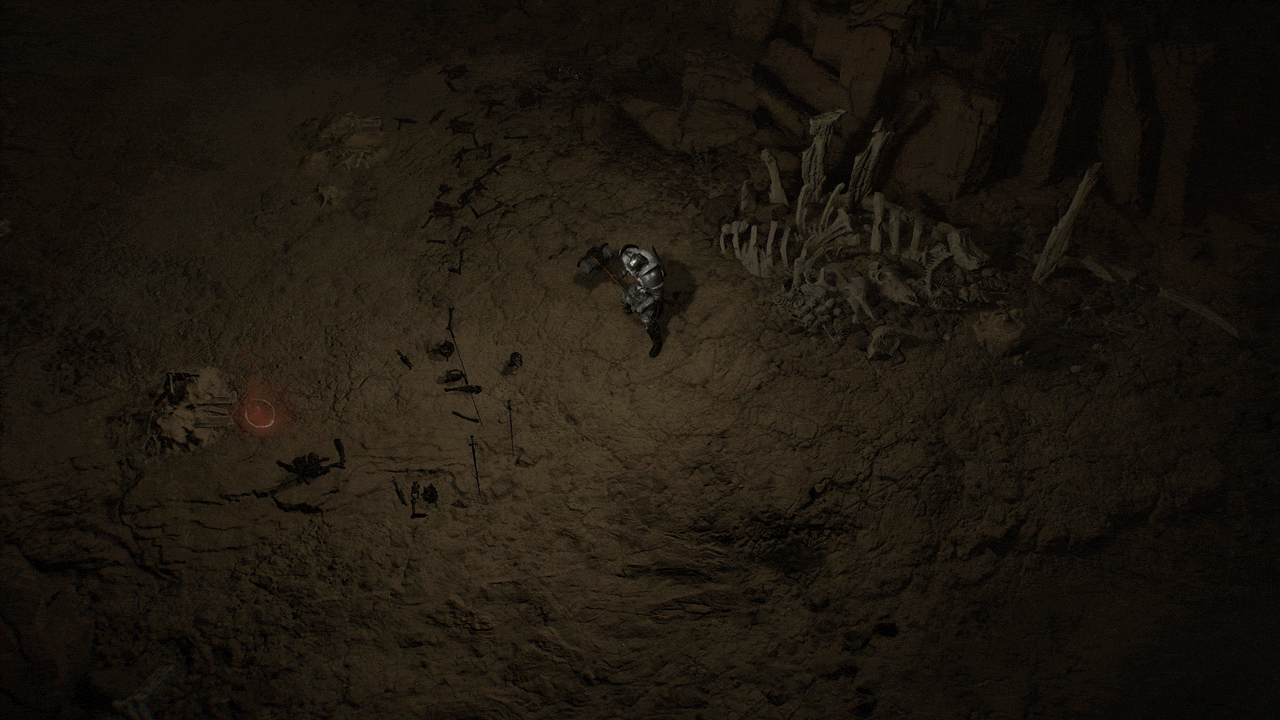
Mephisto’s hatred has spread far and wide, creating nightmarish monstrosities to roam the land and reinstilling a sense of dread in the hearts of Sanctuary’s denizens. No one and nowhere is safe from the Lord of Hatred’s maddening influence, not even you.
Season of Hatred Rising begins on October 7 at 4 p.m. PDT.
Vessel of Hatred, the first expansion for Diablo IV, will also officially go live on October 7 at 4 p.m. PDT globally. Visit our What You Need to Know for Vessel of Hatred blog to prepare for launch. If you haven’t pre-purchased yet, you can do so here.
Thank you to everyone that participated in our 2.0 Public Test Realm (PTR) for PC and Battle.net. Throughout the article, any text or section marked in red denotes a change made based off feedback from our latest PTR. Content shown in this blog does not require the Vessel of Hatred expansion to experience unless specified otherwise.
Codex
A Colossal New Threat: Realmwalkers
Seething Realm—March Boldly into Uncertainty
Bolster the Zakarum Remnants in a New Quest
Awaken Power Using New Class Skills and Passives
Unlock Rewards with the Season Journey and Battle Pass
Wander Boldly with Party Finder
Acquire Fabled Threads from Tejal’s Shop
Community Guides for Season of Hatred Rising
Catch Up on the Pre-Launch Livestream
A Colossal New Threat: Realmwalkers
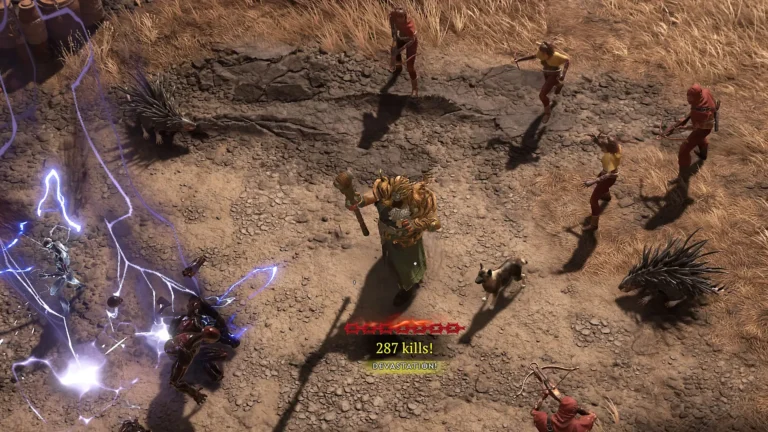
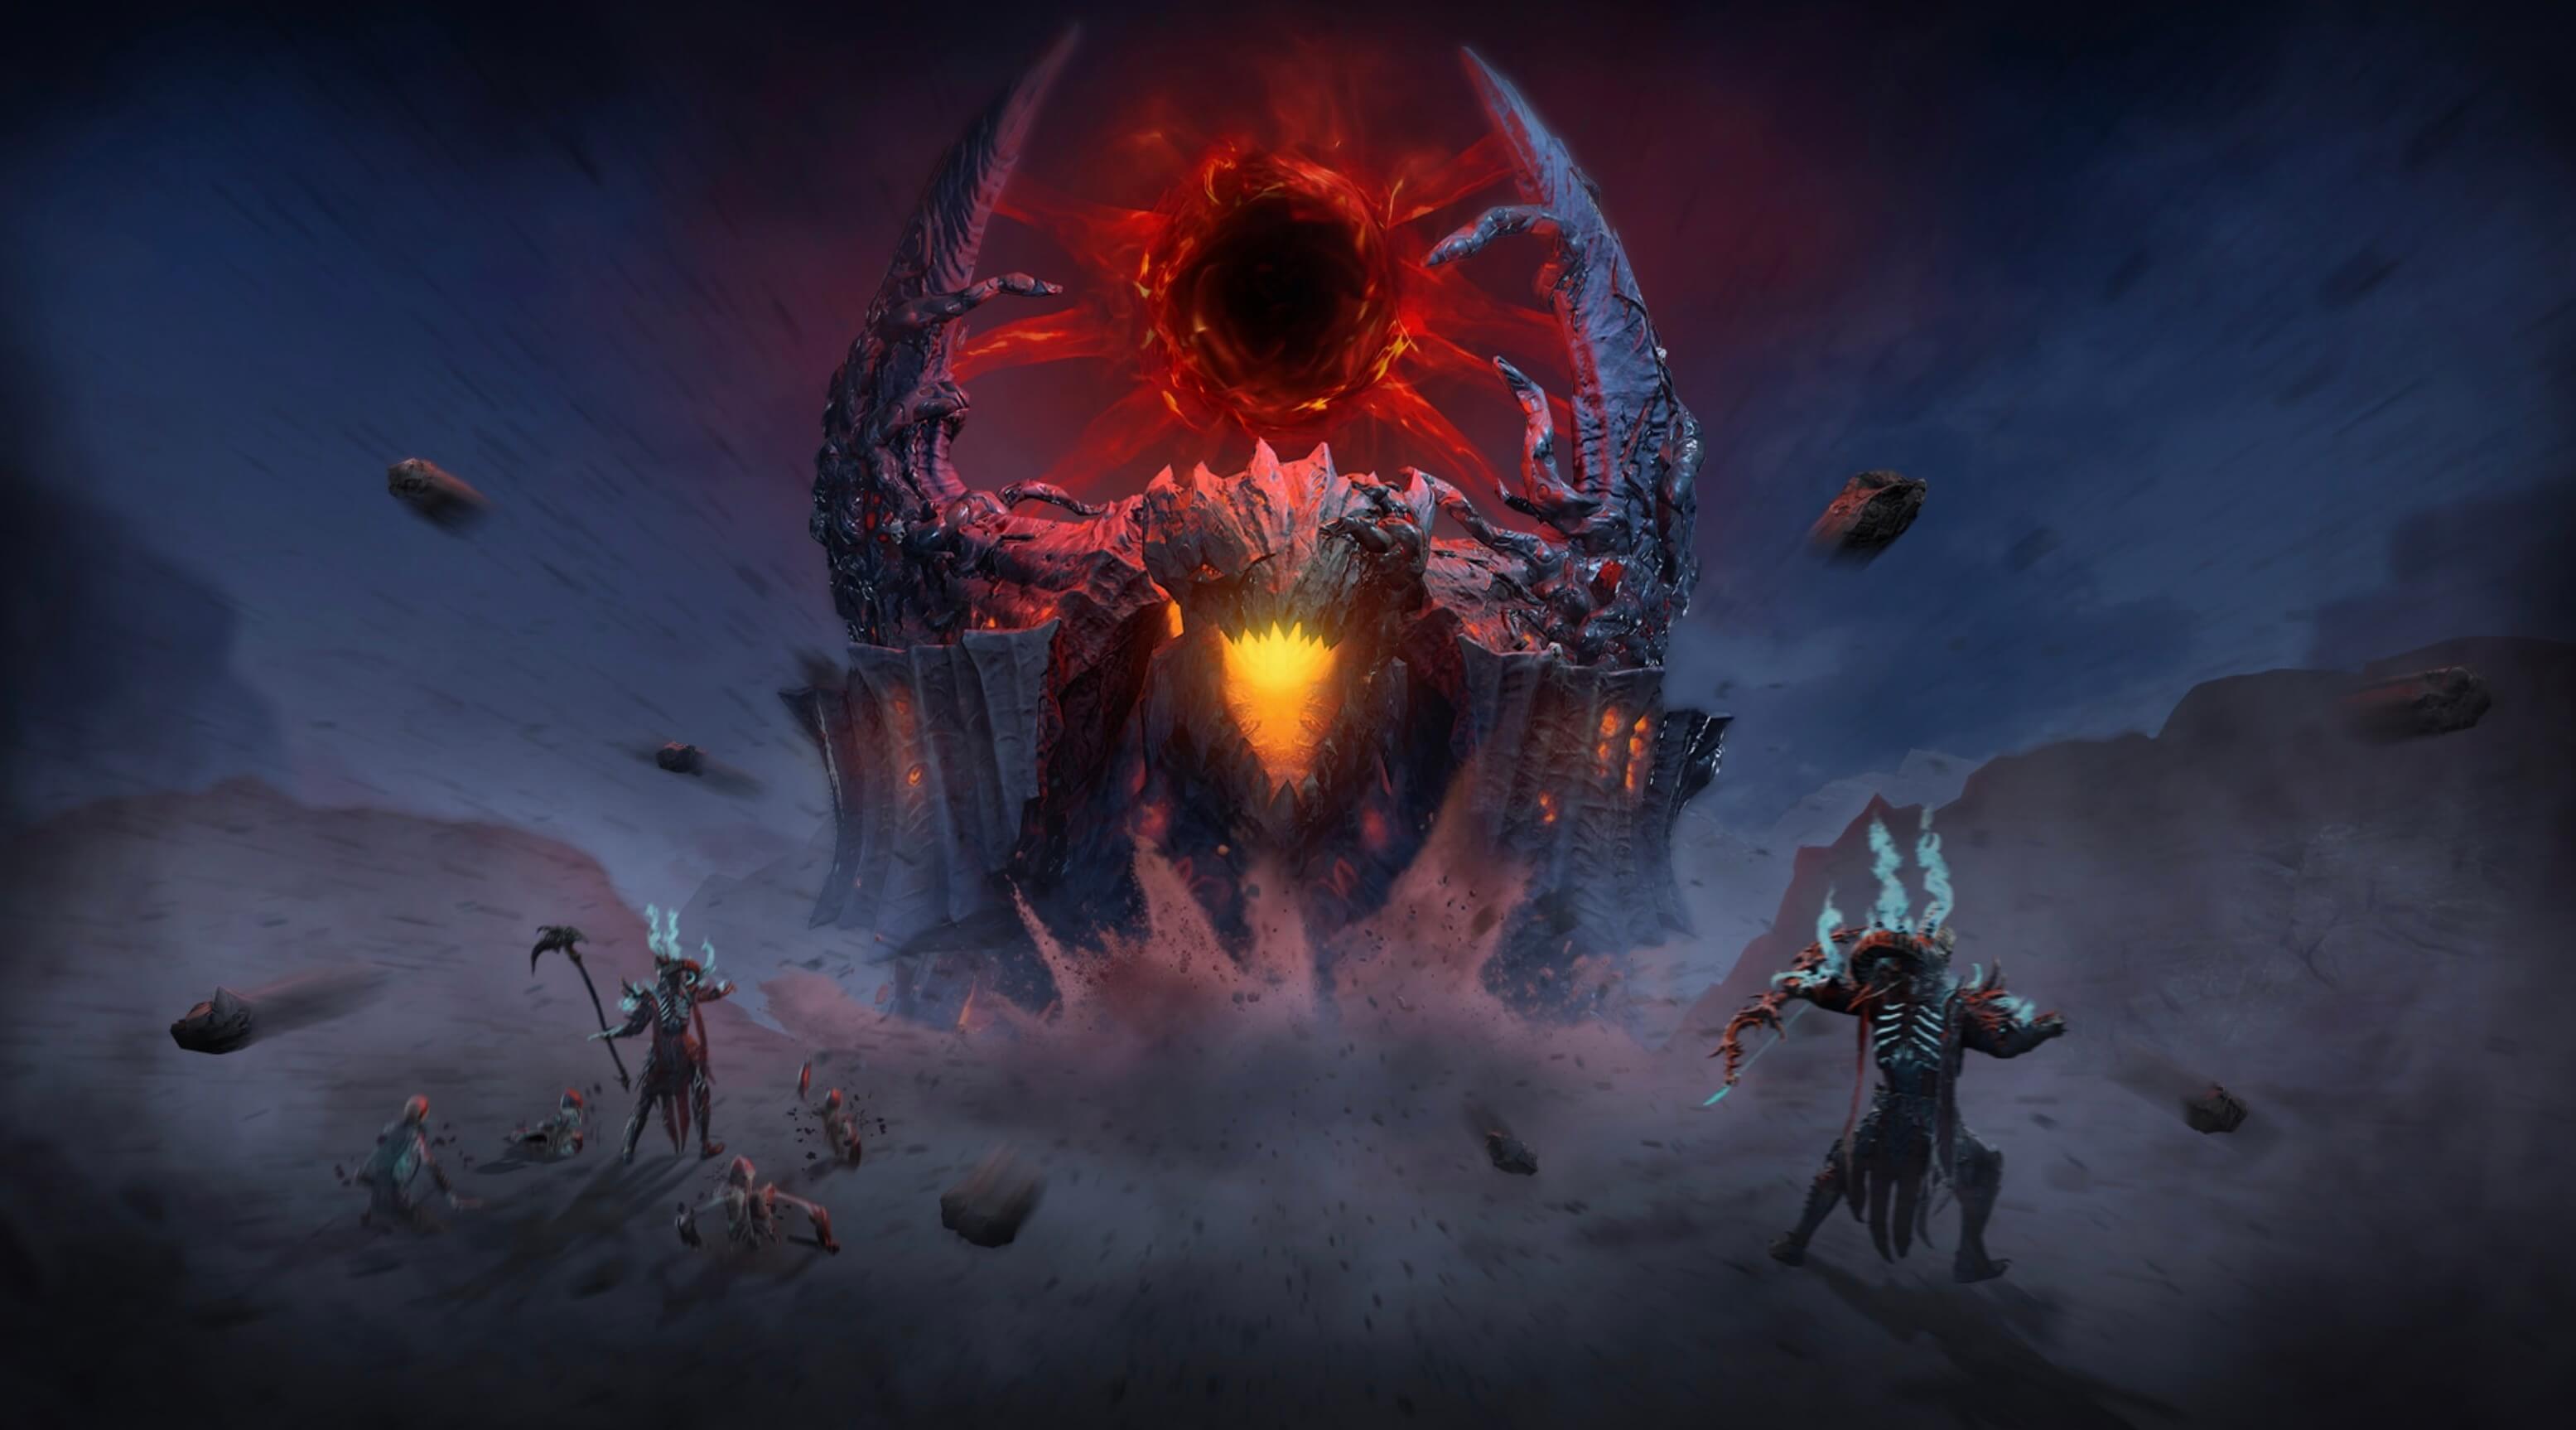
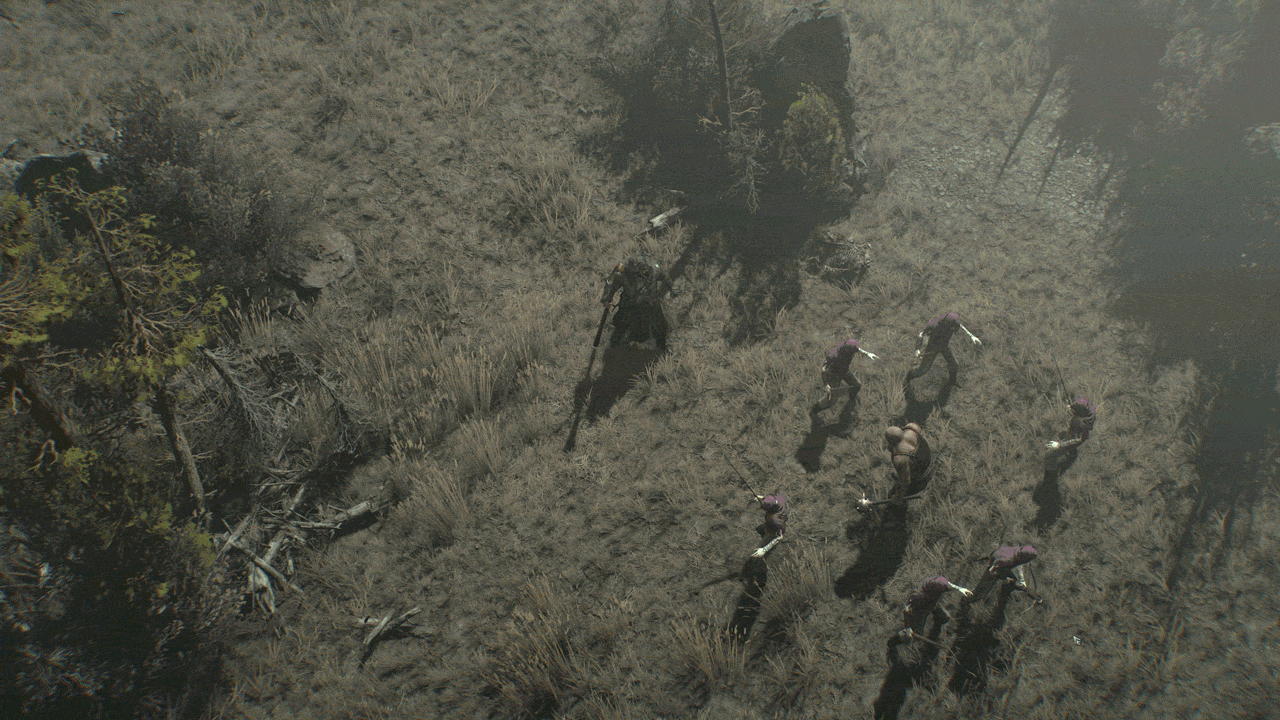
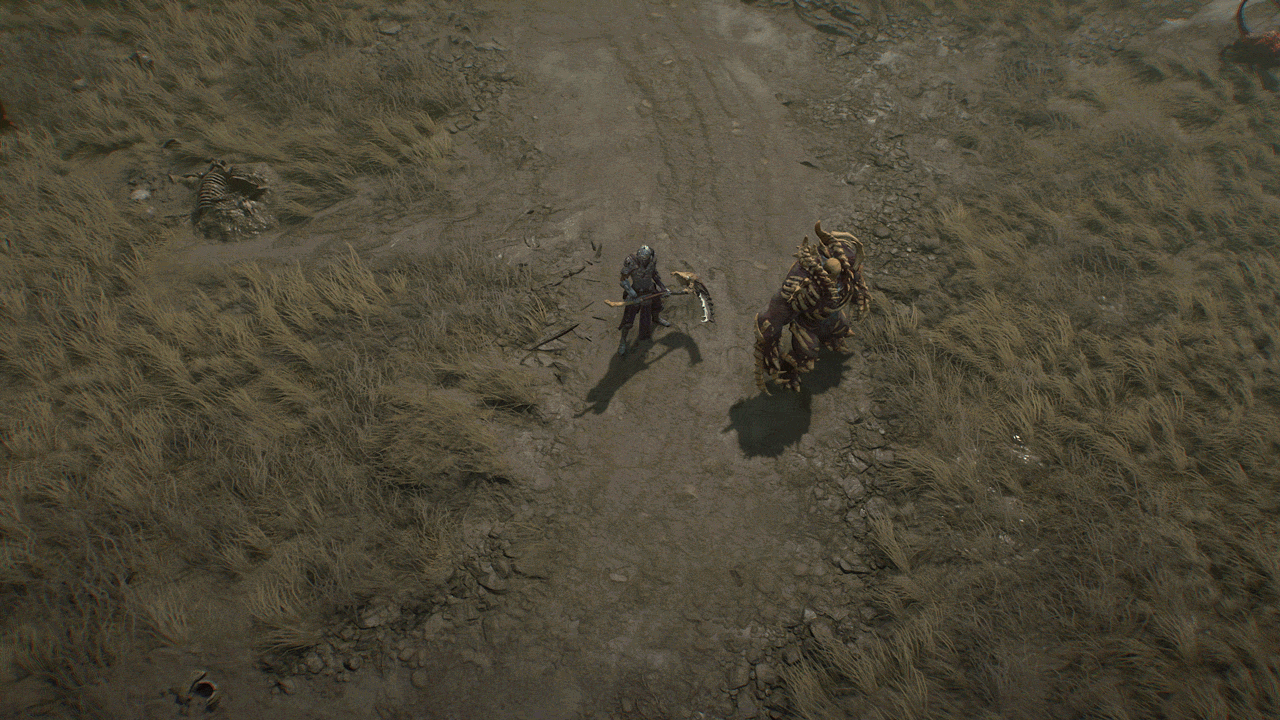
Gargantuan heralds of Hell bearing sanguine-eyed portals on their backs have been spotted stomping about Sanctuary. Their presence is a grim tavern tale—a harmless prank meant to scare the weary traveler—turned into reality by Mephisto’s hatred. They are known locally as Realmwalkers.
Realmwalkers can threaten an entire Region at once, spewing out nightmares born of hatred from the portal fused into their bodies. By Mephisto’s will, a Realmwalker will spawn in a Region, and after charging up, it will begin to lumber about the Region in search of sacred ground. Realmwalkers are invulnerable during this phase, but fearsome Bloodbound Guardians will rush to protect the Realmwalker while it wanders. Eliminate them to remove chunks of the Realmwalker’s health.
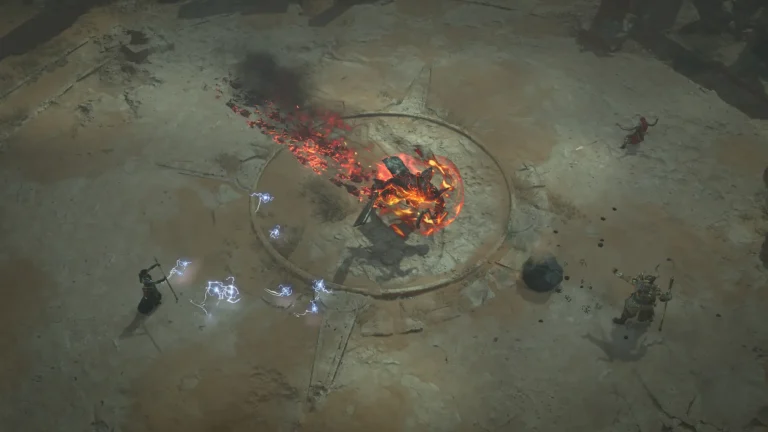
When the Realmwalker arrives at the ritual site, it’ll slam into the ground, creating three Hatred Spires around it. Dismantle these spires quickly and render the Realmwalker vulnerable before it acquires too much power.
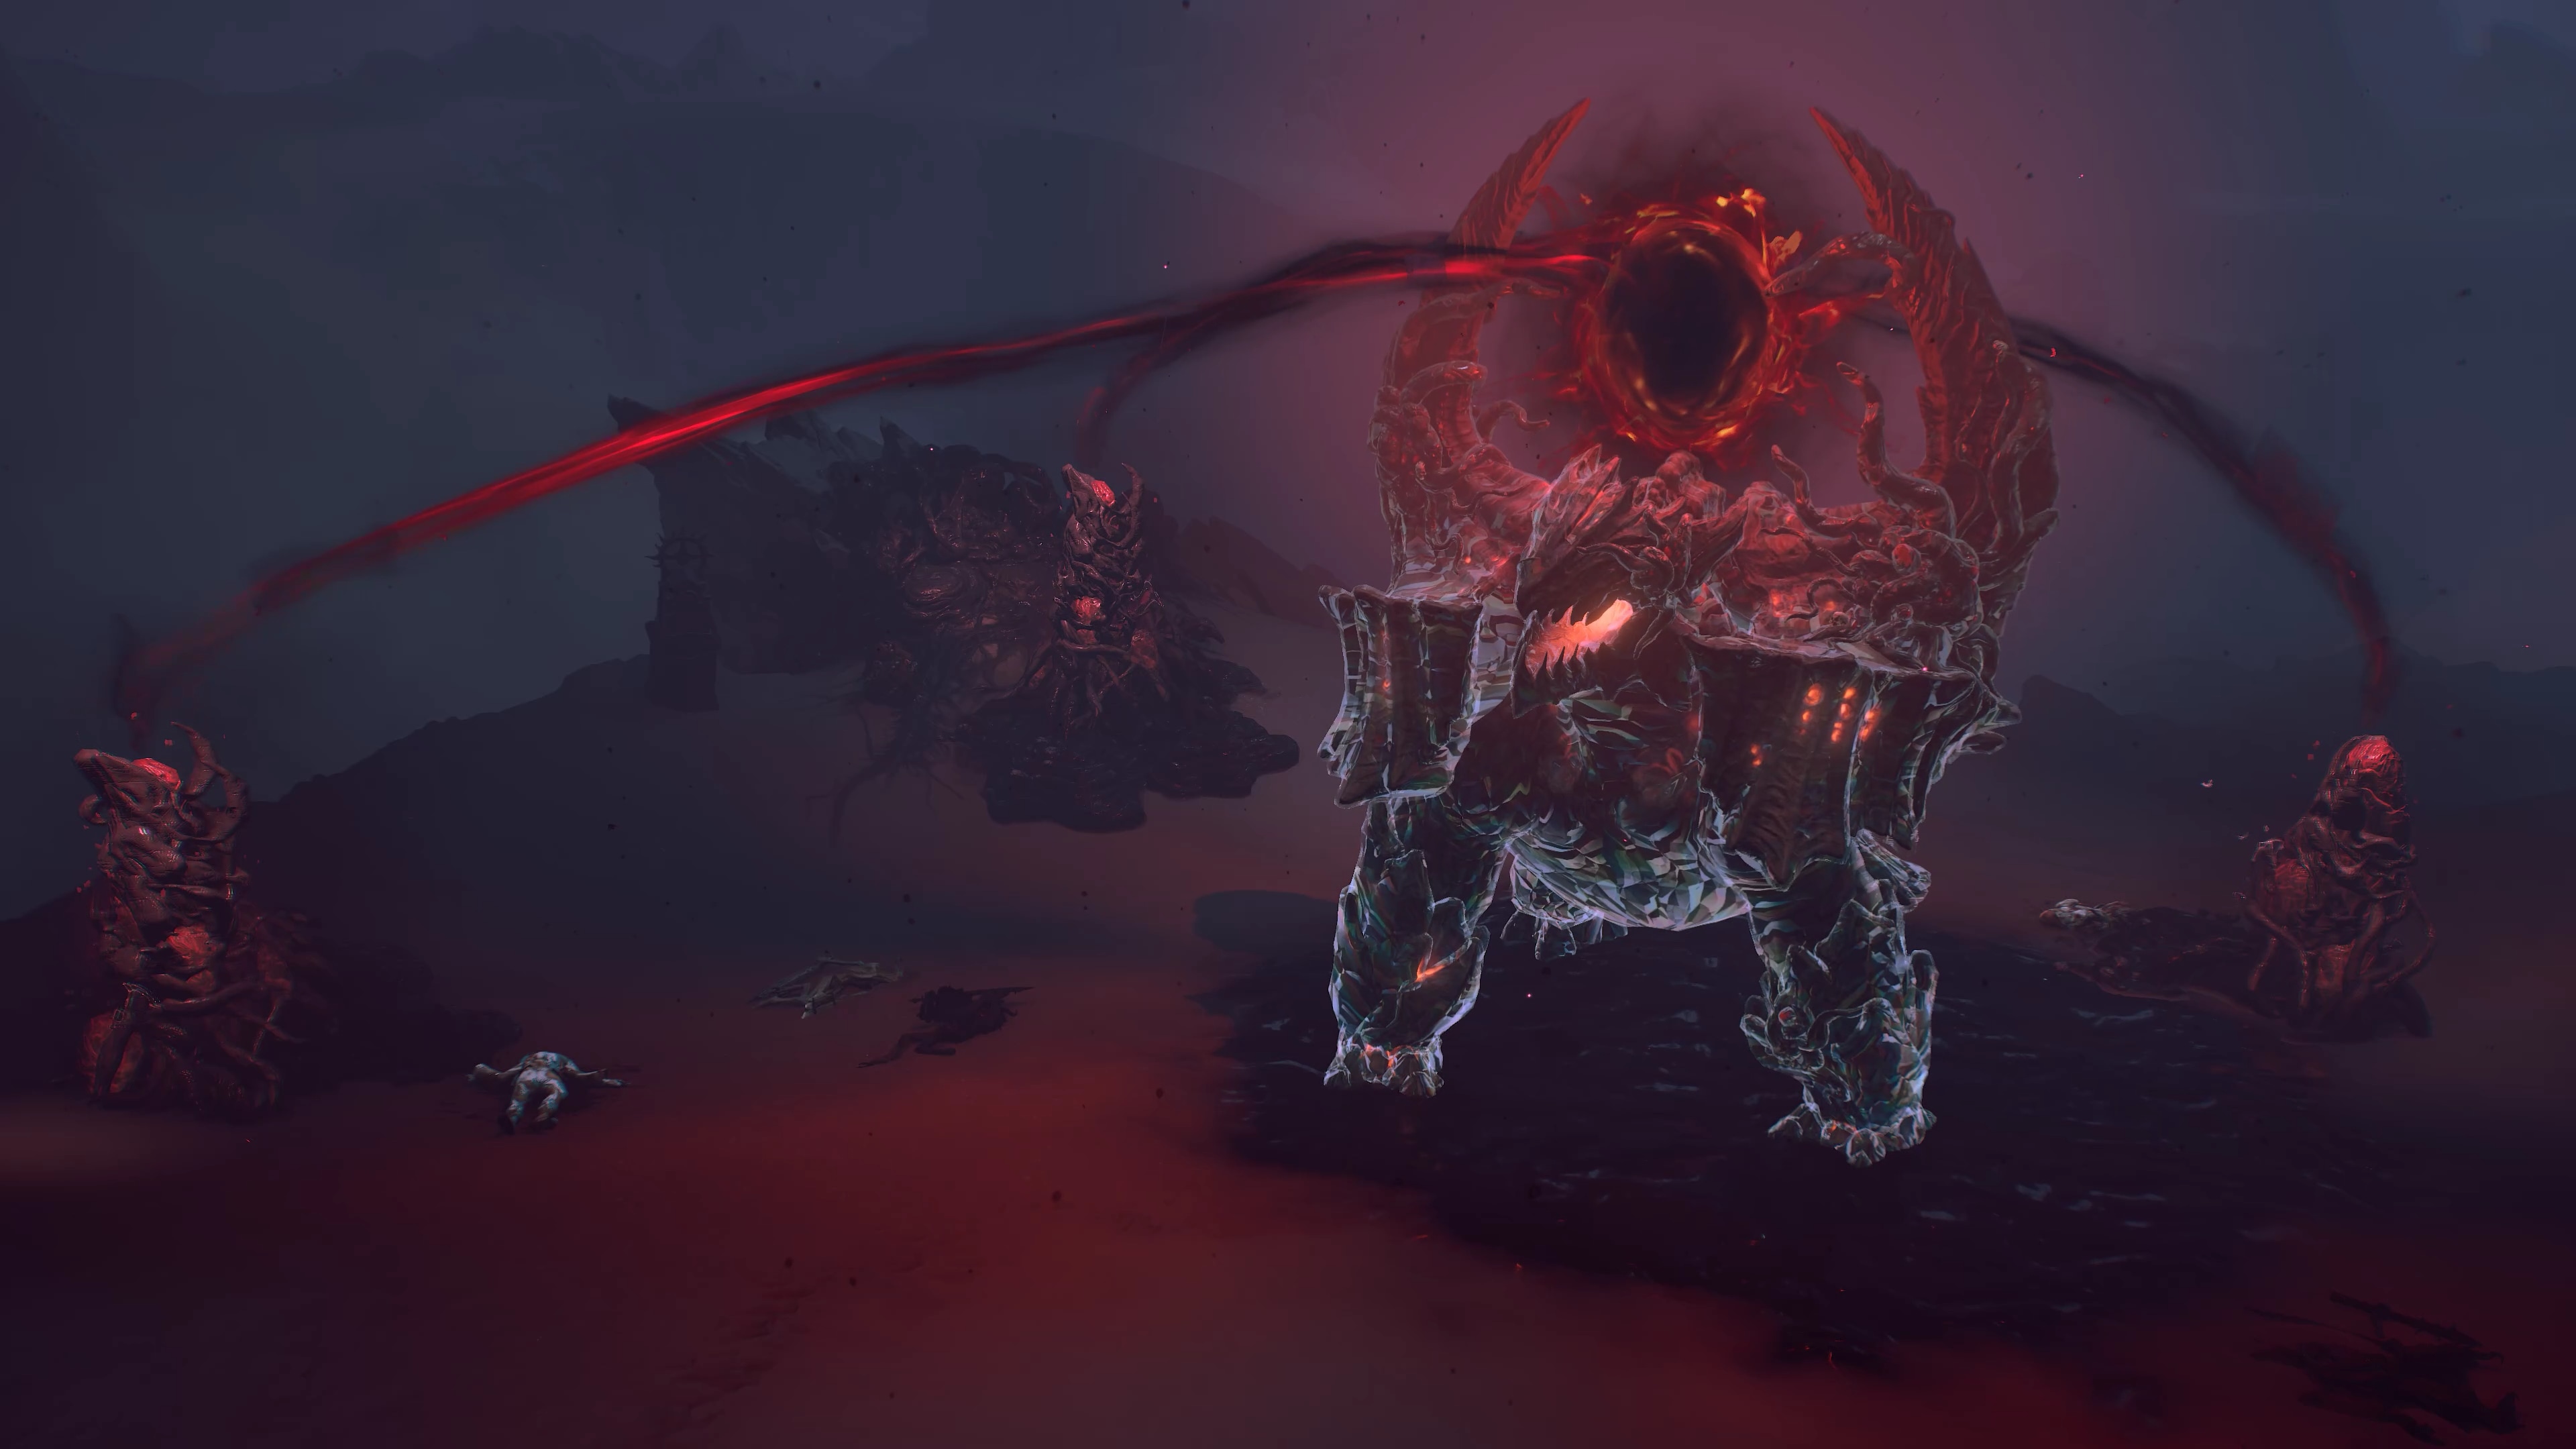
Once the Hatred Spires have fallen, you can finish the job. Put the demonic behemoth to rest! After the beast has fallen and glory claimed in your name, the truest test of your mettle begins: you may now enter the portal it leaves behind.
Realmwalker Spawn Schedule
Throughout Estuar, the continent home to the 5 Regions of Diablo IV’s base game, a Realmwalker will spawn in a Region every 15 minutes, rotating locations each time. Once an hour, a second Realmwalker will appear in Nahantu in addition to being somewhere in Estuar.
The Tree of Whispers demands the power of the Realmwalkers! The first Realmwalker of every hour spawned in Estuar will be a Whisper. Every 3 hours, the Realmwalker spawned in Nahantu will be a Whisper.
March Boldly into Uncertainty—Seething Realm
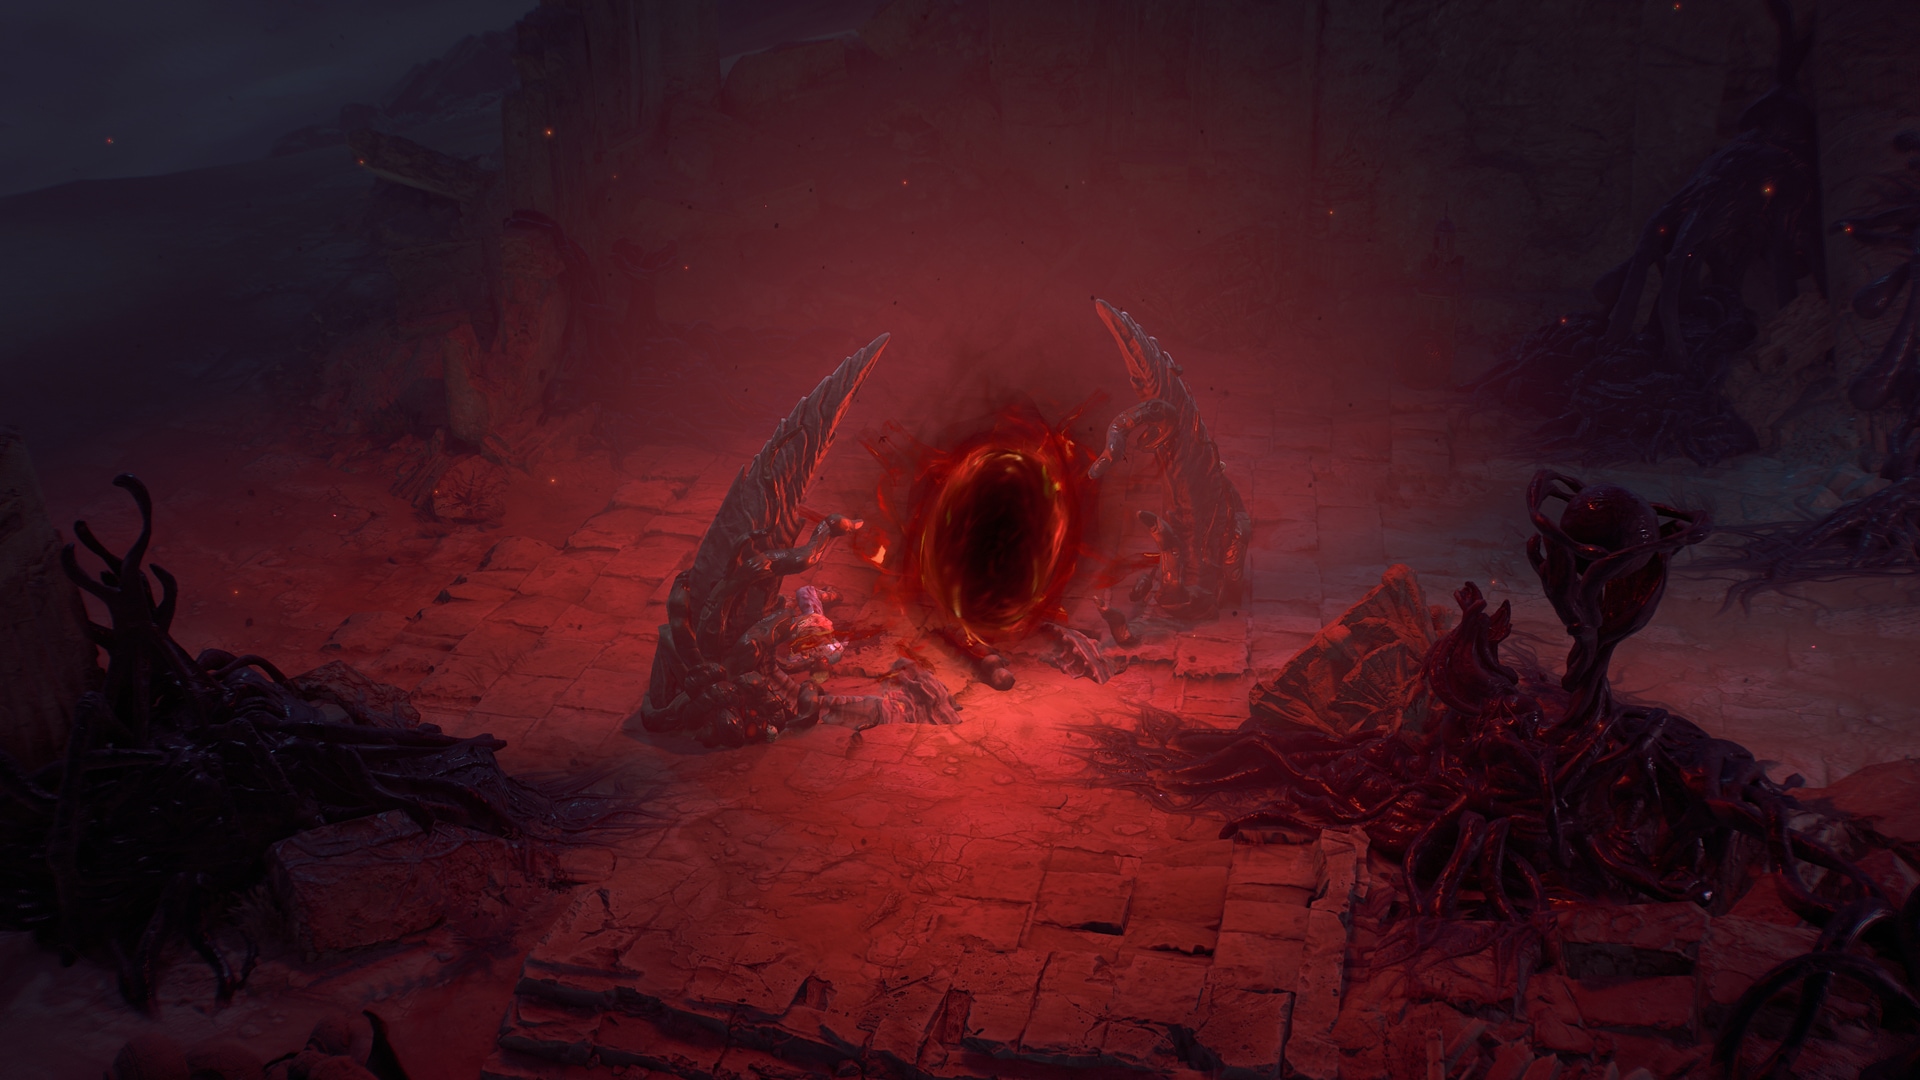
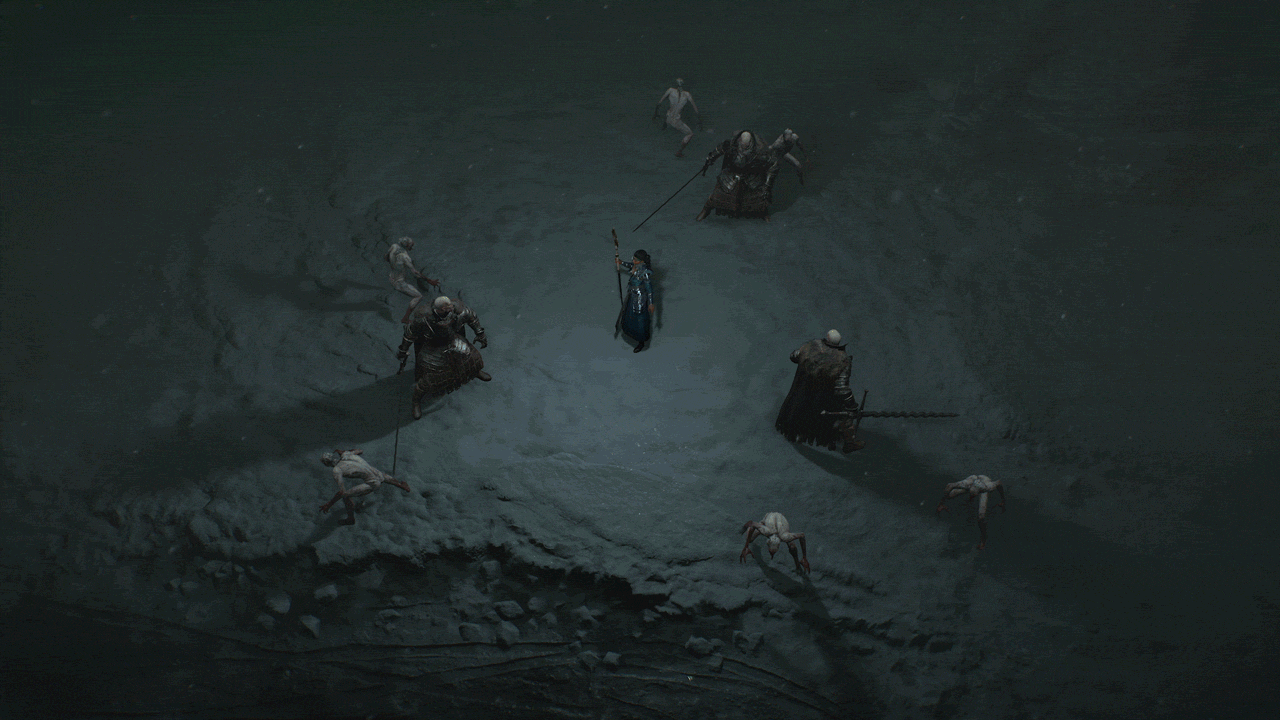
One bitter challenge breeds a new one: a Seething Realm. The Realmwalker’s defeat has left a crimson portal at your feet. You must venture forth to put an end to this ploy of Mephisto’s. The air inside the dungeon might feel still, but a fast-approaching chorus of footsteps suggests otherwise.
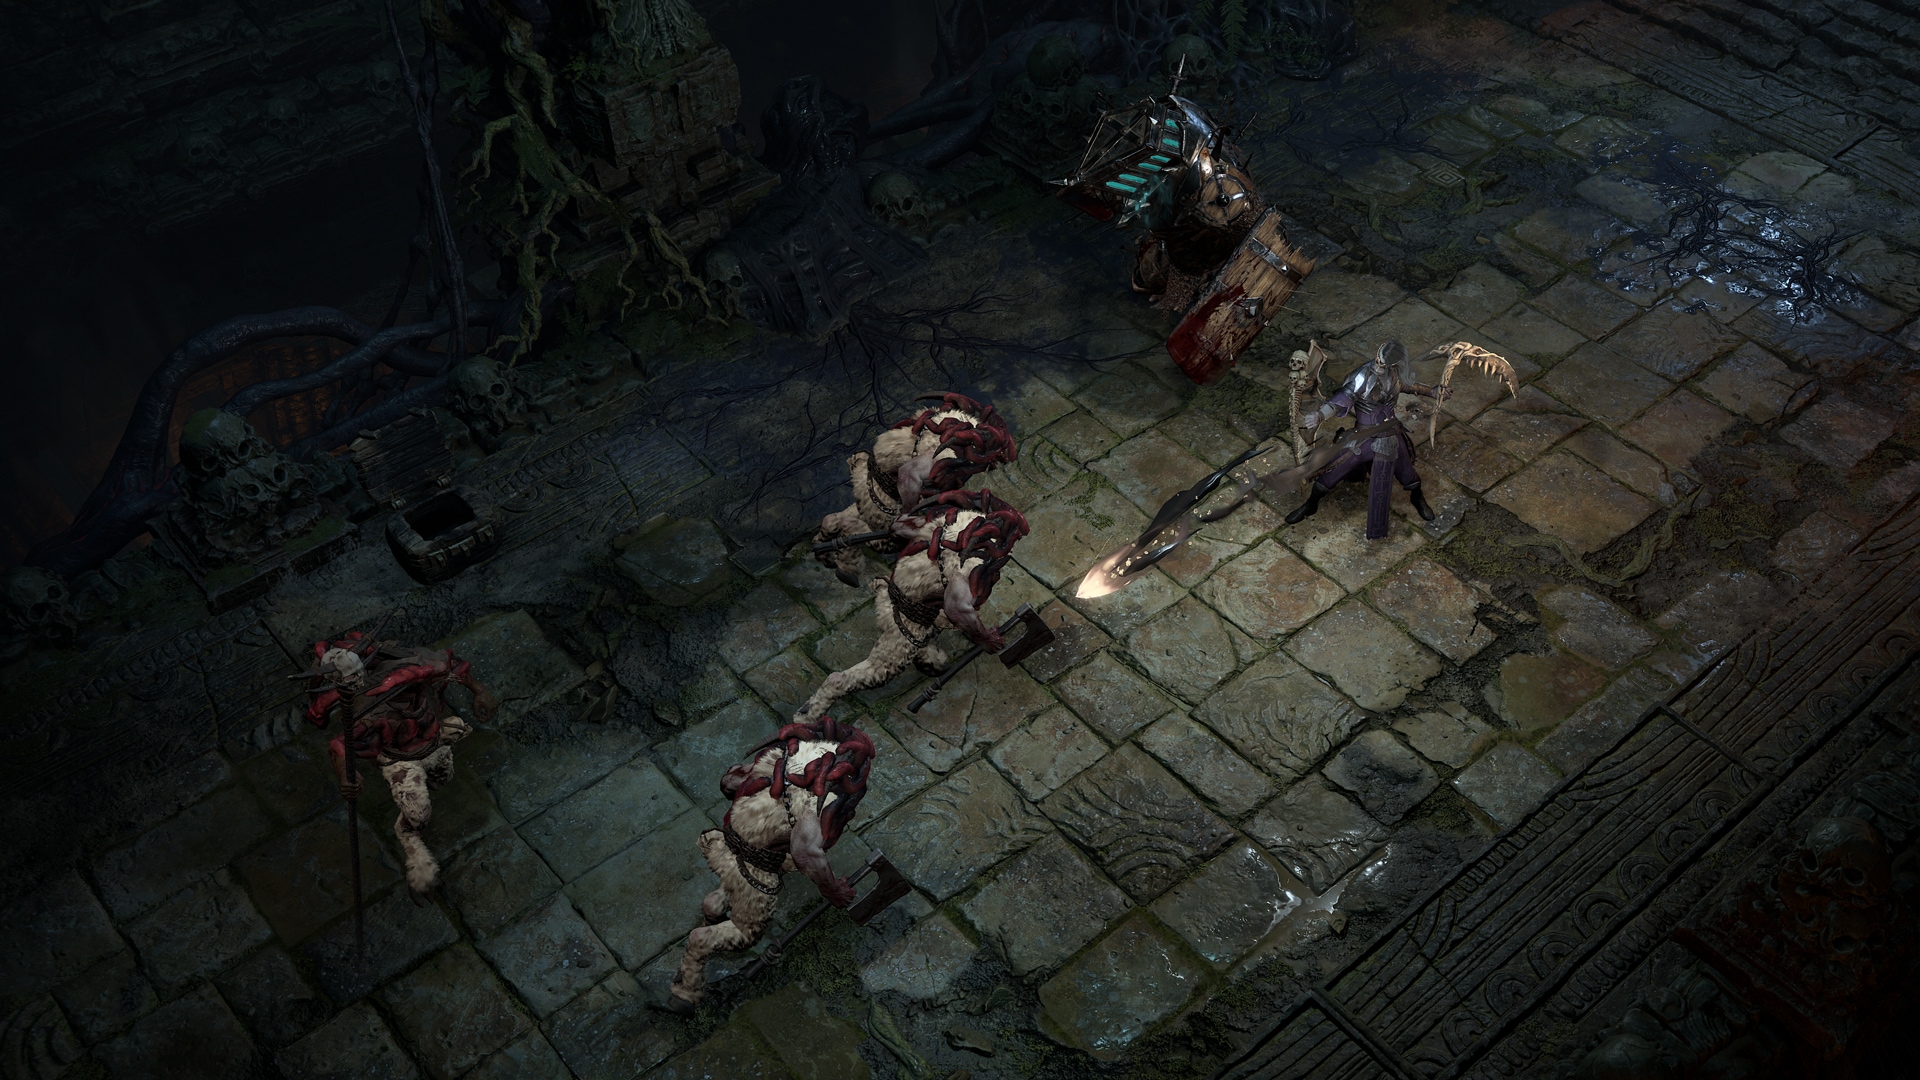
Seething Realms are dungeons rife with ranks of monsters to slay and treasure to claim. You’ll need to carve a path through the dungeon to locate the Realm Gate. Once there, you’ll be presented with a choice to offer up certain materials. Select the Seething Opal you wish to receive as your reward upon completing the rest of the Seething Realm dungeon.
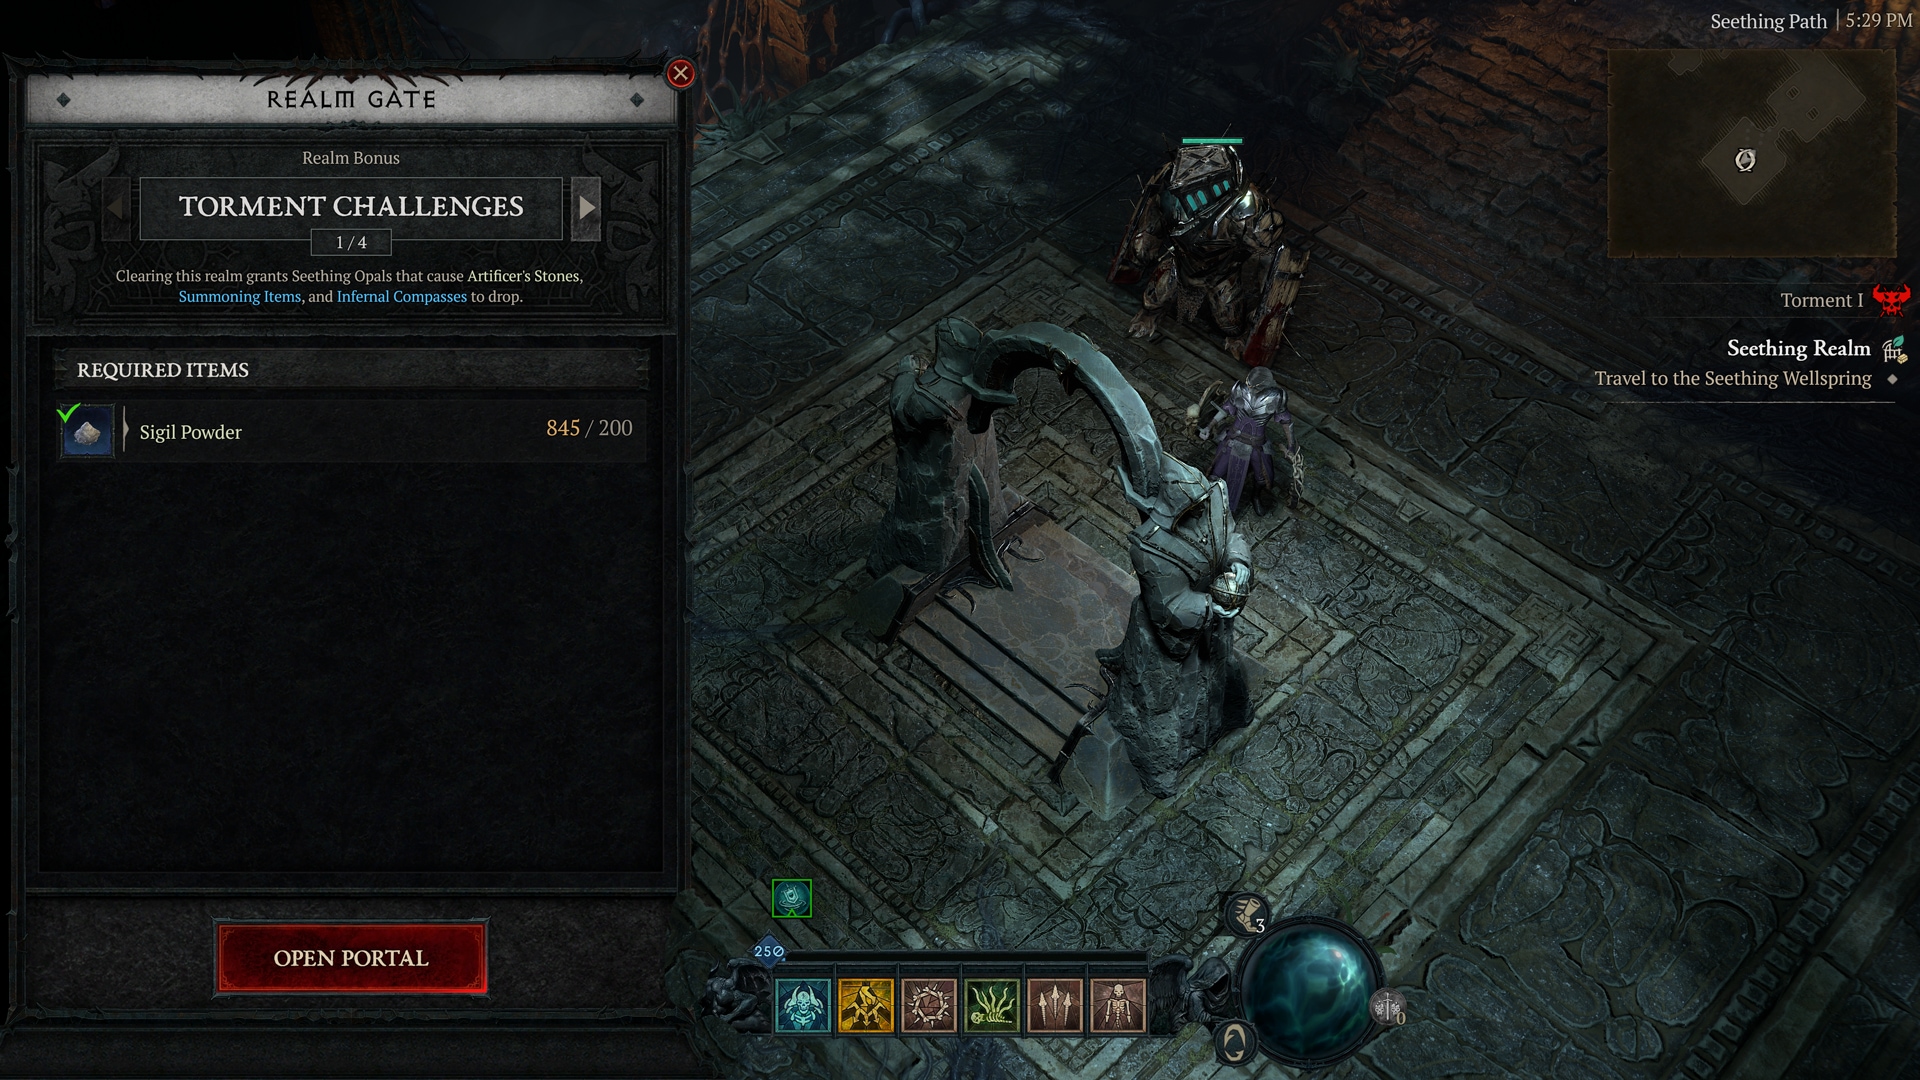
Power Born from Hatred: Seething Opals
Seething Opals are a new type of Elixir that provides you with a 15% experience increase and other bonuses for 30 minutes at a time. There are 5 Seething Opals in total. Note that the Seething Opal of Torment can only be acquired while you’re playing on Torment Difficulty I or higher. The material cost to select them as your reward at the Realm Gate and full effects can be seen below.
- Seething Opal of Equipment: 25 Murmuring Obols
- Seething Opal of Materials: 5 Murmuring Obols
- Seething Opal of Torment Challenges: 200 Sigil Powder
- Seething Opal of Gold: 1 Iron Chunk
- Seething Opal of Socketables: 3 Angelbreath
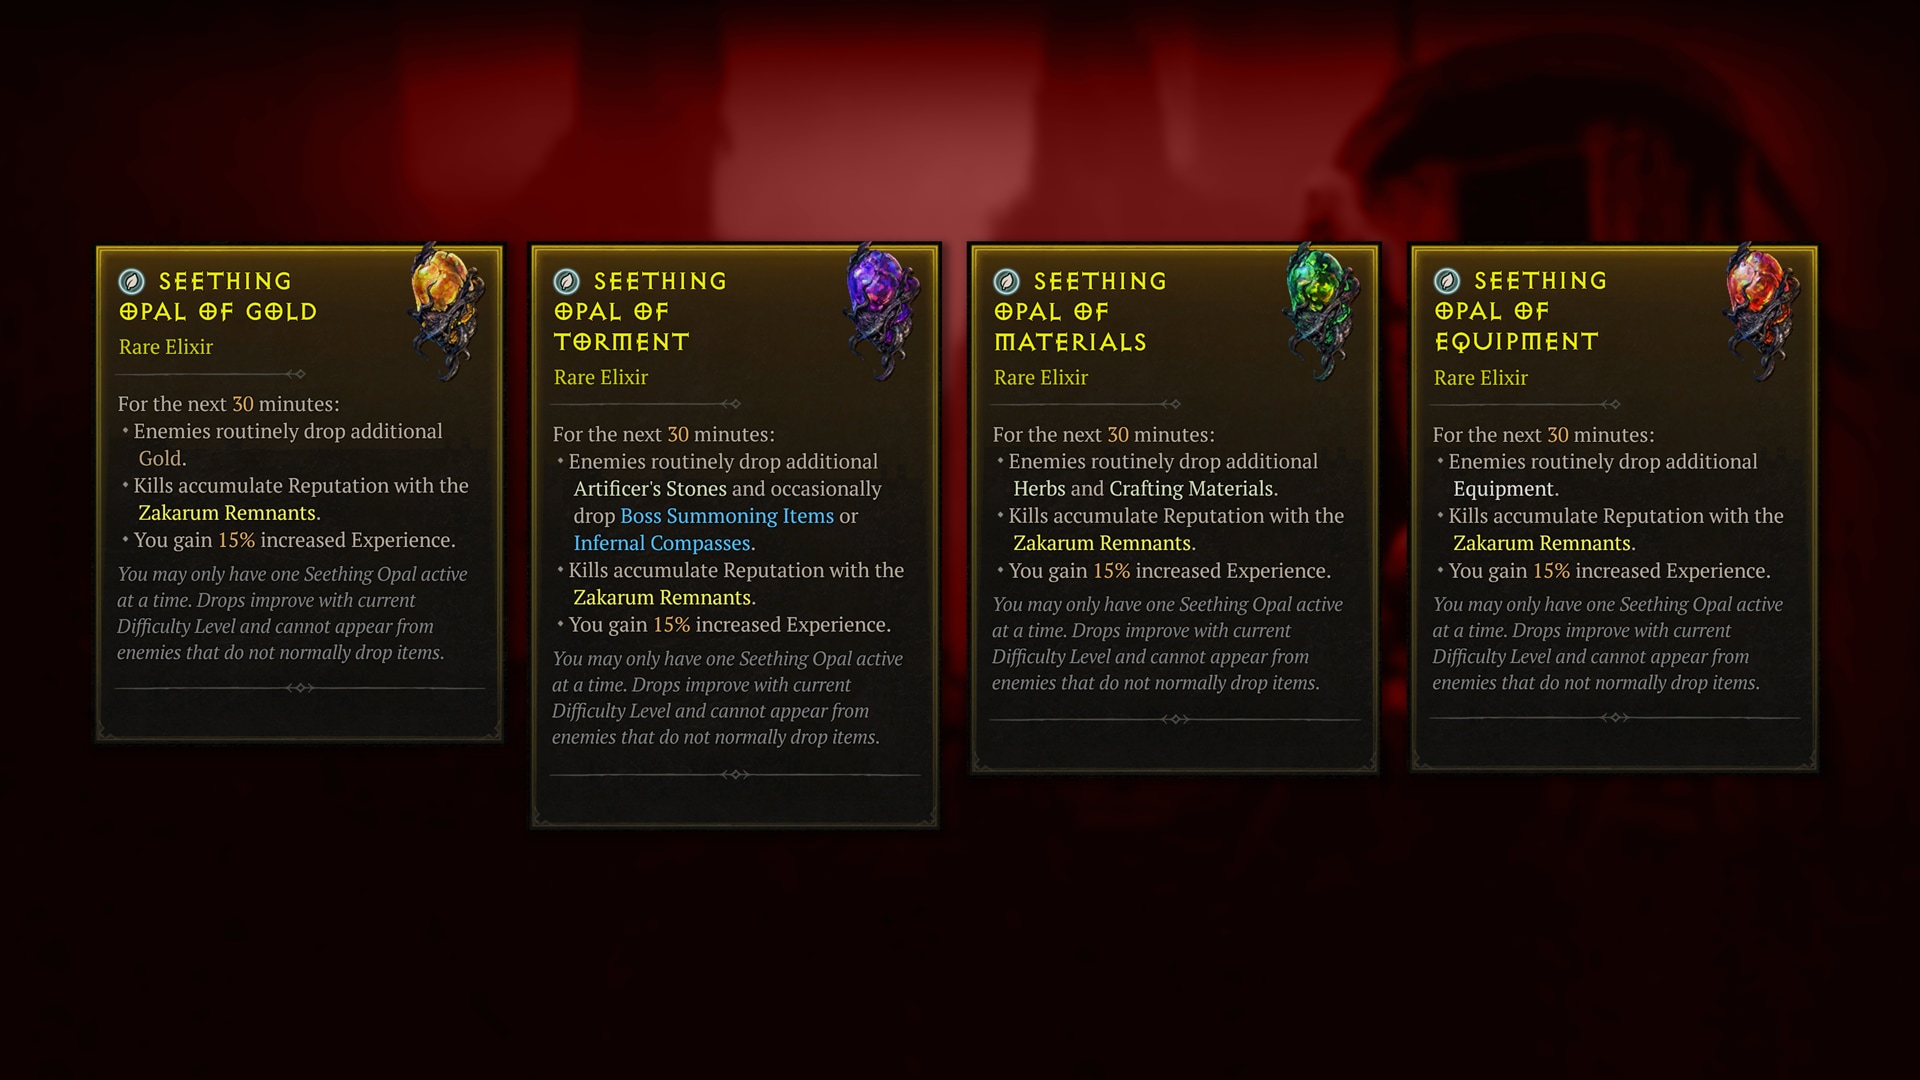
The Seething Opal of Socketables cannot be acquired unless you own the Vessel of Hatred expansion and are playing on Penitent Difficulty or higher in a Nahantu-based Seething Realm dungeon.

Bolster the Zakarum Remnants in a New Quest

After a failed attempt to locate Akarat’s tomb, the surviving Zakarum Remnants licked their wounds in Hawezar. Directionless, they searched for meaning and a use for the stockpile of equipment lying in their armory. The appearance of Realwalkers through Mephisto’s hatred has provided the Remnants with renewed purpose and a target to strike against. Lend the order a hand in protecting Sanctuary!
Visit Crusader Damond in Zarbinzet, Hawezar to begin the Creeping Hatred quest, where you’ll learn how to annihilate Realmwalkers and harness the arcane power of the Seething Realms to acquire useful Seething Opals. You must either complete the final quest in the base game’s campaign—Legacy of the Horadrim—or opt to skip the base game’s main questline to embark on Damond’s quest.
Earn Riches with Reputation
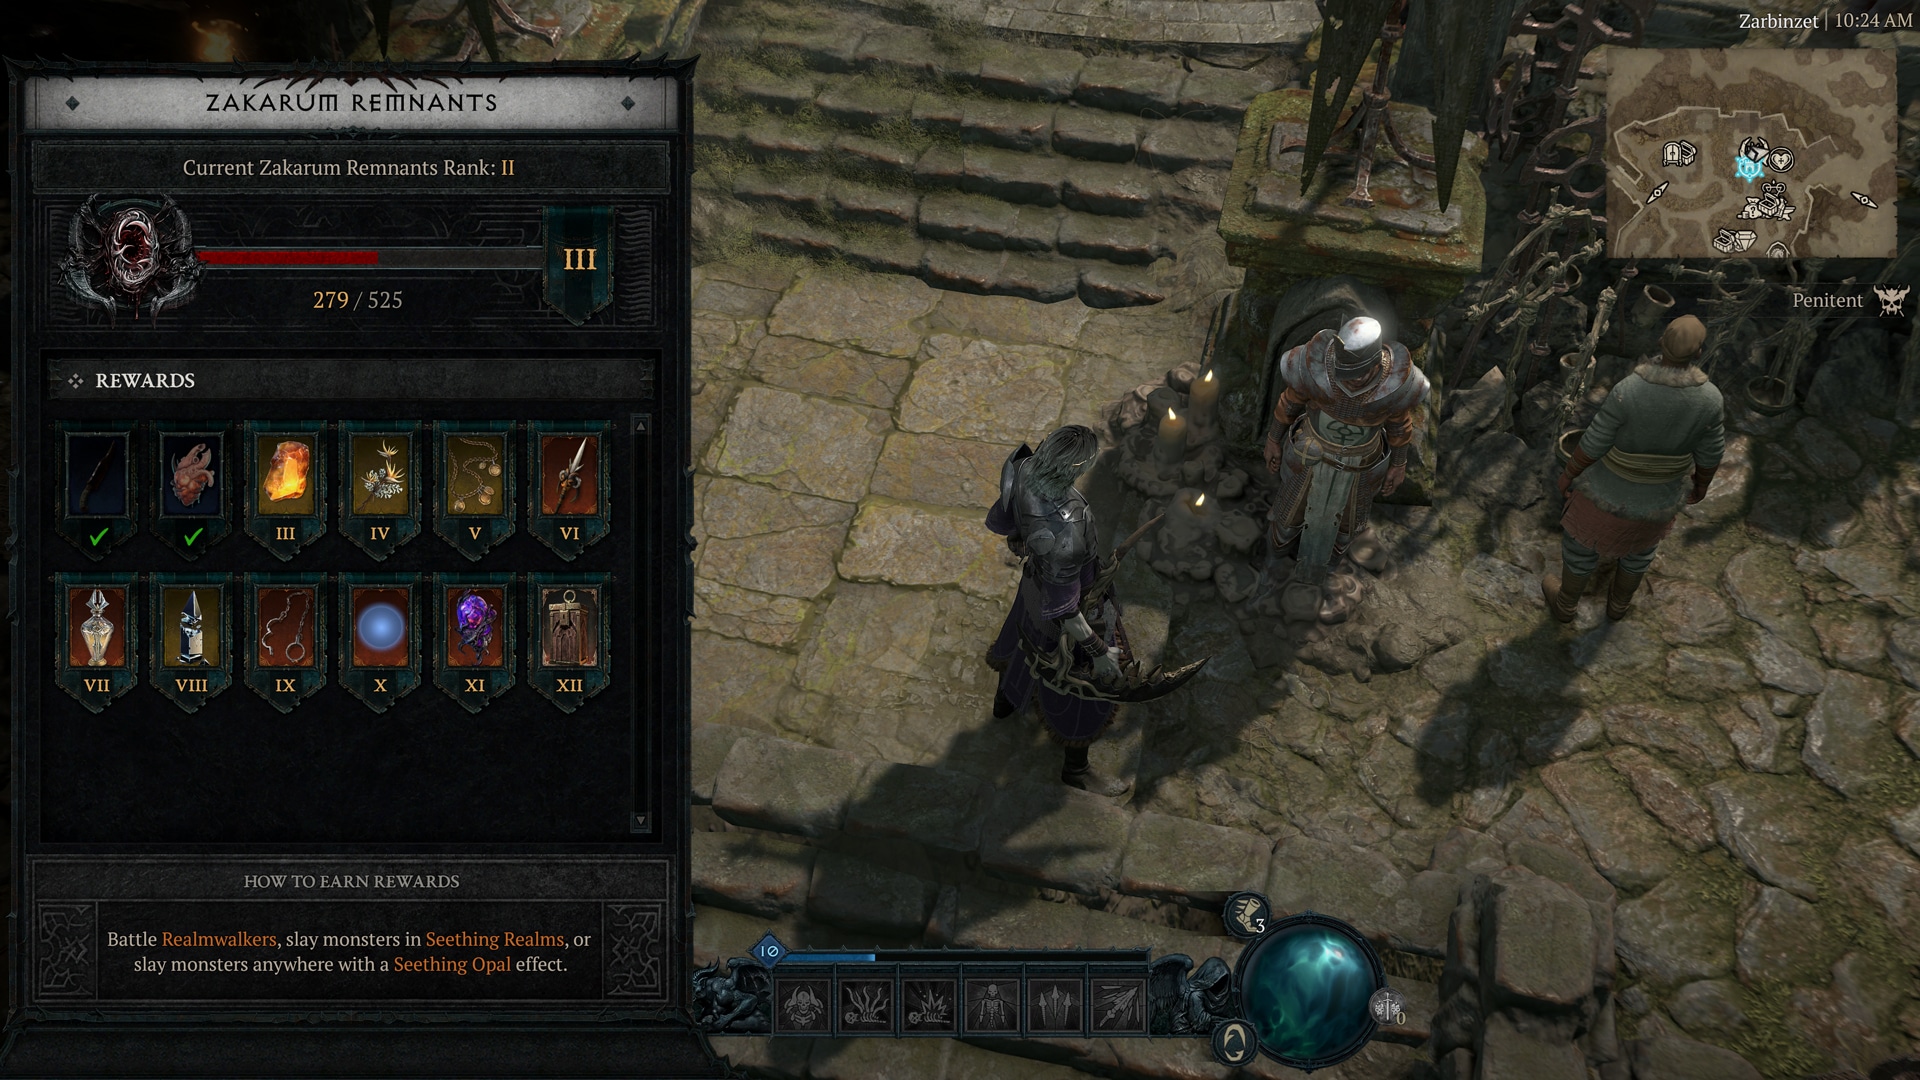
It may not be Akarat’s tomb, but the Remnants have unearthed components to aid in the conflict against the Burning Hells. They’ll happily grant you these curios as a reward for extinguishing Realmwalkers, completing Seething Realms, and carving through monsters anywhere while you have an active Seething Opal effect.
Major Progression Updates
Why Make Systemic Changes?
Developer’s Note: Our original vision for character progression was that you would have a grand journey traversing through World Tiers and swapping out gear, gaining incremental strength through the Paragon system. While that is fun the first time, on repeated play throughs, World Tier III and Sacred items can add a lot of stat bloat that takes away from the experience.
Since launch we’ve added endgame features like Infernal Hordes and The Pit of the Artificer. Vessel of Hatred will expand the endgame line up even further, adding Dark Citadel and Undercity to the mix. Our hope is that these new systemic changes allow for new characters to reach the endgame faster through an enriched leveling system.
Leveling Adjustments
The way Paragon Points function has been adjusted. Going forward, earned Paragon Points will now be tied to Realm versus Character Level. This means that all Paragon Levels earned will be shared across all your characters on the same Realm (Seasonal or Eternal) and mode (Standard or Hardcore), in their respective partitions. To support this shift, we’ve made a variety of alterations to the leveling journey, other stats, and monster levels. Numbers and values are also easier to understand.
Paragon and Character Level Split
Paragon and character levels are now split out, with Levels 1–60 representing character level. This means you can earn an additional 10 Skill Points, along with 10 more levels, opening additional avenues of character customization. Starting at Level 60, players will begin to earn Paragon Levels which can be used to unlock Paragon Nodes.
Existing Characters above Level 50 will have all their experience-based Paragon Points converted to a Paragon Level. To make the journey to max level and beyond more impactful, we are building out the levels across the two paths, character level and paragon. For example:
- If your character is Level 100 currently, once these changes go into effect, your character level will be adjusted to 50, and all 200 Paragon Points your character has earned with be converted to Realm-wide Paragon Levels. If your character is Level 50 and below, nothing will change for them.
- At the end of a season, all the Paragon experience you earned during the season will be added to your Eternal Realm characters’ Paragon experience track.
Stat Adjustments
In addition to splitting out character and Paragon levels, we’ve revisited stats like Health, Armor, and Core Stats.
Developer’s Note: We’ve received player feedback that the numbers used to depict stats and damage have gotten out of control. We’ve adjusted stats in a way that makes the information more consumable. This change has no bearing on the strength of your character.
New Difficulties System
Standard Difficulties
Developer’s Note: Much of what drove these changes was noticing that it was more fun to be able to control your difficulty and reward pacing using Profane Mindcages and Tormented versions of bosses.
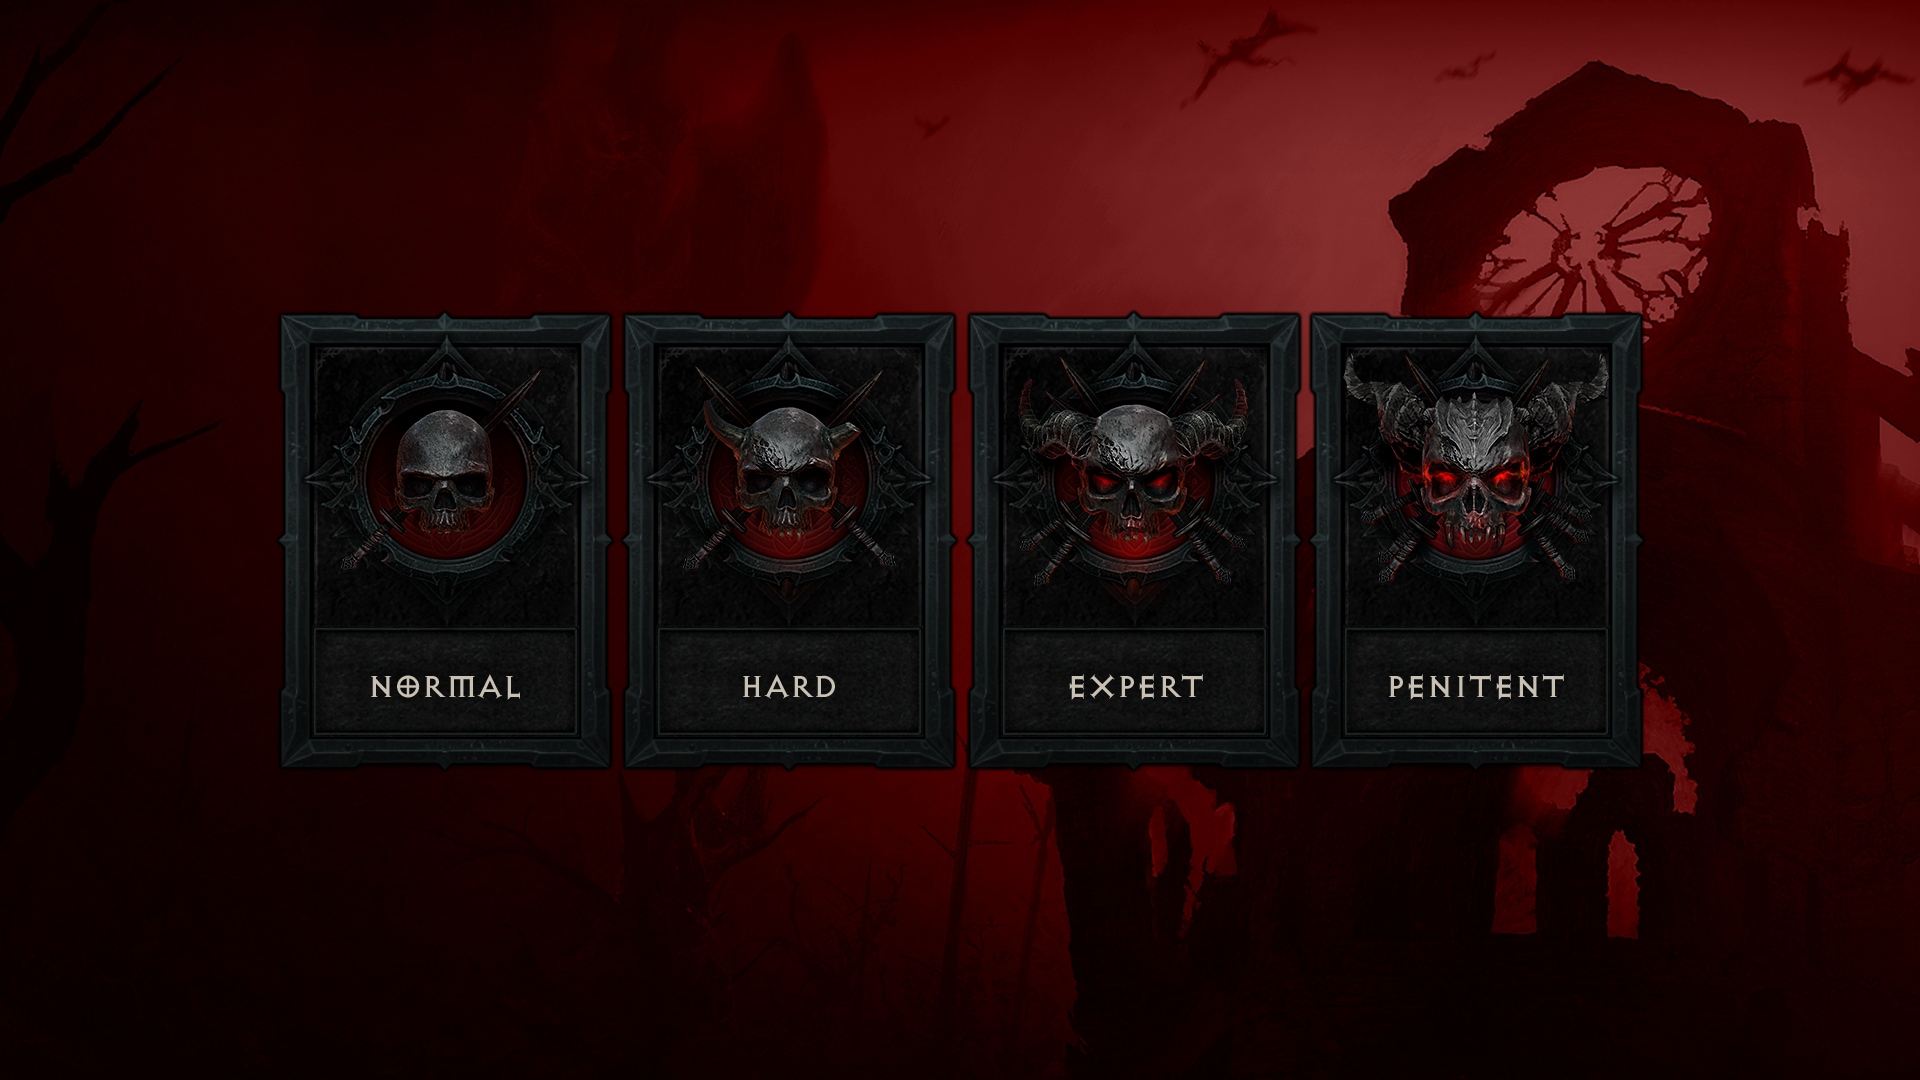
World Tiers have been changed to Difficulties, a new way to control your challenge and reward. The first 4 Difficulties—known as Standard Difficulties—are Normal, Hard, Expert, and Penitent. The purpose of Standard Difficulties tiers is to grow your character while you strive to hit character Level 60, the new maximum.
- Normal is a slower-paced mode suited for those looking for a lighter challenge.
- Hard and Expert offer an increased challenge for those looking to test their mettle and play at a faster pace.
- Penitent isn’t for the faint of heart. Those looking to pave a path to the new Torment Difficulties will face off against heightened danger. Play at your own peril!
As you ramp up in Difficulty, the amount of Gold and experience you earn will rise too. Here’s how to unlock each Difficulty:
- Normal and Hard are unlocked by default.
- Expert is unlocked after completing Diablo IV’s prologue.
- Penitent is unlocked upon completing the final quest in the base game’s campaign—Legacy of the Horadrim—or by opting to skip the base game’s main questline.
Your Gateway to Hell: Torment Difficulties
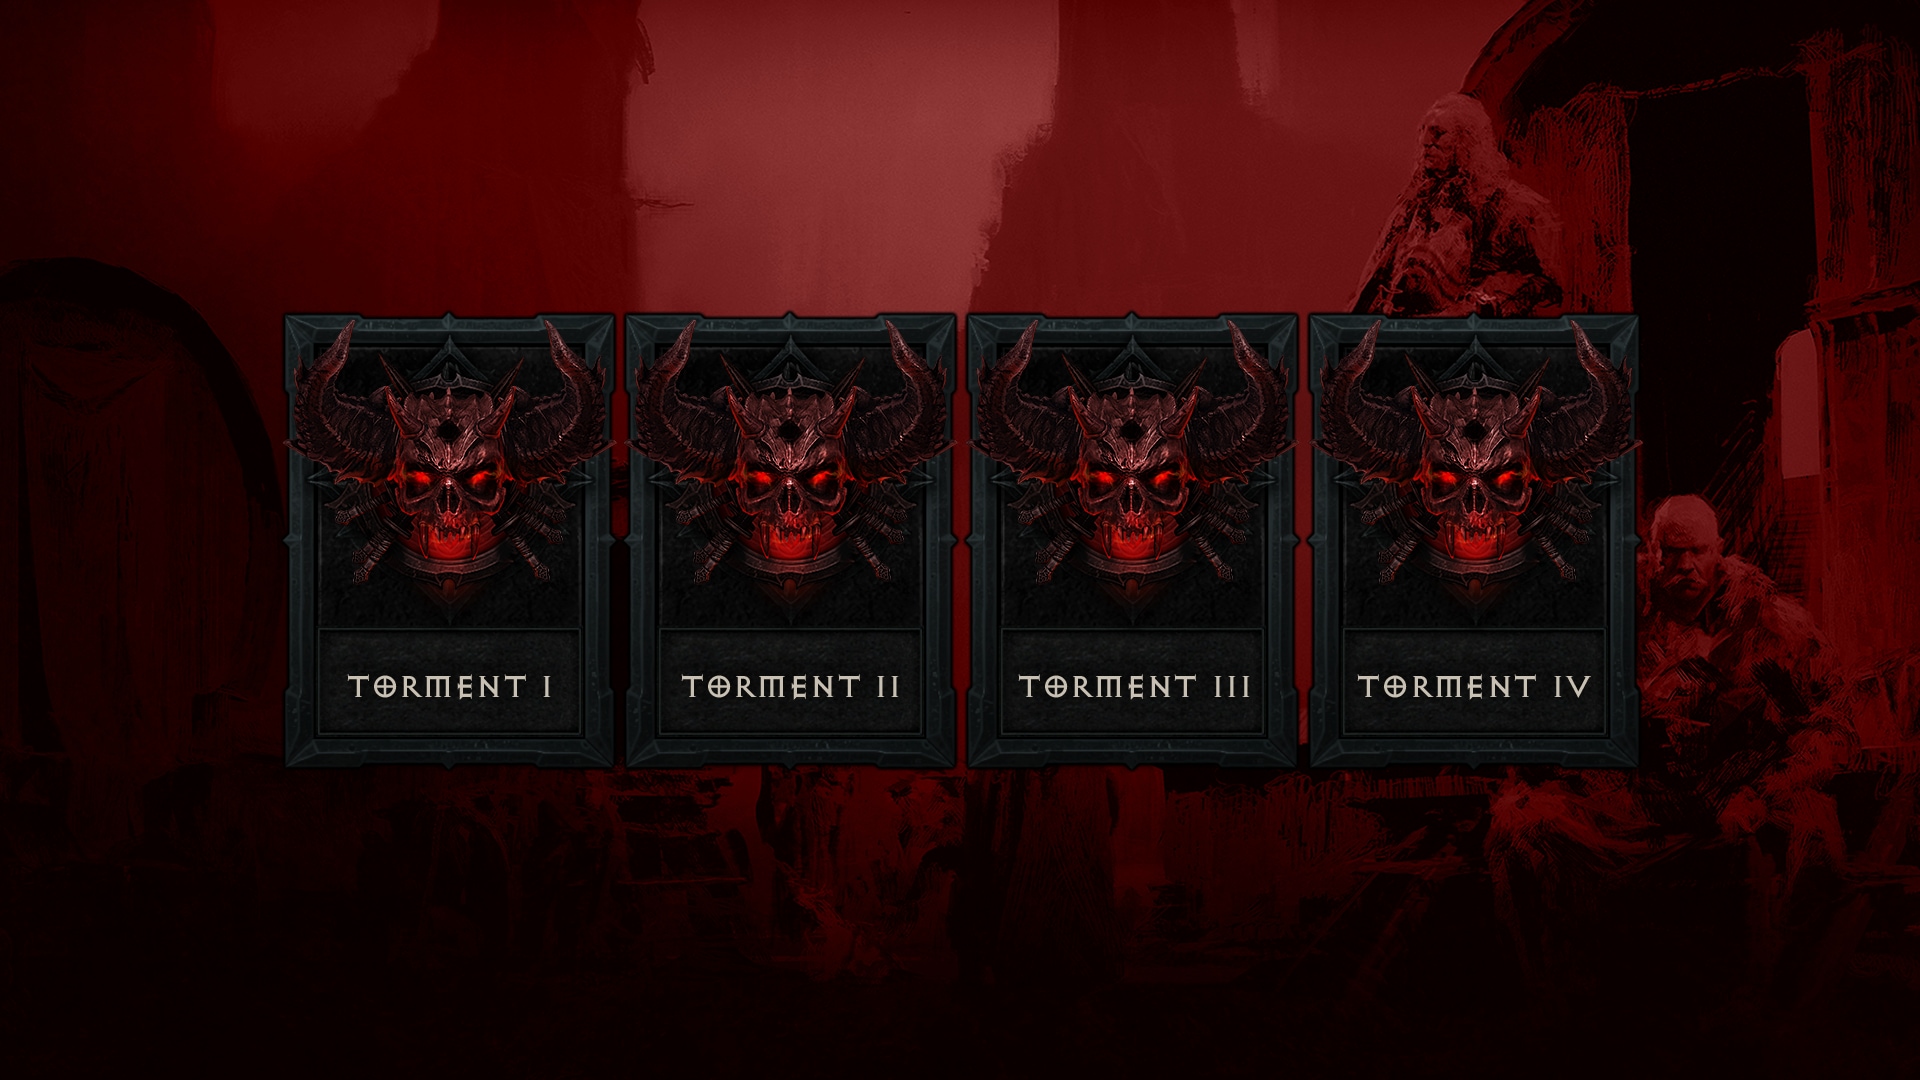
Making it to the new Torment Difficulties is the mark of a veteran warrior—this is where the endgame truly begins. Your ability, to progress through Torment Difficulties is directly linked to the Pit. As you strive to reach higher Pit Tiers, the Torment Difficulty you have access to will also increase. The higher the Torment Difficulty, the more likely you are to encounter Legendary and Ancestral item drops. Here’s the breakdown of how to unlock each Torment Difficulty:
- Reaching Level 60 unlocks the Pit and Tiers 1–20 of it. Beating Pit Tier 20 unlocks Torment Tier I.
- Beating Pit Tier 35 unlocks Torment II.
- Beating Pit Tier 50 unlocks Torment III.
- Beating Pit 65 unlocks Torment IV.
As if danger wasn’t abundant enough in Sanctuary, Torment Difficulties foster a new hazard: Curses. While playing in Torment Difficulties, your armor and Resistances are reduced as follows:
- Torment I: -250 Armor and -25% All Resist
- Torment II: -500 Armor and -50% All Resist
- Torment III: -750 Armor and -75% All Resist
- Torment IV: -1000 Armor and -100% All Resist
By adding more Difficulties and separating them out in this way, players now have increased choice in how they engage with the risk and reward style of Diablo IV going forward.
Monster Levels
Monsters will no longer have their level displayed and will scale to the Difficulty you’re playing on.
Developer’s Note: We received feedback about level scaling resulting in feeling weak. By removing monster levels entirely and leaning into Difficulty, you now have the freedom to more precisely choose your challenge level.
Paragon Updates
Masterworking Materials
Obducite will be the only Masterworking material going forward. Ingolith and Neathiron have been removed. Obducite will no longer drop in the Pit, and instead only drops in Nightmare Dungeons, Infernal Hordes, and Vessel of Hatred’s Undercity. Ingolith and Neathiron will remain in your materials tab and can be transmuted into Obducite at The Alchemist.
Developer’s Note: Constantly needing to transmute Masterworking materials between 3 different rarities felt like a chore, so we’ve consolidated them into 1 unified material.
We also received feedback that Nightmare Dungeons were tedious to run, as most of the reward was baked into finishing the Dungeon. This made speed the only metric used to measure success. By replacing the Nightmare Dungeon’s primary reward with something grindable like Obducite, every part of the Dungeon now provides a meaningful reward. From events to elite packs to bosses, everything has the chance to drop Obducite.
Glyphs
Developer’s Note: We received feedback that the Pit rewards were feeling lackluster. We wanted to make the action of upgrading Glyphs more satisfying, while simultaneously offering better rewards for pushing deep into the Pit. Our desire was to give Glyphs more power, but the Glyph upgrading experience system did not scale well and was needlessly grindy. So we moved Paragon Glyph upgrading out of Nightmare Dungeons and into the Pit, and redesigned the system to give more control over how quickly Glyphs can be upgraded.
Glyphs have undergone a metamorphosis to better meld with the other changes we’ve made.
- Upgrading a Glyph is no longer driven by experience. Instead, you’re given attempts to increase your Glyph’s Rank by completing Pit Tiers.
- Three attempts to upgrade your Glyph’s Rank are rewarded for successfully completing the Artificer’s Mastery, and a bonus attempt for not dying.
- Each upgrade attempt can be used to increase any Glyph that isn’t already at max level. The chance to upgrade your Glyph is based on the level of the Glyph and the Tier of the Pit you complete. For example, completing a Pit Tier that is 10 higher than your Glyph’s Rank guarantees an upgrade Rank.
- Completing a Pit Tier that is significantly higher than your Glyph’s current Rank grants bonus upgrade ranks per attempt.
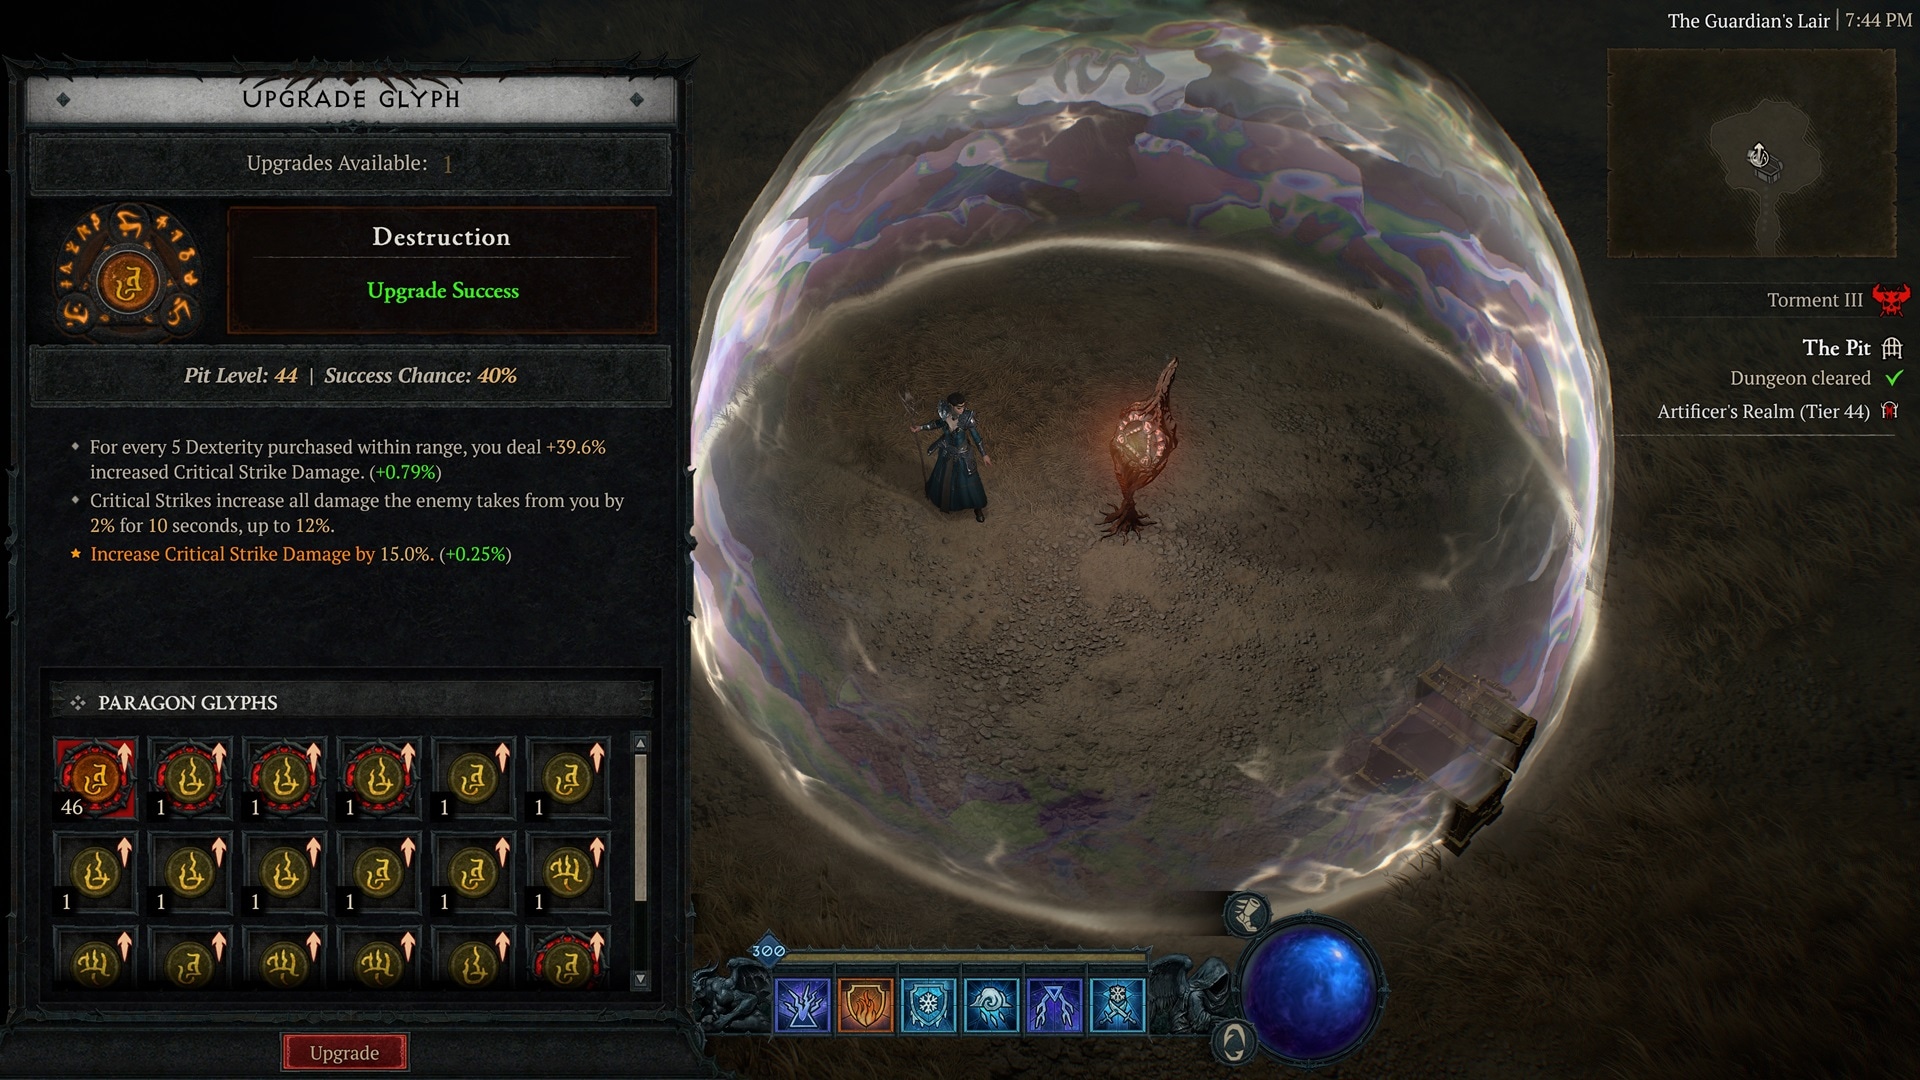
Every 20-level difference between the completed Pit Tier and Glyph Rank grants a bonus upgrade per attempt. Here’s an example of this system in action:
Three deathless Pit Tier 30 runs would take a Glyph all the way up to Rank 19, rapidly unlocking the additional Radius Size increase:
First Pit Run
- Attempt 1: Glyph Rank increases from 1 to 3.
- Attempt 2: Glyph Rank increases from 3 to 5.
- Attempt 3: Glyph Rank increases from 5 to 7.
- Bonus Attempt 4: Glyph Rank increases from 7 to 9.
Second Pit Run
- Attempt 1: Glyph Rank increases from 9 to 11.
- Attempt 2: Glyph Rank increases from 11 to 12.
- Attempt 3: Glyph Rank increases from 12 to 13.
- Bonus Attempt 4: Glyph Rank increases from 13 to 14.
Third Pit Run
- Attempt 1: Glyph Rank increases from 14 to 14 (Radius Size increase).
- Attempt 2: Glyph Rank increases from 15 to 16.
- Attempt 3: Glyph Rank increases from 16 to 17.
- Bonus Attempt 4: Glyph Rank increases from 17 to 18.
The maximum level of a Glyph has been increased from 21 to 100. At Level 45, a Rare Glyph can be upgraded to a Legendary Glyph using Gem Fragments with the following bonuses:
- The Glyph’s Radius Size has increased from 4 to 5.
- The Glyph gains an additional affix.
Paragon Boards
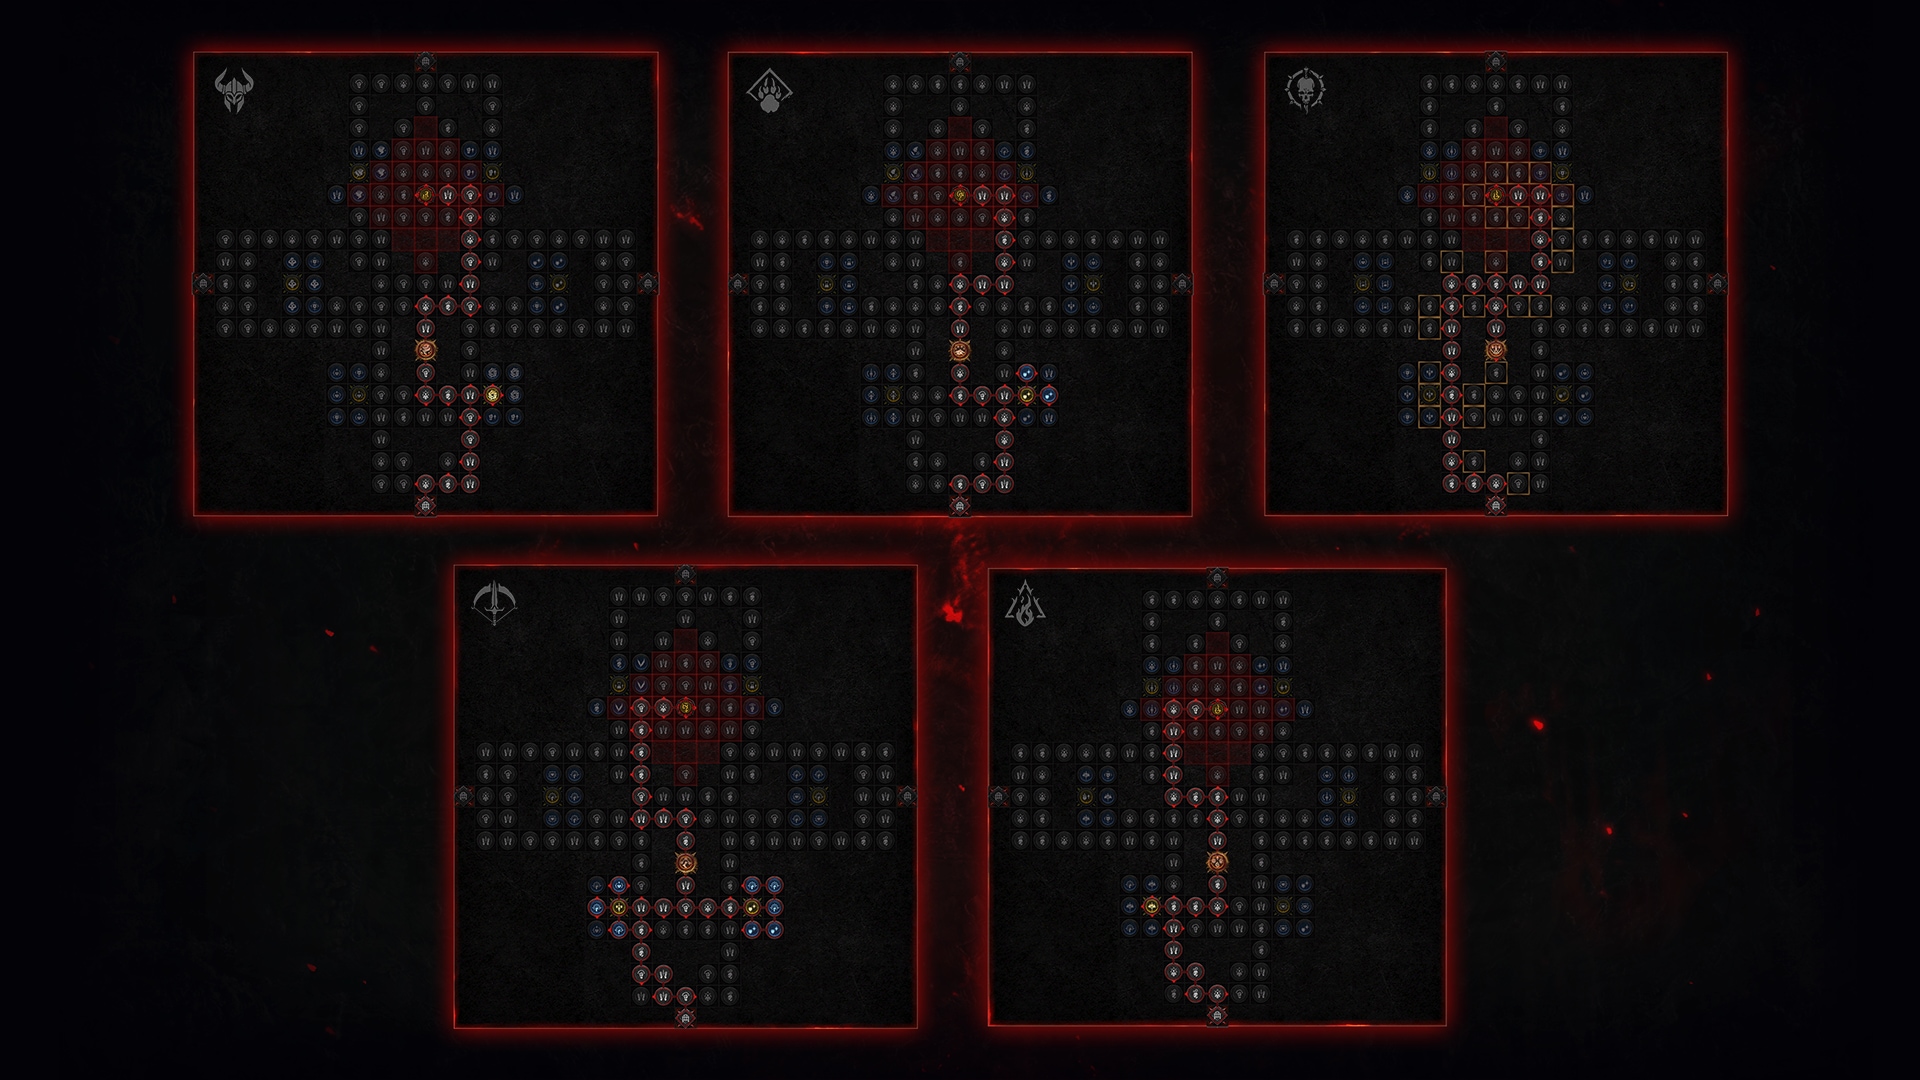
Each Class has received 1 new Paragon Board. These Paragon Boards each come with a new Legendary Node, and extra Normal nodes meant to enhance the Legendary Glyph’s range. Rare nodes have received adjustments as well, making them generally more useful. Additionally, only 5 Paragon Boards can be equipped, including your starting board.
Developer’s Note: With the introduction of so many new sources of power (namely Legendary Glyphs), we wanted the focus to be more on which board and glyphs you want. By limiting the number of boards, we can inject more power into choices made within the system.
The number of Paragon Points that can be earned by leveling has increased from 200 to 300.
Developer’s Note: We received feedback that while the faster levelling speed to get your build to late game was appreciated, the experience of killing monsters and completing activities at what was Level 100 under the old system felt flat due to a lack of experience gained.
We’re raising the amount of Paragon Levels you can earn. This change, paired with the Paragon Board limit, means that you’re able to fully realize your build at roughly Paragon Level 200. Additional points can be allocated to the remaining Magic, Rare, and Normal nodes that will help you hit bonus stat thresholds.
Limiting the number of Paragon Boards attached allows us to concentrate more of the power into the boards and Glyphs themselves. This puts more of the decision-making focus on boards and Glyphs that fit your build.
Item Quality Rework
Developer’s Note: We felt Sacred and Ancestral Items lost their specialness and flair due to how common they became. These changes transform Ancestral items into mighty endgame items worth the chase.
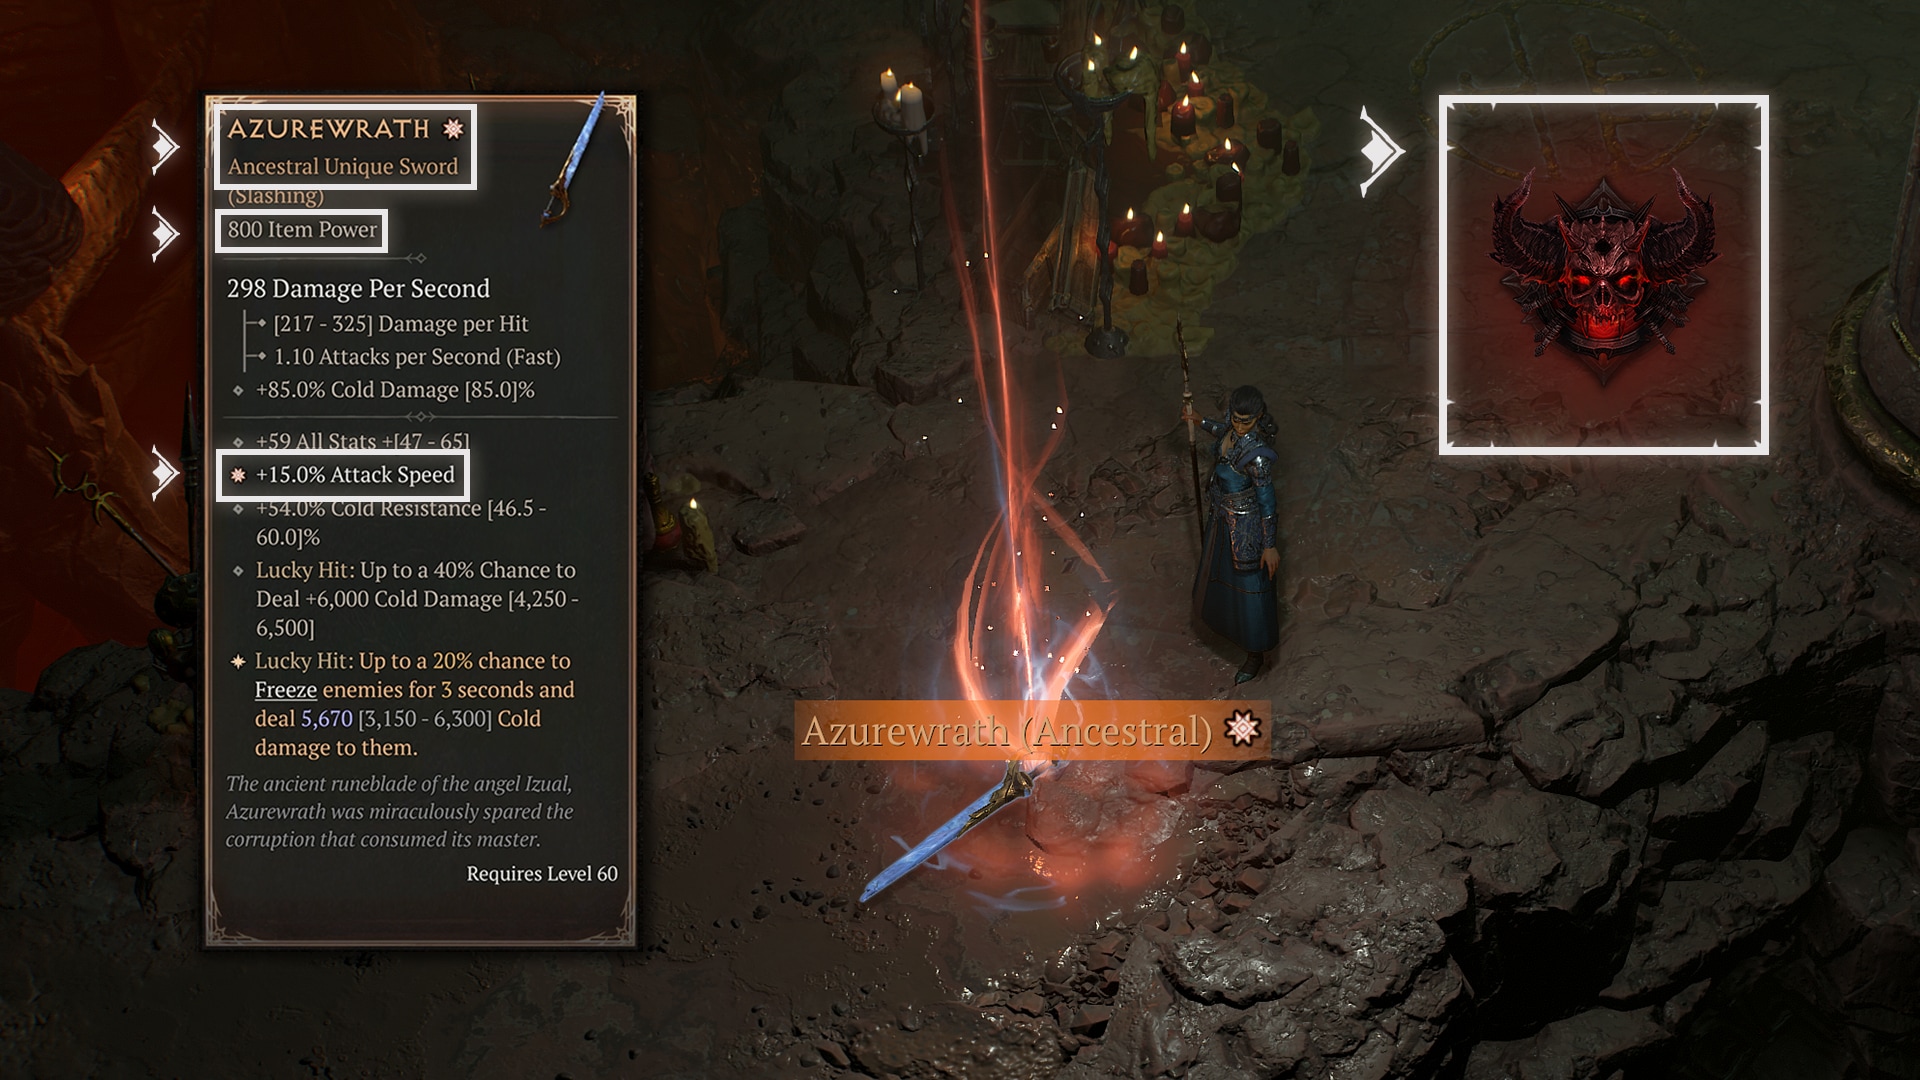
Ancestral Items
- Ancestral items start dropping in Torment 1.
- Ancestral items always drop at Item Power 800, the highest possible.
- Greater Affixes only appear on Ancestral items.
- Ancestral items always contain at least 1 Greater Affix.

General
- Sacred Items will no longer drop. Any Sacred Items you have on your character will be marked as ‘Legacy.’ They can continue to be used but cannot be upgraded.
- Non-Ancestral items are capped at Item Power 750. Legendary items dropped when you’re Level 60 will always be Item Power 750.
- Item Power 750 items can now be Masterworked up to 8 times.
- Because Character Levels are being re-adjusted in the new Realm-wide Paragon system, items with Item Power over 540 are being adjusted to 540. Affixes on these adjusted items will be rerolled at the highest values in their respective ranges.
Waypoint and Wardrobe Updates
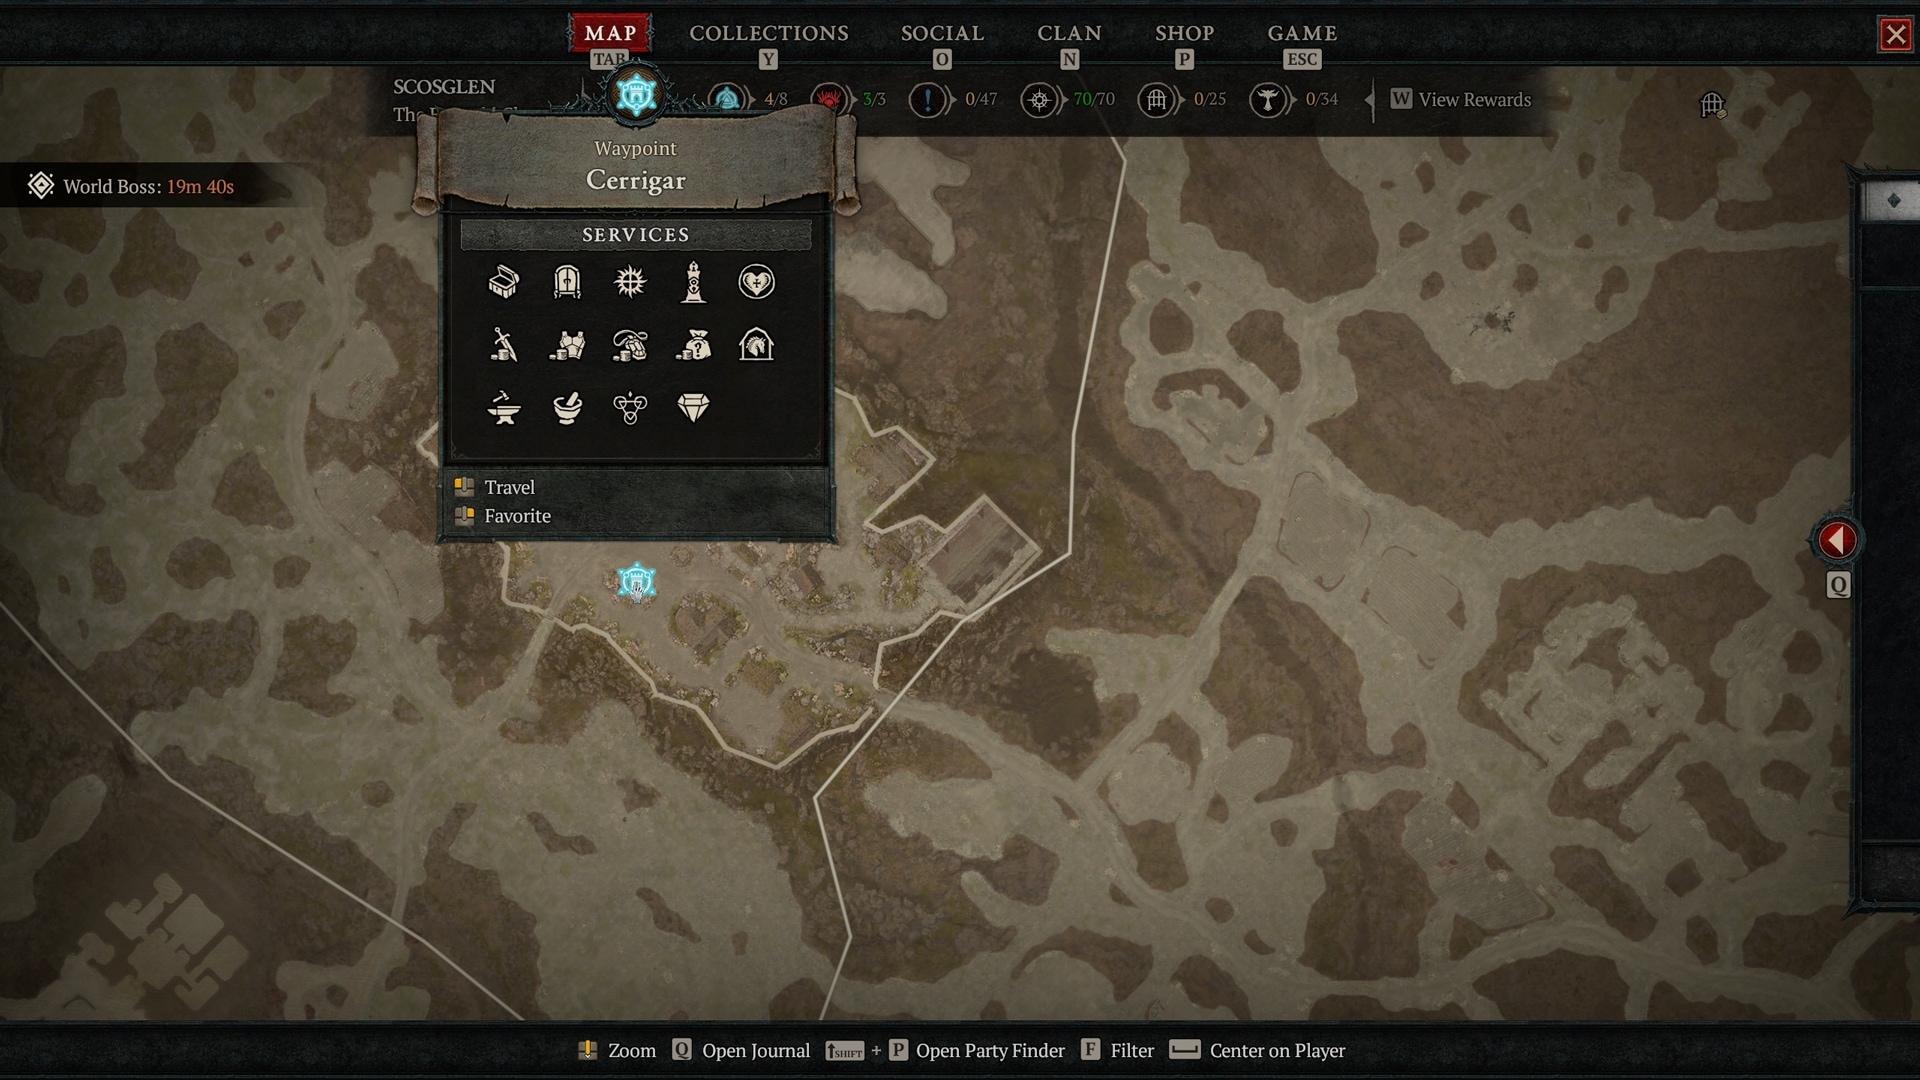
- Instead of teleporting by default to the closest Waypoint located in a hub city, you can now favorite a new Waypoint to teleport by default to. To favorite a Waypoint, hover over its icon on the Map.
- The Wardrobe can now be accessed through a button in the Character menu. Wardrobes in towns remain unchanged.
Awaken Power Using New Class Skills and Passives
1 New Skill for Each Class
Martial experts in Sanctuary have developed new techniques to vanquish darkness. Now you must learn them for yourself. Each of these Skills uncovers a new direction to take your Class build.
Barbarian
- Mighty Throw [Weapon Mastery Skill, 12 Second Cooldown]: Hurl your weapon, dealing 80
60% Weapon damage upon impact and sticking in the ground. While in the ground, your weapon pulses and deals 3520% Weapon damage every second for 4 seconds.- Enhanced Mighty Throw: While a thrown weapon is out, gain 25%[+] increased Attack Speed.
- Fighter’s Mighty Throw: Swapping weapons near any of your thrown weapons creates an additional pulse. Each extra pulse generates 5
3% of your Maximum Life as a Barrier for 5 seconds. - Warrior’s Mighty Throw: Mighty Throw’s impact deals 200%[x] increased damage and Stuns enemies for 2 seconds.
Druid
- Stone Burst [Earth Core Skill, 30 Spirit Cost]: Gather stones beneath your enemies then detonate them dealing 120
80% Weapon damage. Channeling deals 20% Weapon damage and increases the size of the affected area, up to a 400% increase after 1.0 seconds.- Enhanced Stone Burst: Stone Burst’s final explosion damage is increased by 25%[x] within the initial radius.
- Primal Stone Burst: While Channeling Stone Burst, and for 2 seconds after it ends, gain 30%[+] Attack Speed.
- Raging Stone Burst: Stone Burst costs 66%[x] more Spirit, and its final explosion deals 50%[x] more damage.
Necromancer
- Soulrift [Darkness Ultimate Skill, 50 Second Cooldown]: For 8 seconds, you corrupt surrounding enemies, dealing 65% Weapon damage per second. Every 0.25 seconds of this duration, you absorb the souls of up to 3 enemies, gaining 2 Essence and a Barrier for 2% of your Maximum Life for 5 seconds. You absorb 3 souls at a time from Bosses.
- Supreme Soulrift: Every soul absorbed increases your damage by 1%[x], up to 30%[x]. This bonus persists for 5 seconds after Soulrift ends.
- Prime Soulrift: Enemies with their souls ripped out become Vulnerable for 2 seconds. When Damaging enemies affected by Soulrift, you have a 5% chance to absorb their soul.
Rogue
- Dance of Knives [Cutthroat Agility Skill, 6 Charges, 1 Second Charge Cooldown]: Channel to launch knives at surrounding enemies, consuming one Charge per second and each knife dealing 70% damage. You gain 20%[+] Movement Speed and 10%[+] Dodge Chance while Channeling Dance of Knives.
- Enhanced Dance of Knives: Every 30 meters you travel while Channeling Dance of Knives grants 4 Charges.
- Methodical Dance of Knives: When you stop Channeling Dance of Knives, drop up to 12 Stun Grenades, each dealing 20% Weapon damage. The Channeled duration determines how many are dropped.
- Disciplined Dance of Knives: Dance of Knives Slows enemies hit by 25% for 3 seconds and has a 20% chance to pierce.

Sorcerer
- Familiar [Conjuration Skill, 3 Charges, 12 Second Charge Cooldown]: Summon a Familiar matching the element of your last cast Skill for 8 seconds. It seeks enemies and periodically explodes, dealing 40% of its element’s damage in an area.
You may have 6 Familiars active at a time.- Enhanced Familiar: Familiars apply effects around them every 0.5s based on their element. Fire Familiar: Applies 40
94% Burning damage to enemies. Cold Familiar: Applies 15% Chill to enemies. Lightning Familiar: Stuns enemies for 1 second. - Summoned Familiar: Your Familiars’ elements now follow a set cycle through Fire, Cold, and Lightning when you cast any Skill. While you have at least two different element Familiars active, you gain 3%[+] Damage Reduction.
- Invoked Familiar: While you have a Familiar active, you deal 10%[x] increased damage of its type.
- Enhanced Familiar: Familiars apply effects around them every 0.5s based on their element. Fire Familiar: Applies 40
5 New Passives for Each Class
Refine your character into the ultimate agent of destruction with 5 new Passives for each Class. We’ve also added additional connections for some Passives in each Class’s Skill Tree. This means there are more avenues to unlock these Passives, allowing greater flexibility when leveling.
Barbarian
- Belligerence: Damaging an enemy with a Basic Skill increases your damage by 3/6/9% for 4 seconds.
- Heavy Hitter: Your Ultimate Skills deal 15/30/45% more damage.
- Warpath: After Overpowering, you deal 4% increased damage for 4 seconds.
- Irrepressible: Casting a Weapon Mastery Skill Fortifies you for 10% of your Maximum Life.
- Barbed Carapace [Key Passive]: For every 25 Fury you spend, you gain 10%[+] Thorns for 8 seconds, up to 120%. Casting a Skill with a Cooldown grants you Unhindered for 5 seconds. During this time, you deal 100% of your Thorns as physical damage to Close enemies every second.
Druid
- Humanity: You deal 5/10/15%[x] more damage while in Human form.
- Catastrophe: You deal 5/10/15%[x] more damage for 8 seconds after casting an Ultimate skill.
- Feral Aptitude: You deal 3%[x] increased damage while Healthy and 3%[x] increased damage while above 100% Movement Speed. These bonuses can stack.
- Backlash: You deal 4%[x] increased damage for 5 seconds after casting a Defensive Skill.
- One with Nature [Key Passive]: Your Companion Skills each gain 1 additional companion and deal 60
50%[x] increased damage. Gain the Passive Effect of Ravens, Wolves and Poison Creeper.
Necromancer
- Necrotic Fortitude: Lucky Hit: Your damage has up to a 5/10/15% chance to grant a Barrier for 7
5% of your Maximum Life for 6 seconds. - Finality: You deal 5/10/15%[x] increased damage for 8 seconds after casting an Ultimate Skill.
- Titan’s Fall: While Fortified you deal 6/12/18%[x] increased damage to Elites.
- Precision Decay: Your Lucky Hit chance is increased by 5/10/15%[+].
- Affliction [Key Passive]: Enemies affected by Vulnerable, Crowd Control, or Shadow Damage over Time are infected with Affliction and take 15%[x] increased damage from you and your Minions. Your Curse Skills deal 80%(Weapon Damage) Shadow damage to enemies that have Affliction. This amount increases by 30%[x] of your damage to Crowd Control, Vulnerable, and Shadow Damage over Time combined.
Rogue
- Target Practice: Your Critical Strike Chance with Marksman and Cutthroat Skills is increased by 3/6/9%.
- Balestra: Gain 4/8/12% increased Damage for 4 seconds after using Evade.
- Evasive: After Dodging an attack, gain 2/4/6% Damage Reduction for 4 seconds.
- Unto Dawn: Your Ultimate skills deal 15/30/45%[x] increased damage.
- Alchemical Admixture [Key Passive]: Dealing 3 different types of non-physical damage increases the Potency of your Imbuement skills by 40% for 5 seconds. This Potency is further increased by 20% of the total amount of your Bonus Damage to Poison, Shadow, and Cold.
Sorcerer
- Evocation: Gain 4% Cooldown Reduction.
- Energy Focus: You generate a 6 second Barrier for 0.5/1.0/1.5% of your Maximum Life every second up to 30%. This effect is lost for 5 seconds after losing health.
- Dampen Layer: You gain 2/4/6% Damage Reduction while you have an active Barrier.
- Elemental Synergies: Your Frost, Shock, and Pyromancy damage is increased by 1/2/3%[x] for each skill you have equipped of that type.
- Enlightenment [Key Passive]: Casting any Skill grants 1 stack of Enlightenment, or grants 15 if your previous cast Skill was a different Element. After gaining 100 stacks, you become Enlightened, can no longer gain stacks, and lose 10 stacks per second. While Enlightened, your Bonus Damage with Fire, Lightning and Cold are equal to them combined and you gain:
- 25%[x] increased damage
- 45%[+] Mana Regeneration
- 20%[+] Attack Speed
Unlock Rewards with the Season Journey and Battle Pass
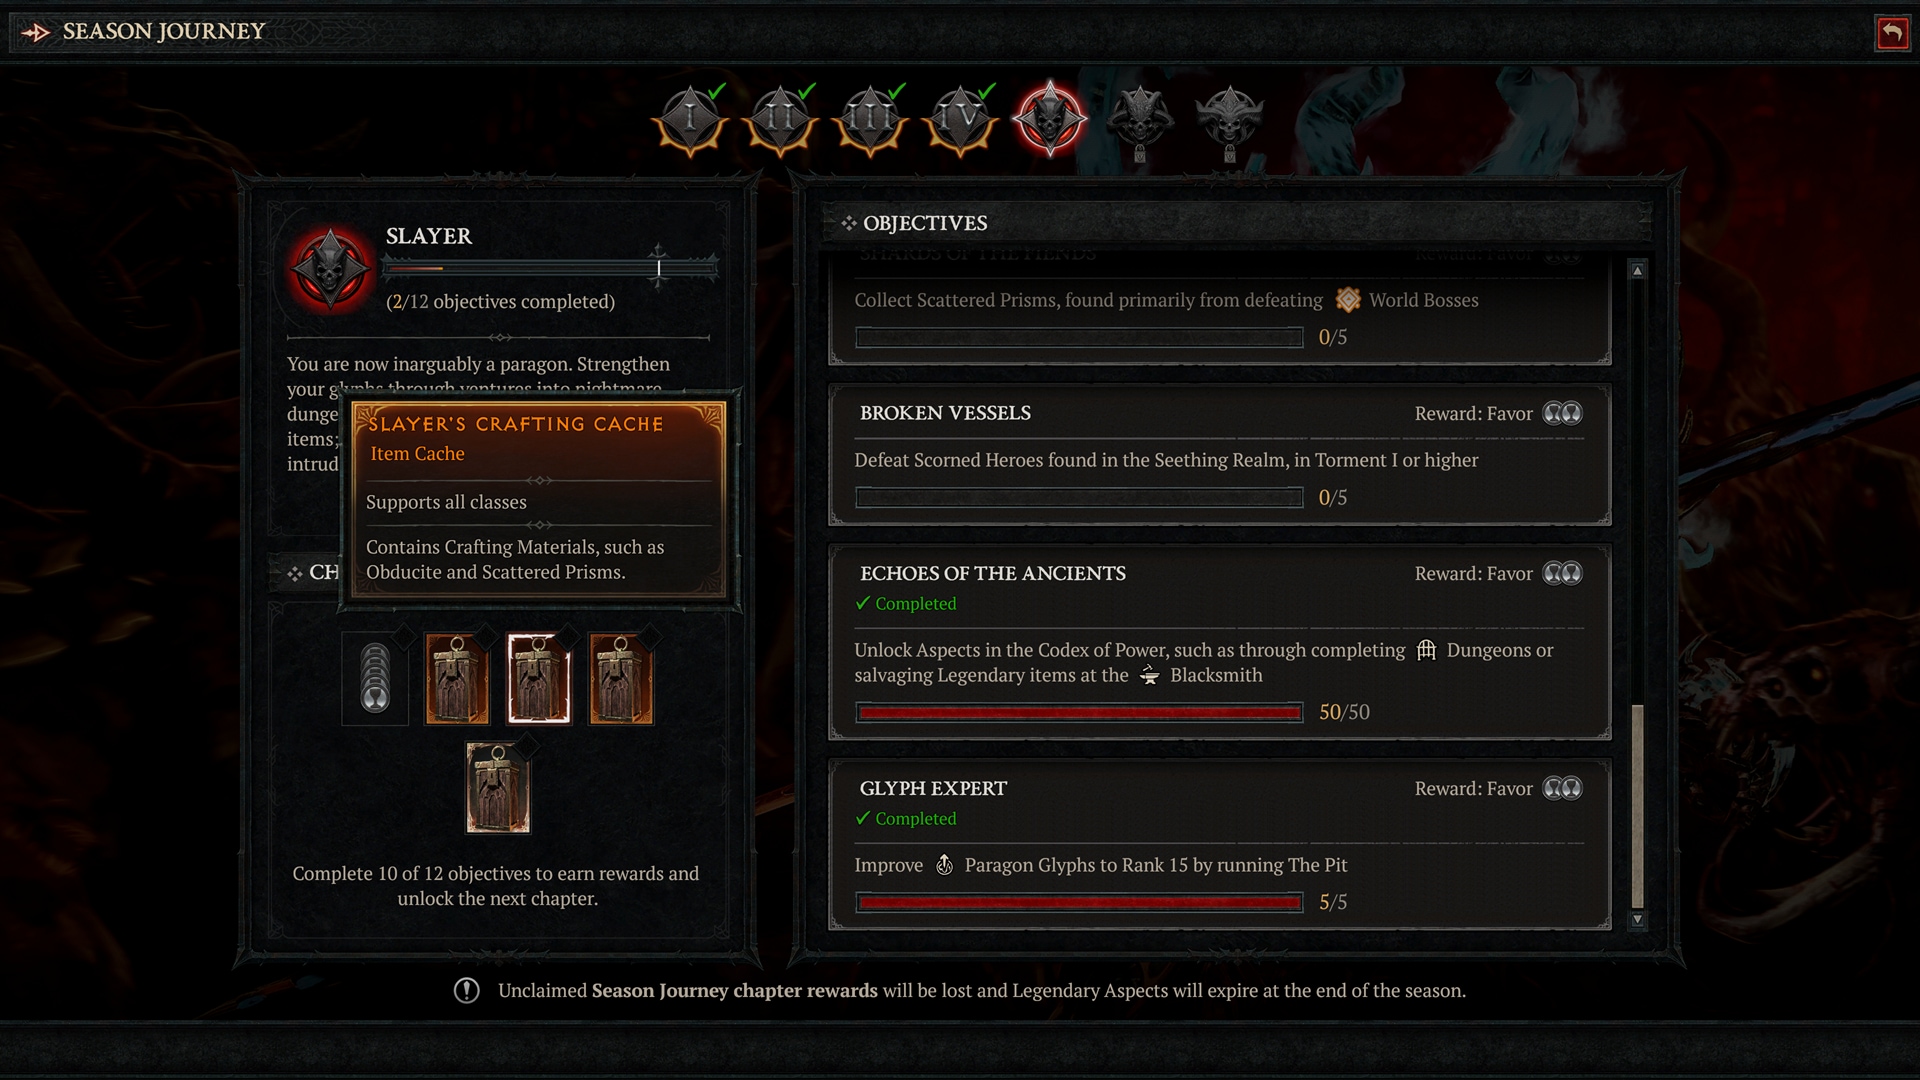
As you water Sanctuary’s soil with the constant flow of demon blood, you’ll earn rewards from the Season Journey and Battle Pass.
The Season Journey is broken into Chapters with tasks to complete. As you progress through the Journey, you’ll earn rewards befitting a defender of Sanctuary, such as a Resplendent Spark, Shepard of Hollows Mount Trophy, and Seething Opals. The Journey also provides Favor—the resource used to climb through the Battle Pass’ Tiers— earnable simply by playing aspects of the game.
Revitalize Your Soul with New Finery
The Season of Hatred Rising Battle Pass begins on October 7, 4 p.m. PDT and hosts 90 Reward Tiers (28 Free Tiers and 62 Premium Tiers).
Smoldering Ashes earned from the Free Tiers can be spent on Season Blessings that provide helpful bonuses to beat back Hell’s armies. There are 3 new Blessings for Season of Hatred Rising:
- Urn of Opals: Boost the chance of receiving an additional Seething Opal reward after completing a Seething Realm.
- Urn of Remnant: Boost the rate that you increase your reputation with the Zakarum Remnants.
- Urn of Curiosities: Boost the chance of receiving a second item when purchasing from the Purveyor of Curiosities.
The bonuses gained from the 5 Season Blessings only last until the end of Season of Hatred Rising.
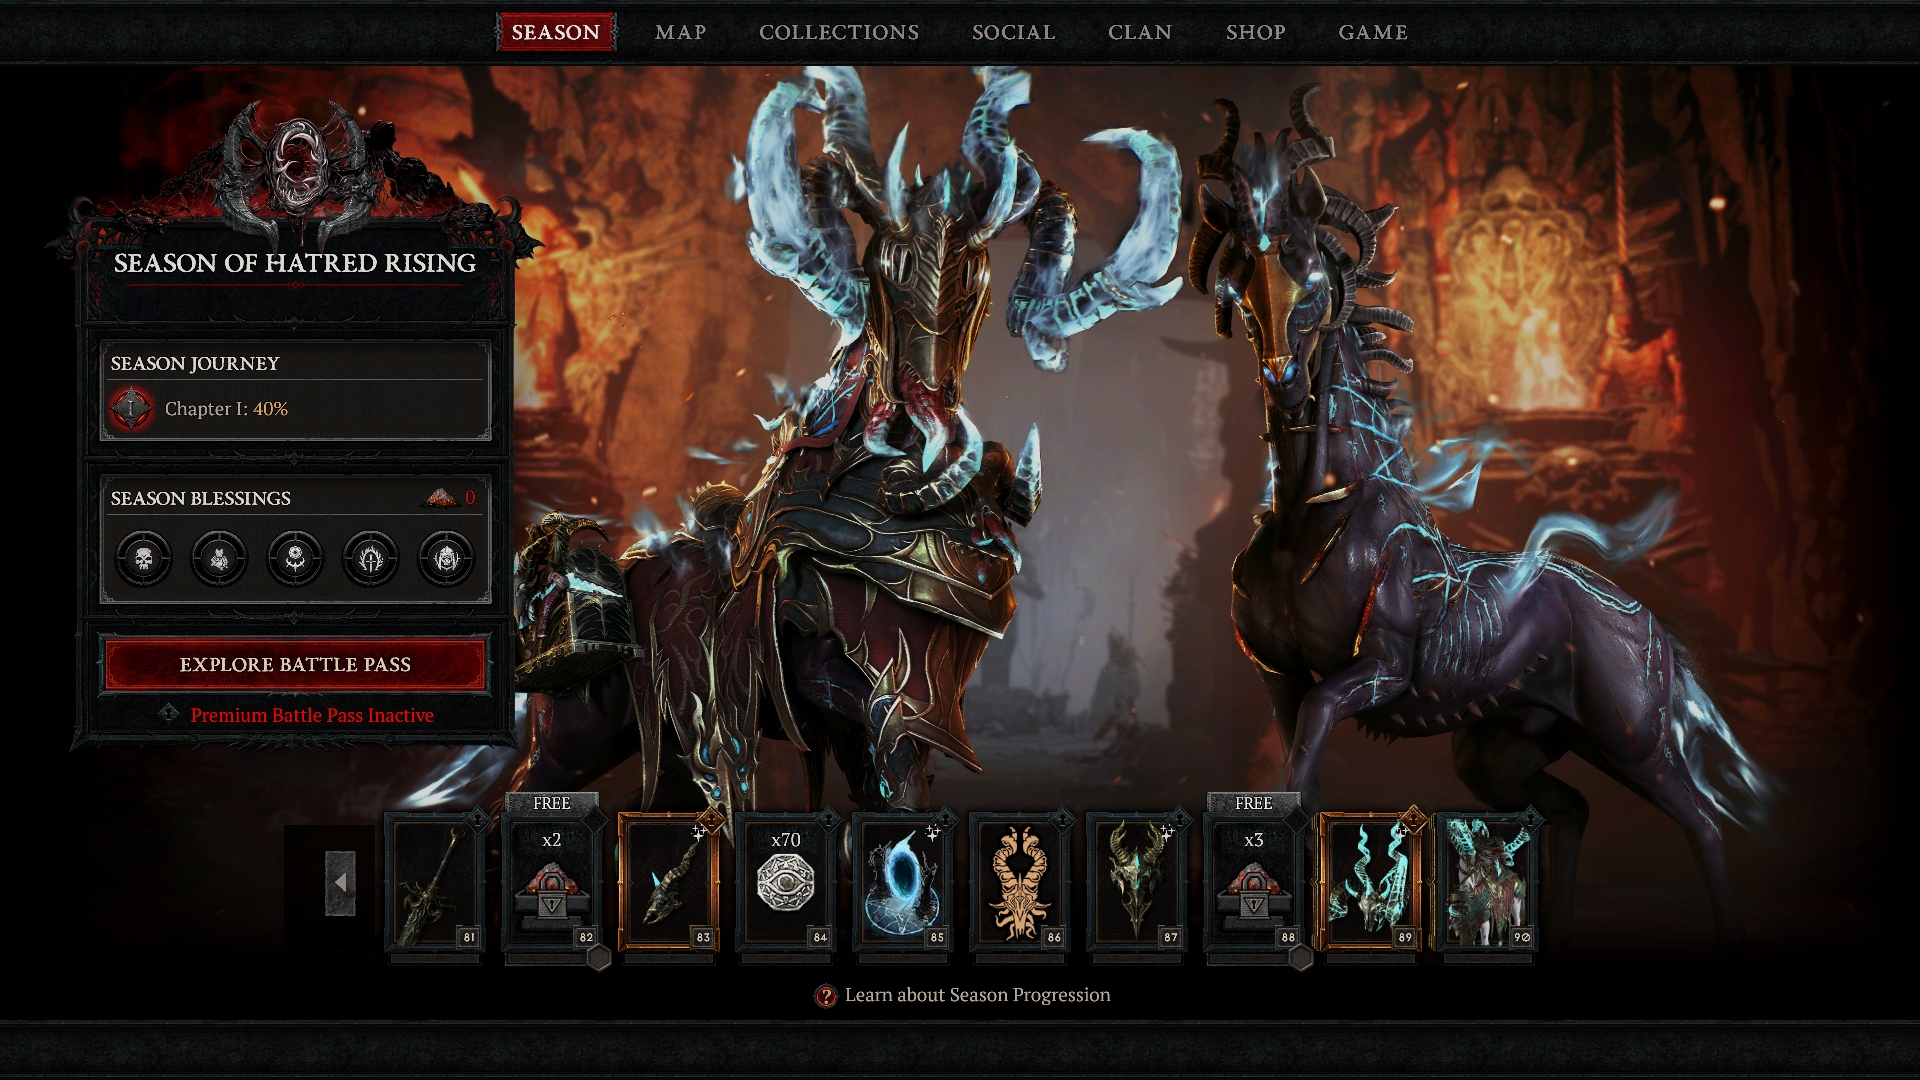
If you get the Premium Battle Pass, not only will the rewards of the Free Tiers be yours to wield, but Soul Drinker’s Armor Set, Platinum, and more also await you, including the Steed of Viz-Jun Present Mount, Curse of Viz-Jun Present Mount, and Ravenous Soul Mount Trophy, which unlocks at Tier 90. The Accelerated Seasonal Battle Pass also contains 20 Tier Skips and the Creeping Hollows Emote.
Wander Boldly with Party Finder
Party Finder is here to help you locate the right allies! This new feature allows you to find wanderers of a similar mettle within Sanctuary.
Go Far, Go Together
Party Finder gives you the ability to list the type of party you’re looking for, set what game type or activity you’d like to run, where you’d like to play, and add preferences for both casual and completionist players alike.
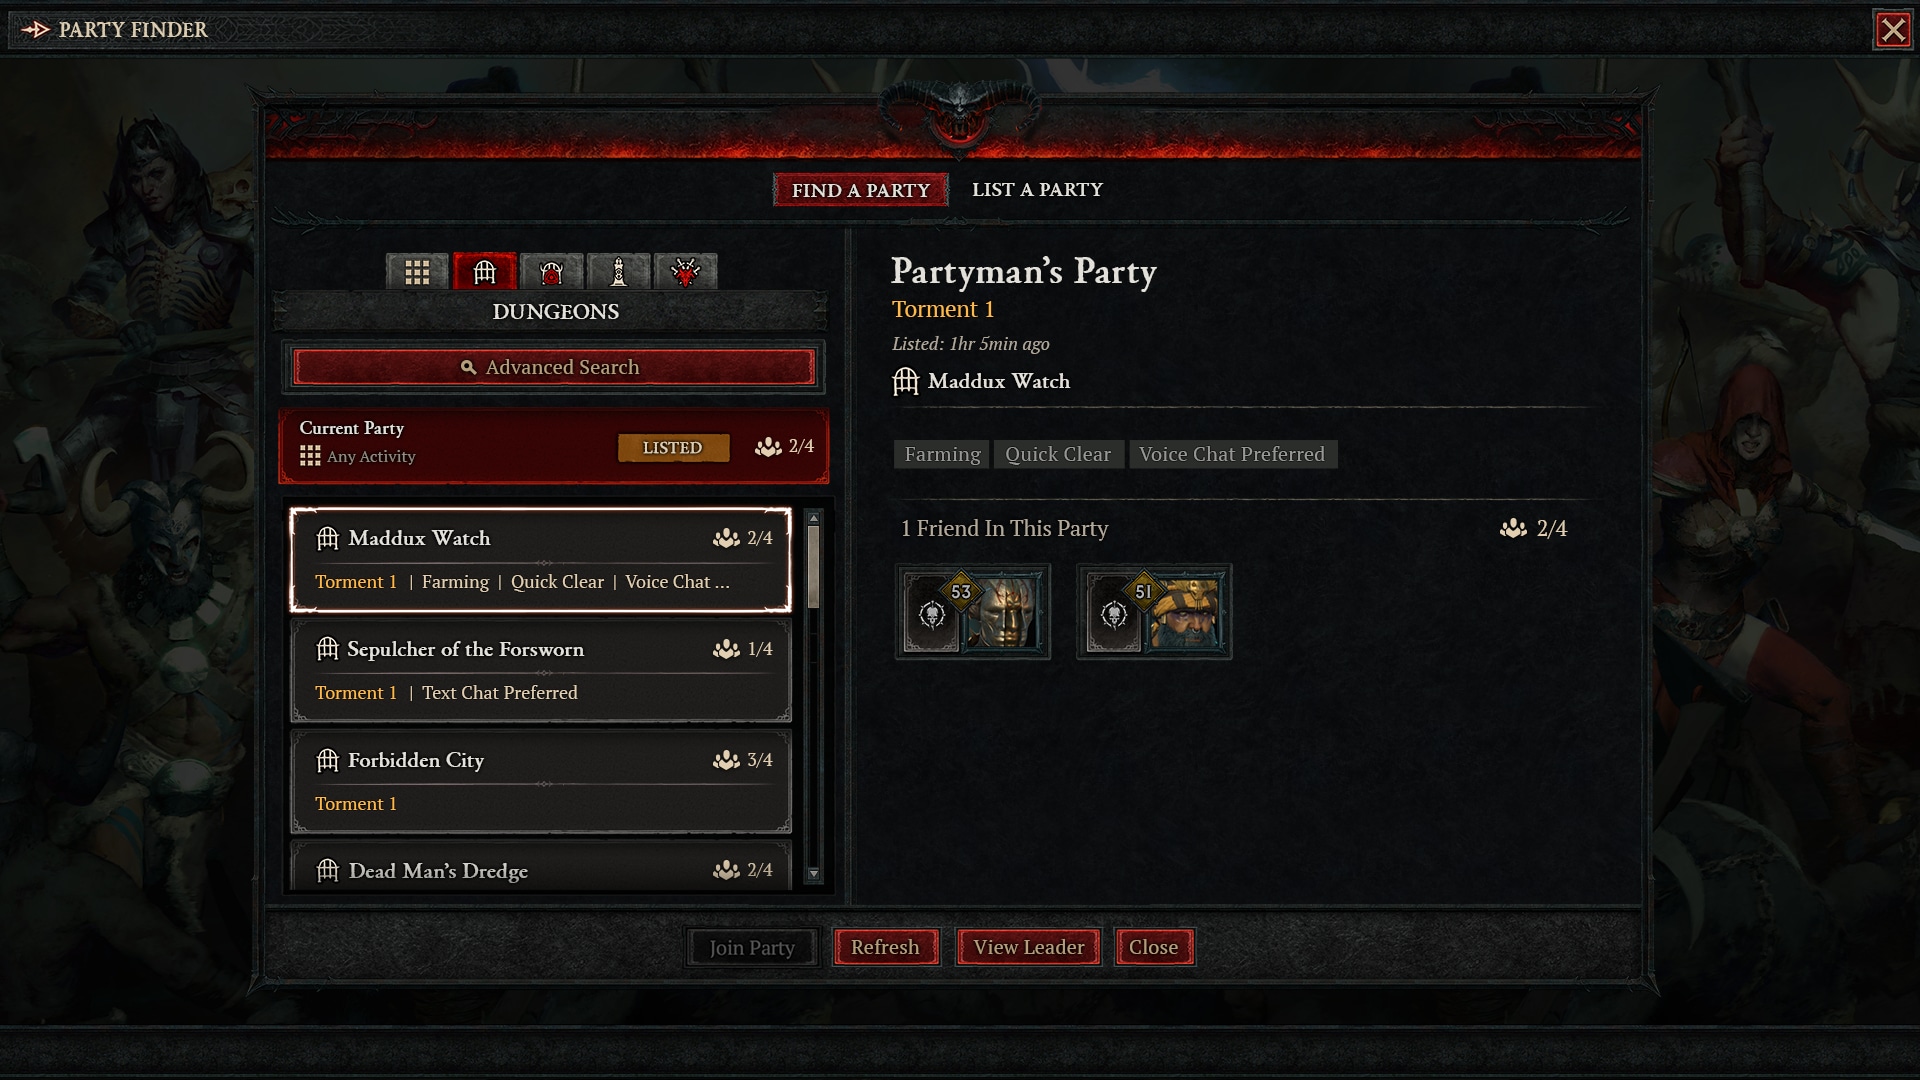
You can use Party Finder to list or find a party for multiple activities within Sanctuary: from slaying through Nightmare Dungeons, selecting Wings to complete in the Dark Citadel, and finding other players to share Materials to summon Endgame Bosses, to completing your Codex of Power. Party Finder can be accessed in a variety of ways, with quick access to certain activities via the Map, in-game Menu, or through a pre-set action on your emote wheel.
Acquire Fabled Threads from Tejal’s Shop

We’re dialing up the heat in the Shop with new Equipment, Armor, Accessories, Mounts, and Mount Armor bundles that will have you slaying in style. Starting on October 7 at 6 p.m. PDT, visit Tejal to browse her wares—remember to check back often, as she’ll update her stock throughout Season of the Infernal Hordes.
One such rarefied find from the far reaches of Sanctuary is the Black Smoke bundle for the Rogue, which contains the Black Smoke Armor Set, 2 Weapon Cosmetics, and the Stain of Smoke Marking for all your Rogue characters. This bundle can be purchased from Teja’s Shop for 2,800 Platinum.
Community Guides for Season of Hatred Rising
If you need sage guidance in your character’s journey throughout the season, look to our Community guides for tips and insights on builds for every class. From early game levelling, all the way to end-game builds, they’ve got you covered!
Visit our trusted Community resources here:
Catch Up on the Pre-Launch Livestream

Looking for more details about Season of Hatred Rising? Watch the video below to see director of community Adam Flecther and a rotating cast of developers from the team talk about the upcoming season, the Vessel of Hatred expansion, and more in our most comprehensive livestream to date!