Cosmic Exploration Guide and Rewards in FFXIV
Welcome to the main page for Final Fantasy 14's Cosmic Exploration! This page provides all the information you may need for Cosmic Exploration including the Cosmic Tools, Mission Types, Rewards and how to score!
What is Cosmic Exploration in FFXIV?
Cosmic Exploration is new Lifestyle content released in Patch 7.2 of Dawntrail. Functioning similarly overall to Ishgard Restoration compared to Island Sanctuary, players work together to progress and upgrade new areas while gaining rewards.
Cosmic Exploration also counts as leveling content where players at level 10 or above gain experience points and can use this as a way to progress to 100. The relic tool, called Cosmic Tools also starts at level 10 and is upgraded as you also level.
How Do You Unlock Cosmic Exploration?
Cosmic Exploration is unlocked in Old Sharlayan (12.6, 13.6) using the quest "A Cosmic Homecoming". The only requirement is that you must have completed the Main Scenario Quest "Endwalker" as well as be a crafting or gathering class at level 10.
You can return to Sinus Ardorum at any time by speaking to Drivingway in Mare Lamentorum (21.9, 13.2). Planets beyond the Moon (Sinus Ardorum) can only be unlocked after the first planet is unlocked.

Cosmic Exploration's Gameplay Loop
The basic gameplay loop for Cosmic Exploration is to complete Missions (leves), Mech Ops (FATEs/CE's) and Red Alerts (rare FATEs) while working as a server to complete the development of your area. Most importantly, your stats matter and contribute to your success!
Developing the zone as your server grants access to more unlocks in the area such as more mobility options, further areas and new buildings in the central "hub".
Cosmic Exploration is also where you unlock and upgrade your Cosmic Tool, the relic tool for level 100. This tool starts at level 10 allowing new players to work on upgrading this tool as they level while endgame players simply need to upgrade the tool to endgame ilv's to be able to use it practically.
Unique System Changes With Cosmic Exploration
While Cosmic Exploration is it's own content, there are some changes to base gameplay mechanics worth being aware of. These include:
- New Sprint - Stellar Sprint instead is a faster, permanent version of sprint giving 50% increased movement speed. Even though you can mount, this can also be kept on at all times making travel faster between nodes.
- Cosmoliner - The cosmoliner is a faster way of traveling around the area and is built-up over time as your server develops the zone.
- Duty Actions - Cosmic Exploration has duty actions. The main one is Stellar Return which allows you to teleport back to base, certain missions grant your DoH and DoL classes with a new action too.
- Spiritbonding Changes - Spiritbond rate is drastically different inside of Cosmic Exploration, and not for the better.
- Revisit cannot proc in Cosmic Exploration.
- Gathering classes automatically recover GP based on what was spent in a mission while cordial cooldown is also reset.
- Chain system that grants increased rewards the more missions you successfully complete at gold rank in a row.
Every Planet in Cosmic Exploration
There are 4 different planets/zones available within Cosmic Exploration which will be unlocked as the expansion progresses. These are:
- Sinus Ardorum
- Phaenna
- Oizys
- ??? (Patch 7.5x)
Each planet has a different environment with different missions. Furthermore, different stages of the Cosmic Tools are unlocked within each planet. That being said, all stages of the tool can be completed on the most recent planet.
When unlocked, players can travel to the stars at any time by speaking to Drivingway in Mare Lamentorum (X:22, Y:13). You can also change your instance by speaking to Drivingway again. The Bestways Burrow aethertyte can also be used to travel to the newest zone.
The Exotablet and How it Works
The Exotablet is your "menu" in Cosmic Exploration allowing you access to various features and mechanics inside of the area. This is what allows you to see the current progress being made, your score, your credits as well as activate Stellar Missions.
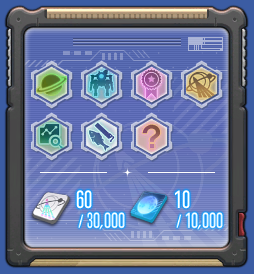
| Option | How it Works |
|---|---|
| Stellar Missions | Allows you to view and access stellar Missions, essentially leves, to gain rewards and progress inside of the area. You can also view your completed missions to keep track. |
| Mech Ops | Allows you to apply as a Pilot to participate in an active Mech Ops operation. |
| Stellar Successes | Shows you "Daily Quests" as well as Standard objectives that are always available. |
| Infrastructure Index | Shows you how your server is currently doing in terms of Development and allows you to view videos of prior upgrades for those who missed them. |
| Cosmic Research | Shows your current progress in the Cosmic Tools as well as any current bonuses available for having multiple tools upgraded. |
| Cosmic Class Tracker | Shows your total score created. (Does not include score generated by being a Mech in Mech Ops) |
| Exploration Guide | Showcases a brief guide to Cosmic Exploration. |
Cosmocredits and Region-Specific Credits
Cosmocredits is the main universal currency used in Cosmic Exploration.
Cosmocredits are used to buy glam, minions, dyes and so on as well as a helpful source of grade 11/12 DoH/DoL materia.
Additionally, there is a zone-specific currency which is used for 2 things, either spend 1,000 on Cosmic Fortunes or 1,000 on Mech Ops. Completion of
Mech Ops always grants you with a bunch of credits as well as a Big Bang Ticket for a better version of Cosmic Fortunes. So either way, you gain
a chance at roulette, Mech Ops just also gives you more rewards and better rewards.
Credits are most easily obtained via the Stellar Successes "Dailies" however they are relatively farmable by ranking gold on Missions with high rewards from them. Red Alerts especially are great for farming Region-Specific Credits.
Infrastructure Index and Server Progress
The Infrastructure Index showcases both your current server progression inside of Cosmic Exploration as well as a Video Log of developments that have occurred.
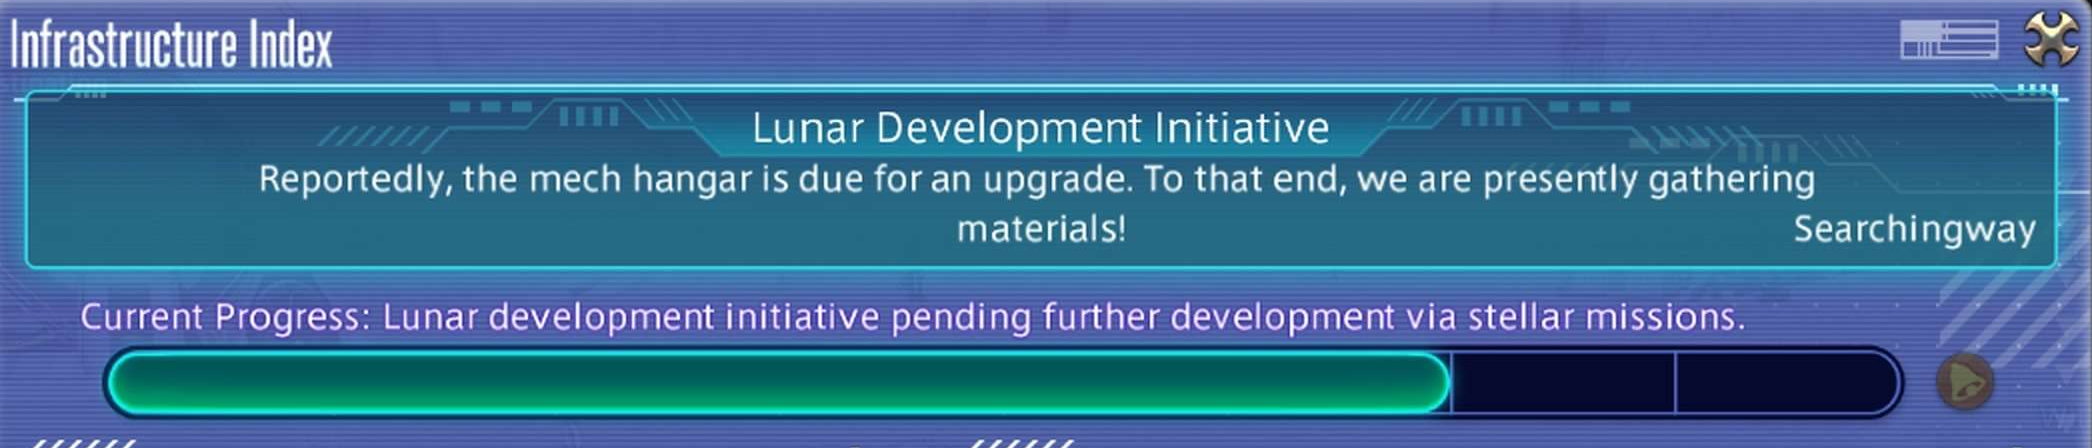
Development occurs naturally over time as players gain Score/Contribution from completion of Missions and FATEs. While Red Alerts are great for helping development occur, they do not directly push the bar forward themselves. But as a result of Critical Missions being very efficient as well as players generally being more active during a Red Alert.
Cosmic Tools
The Crafting and Gathering relics for Dawntrail are the Cosmic Tools. These special tools begin at level 10 and are upgraded along the way until they become an endgame i750 tool with unique effects too! These tools will also be upgraded over time with future patches and content updates to be some of the best tools for your Crafting and Gathering classes.
Completing Cosmic Tools even grants a bonus to the data acquisition of later tools for that stage.
Read our specific Cosmic Tools guide to understand how to best farm these tools and the requirements for them.
Stellar Missions
Stellar Missions are your main gameplay loop in Cosmic Exploration, if you like leves your going to love these. Stellar Missions act very similarly to leves in which you craft required items or gather at nodes in specific locations when initiated. They grant Credits, exp, relic data and also contribution on ranking days. Crafting classes are given the materials required when you initiate their missions while fishers are given 999 bait. All items exist in their own inventory not your normal inventory!
There are many "tiers" of missions. Starting with Class D, C and B then finally onto Class A which also has , EX and EX+ missions. Generally speaking, missions will increase in difficulty through each class with some Class A gathering Missions being tight on timing or have more RNG while some class A crafts are Expert Crafts.
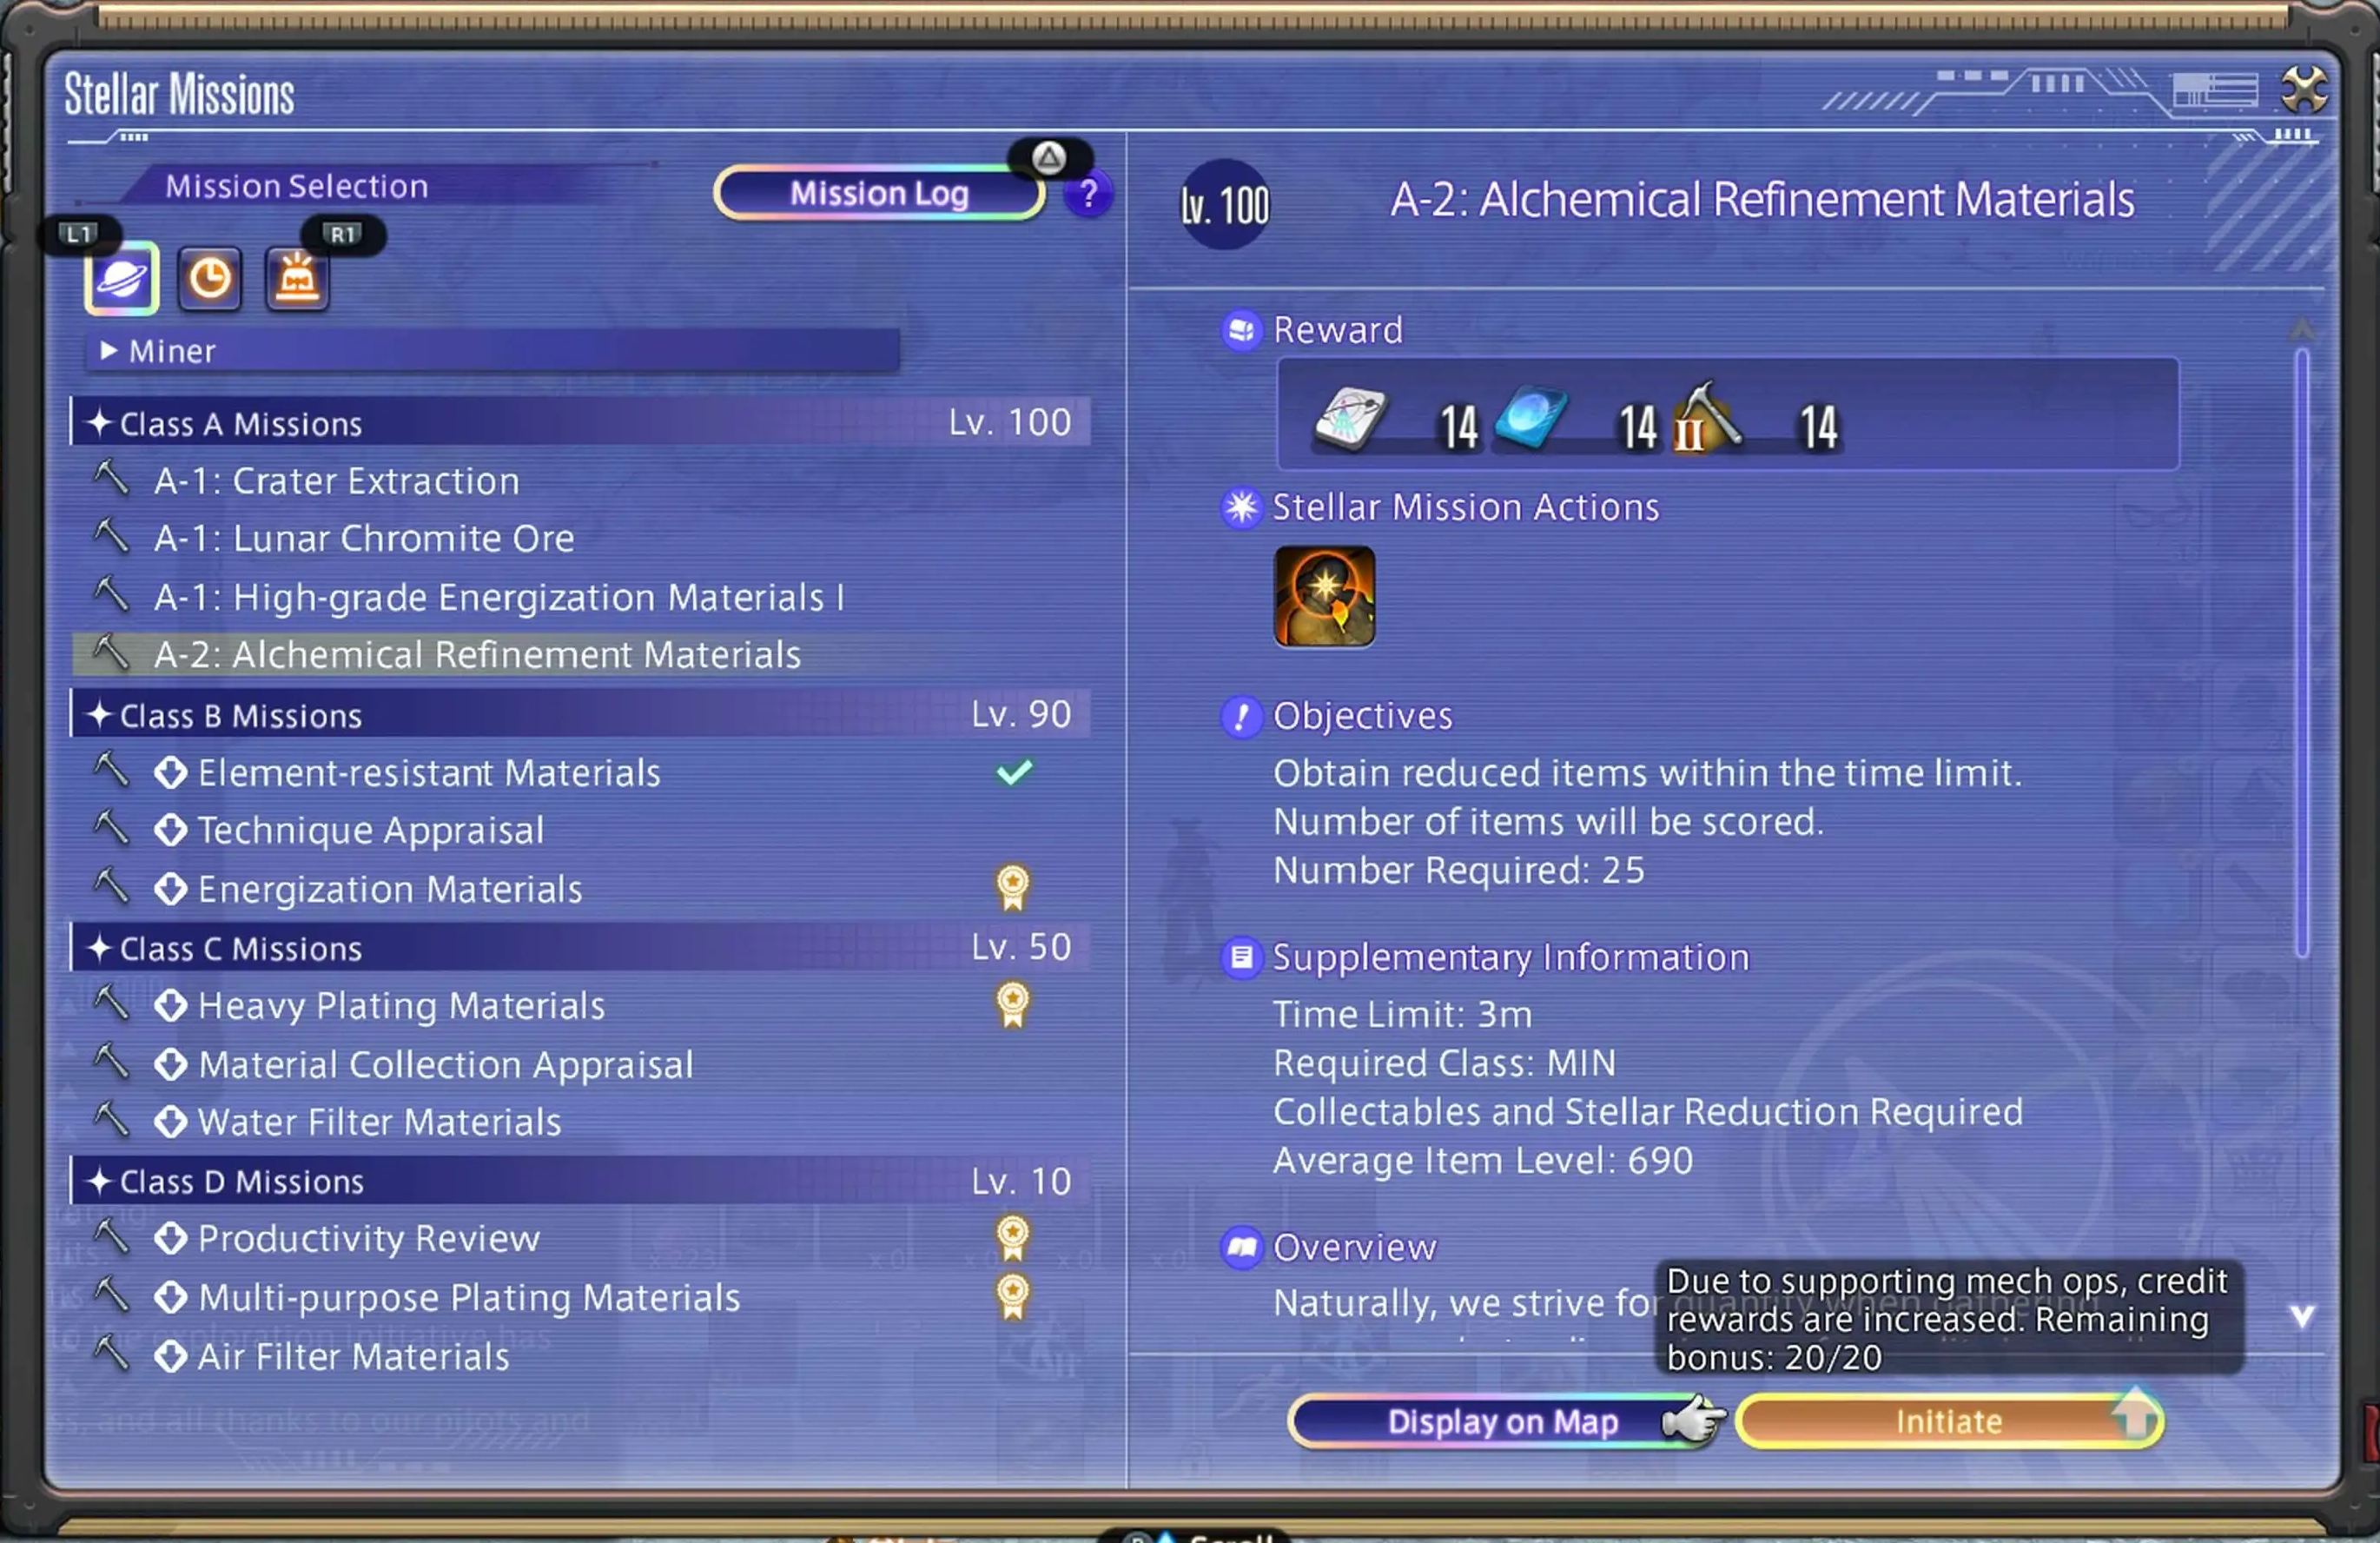
On top of this, there are missions which have specific conditions such as Critical Missions, Sequential Missions, Time-restricted Missions and Weather-restricted missions. Not all missions are available either until server-wide progress has been made during the zone's development.
Missions inside of Cosmic Exploration are notably different compared to other crafting and gathering content, new ways of using existing mechanics have been added to these missions. For example a gathering mission that requires boon chains, or crafts with only 20 durability.
Gold and Silver Mission Completion
When you complete a mission it will be given either a tick or medal with a medal being for hitting a gold rating and tick for silver/bronze on this mission. Gold rating provides a 5x buff to the rewards while silver provides a 4x increase. You can check your current progress on getting all gold missions in the Stellar Missions menu by pressing "Mission Selection".
This does not apply to any Critical Missions during a Red Alert which are always gold but do not have a 5x increase to rewards. The reward also applies differently to experience points while leveling, instead providing an XP bonus as a percentage of your current level based on if you bronze/silver/gold.
Gold on certain missions also unlock further missions with Sequential Missions requiring a gold and even specific weather missions requiring a gold on later Sequential Missions.
Increased Rewards for Repeatedly Hitting Gold
Completing multiple Class A missions or above at gold grants increased rewards for credits, dronebits and Starward Standing contributions. This will happen 6 times before resetting with the rewards being:
- 1 Gold - No increased rewards
- 2 Gold - +5%
- 3 Gold - +10%
- 4 Gold - +15%
- 5 Gold - +20%
- Super Star - +30%
Rerolling for specific missions will break this chain due to needing to start and end a mission to reroll your selection.
Stellar Mission Actions
Stellar Mission Actions are extra skills given to your classes during a select few missions which are incredibly useful. These are:
 Material Miracle (DoH) - Lasts for 45 seconds, Guarantees a Good, Sturdy, Centered, Pliant, Primed, or Malleable material condition each step. Basically, craft fast!
 Collector's Stellar Standard (MIN/BTN) - Makes your next Brazen be max instead of random and increases chance that Meticulous will not decrease integrity by 40%.
 Stellar Hookset (FSH) - Removes the Inefficient Hooking status and increases rating for fish.
- Stellar Steady Hand (DoH) - Guarantees action success for the next 3 steps.
- Greater Reach (MIN/BTN) - When gathering chain is at 4/8/12/16, restore 200 GP and 1-4 attempts/integrity.
- Multihook (FSH) - Adds an extra hook to the line, granting a chance to double next catch. This acts as a buff meaning it stacks with Double/Triple Hook.
These Actions, aside from Greater Reach, have limited uses so make sure to use them wisely!
Mission in Progress
The Mission in Progress menu firstly allows you to report a mission to obtain the rewards. But more importantly grants you access to both the Cosmic Crafting Log to begin crafting and also Stellar Reduction. Which is Aetherial Reduction but specifically for use during select missions.
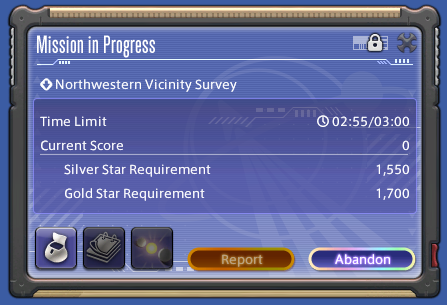
The Mission in Progress menu also tells you the requirements for Gold (5x bonus) and silver (4x bonus).
While Abandon is primarily meant to be to simply quit out due to bad luck or if you do not want to continue, you can also use it to "reroll" your available missions making it a great tool.
Rare Mission Types
As mentioned, there are rarer types of Stellar Missions. These are collectively called "Provisional Missions" and "Critical Missions". Provisional missions include Sequential Missions, Time-restricted Missions and Weeather-restricted Missions.
Provisional Missions can be found on the "clock" icon on the Stellar Missions menu while the "alarm" icon is for Critical Missions. There is no in-game notification to inform you that Provisional Missions are available so keep an eye on the weather/time and if you complete any starting sequential missions!
Different missions are available on different planets, so please check out their respective pages:
Weather-restricted Missions
Weather-restricted Missions are as you may have guessed, based on the weather. There is no skywatcher inside the area however plenty of skywatching websites are available. Weather-restricted missions generally last longer than a time-based mission giving you more opportunities to score high points.
Time-restricted Missions
Time-restricted Missions only appear for a limited time each in-game day, but the window changes depending on the class. This allows you to rotate through each class to gain score and contribution when there are no critical/weather missions available.
Sequential Missions
Sequential missions are missions that only appear after the first mission in the "sequence" has been completed. For example the A-Class Mission Hub Vicinity Gathering I unlocks access to EX: Hub Vicinity Gathering II. Sequential missions are sometimes indicated by having numbers after them but this is often not the case. The "starting" mission for a chain of sequential missions does not have to be a standard mission.
Sequential Missions are available once you complete the required mission with a gold rating and will appear in the second tab of your mission list as well as provide a small pop-up notification. Sequential missions can also unlock further sequential missions.
Critical Missions
Critical Missions are only available during a Red Alert which is easily identifiable by the pop-up at the top of your screen. You will have a set time window to complete as many Critical Missions as possible. These are quick missions that grant a lot of rewards, especially Region-specific Credits on top of being great for score.

Missions are only available to specific classes during a Red Alert and require even crafter's to go to a specified area not just gathering classes.
Mech Ops
Mech ops are special fate-like missions that occur regularly while participating in Cosmic Exploration. An announcement will appear with a countdown as to when a Mech ops will begin. Mech Ops can appear every 20 minutes unless a Red Alert or Development progress stage is made, then the current Mech Ops will be skipped.

Teleport back to base and speak to your zone's specific Mech Ops NPC indicated by the in-game map to be taken directly to the Mech Ops mission.
You can also request a pilot application from these NPC's. This costs 1,000 Region-specific Credits and allows you to apply as a pilot to control a Mech in the next Mech ops. Completing a Mech ops grants you both Credits, Contribution towards ranking and a Big Bang ticket used in Cosmic Fortune, you even have a rare chance to drop the mount!
To learn more about Mech Ops including the rewards, when they spawn and contribution tiers. Check out our guide below.
Cosmic Fortune
Cosmic Fortune is a system added to Cosmic Exploration allowing you to take a chance at a selection of rare and valuable items. Spend 1,000 Region-specific Credits to have 2 different wheels pop-up providing you with different items and odds and take your pick.

On occasion, rare wheels can also pop up guaranteeing you the "carrot" prize!
Stellar Opportunity if landed on, will reveal a new roulette wheel with a new set of special prizes giving you better odds.
Additionally, Big Bang fortunes are available using a ticket gained from Mech Ops. Mech Ops also costs 1,000 credits but Big Bang fortunes provide better items. This means you should always have a Mech Ops token stashed away in your pocket before spending Credits on Cosmic Fortunes.
To learn the full list of rewards and more information, check out the guide below:
Artifact Search Missions
Artifact Search Missions are a mechanic added with Oizys, where players can exchange a new currency obtained from chaining gold missions together to unlock treasure locations around the map. Collect the treasure and exchange it with Kaede at the base for a range of rewards.
Starward Standings Ranking System
Much like the Ishgardian Restoration, Cosmic Exploration also features a ranking season. Unlike the Ishgardian Restoration however, this new system has no time limits. The main differences with Cosmic's Ranking system are:
- Ranking Periods are 1 day instead of 10 days. With every other day being a ranking day.
- Only 1 person can rank during a ranking day.
- There are no real rewards for being top of your server.
- Ranking seasons will never end unlike Ishgard.
- How much you contribute towards ranking is incredibly vague and hidden. Using the hidden value "contribution" instead of the score system that exists.
- Only the most recent planet is eligible for ranking.
Players with the highest Contribution(different to score) at the end of the day will be designated the Star Contributor which grants you the Astral Aura, a unique glow visible for 2 weeks inside of Cosmic Exploration zones as well as your character as a hologram in the main base for 2 weeks. You also cannot become Star Contributor again until after this period is up, but theres no titles or achievements for it.
Contribution and How it Works
Ranking is not based on score and is instead based on contribution which comes from:
- Generated by doing missions as a DoH or DoL
- Mech Ops
- Progressing Projects (server-wide fates to upgrade the region)
Contribution is a hidden value and unrelated to Score. Contribution is currently only a hidden value that the text box only provides information that is vague such as you creating a "Sizeable Contribution". The full list in order is:
- Modest
- Respectable
- Generous
- Sizeable
- Immeasurable
On days when there is no ranking period, you will be unable to gain contribution and you will have no notification in your chat log.
The only indication of your overall ranking contribution for the day is by speaking to Scanningway who will give you a rough approximation as a percentage. For example Scanning way will tell you that "you are in the top 20%" if between 10 and 20%. You can never see your exact contribution unfortunately. Furthermore anyone in the top 10% has a chance at being 1st in rankings! Scanningway will not give you any information more precise than "top 10%" which means you could currently be ranked 1st on your server and you wouldn’t even know.
How to Rank Well on the Starward Standings
Ranking 1st on your server can be a difficult task and require a large amount of time. Listed below is some general advice on how you can aim to rank well. Further sections later in the guide go into more specific optimisations for DoH, DoL and Fishing to improve efficiency on specific mission types.
- High Stats make crafts easier: If your ranking, gear and stats are a must. The missions mention about i690 but neither your stats or the items are scaled to i690. Use the best gear you can!
- Use Food and Pots: Food is common at endgame and using a CP potion on crafters or chugging cordials on gathering classes is important.
- Get in the Robot!: You gain a good amount of contribution from Mech Ops when inside the mech. Doing the fates on-foot is noteably less but unknown if good for contribution (not good for score but score is different to contribution)
- All classes contribute: To rank, don't just stick on a single class. Outside of weather and special events, there are time-based missions with only a few crafters having missions every 2 hours in-game. This means you want to keep rotating classes when there is no weather/critical missions.
- MIN/BTN is great for Critical Missions: Inside Critical Missions Miner and Botanist are amazing due to GP resetting after each mission. These are your go-to classes during a Red Alerts!.
Most Importantly - Understand that ranking and contributing is not required for anything specific! You do not need score for the relics, or to farm credits. You don't even need to the do the hardest missions for the Cosmic Tools! This is entirely for bragging rights and a shiny glow.
Crafting & Gathering Advice for Missions and Scoring
Before Diving into specific advice for each class, here is some general advice you should be aware of to make missions easier and help you get gold rankings every time.
- Gear Matters! No! The i690 suggested min ilv on Cosmic isn’t a sync. They are rlv 750+ crafts and glv 750 gatherables that require current endgame gear to have reasonable success.
- The hardest missions are not required for relic. That's right, experts and any super difficult missions are optional for the relic. They are for scoring and points.
- Use food and pots. Food is important at endgame and Cosmic is no different. Either of the current endgame DoH foods is viable while good DoL food depends on breakpoints. Gathering classes should be chugging cordials.
- Reroll missions you do not like. You can accept and abandon missions to reroll your list, allowing you to find the best or easiest missions that you prefer. Note however this will remove your gold chain.
- Silver is not far off from Gold. Gold grants a 5x buff while silver grants a 4x buff. If your struggling with gold, silver is still a really good bonus.
General Scoring Priority
Generally speaking. The priority while scoring is dependent on the planet itself. With each planet having different strategies, please check out those specific pages/spreadsheets! Aside from that, Red Alerts are always good, and then weather/timed/sequential afterwards. However while a sequential mission can look good on paper, the other missions in that chain may make that mission actually worse.
Gathering classes need to consider travel time as well as mission RNG. If a mission ends up hard to do consistently, it will not give you great points. At the same time, if a mission is very far away such as with sequential, your losing score by having to travel.
Check out the specific spreadsheets for Crafting and Gathering which have calculated efficiencies for various mission types to learn more!
Crafting Advice
Crafting Macro Spreadsheet for High-Tier and Mid tier meldsets
Class A crafts come in 2 forms, Normal Crafts or Expert Crafts. But all of
these crafts are relatively endgame-similar so make sure to
use food such as ![]() Ceviche/
Ceviche/![]() Rroneek Steak and a pot like
Rroneek Steak and a pot like
![]() Cunning Craftsman's Tisane can also be very useful. If needed,
crafting on your Specialist can also be helpful due to the additional stats and
specialist skills available,
Cunning Craftsman's Tisane can also be very useful. If needed,
crafting on your Specialist can also be helpful due to the additional stats and
specialist skills available, ![]() Crafter's Delineation's are thrown at you
during Cosmic Fortune.
Crafter's Delineation's are thrown at you
during Cosmic Fortune.
Many of the Class A crafts are expert crafts, these are much harder crafts with a wider range of conditions that require you to generally react manually instead of using a macro. While players with very high stats can macro most of these crafts, they cannot macro all of them so manual craft is a must. Check our expert crafting guide for more information. No Expert Crafts are required for the relic itself!
35 and 20 Durability Crafts
While most experts can be handled in a traditional sense. Some of the crafts available only have 20 and 35 durability which can be quite limiting rotationally. The 35 durability craft cannot be macroed even just to silver.
Furthermore, you can be easily caught out by some gameplay mechanics that are often not a problem.
 Manipulation acts after a skill. So if you use
  Prudent Touch, you would
lose 5 durability, game checks if you failed the craft, and then gain gain 5 after. This means that you can fail the craft with both
Prudent and
Prudent Touch, you would
lose 5 durability, game checks if you failed the craft, and then gain gain 5 after. This means that you can fail the craft with both
Prudent and  Preparatory Touch being common ways.
 Groundwork only does half it's effect when at 10 durability or below. This is half your durability on these crafts
so be very careful with progress skills.
Groundwork only does half it's effect when at 10 durability or below. This is half your durability on these crafts
so be very careful with progress skills.
Aside from that, generally thes crafts have an increased focus on using
![]() Prudent Touch as it is durability efficient as well as
Prudent Touch as it is durability efficient as well as
![]() Delicate Synthesis as it provides both progress and quality.
Delicate Synthesis as it provides both progress and quality.
Miner/Botany Advice
Gathering Spreadsheet for Breakpoints and Score efficiency can be found here.
Listed below is advice on how to successfully complete each "type" of mission available. Remember that GP management is very important as well as ensuring you down a lot of cordials to maintain GP.
While waiting for GP to regen, try to complete some easier A-Class missions at silver or B-Class missions at gold. The missions that require both gathering and crafting are great for this!
Item Collection Missions
These missions want you to gather nodes quickly and under quite a strict time limit. If your gathering stat is high enough to gain +2 on a Bountiful Yield/Harvest II then you should spam that skill.
Some of these missions do not have a strict time but instead have very high requirements so make sure to move quickly and have GP ready to spam.
Chain-Based Missions
Some missions want a "chain", that being smacking a node multiple times in a row. The longer the chain, the more score gained. Starting at 50 for your first chain and capping at 200, for example: 0, 50, 50, 50, 150, 200, 200, 200...
Use all of your GP on ![]() Solid Reason +
Solid Reason + ![]() Wise to the World procs on the
node with a +integrity node bonus to make the most of it. The more 200's you can gain
in a single node the better. This can require some luck with Wise procs.
Wise to the World procs on the
node with a +integrity node bonus to make the most of it. The more 200's you can gain
in a single node the better. This can require some luck with Wise procs.
Boon Missions
Some missions simply want Gatherer's Boon and only boon either in the form of granting points towards the mission by triggering boon or by specifically hitting a chain of repeated boons.
In either mission, using ![]() Mountaineer's Gift I and
Mountaineer's Gift I and ![]() Mountaineer's Gift II (or the BTN equivalents)
is key to success in these missions.
Mountaineer's Gift II (or the BTN equivalents)
is key to success in these missions.
Collectable and Reduction Missions
Collectable missions come in 2 main forms, the first being collecting collectables and gaining points on their collectability while the second requires you to reduce the items down into sands. Many of these missions also give you access to your Stellar Mission Action, try to use this on node bonuses to get the most out of the limited uses it has. As a general piece of advice, collectable rotations tend to follow the following:
![]() Scrutiny >
Scrutiny > ![]() Meticulous Prospector >
Meticulous Prospector > ![]() Scrutiny >
Scrutiny > ![]() Meticulous Prospector > Whatever skill gets you to 1000 rating
Meticulous Prospector > Whatever skill gets you to 1000 rating
With Cosmic, this can differ slightly due to node bonuses, aspects of various missions and the proc chance of Collector's High Standard being much higher often meaning that your best bet is to simply spam Meticulous and use the Stellar Action.
For the gathering collectable missions, simply gather the collectable at T3 collectability rating. Anything above tier 3 gives a great amount of score however 1000 rating does give the most. It is never worth spending integrity to get to 1000 rating if you are already in tier 3.
The reduction ones however want you to aim for 1000 collectability whenever you use GP no matter what. This is because at 1000 rating you have a chance at a bonus, which gives you a large amount of sands and makes the missions much easier. With practice, you can gather enough 1000 rating collectables that you wouldn’t even need bonus sands.
Also: you can reduce while moving! Reduce while you travel between nodes don’t just stand there!
Crafting Missions
Some gathering missions are more about crafting than gathering. These missions are great for letting your GP regen while you craft. There is not much advice that can be given here but whatever class you finish the mission on gets the score. So you can pick if your gathering class or crafting class gains the score.
Fishing Advice
Fishing Spreadsheet with Hole Data
The spreadsheet also has a tab dedicated to specific fishing advice for each hole which is going to be the best thing you can check out. Furthermore, Fishing Youtuber Fruity Snacks has several dedicated videos for information n each hole. Alongside comprehensive video guides for each one.
Useful Tools and Resources for Cosmic Exploration
Listed below are a series of tools and resources worth checking out to help with Cosmic Exploration:
- Consolegameswiki page for Cosmic Exploration featuring every mission available
- Expert Crafting Guide
- Crafting Spreadsheet
- Gathering Spreadsheet
- Fishing Spreadsheet
- Fruity Snacks FFXIV Fishing YouTube Channel with Cosmic Guides
- Fishcord with a dedicated cosmic channel for fishing
- Lalachievements Mission Ticklist and Weather Tracker
- Sinus Ardorum Cosmic Tool Helper
Changelog
- 27 Jan. 2026: 7.41 Updates.
- 02 Sep. 2025: 7.31 Updates.
- 25 Apr. 2025: Further details added and some prelimiary advice.
- 23 Apr. 2025: Full Guide Released. Macros may be added later.
- 07 Feb. 2025: Page released with currently known information.
More FFXIV Content

This guide has been written by I'nanghal Shikhu (Discord - Shikhu). He is a Crafting & Gathering theorycrafter, mentor for The Balance and also a guide maker for Teamcraft alongside Icy Veins. He also managed to obtain 10 top 12's on the leaderboard during the Ishgard Restoration rankings.
- Get Your Switch 2 Before Prices Increase September 1st
- EP8 Now Available — Listen to These Dawntrail Tunes ASAP
- FFXIV Players Can Now Grab Berlin Fan Fest Merch Before It Sells Out
- FFXIV Players: Here’s Every Major Drop Before Evercold Hits
- Evangelion Alliance Raid Announced for FFXIV Evercold in 2027
- FFXIV Launching on Switch 2 But Leaving PS4 — Here’s What You Need to Know
- FFXIV Patch 7.5 Just Kicked Off Dawntrail’s Final Chapter
- Yoshi-P Fanfest Q&A: Glamour Plates, Job Design, and Favorite Scion