Keybindings and Hotbar Setup for Dancer — Dawntrail 7.2
Welcome to our keybinding and controller setup guide for Dancer. Here you'll find example setups to play FFXIV for mouse and keyboard configurations, as well as controller users.
Keybindings and UI Introduction
In most games you will play, the way you sort your keybinds is usually up to personal preference. While the examples we show here are considered to be good, they are meant to be used as a template to give you ideas on how you might want to sort your own keybinds. If the examples here work well for you, don't let that stop you from using them instead.
Dancer Hotbar Setup
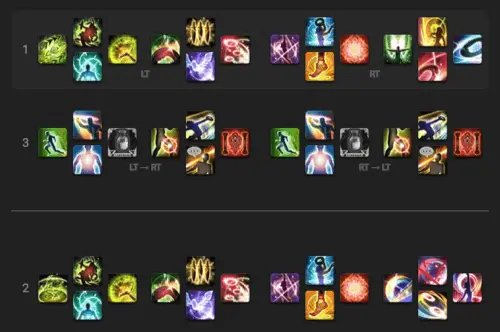
For controller, we have an example that uses two full hotbars on each of the triggers, and a third half hotbar
accessed by holding down both triggers. The first contains our single target attacks, and the second hotbar
contains our AoE attacks. The third hotbar, accessed by pulling both triggers down (it's duplicated so
that the order does not matter) contains our role actions, potions, and other things you may not use often such
as the ![]() Limit Break. You can enable the double trigger hold hotbars by going into your settings, found in
Character → Hotbar → Custom → Expanded Hold Controls.
Limit Break. You can enable the double trigger hold hotbars by going into your settings, found in
Character → Hotbar → Custom → Expanded Hold Controls.
Keyboards and Mouse keybinds will vary wildly depending on which layout of keyboard you use. This example is on a QWERTY keyboard using WASD for movement. This is purely player preference. If you prefer to move with different keys, don't let that stop you.
In this example, we utilize the standard number keys as well as the Function keys, with a CTRL modifier for the third hotbar and a Shift modifier for the fourth.
General Keybind Advice
FFXIV as a game incentivizes you to swap between many jobs and roles to fully experience the combat systems the game has to offer. To that end, we have some suggestions to help you keep your muscle memory while swapping between jobs.
- It is very strongly suggested that you keep similar buttons on the same hotkeys between jobs.
With some jobs, this won't be possible, but most of them can be set up very similarly.
Some examples of this include:
- Buttons for basic 123 combos should be on the same, easy to reach buttons.
- Similar mitigation abilities and role actions should be on the same buttons between jobs.
For example,
 Shield Samba,
  Tactician and
  Troubadour
all do the exact same thing, and should be on the same button.
 - If playing on a controller, you can use a hotbar to track cooldowns such as raid buffs or party mitigation.
- Put your hotbars on your screen in a place where you will be able to pay attention to the fight, party members, and your own cooldowns and rotation.
- It is highly recommended that you ensure it is easy for you to move while using your keybinds.
Changelog
- 31 Mar. 2025: Page updated for patch 7.2.
- 04 Jul. 2024: Page updated for patch 7.0.
- 17 Apr. 2024: Page added.
Guides from Other Classes

Stella is a long-time FFXIV player who started in 2018, and has become a Mentor for The Balance in the years since. She enjoys large-scale content such as Eureka and Save the Queen areas and raids, and can be found on Twitter, Youtube and Twitch, as well as Discord (EshEhdAfah). After several previous tiers of raiding casually, she has cleared Anabaseios Savage week 1, completed four out of five Ultimate raids, and taken to challenging herself by using unorthodox, high-speed builds for certain jobs in older ultimates in Party Finder.
- FFXIV - Your Ultimate Cosmic Exploration Guide!
- FFXIV - Seekers of Eternity Patch 7.21 Notes Are Here!
- FFXIV - Invite Your Friend Back and Get Exclusive Rewards With the Callback Campaign!
- FFXIV - When Does the Mobile Version Release?
- FFXIV - Are You Ready for the Hatching Tide?
- FFXIV - Beastmaster Icy Veins Sneak Preview??
- FFXIV - Pre-orders Are Open for the TTRPG Scenario and Gamemaster Guide!
- FFXIV - Seekers of Eternity Patch 7.2 Now Live!

