Detailed Guide to Eureka Anemos
Deep in the Glass Ocean, the great expanse of the Far East, lies an island recorded on no navigational charts. An island that seemingly appeared one day–an island that should not be. Recognizing its potential as a trading post, the brave and ambitious ventured forth to explore and claim it, only to discover an untamed land teeming with strange, monstrous beasts...
The Forbidden Land, Eureka Anemos
The Forbidden Land, Eureka Anemos is the first area of Eureka released in patch 4.25. It is the first of four stages for the Stormblood Eurekan Relic Weapons, and goes from level 1 to level 20.

Eureka Anemos is an land steeped in Wind-aspected aether, the landscape marked by massive gale-scarred rock formations, gigantic trees, and constant howling gusts. Many enemies in this area are aspected to wind, as are the Notorious Monsters ('NMs') that act as FATE bosses and the main source of rewards in the land. The icy spires of Pagos and the burning volcano of Pyros can be seen in the distance, as well as the towering Baldesion Arsenal.
How Do I Begin The Story In Anemos?
Upon arriving for the first time, the player will find themselves in Port Surgate at the southern side
of the map. After talking to Krile and Gerolt, the player will be tasked with obtaining a ![]() Protean Crystal.
These drop randomly from most enemies, so either take the north exit and turn west to fight the Anemosslings, or take the
east exist onto the beach to fight the Squibs. Once you get a Protean Crystal, return to base to complete the first quest.
Protean Crystal.
These drop randomly from most enemies, so either take the north exit and turn west to fight the Anemosslings, or take the
east exist onto the beach to fight the Squibs. Once you get a Protean Crystal, return to base to complete the first quest.

How Can I Level Up In Anemos?
As mentioned in the main Eureka page, the best way to level up is to chain mobs kills together in order to get EXP bonuses and complete the challenge log, while also defeating any NMs that spawn if they are up to +1 above your elemental level.
Additionally, there are two aetherytes available in this area: The Abandoned Laboratory, and The Windtorn Cabin. Both require the player to be Elemental Level 9 before they can be attuned to and used.
How Do I Progress My Relic in Anemos?
In Anemos, 1300 Protean Crystals are required in order to complete the relic. You will also need three ![]() Pazuzu's Feathers,
an item that is primarily obtained from the Level 20 Notorious Monster Pazuzu, but can also be bought from the
Expedition Birdwatcher.
These Protean Crystals are only obtainable from standard mobs, but the NMs in Anemos offer another reward:
Pazuzu's Feathers,
an item that is primarily obtained from the Level 20 Notorious Monster Pazuzu, but can also be bought from the
Expedition Birdwatcher.
These Protean Crystals are only obtainable from standard mobs, but the NMs in Anemos offer another reward: ![]() Anemos Crystals. These crystals
are directly required to obtain the dyeable i350 Artifact gear, but can also be exchanged at Gerolt in batches of 1, 10 or 50 for a random number of
Protean Crystals, giving two and five per Anemos Crystal. As such, 100 Anemos Crystals will give between 200 and 500 Protean Crystals, averaging
around 350.
Anemos Crystals. These crystals
are directly required to obtain the dyeable i350 Artifact gear, but can also be exchanged at Gerolt in batches of 1, 10 or 50 for a random number of
Protean Crystals, giving two and five per Anemos Crystal. As such, 100 Anemos Crystals will give between 200 and 500 Protean Crystals, averaging
around 350.
Anemos Crystals are rewarded from NMs at a rate based on the level of that NM, with the level 1 NM giving just three and the level 20 NM giving 50. As such, it is very easy to finish your first Anemos relic simply by increasing your Elemental Level and doing the storyline. However, bear in mind that 99 Anemos Crystals are required to complete the level 17 quest, so these should be saved prior to being needed for that quest if possible.
How Do I Continue The Story in Anemos?
The story in Anemos will continue upon reaching levels 3, 5, 13 and 17. These quests do not show up in the Journal, and will require players to search for an interactable Confluence using clues given by Krile in her dialogue for that quest.
Level 3: This Confluence can be found inside the Early Natural History Society Observatory at (X:13.5, Y:20.2). Be aware that enemies will spawn inside this building during the night.

Level 5: This Confluence can be found at the northern edge of The Orchard at (X:24.4, Y:23.1).

Level 13: This Confluence can be found by the Val River Swale at (X:20.9, Y:13.0).

Level 17: This Confluence can be found in the Uncanny Valley at (X:32.8, Y:18.3).

Additionally for the level 17 quest, once you have spoken with Krile again, you will need to travel to the Aethernet Control at (X:25.5, Y:16.1). Ensure you have 99 Anemos Crystals before this point, or you will need to delay progressing the story in order to get them.
Once you have completed the story of Anemos, you are able to proceed to Pagos. However it is heavily recommened to reach at least Elemental Level 20 before entering Pagos, and staying in Anemos until Elemental Level 22 or so will make the start of Pagos a little easier.
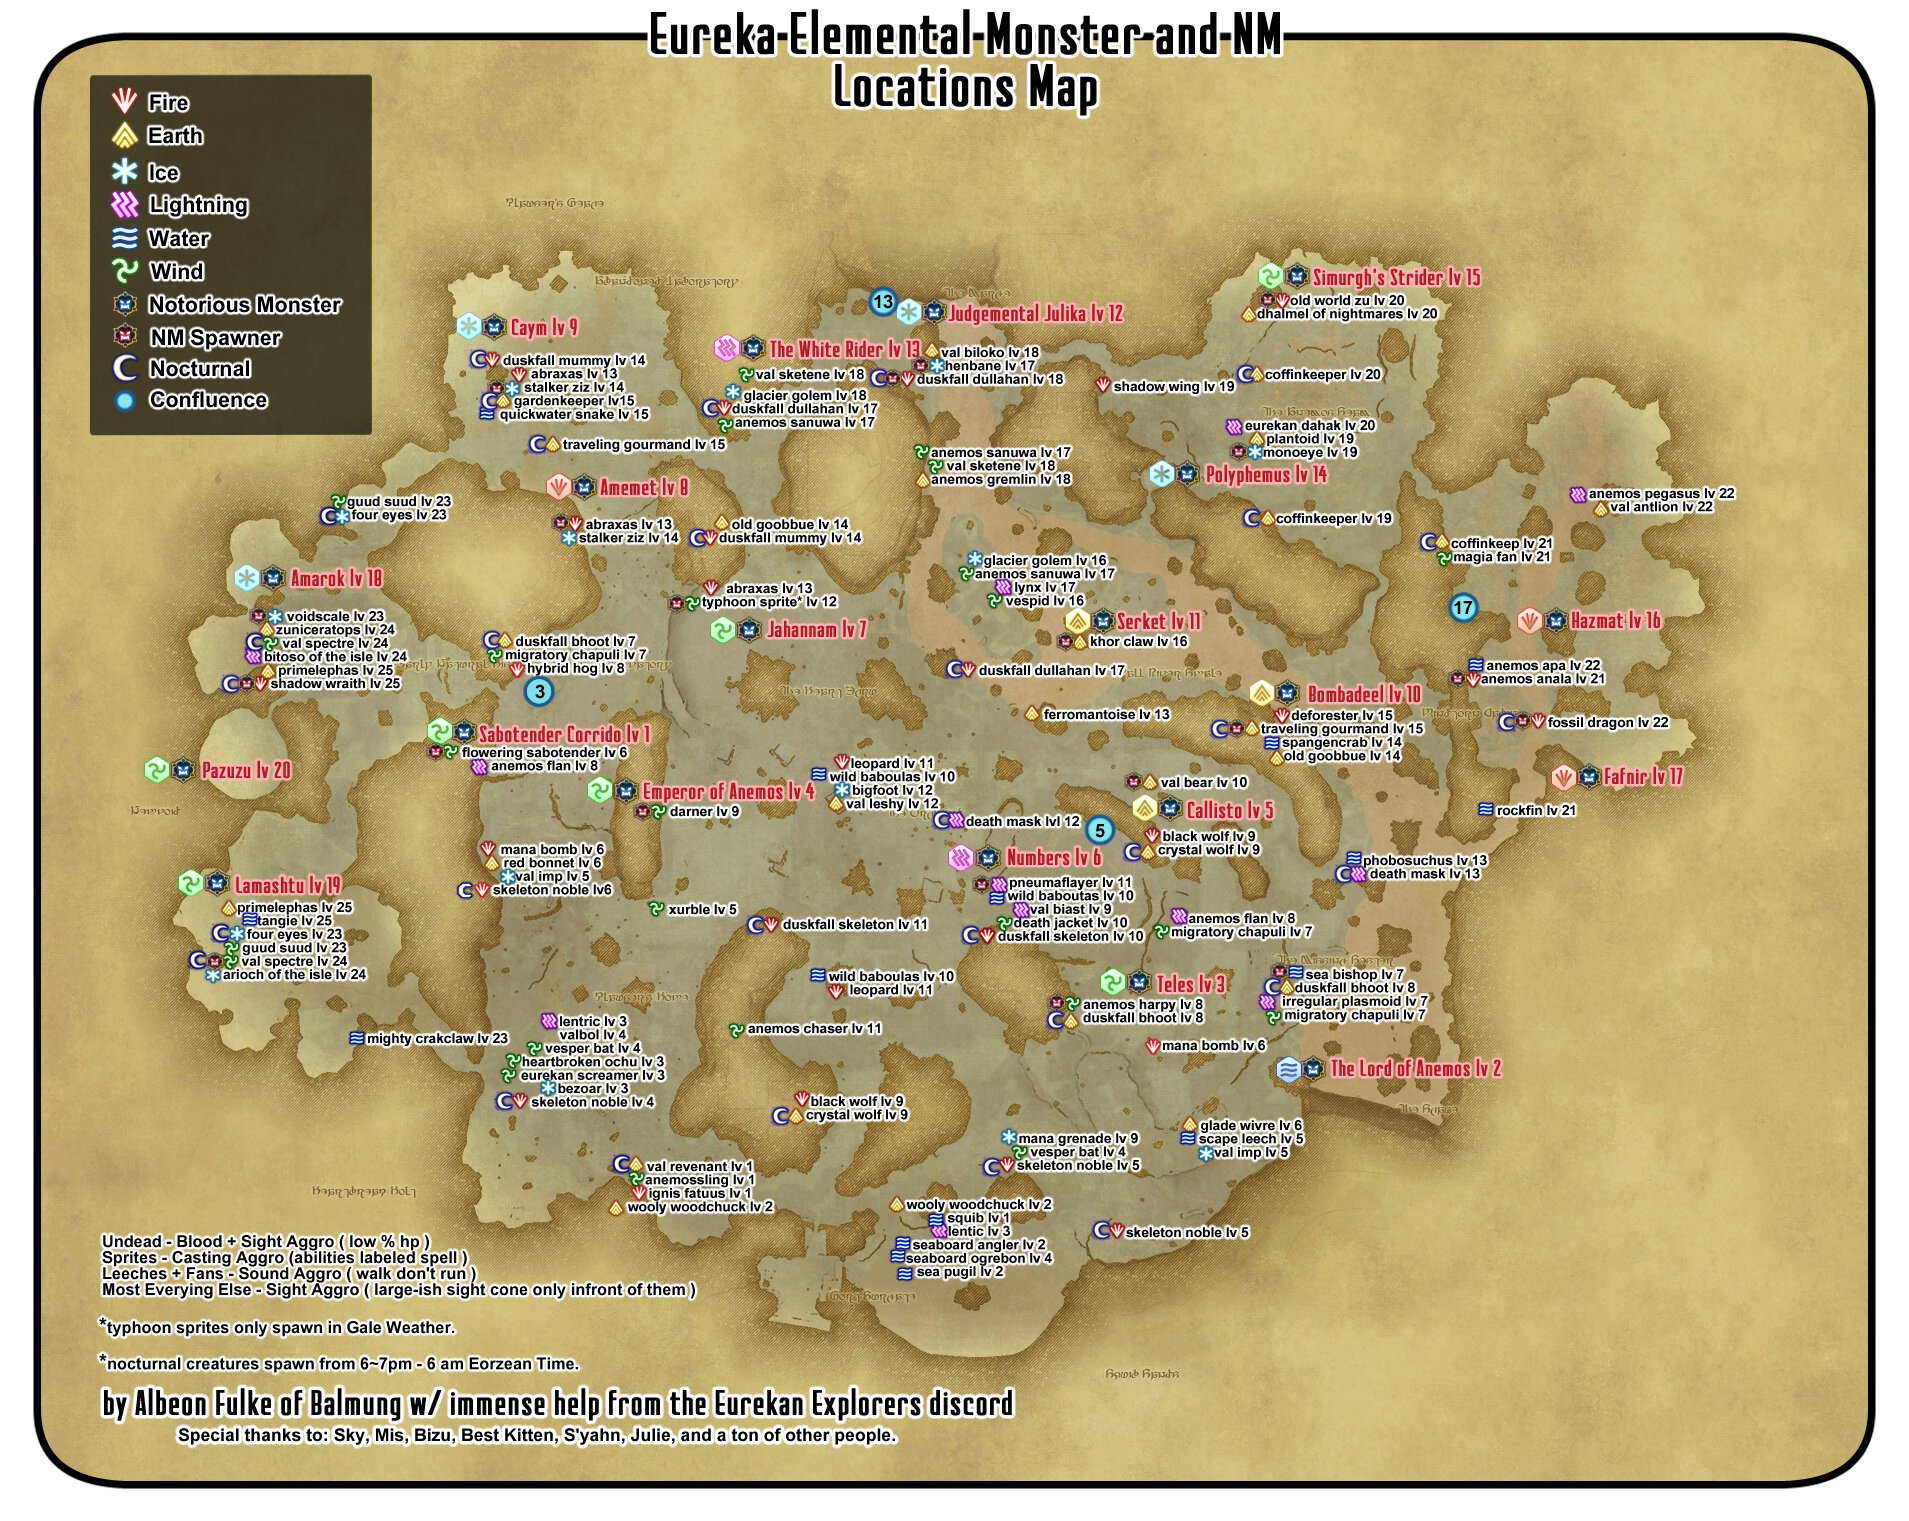
What Notorious Monsters Are in Anemos, and How Can I Spawn Them?
There are a total of 20 Notorious Monsters in Anemos, one for each available level.
| FATE | Notorious Monster | Location | Spawn Mob | Special Conditions | Special Rewards |
|---|---|---|---|---|---|
| Unsafety Dance | Sabotender Corrido (Lv 1) | (X:14.1, Y:21.8) | Flowering Sabotender (Lv 6+) | None | None |
| The Shadow over Anemos | The Lord of Anemos (Lv 2) | (X:27.8, Y:28.2) | Sea Bishop (Lv 7+) | None | |
| Teles House | Teles (Lv 3) | (X:26, Y:26.8) | Anemos Harpeia (Lv 8+) | None | None |
| The Swarm Never Sets | The Emperor of Anemos (Lv 4) | (X:17.2, Y:23.9) | Darner (Lv 9+) | None | |
| One Missed Callisto | Callisto (Lv 5) | (X:27.8, Y:23.3) | Val Bear (Lv 10+) | None | None |
| By Numbers | Number (Lv 6) | (X:23.2, Y:22.7) | Pneumaflayer (Lv 11+) | None | None |
| Disinherit the Wind | Jahannam (Lv 7) | (X:19.1, Y:19.6) | Typhoon Sprite (Lv 12+) | Typhoon Sprites only spawn during Gales weather. | None |
| Prove Your Amemettle | Amemet (Lv 8) | (X:14.7, Y:15.9) | Abraxas (Lv 13+) | None | None |
| Cayn What May | Caym (Lv 9) | (X:12.6, Y:12.4) | Stalker Ziz (Lv 14+) | None | None |
| The Killing of a Sacred Bombadier | Bombadeel (Lv 10) | (X:28.5, Y:20.5) | Traveling Gourmand (Lv 15+) | Traveling Gourmands only spawn at Night. | None |
| Short Serket 2 | Serket (Lv 11) | (X:24, Y:20) | Khor Claw (Lv 16+) | None | |
| Don't Judge Me, Morbol | Judgemental Julika (Lv 12) | (X:22.2, Y:14.9) | Henbane (Lv 17+) | None | None |
| When You Ride Alone | The White Rider (Lv 13) | (X:20, Y:13.4) | Duskfall Dullahan (Lv 18+) | Duskfall Dullahans only spawn at Night. | None |
| Sing, Muse | Polyphemus (Lv 14) | (X:26.2, Y:15) | Monoeye (Lv 19+) | None | None |
| Simurghasbord | Simurgh's Strider (Lv 15) | (X:28.8, Y:13.3) | Old World Zu (Lv 20+) | None | |
| To the Mat | King Hazmat (Lv 16) | (X:35.2, Y:19.7) | Anemos Anala (Lv 21+) | None | None |
| Wine and Honey | Fafnir (Lv 17) | (X:34.6, Y:21.9) | Fossil Dragon (Lv 22+) | Fossil Dragons only spawn at Night. | |
| I Amarok | Amarok (Lv 18) | (X:8, Y:18) | Voidscale (Lv 23+) | None | None |
| Drama Lamashtu | Lamashtu (Lv 19) | (X:8.2, Y:25.3) | Val Specter (Lv 24+) | Val Specters only spawn at Night. | None |
| Wail in the Willows | Pazuzu (Lv 20) | (X:7.3, Y:21.7) | Shadow Wraith (Lv 25+) | Shadow Wraiths only spawn at Night. Pazuzu will only spawn during Gales weather. |
Please refer to either the Detailed Anemos Map or the Local Tracker on the Eureka Tracker website for a visual representation of the locations of NMs and their spawn mobs on the Anemos map.
What Rewards Are Available in Anemos?
Notorious Monsters in Anemos, in additon to Anemos Crystals, will also reward players with ![]() Anemos Lockboxes upon defeat, with the level 1 NM giving just five
and the level 20 NM giving 25. These lockboxes can be opened by speaking to the Expedition Lockpick NPC in Port Surgate, or to R'ghonati in
Kugane. Standout rewards from these lockboxes include the
Anemos Lockboxes upon defeat, with the level 1 NM giving just five
and the level 20 NM giving 25. These lockboxes can be opened by speaking to the Expedition Lockpick NPC in Port Surgate, or to R'ghonati in
Kugane. Standout rewards from these lockboxes include the ![]() Tyrannosaur Horn, the
Tyrannosaur Horn, the ![]() Red Mage Barding, the
Red Mage Barding, the ![]() Wicked Winds Whisper Orchestrion Roll,
the
Wicked Winds Whisper Orchestrion Roll,
the ![]() No Quarter Orchestrion Roll,
No Quarter Orchestrion Roll, ![]() Clear Demimateria III and
Clear Demimateria III and ![]() Allagan Platinum Pieces.
Allagan Platinum Pieces.
Additionally, certain NMs have unique rewards.
- The level 4 NM, The Emperor of Anemos, will sometimes reward the
 Emperor Hairpin.
 - The level 11 NM, Serket, will sometimes reward the
 Scorpion Harness.
 - The level 15 NM, Simurgh's Strider, will sometimes reward the
 Strider Boots.
 - The level 20 NM, Pazuzu, will sometimes reward the
 Altar to Pazuzu.
Changelog
- 08 Mar. 2025: Guide Added.
More FFXIV Content

Stella is a long-time FFXIV player who started in 2018, and has become a Mentor for The Balance in the years since. She enjoys large-scale content such as Eureka and Save the Queen areas and raids, and can be found on Twitter, Youtube and Twitch, as well as Discord (EshEhdAfah). After several previous tiers of raiding casually, she has cleared Anabaseios Savage week 1, completed four out of five Ultimate raids, and taken to challenging herself by using unorthodox, high-speed builds for certain jobs in older ultimates in Party Finder.
- Savage Catchup: How to Ride Your Way to a Clear in M10S
- First Look at Patch 7.5 Comes This Friday — Here’s What to Know
- Here’s What You’ll Need to Step into The Merchant’s Tale
- Little Ladies’ Day 2026 Ends Soon! Don’t Miss These Free Rewards
- Savage Catchup: All the Must-Knows for Tackling M9S
- FFXIV Players Can Earn Free Glamour Items in Valentione’s Day Event
- Don’t Miss NEW Cosmic Exploration & Phantom Weapons — Out Now!
- Been on Break From FFXIV? Don’t Miss Extra Sub Time with the Free Login Campaign!