Keybindings and Hotbar Setup for Gunbreaker — Dawntrail 7.2
Welcome to our keybinding and controller setup guide for Gunbreaker. Here you'll find example setups to play FFXIV for mouse and keyboard configurations, as well as controller users.
Gunbreaker UI and Keybindings Advice
Hotbar setups and keybindings are things that are simultaneously incredibly important and incredibly personal to each player. What might work for one player may be impossible for another. With that in mind, the following hotbar setups are meant to be used as an example, and are not meant to tell you that you need to set up your bars this way. Feel free to tweak these so they work for you, or completely make your own set. The most important thing is to find something that works for you.
Gunbreaker Hotbar Setup
Controller hotbars can and should be adjusted to personal preferences.
Follow the priority of putting things that are used the most frequently on the most accessible button combinations.
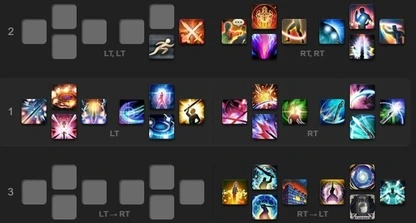
The below example's first bar is the primary bar when you hold LT or RT.
These are the most commonly used skills and are the most easily accessible.
The second bar is the double tap LT and RT bars (called WXHB in the settings menu), which are home to skills
with longer cooldowns or are much less frequently used, like ![]() Lightning Shot.
The third bar is the Expanded XHB and is brought up by pressing both triggers at the same time.
This bar is easier to reach than the second bar, and is therefore home to important mitigation and cooldown skills
that are not used frequently enough to be placed on the primary bar.
You can turn on WXHB and Expanded XHB in Character Menu -> Hotbar -> Custom.
Lightning Shot.
The third bar is the Expanded XHB and is brought up by pressing both triggers at the same time.
This bar is easier to reach than the second bar, and is therefore home to important mitigation and cooldown skills
that are not used frequently enough to be placed on the primary bar.
You can turn on WXHB and Expanded XHB in Character Menu -> Hotbar -> Custom.
Keyboard and Mouse keybindings will be diverse due to the range of keyboards and mice that are available. The below example uses a US QWERTY keyboard, and uses WASD for movement. Using WASD or RMB+LMB for movement is purely a player preference choice, and you should go with whatever is most comfortable for you.
Modifier keys such as L CTRL, L SHIFT, and sometimes L ALT are commonly used and can
help reduce the amount of physical buttons that need to be keybound.
An MMO mouse can also significantly reduce the amount of buttons required by centralizing
several buttons to the right thumb.
If you do not have an MMO mouse, don't worry. Many people are successful in creating
comfortable keybindings without using an MMO mouse.
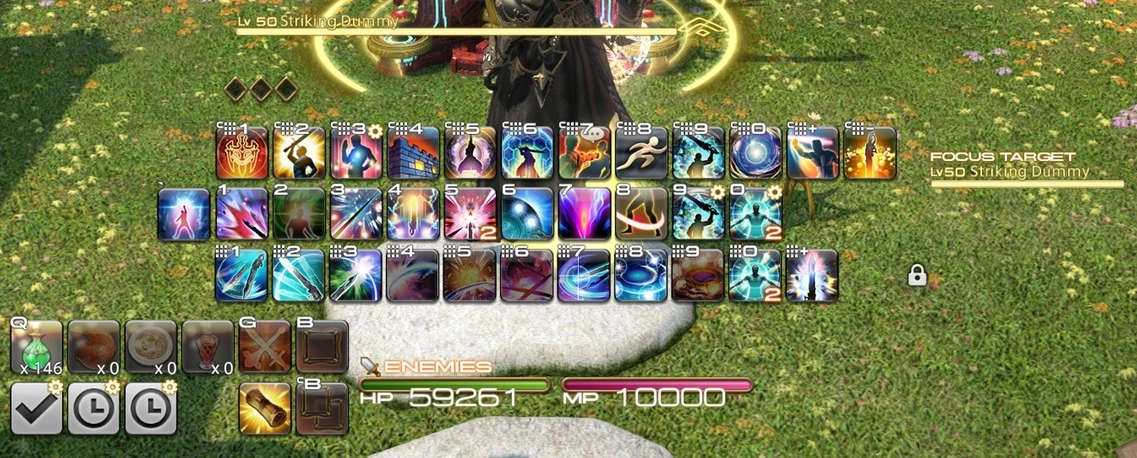
In the below example, a combination of a 12-thumb-buttons MMO mouse, the number bar above the
keyboard, L CTRL as a modifier, and some miscellaneous keyboard buttons are used as needed.
While this setup is comfortable for me, it may be extremely difficult for some, so experiment and
find what works for you. The top bar is CTRL+ 1 to 12 on my MMO mouse.
The middle bar is the number bar above the keyboard, where grave through 7 are comfortable for my reach.
On the bottom is 1 to 12 on my MMO mouse. The bottom left corner is my miscellaneous section, home to Q for potion, G for ![]() Limit Break, and
consumables like food.
Limit Break, and
consumables like food.
Follow these simple rules for chosing a keyboard and mouse setup that is right for you:
- Remember to assign keybindings that are comfortable for you to reach, with the most comfortable and easy to reach binds being home to your most frequently used skills.
- Be careful to avoid keybinds that prevent you from accessing your movement keys at the same time.
- It is okay to bind infrequently used abilities to farther away buttons, but be careful that they are not so far away that it is impossible to press when needed.
- Above all, make sure the keybind is comfortable for you to reach when needed
General UI and Keybinding Advice
The design of FFXIV encourages players to play multiple jobs on the same character. Because of this, it is likely that most players will play at least two or more jobs. This can create some headaches when trying to figure out how to design your hotbar setups as not all jobs play the same way. Below are some tips that will help you mitigate these headaches, regardless of whether you use keyboard and mouse or controller, by keeping things as similar as possible between job hotbars:
- When possible, assign similar abilities to the same buttons. Most jobs have several buttons
that do the same thing as a different job, so keeping them assigned to the same keybinding helps
you keep track of where they are by muscle memory. Some examples of this include, but are not
limited to:
- Combo Abilities: All melee DPS, tanks, and some physical ranged DPS jobs have combo actions. Putting these combos in the same location on your hotbar will help you keep up the muscle memory of where they are and make it easier to swap between jobs.
- Mitigation Abilties: Every combat job has access to at least one form of party mitigation,
whether through class/job actions or through role actions.
For tanks, this is especially important as each tank gets access to
 Rampart and
  Reprisal
via role actions, in addition to their job-specific mitigation buttons.
Many of these job-specific mitigation abilities have the same function and cooldown, such as Gubrbreaker's
 Nebula and Paladin's
  Sentinel which share the same cooldown length of 120s,
and have the same mitigation value of 30% damage reduction. Some job-specific mitigation abilities do not do the
same thing exactly, but are similar enough to consider assigning them to the same keybinding.
An example of this is
  Heart of Corundum and
  The Blackest Night, which are both
strong single target mitigation abilities that can be used on yourself or a party member, and are on a short cooldown.
Keeping these actions bound to the same button makes it easy to carry the muscle memory between jobs.
 - Single Target vs. AoE Abilities: Every job has skills that either only affect a single target,
or affect targets in an Area of Effect (AoE). Keep single target skills grouped together in similar keybindings,
and do the same with AoE skills to avoid confusion when playing other jobs. For example you may wish to keep
 Fated Circle and
  Decimate on the same keybinding as both spend gauge to
execute an AoE attack.
 - GCD vs. oGCD Abilities: It can be very disorenting to be used to a button being a GCD action, and pressing it on another job activates an oGCD instead. Keeping GCDs and oGCDs grouped to similar keybindings will help with the general gameplay flow when swapping between jobs.
- Put abilities on easy to reach buttons based on how frequently you use that ability. For example, Combo abilities tend to be the most used abilities on any job, so those should be on easy to reach buttons. Abilities that are less frequently used can be put on buttons that are less accessible, but should not be so far out of the way that it is difficult to press when needed.
- Use modifier keys to reduce the amount of physical buttons you need to have keybound. For example, instead of using 1 2 3 4 5 6 7 8 and 9, you might instead use 1 2 3, L CTRL + 1 2 3, and L SHIFT + 1 2 3. This has the added benefit of reducing the distance your hand/fingers need to travel to press the key. L CTRL, L SHIFT, and sometimes L ALT are common modifier keys, but remember to use ones that are comfortable for you. An MMO mouse also works very well for doing this, but you can do just fine without one as well.
- Make sure that you are still able to comfortably move your character while pressing each keybinding. This is especially important during periods where you are having to press a lot of buttons at once, such as burst windows or periods where multiple mitigation abilities are needed at once. Keybinds preventing you from moving during these times may result in deaths/party wipes from failed mechanics!
- Your core HUD information (such as hotbars, buffs and debuffs, target bar, etc.) should be in a place that is easy to view while also keeping your character the center of your attention. The farther away something is on your screen, the harder it will be to see it while keeping up your character's positioning, the boss/enemies, and the arena. Furthermore, make sure your character is clearly visible and you do not have UI elements covering your player model, as it is important to be able to see your character clearly for several mechanics.
- If you play on controller, you can add an additional hotbar on your screen and place important abilities on it to track cooldowns without the need to swap hotbars to see them. This can help with both cooldown management and staying focused on your character/the fight.
Guides from Other Classes

Torael Valdis, or Tor for short, is an experienced raider in FFXIV who has been playing the game since the tail end of the Heavensward expansion. His experience includes multiple Week 1 Savage Tier kills as well as completion of each Ultimate Raid in the patch they were released. You can find him in The Balance Discord where he currently is active as a melee DPS mentor. He also occasionally streams early prog on his Twitch.
- FFXIV - Seekers of Eternity Patch 7.2 Now Live!
- FFXIV - Last Chance: Free Fantasia Disappears with Patch 7.2!
- Final Fantasy XIV - Famitsu Interview with Yoshi P Breakdown!
- FFXIV - Live Letter Breakdown: What Is Coming With Patch 7.2?
- FFXIV - Celebrate the Start of Spring With New Sales!
- FFXIV - Everything You Need to Know About the Next Producer Live Letter!
- FFXIV - Patch 7.18 Notes: Weekly Restrictions Removed, Adjustments, and More!
- FFXIV - Little Ladies Day 2025 Guide and Schedule!

