Pictomancer DPS Rotation, Openers, and Abilities — Dawntrail 7.5
On this page, you will learn how to optimise your opener and rotation in both single-target and multi-target situations. We also cover the use of your cooldowns, to ensure you can achieve the best use of them every time as a Pictomancer DPS in Final Fantasy XIV: Dawntrail (Patch 7.5).
Pictomancer Openers in Dawntrail

This opener is the one you'll want to use for a majority of encounters, as well as a majority of party compositions. This opener offers a fair bit of flexibilty in regards to your Starry Muse timings, as well as the ability to adjust it to the third GCD if necessary for whatever reason. Your usage of Holy in White also is afforded some flexibilty by this opener compared to the 3rd GCD opener below, which makes crafting a fight timeline easier to do, if you tend to make one for each fight. There may be a small GCD clip depending on your ping with the triple weave at the beginning. In a majority of cases, or with ping mitigation tools, this clip will rarely end up becoming a loss in most cases.

This opener instead places your Starry Muse buff at the third GCD. If you are not explicitly aware of why you'd need to use this opener, it's generally recommended to use the 2nd GCD opener above instead. For some buff timings, fight phasing or pings, this may be a better option. For example, if the above 2nd GCD opener causes too large of a clip because of your ping, it may be best to use this opener instead. The most frequent use of this opener, however, should be for groups that have agreed to use a third GCD alignment of their raid buffs. Do not use this if the rest of your group is placing their raid buffs at the second GCD. Lastly, this opener may also be an option if there's a fight timeline that you've mapped out where frequent usage of Holy in White is found to be optimal.
Burst Window Sequences
Pictomancer also has many different possible setups for raid buff windows, due to a
few different aspects of how the class is designed. For example, the normal "combo" sequence of
the job is performed via a buff that has a 30 second duration, called Aetherhues. This
means that performing whatever sequence of spells in between one "step" of the combo will not cause
the window to use the second "step" of the combo to time out so long as the next step is taken before the 30 seconds elapses.
You can also use ![]() Subtractive Palette at any point during the combo and pick back up from the
same spot in the Subtractive combo. For example, if you execute the second step of the base combo,
then hit Subtractive Palette, you can immediately use the third step of the Subtractive combo.
Subtractive Palette at any point during the combo and pick back up from the
same spot in the Subtractive combo. For example, if you execute the second step of the base combo,
then hit Subtractive Palette, you can immediately use the third step of the Subtractive combo.
9 Spell Single Muse Burst
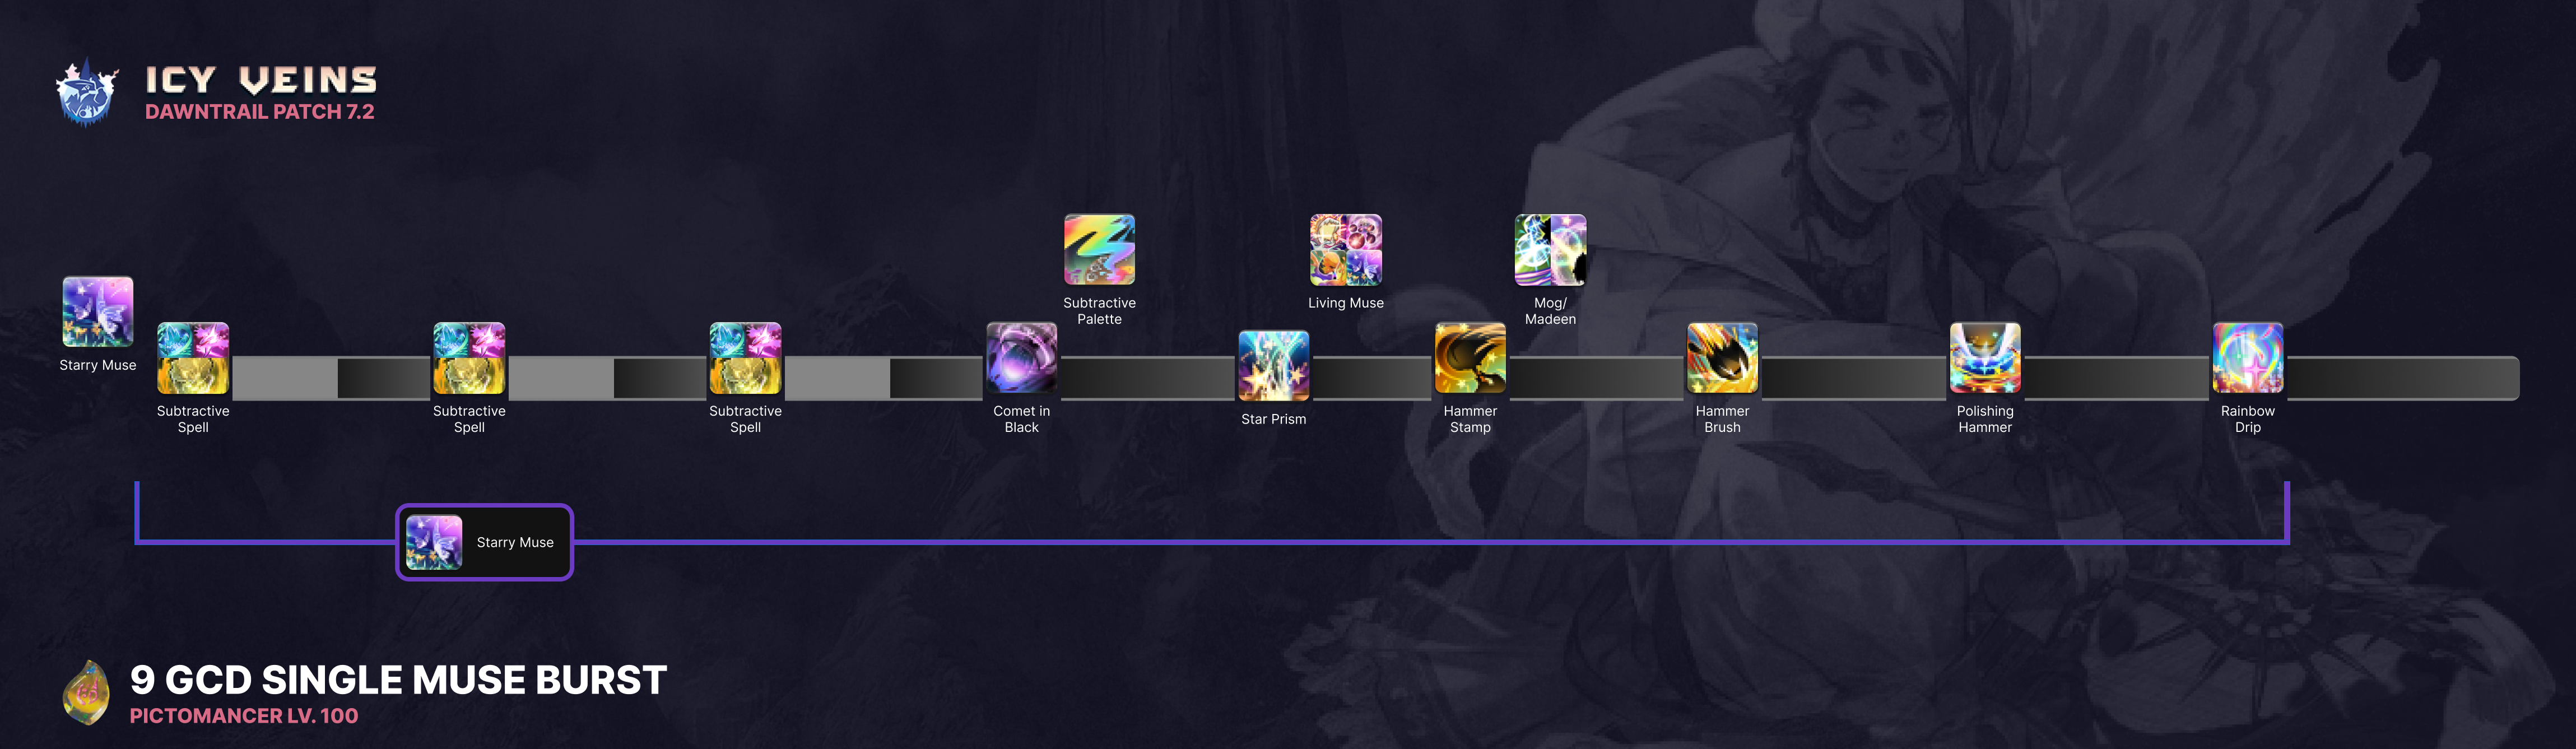
The "original" setup for a burst window we have will include a single muse and nine spells. This setup requires a fairly strict execution, but is generally less strict than the subtractive combo options presented later. This can potentially cause raid buff timing to drift if you aren't careful. That said, it only requires a single Living Muse charge to execute. Please note that due to how buff propagation works, you'll want to head into this window with a subtractive spell. In addition, if you have an Astrologian in the party, make sure the third GCD is a hardcasted Subtractive spell as well to catch their usual Spear card timing.
Aetherhue
 Aetherhue is the "filler" of the Pictomancer job, as well as its most basic concept. This combo
consists of three parts and appears to generate a set amount of gauge, as well as
either a white or black pip on another portion of the job gauge. The first bit of the Aetherhue combo is
Aetherhue is the "filler" of the Pictomancer job, as well as its most basic concept. This combo
consists of three parts and appears to generate a set amount of gauge, as well as
either a white or black pip on another portion of the job gauge. The first bit of the Aetherhue combo is ![]() Fire in Red,
followed by
Fire in Red,
followed by ![]() Aero in Green, finished off by
Aero in Green, finished off by ![]() Water in Blue.
This 1-2-3 combo generates 25 gauge, as well as a pip of white paint, which allows the Pictomancer to
execute
Water in Blue.
This 1-2-3 combo generates 25 gauge, as well as a pip of white paint, which allows the Pictomancer to
execute ![]() Holy in White.
Holy in White.
At 50 gauge, the Pictomancer can execute an ability to invert the 1-2-3 combo, which features
different spells that lead to a pip of paint at the end of the combo. Use of this
ability also changes one of the already-earned white paint pips to a black-colored pip if one exists or ensures the next is a pip of black paint. The inverted
combo begins with ![]() Blizzard in Cyan, followed by
Blizzard in Cyan, followed by ![]() Stone in Yellow, then ending with
Stone in Yellow, then ending with
![]() Thunder in Magenta.
Thunder in Magenta.
White paint pips can also be generated by ![]() Rainbow Drip (unless you're in your
Landscape, which we'll touch on below). This spell will immediately generate a white pip for your gauge,
and will also be able to be executed instantly after casting five spells in your Landscape motif.
Read on for more details about how these motifs work!
Rainbow Drip (unless you're in your
Landscape, which we'll touch on below). This spell will immediately generate a white pip for your gauge,
and will also be able to be executed instantly after casting five spells in your Landscape motif.
Read on for more details about how these motifs work!
Core Mechanic, Motifs
 Pictomancer's resource gauge is comprised of a second half, called Motifs; three (initially)
empty canvases that hold Motifs that the Pictomancer can prepare both before battle and during battle.
Each of the canvases holds one specific type of Motif: the Creature Motif, the Weapon Motif
and the Landscape Motif. While out of combat, these are instantaneous to prepare; during
combat, however, these have varying cast times. Worth noting is that
Pictomancer's resource gauge is comprised of a second half, called Motifs; three (initially)
empty canvases that hold Motifs that the Pictomancer can prepare both before battle and during battle.
Each of the canvases holds one specific type of Motif: the Creature Motif, the Weapon Motif
and the Landscape Motif. While out of combat, these are instantaneous to prepare; during
combat, however, these have varying cast times. Worth noting is that ![]() Swiftcast is
able to be used to prepare these Motifs, and the cooldown for Swiftcast was reduced to 40 seconds
in Dawntrail with a new trait.
Swiftcast is
able to be used to prepare these Motifs, and the cooldown for Swiftcast was reduced to 40 seconds
in Dawntrail with a new trait.
Creature Motifs
Beginning our deep dive at the ![]() Creature Motif, this part of the Motif System
allows you to prepare a portion of the creature, then execute it to perform an attack tied to the Creature
Motif that you painted. You begin by preparing
Creature Motif, this part of the Motif System
allows you to prepare a portion of the creature, then execute it to perform an attack tied to the Creature
Motif that you painted. You begin by preparing ![]() Pom Motif, executing it with
Pom Motif, executing it with
![]() Pom Muse. Next comes
Pom Muse. Next comes ![]() Wing Motif and
Wing Motif and ![]() Winged Muse.
Once these two Muse actions have been executed, the Pictomancer gains access to
Winged Muse.
Once these two Muse actions have been executed, the Pictomancer gains access to ![]() Mog of the Ages.
You keep these creature parts and execute and render two more Motifs (and their matching actions),
Mog of the Ages.
You keep these creature parts and execute and render two more Motifs (and their matching actions),
![]() Claw Motif,
Claw Motif, ![]() Clawed Muse,
Clawed Muse, ![]() Maw Motif and
Maw Motif and
![]() Fanged Muse. Like before, casting these two Muses will allow you to use a new ability --
Fanged Muse. Like before, casting these two Muses will allow you to use a new ability --
![]() Retribution of the Madeen, which is a powerful, instant-cast line AoE, much like
Retribution of the Madeen, which is a powerful, instant-cast line AoE, much like ![]() Mog of the Ages.
Executing this spell resets the player to the beginning of the Creature Motif combo, starting with
Mog of the Ages.
Executing this spell resets the player to the beginning of the Creature Motif combo, starting with
![]() Pom Motif again. The skill used to execute the Creature Motif holds up to three
charges, with a 40 second cooldown on each at level 100.
Pom Motif again. The skill used to execute the Creature Motif holds up to three
charges, with a 40 second cooldown on each at level 100.
Due to the 7.2 potency changes, there's now one additional wrinkle to consider when preparing Creature Muses during a fight. Essentially, due
to the potencies being decreased across the board, but the cast time to prepare these Motifs remaining the same, it is not always worthwhile to
prepare a Creature Muse at the end of a fight unless it will result in a use of ![]() Mog of the Ages or
Mog of the Ages or ![]() Retribution of the Madeen
before the boss dies. If you will only have time for a
Retribution of the Madeen
before the boss dies. If you will only have time for a ![]() Pom Muse or
Pom Muse or ![]() Clawed Muse, do not spend the time preparing the Motif, as
your basic RGB or Subtractive combo will be higher potency per second.
Clawed Muse, do not spend the time preparing the Motif, as
your basic RGB or Subtractive combo will be higher potency per second.
Weapon Motifs
The second type of motif that the Pictomancer has access to is the ![]() Weapon Motif.
This prepares a three-part Hammer combo. This combo deals damage guaranteed to crit and direct hit
for each step of the combo, resulting in a nice bit of burst damage when executed. In addition,
each Hammer combo is an instant cast, making it a strong
option for movement without having to sacrifice potency while doing so. All three steps of the
combo can be executed from range, in spite of the weapon, giving players even more flexibilty. The
skill used to execute the Hammer Motif can hold up to two charges, with a 60 second cooldown on each.
Weapon Motif.
This prepares a three-part Hammer combo. This combo deals damage guaranteed to crit and direct hit
for each step of the combo, resulting in a nice bit of burst damage when executed. In addition,
each Hammer combo is an instant cast, making it a strong
option for movement without having to sacrifice potency while doing so. All three steps of the
combo can be executed from range, in spite of the weapon, giving players even more flexibilty. The
skill used to execute the Hammer Motif can hold up to two charges, with a 60 second cooldown on each.
Due to changes in patch 7.2, Hammer combo is now much weaker than it was at Dawntrail's launch, which gives rise
to alternative burst windows discussed above. It is worth mentioning, however, that chatter about Hammer being entirely
worthless outside of your two-minute buff windows is not always accurate, particularly during prog. Hammers can still
be used when learning a fight for movement purposes, unless you are absolutely sure you can perform a mechanic without the extra
movement the skill provides. Remember - your first responsibility is to remain alive. You won't provide any damage at all if you
die trying to fight in an extra Subtractive GCD while still learning a fight. In addition, it is always worthwhile to use a
Hammer combo if you can prepare ![]() Weapon Motif during downtime of a fight.
Weapon Motif during downtime of a fight.
In addition, your Hammer combo is still more powerful than the RGB portion of our basic combo, so it can be a more powerful option at the end of a fight to use these, depending on the resources available to you. If you are fully comfortable with a fight and you no longer need the Hammer combo to comfortably execute movement-heavy mechanics, your odd-minute Hammers (the minutes between your raid buff windows) can and should be skipped where possible as of patch 7.2.
Landscape Motifs
Finally, the third and final motif that the Pictomancer can make use of is the ![]() Landscape Motif.
The Landscape Motif allows access to Pictomancer's raid buff,
Landscape Motif.
The Landscape Motif allows access to Pictomancer's raid buff, ![]() Starry Muse. This places
a ground AoE on the field, granting a wide array of buffs. The first is a party-wide 5% damage buff,
which lasts for 20 seconds. The rest are specific to the Pictomancer, including a cast and recast time reduction
on each of the next five Aetherhue spells (or
Starry Muse. This places
a ground AoE on the field, granting a wide array of buffs. The first is a party-wide 5% damage buff,
which lasts for 20 seconds. The rest are specific to the Pictomancer, including a cast and recast time reduction
on each of the next five Aetherhue spells (or ![]() Star Prism) cast inside of the drawn circle on the ground.
Once all five stacks of this effect, called Hyperphantasia, are consumed, you gain an instant cast of
Star Prism) cast inside of the drawn circle on the ground.
Once all five stacks of this effect, called Hyperphantasia, are consumed, you gain an instant cast of ![]() Rainbow Drip.
Last, but not least, each use of
Rainbow Drip.
Last, but not least, each use of ![]() Starry Muse grants a free use of
Starry Muse grants a free use of ![]() Subtractive Palette,
which allows access to the Subtractive Combo and converts a pip of white paint to black paint (or ensures the next pip generated
is a black paint pip).
Subtractive Palette,
which allows access to the Subtractive Combo and converts a pip of white paint to black paint (or ensures the next pip generated
is a black paint pip).
Pictomancer Utility
Pictomancer also has access to other spells that increase its utility in a group setting.
![]() Tempera Coat is a personal shield that grants a shield to the user for 20% of their max HP. This shield has
a cooldown of 120 seconds, but if the shield is consumed in its entirety by damage, this is reduced to
60 seconds. You can also use Tempera Grassa when under the effect of Tempera Coat to spread this shield
to your nearby party members, creating a shield for 10% of their max HP for each player affected by it. This
comes with an identical cooldown to Tempera Coat, but is reduced by 30 seconds if the shield is consumed.
Tempera Coat is a personal shield that grants a shield to the user for 20% of their max HP. This shield has
a cooldown of 120 seconds, but if the shield is consumed in its entirety by damage, this is reduced to
60 seconds. You can also use Tempera Grassa when under the effect of Tempera Coat to spread this shield
to your nearby party members, creating a shield for 10% of their max HP for each player affected by it. This
comes with an identical cooldown to Tempera Coat, but is reduced by 30 seconds if the shield is consumed.
Lastly, Pictomancer also has access to ![]() Smudge, a strong movement skill that allows the user
to dash 15 yalms forward. This only has a cooldown of 20 seconds, so it's available to use relatively frequently. Stronger
still is the effect it grants to the user: a movement speed increase that lasts for five seconds, which is invaluable
in content that requires the caster to move often instead of remaining stationary.
Smudge, a strong movement skill that allows the user
to dash 15 yalms forward. This only has a cooldown of 20 seconds, so it's available to use relatively frequently. Stronger
still is the effect it grants to the user: a movement speed increase that lasts for five seconds, which is invaluable
in content that requires the caster to move often instead of remaining stationary.
Pictomancer's AoE Rotation
Pictomancer's AoE rotation is relatively straightforward, though there are plenty of options.
Amongst the strongest available is ![]() Star Prism, which is the job's level 100 capstone spell. This spell deals
heavy damage to the first enemy hit, with a 50% fall-off after that. It also heals all party members
with an AoE heal, bringing a good amount of utility as well, though this shouldn't be saved for
the heal. This, however, can only be executed when you have the Starstruck buff from
Star Prism, which is the job's level 100 capstone spell. This spell deals
heavy damage to the first enemy hit, with a 50% fall-off after that. It also heals all party members
with an AoE heal, bringing a good amount of utility as well, though this shouldn't be saved for
the heal. This, however, can only be executed when you have the Starstruck buff from ![]() Starry Muse,
so usage of this will be more restricted.
Starry Muse,
so usage of this will be more restricted.
The next-best option Pictomancer has is the Hammer combo, each step of which hits in an AoE and is guaranteed to direct hit and critical hit each enemy. These also have a fall-off of 50% after the first enemy hit, but with potencies of 520, 580 and 640 with each step, these are still a massive amount of damage that also allows for the Pictomancer to move freely due to their instant cast.
Pictomancer's living muses and portrait skills are the next strongest ability in its toolkit when it
comes to AoE damage. Given that painting motifs is instant out of combat, take care to
prep another use of each inbetween pulls. While the cast after the first is a
three-second cast while in combat, it's generally still ideal to use the muse you painted between pulls, then hardcast
a second use to make the portrait, be it ![]() Mog of the Ages or
Mog of the Ages or ![]() Retribution of the Madeen, available to
use before enemies start to die, as the value on these skills fall as enemies die.
Retribution of the Madeen, available to
use before enemies start to die, as the value on these skills fall as enemies die.
![]() Comet in Black hits for 780 potency, with a 50% fall-off, and similarly to the Hammer combo, is an
instant cast. Due to this, it's still a strong option for AoE, though due to how Black Paint is gained, it's unlikely
to be available as often as you'd otherwise like during dungeons.
Comet in Black hits for 780 potency, with a 50% fall-off, and similarly to the Hammer combo, is an
instant cast. Due to this, it's still a strong option for AoE, though due to how Black Paint is gained, it's unlikely
to be available as often as you'd otherwise like during dungeons. ![]() Holy in White is the next-best option
to it when Comet in Black isn't able to be used, being 480 potency (also with the 50% fall-off), which is still a very
strong option for AoE situations.
Holy in White is the next-best option
to it when Comet in Black isn't able to be used, being 480 potency (also with the 50% fall-off), which is still a very
strong option for AoE situations.
One of the odder options available after these is ![]() Rainbow Drip, which has a higher potency than the
options following it. Rainbow Drip is 900 potency, with a 50% fall-off and hits in a line AoE in front of the caster.
While this is a large amount of potency (even if it has a long cast), it's important to note that this
spell doesn't generate any Palette Gauge to access
Rainbow Drip, which has a higher potency than the
options following it. Rainbow Drip is 900 potency, with a 50% fall-off and hits in a line AoE in front of the caster.
While this is a large amount of potency (even if it has a long cast), it's important to note that this
spell doesn't generate any Palette Gauge to access ![]() Subtractive Palette or
Subtractive Palette or ![]() Comet in Black, so using the next
options instead of Rainbow Drip to be able to use Comet in Black on the next pull is a consideration to keep in mind.
Comet in Black, so using the next
options instead of Rainbow Drip to be able to use Comet in Black on the next pull is a consideration to keep in mind.
Lastly, we have the two AoE combos that Pictomancer has. The better of the two is, of course, the stronger
Subtractive AoE combo, which consists of ![]() Blizzard II in Cyan,
Blizzard II in Cyan,
![]() Stone II in Yellow and
Stone II in Yellow and ![]() Thunder II in Magenta.
These spells have a longer cast time than the normal AoE combo, but have beefier potencies to make up for it,
offering 160, 180, and 200 potency respectively. This combo also will convert White Paint to Black Paint when
using
Thunder II in Magenta.
These spells have a longer cast time than the normal AoE combo, but have beefier potencies to make up for it,
offering 160, 180, and 200 potency respectively. This combo also will convert White Paint to Black Paint when
using ![]() Subtractive Palette to access this, which as mentioned above, is a strong AoE skill for large pulls, as
well as giving you another White Paint (or Black Paint, if no Paint is currently held by the caster). The normal
AoE combo of
Subtractive Palette to access this, which as mentioned above, is a strong AoE skill for large pulls, as
well as giving you another White Paint (or Black Paint, if no Paint is currently held by the caster). The normal
AoE combo of ![]() Fire II in Red,
Fire II in Red, ![]() Aero II in Green and
Aero II in Green and ![]() Water II in Blue close out the AoE options. Given their
relatively low potencies, these should only be used when there are no other options and you need to build White Paint for
Water II in Blue close out the AoE options. Given their
relatively low potencies, these should only be used when there are no other options and you need to build White Paint for ![]() Holy in White.
Holy in White.
Changelog
- 02 May 2026: Reviewed for Patch 7.5.
- 05 Aug. 2025: Preliminary changes for patch 7.3. These are not final, and new burst windows will be added with another changelog entry once these are finalized.
- 03 May 2025: Updated openers and bursts to reflect most recent suggested openers.
- 31 Mar. 2025: Updated the Burst, Hammer Motif and Creature Motif sections to reflect Patch 7.2 changes.
- 03 Jan. 2025: Corrected 2nd GCD opener to have correct skill icon.
- 16 Dec. 2024: Updated burst section to remove 8 Spell Burst, as well as updating the Openers section, adding a 2nd GCD opener option with some explanation as to each Opener's use case.
- 01 Sep. 2024: Updated to remove references to early information.
- 01 Aug. 2024: Updated standard opener to better accomodate AST card timings.
- 02 Jul. 2024: Finalized opener section for launch Dawntrail.
- 24 Jun. 2024: Added graphics for burst sequences, as well as a third sequence. Added AoE section. Updated odds and ends section with info about Tempera Coat, Tempera Grassa and Smudge.
- 16 Jun. 2024: Added tentative burst sequences for Media Tour build.
- 13 Jun. 2024: Context added for both Openers added, added second opener image.
- 07 Jun. 2024: Pictomancer Opener added.
- 31 May 2024: Updated information in the Motifs and Aetherhue sections, added link to PLL Digest.
- 30 May 2024: Guide added.
Guides from Other Classes

This guide was written by Laille, a head admin in The Balance Discord, a comprehensive resource for theorycrafting combat jobs in FFXIV. He has been raiding since Stormblood, and has also been involved in Red Mage theorycrafting. He uploads videos to Youtube and streams on Twitch.
- Get Your Switch 2 Before Prices Increase September 1st
- EP8 Now Available — Listen to These Dawntrail Tunes ASAP
- FFXIV Players Can Now Grab Berlin Fan Fest Merch Before It Sells Out
- FFXIV Players: Here’s Every Major Drop Before Evercold Hits
- Evangelion Alliance Raid Announced for FFXIV Evercold in 2027
- FFXIV Launching on Switch 2 But Leaving PS4 — Here’s What You Need to Know
- FFXIV Patch 7.5 Just Kicked Off Dawntrail’s Final Chapter
- Yoshi-P Fanfest Q&A: Glamour Plates, Job Design, and Favorite Scion