Recollection (Extreme) Trial Guide
This guide aims to prepare players for "Recollection (Extreme)" by providing detailed explanations of the fight's mechanics, as well as consistent strategies for the purpose of farming.
Introduction to Recollection (Extreme)
Once more the wandering minstrel weaves a tale with his musical talents, this time an ode to a stalwart knight who served with distinction beneath thunderous skies. With peerless skills and formidable magicks she defended the throne, yet as the queen was barred from the battlefield, she never spied Zelenia's cold, merciless gaze, nor glimpsed the raging fury that burned within her breast. What would this simulacrum born of the queen's memories become had Sphene possessed firsthand knowledge of the warrior's unbridled ferocity? As the ballad fills your ears, a vision of this daunting foe begins to take shape...
Unlock Requirements
Recollection (Extreme) can be unlocked at level 100 after completing the main scenario quest "Descent to the Foundation" and talking to the Wandering Minstrel in Tuliyollal. It requires a minimum item level 730 to queue, but this requirement can be bypassed by entering with a full party.
Zelenia (Extreme) Encounter Guide
The encounter is split into an introduction, adds phase, and several sets of mechanics.
Raid Preparation
Begin by assigning clock positions for each party member, with supports on cardinals and DPS on intercardinals. Each DPS will have a support partner indicated by the colour waymark pairs. Finally, the raid will be split into two light parties of one tank, one healer, and two DPS each based on the partner splits.
Waymarks should be set up with ABCD in the cardinals and 1234 on intercardinals.
Zelenia's Main Mechanics
The major mechanic in Recollection (Extreme) is Roseblood Bloom. Similar to normal mode, this ability changes the arena into distinct conal tiles with a bleed puddle in the middle. Rose patterns may spawn on these tiles and be created through certain abilities. Rose tiles copy any mechanic that is touching it to the entire tile and any tile adjacent to the rose tile. These include AoEs, stack markers, and towers. Players will have to "program" each mechanic set to satisfy certain constraints.
Introductory Phase
You will fight Zelenia. The arena has a death wall.
Introduction Mechanics
Zelenia introduces the following abilities during this introductory phase.

- Thorned Catharsis: Raidwide magical damage.
- Shock: Four players in one role receive a marked AoE with a countdown, while the other four players receive a donut AoE with a countdown. Once it finishes, it leaves behind a puddle that ticks repeatedly for fire damage and inflicts a short fire debuff, meaning you will die if hit by more than one AoE. In addition, four towers spawn on intercardinals which need to be soaked.
- Specter of the Lost: Two random non-tanks receive tethers. These do a physical conal tank buster and need to be picked up by tanks.
- Escelons' Fall: Zelenia shows four "Witch Hunt" proximity markers in order, as seen in the above image: the first is close, and the second is far. She will either slash the four closest players or the four furthest players in sequence with a conal AoE that deals physical damage and inflicts a physical debuff.
- Stock Break: A mulit-hit stack marker on a healer that hits four times.
- Blessed Barricade: Transitions to adds phase.
Introduction Strategy
- Begin by standing in clock spots. Whichever role receives the donut AoE for Shock needs to stand on the intercardinal towers. Their partner spreads on the cardinal coloured waymark and dodges out of the AoE after. Don't be too close to the middle, as tanks need to pick up and mitigate Specter of the Lost after.
- While there are multiple ways to handle Escelon's Fall in party finder, all of them do work and it is up to the preference of the party. Four preassigned players (usually of one role) will have to ensure they bait the first and third hits on their clock spot, while the other four players have to ensure they bait the second and fourth hits on their clock spots. This can involve all players moving (swapping between close and far) when needed or one set of players moving. For example, if it was close-far-far-close, the first group will begin close and the second far. They will stay for the second hit, swap for the third hit, and stay for the fourth hit.
- This mechanic happens three times throughout the fight, so it's necessary to master now.
Adds Phase
Blessed Barricade will spawn four Roseblood Drop adds at intercardinals that need to be killed. Zelenia's Aether gauge will steadily increase throughout the phase, wiping the party if it reaches 100. Split the party into supports going west and DPS going east.
Adds Phase Mechanics
Zelenia uses the following mechanics during adds phase.
- Towers: Four sets of two towers spawn that require at least three players to soak them. The left tower spawns south west initially, while the right tower spawns north east. Soaking them deals light magical damage.
- Power Break: Zelenia summons shades east and west. East shades tether onto each DPS in a random order, while west shades tether onto each support in a random order. The clone will do a half-room cleave on the side of the raised sword, and the tethered players need to point this away from the middle.
- Perfumed Quietus: Zelenia's ultimate, dealing massive raidwide magical damage.
Adds Phase Strategy
- The adds phase is relatively simple but is a light DPS check. Players need to kill the four adds while baiting the half-room cleave outside and soaking towers.
- Since tethers and towers are fixed, DPS go north east to begin and supports go south west. If you are not tethered, you soak the tower.
- The tethered player needs to orient the add such that their cleave faces outside. Melees can do so while hitting an add.
- Repeat this until all four adds are dead. If successful, Perfurmed Quietus will not wipe the party.
Roseblood: 1st and 2nd Bloom
Each set of Roseblood Bloom creates a certain pattern on the arena. Players will need to solve these while not dying to any AoEs. Most AoEs will inflict a stack of damage taken increased. Remember to not move through the middle puddle.
Roseblood: 1st and 2nd Bloom Mechanics
Zelenia introduces the following mechanics.
- Alexandrian Thunder II: Three conal AoEs that rotate in the direction indicated. These will spin for just over 90 degrees. Hits Rose tiles.
- Alexandrian Thunder III: Marked AoEs on all players which inflicts a lightning debuff. Hits Rose tiles.
- Alexandrian Thunder IV: Two rings form around her. The inner ring indicates a point-blank AoE, and the outer ring indicates a donut AoE. These will go off in the order they spawned.
- Thunder Slash: Conal AoEs go off in sequence accompanied with Alexandrian Thunder IV. Dodge out or in while avoiding the cones. Hits Rose tiles.
Roseblood: 1st and 2nd Bloom Strategy
- Both the first and second Roseblood Blooms are simple in execution.
- For the first one, the party starts in the southeast if the rotation is clockwise and in the northwest if the rotation is counter-clockwise. Chase the conal AoE without getting hit by it or standing in a Rose tile. Afterwards, spread for Alexandrian Thunder III while not standing on a Rose tile.
- For the second one, there will be one side with two safe inner tiles and one side with two safe outer tiles. You'll have to go to the side with two tiles safe for the second mechanic in Alexandrian Thunder IV. Another way of thinking about it is to start on the side with only one safe tile for the first mechanic.
- Dodge the cleaves and AoEs by dodging in or out for the donut and point-blank. You'll have to move either diagonally or straight to dodge the second cleave, then move to the other safe tile to dodge the third cleave.
- Tanks will have to pick up the tank buster tether after this.
Roseblood: 3rd Bloom
The third bloom is a mechanic which assigns positions based on roles. There are different ways to assign positions for this, so discuss with your party which strategy you are using.
Roseblood: 3rd Bloom Mechanics
Zelenia introduces the following mechanics.
- Bud of Valor 1: Summons a shade at the edge of the arena which spawns four towers on intercardinal outer Rose tiles.
- Emblazon: Marks four players of one role with a Rosebud, which turns their tile into a Rose tile. Inflicts a magic vulnerability debuff and explodes if the player is standing on a Rose tile.
- Bud of Valor 2: Summons a shade at the edge of the arena which casts Alexandrian Banish II, a stack on a random support and DPS. Three players of one role will also get a donut Shock.
Roseblood: 3rd Bloom Strategy

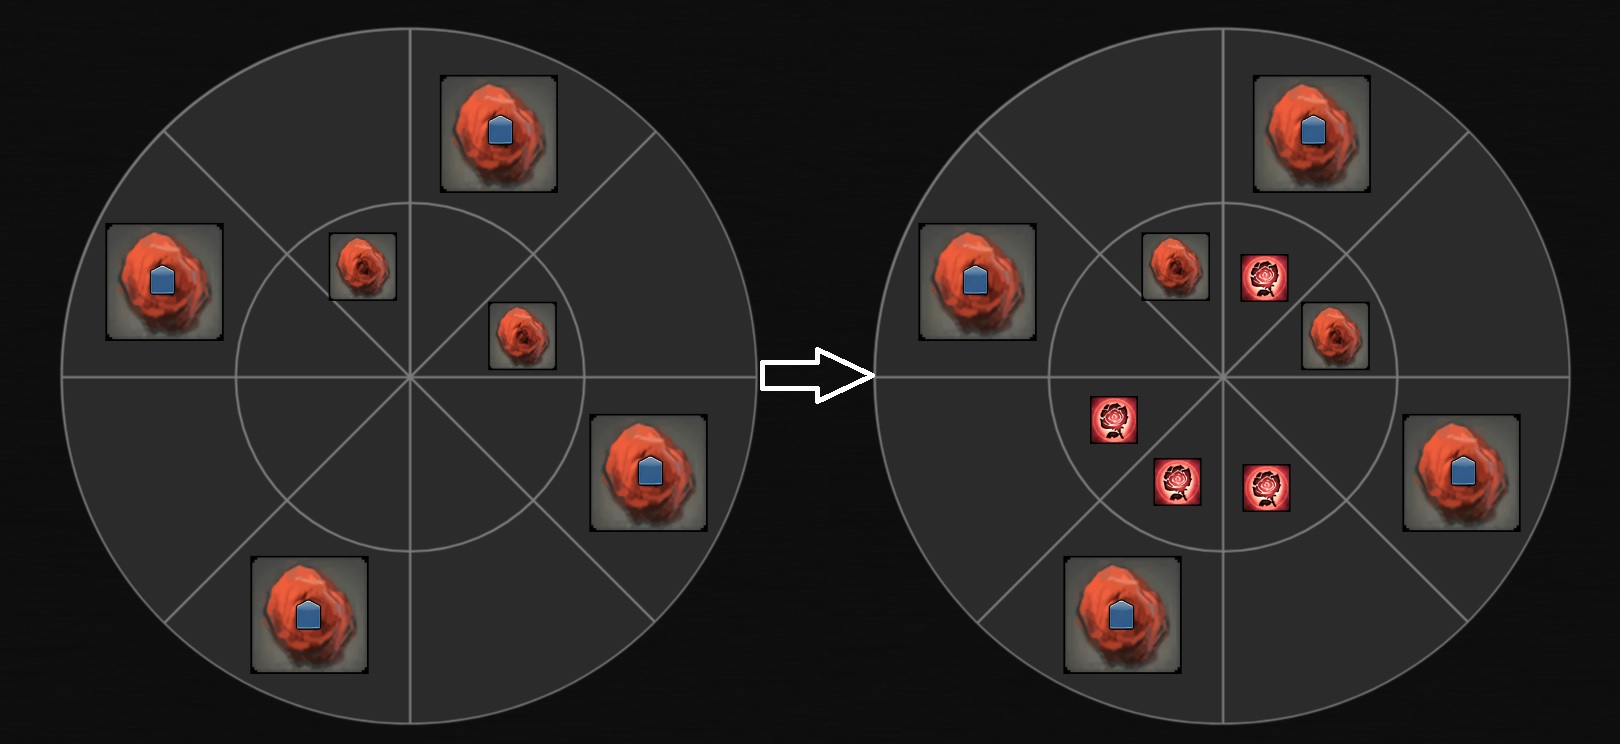
- The goal of the 3rd Bloom is to make sure no towers are connected after creating four new Rose tiles. The initial Rose tile pattern is shown on the left, though it can be mirrored or flipped. The Rose tile pattern that solves the puzzle is on the right.
- To do this mechanic, have each pair claim a quadrant of the arena. Players targeted with Emblazon have to create the Rose tile pattern shown on the right, while the other role needs to stand on the Rose tile with the tower.
- The player marked for Emblazon in the quadrant with the inner Rose tiles surrounding it takes that one. The other three players with the rose will squeeze in towards the tile opposite of that one. The other role players will soak the tower in their quadrant.
- After Emblazon goes off, those players should stand on a safe tile.
- The next mechanic is Escelons' Fall combined with donut Shock and Alexandrian Banish II. Players should stack with their role on the hitbox, with supports north and DPS south. As one role is trapped inside their donut AoEs, the non-trapped role is forced to always take the first bait for Escelons' Fall.
- For this one, have the four players spread north and south after around the boss in RMMR based on light party sides. Do the mechanic normally after the first hit. Shock Break always follows the four cleaves.
Roseblood: 4th Bloom
The fourth bloom is also a mechanic which assigns positions based on roles. Players are split by role and have to create the correct pattern yet again.
Roseblood: 4th Bloom Mechanics
Zelenia introduces the following mechanics.
- Encircling Thorns: Tethers four players of one role to four players of the other role. Tethers are broken by distance.
- Alexandrian Banish III: A stack marker on a random healer. This hits Rose tiles, which makes all players in the Rose tile and connected Rose tiles part of the stack mechanic.
- Bud of Valor 2: Summons a shade at the north and south edges of the arena which casts Power Break.
Roseblood: 4th Bloom Strategy

- Begin by locating the side of the arena with four adjacent safe tiles. This is where the four players of the role targeted with Emblazon will go, and it can either be north or south. Melee will go on the inside, ranged on the outside, and sides are determined by light party facing the boss.
- The other four players will be targeted by Alexandrian Thunder III, an AoE. They cannot hit any Rose tile on the side of the arena the four Emblazoned players are, or they will get hit by the AoE and die.
- Next, all players go to the side of the arena with two safe inner tiles. Stack up, then have supports go left facing the boss and DPS go right facing the boss to break Encircling Thorns. While moving to the edge of the arena, everyone needs to go inside the two outer Rose tiles to ensure all players are in the stack.
- Next, players need to perform Escelons' Fall with two half-room cleaves. This will be done the same way as the first one as there are no movement restrictions, but before the first bait players need to all be on the safe side of the half-room cleave. Immediately after the fourth bait, players need to move to the safe side again. Stack for Stock Break after.
Roseblood: 5th and 6th Bloom
The fifth Bloom is an execution check while the sixth Bloom is the final hurdle of the fight and requires players to connect towers with a safe spot from cleaves.
Roseblood: 5th and 6th Bloom Mechanics
Zelenia introduces the following mechanics.
- Valorous Ascension: Summons Briar Thorns at the edge of the arena that do a line AoE across the arena. Also deals two instances of raidwide physical damage.
- Holy Hazard: Zelenia shows indicators for two sets of two 120 degree cleaves opposite of each other. These will go off in the order they spawned.
Roseblood: 5th and 6th Bloom Strategy
- Begin by locating the side safe from the first set of Briar Thorn line AoEs. Players will need to move into the opposite safe spot in the path of the first line AoE while dodging the in and out from Thunder Slash. Make sure you don't move through the middle.
- Immediately after is a set of tank buster tethers.
- The sixth and final Bloom is the most difficult mechanic in the fight. Players need to look to determine if the outer tower or inner tower is unsafe for the second Holy Hazard cleave, and place their Emblazon buds in a way that forms a path to the unsafe tower in a safe spot.
- Have group 1 go north and group 2 go south. If the inner tower will be hit first, the Rose tiles need to be placed on the outside north and south safe tiles. If the outer tower will be hit first, the Rose tiles need to be placed on the inside north and south tiles. The melee should be left facing the boss and the ranged should be right.

- The players not targeted for Emblazon need to soak the tower. All players need to dodge Holy Hazard into the safe tile if they had Emblazon or onto the Rose tile if they didn't. Melee should get the inner tower and ranged should get the outer tower.
- An alternative strategy exists where players will always place Emblazon on the inner tiles. The party will then use extreme mitigation that possibly includes tank limit break to mitigate the Rose tile and Holy Hazard damage. This makes the sixth Bloom much easier to execute at a small DPS cost, but is commonly used because the DPS check is fairly lenient.
- Afterwards, the boss will repeat the first Bloom mechanic with the rotating conal AoEs.
- She then casts Specter of the Lost, three Stock Breaks, and then an enrage sequence. Kill the boss before she kills you!
Rewards
When Zelenia is defeated, the treasure coffer will contain ![]() Queensknight Weapon Coffer (IL 745),
as well as one random item level 745 Queensknight weapon. In addition, there is
a chance for the
Queensknight Weapon Coffer (IL 745),
as well as one random item level 745 Queensknight weapon. In addition, there is
a chance for the ![]() Knight Core and
Knight Core and ![]() Faded Copy of Roses of May (Dawntrail)
to appear. Finally, there is a rare chance for the mount,
Faded Copy of Roses of May (Dawntrail)
to appear. Finally, there is a rare chance for the mount,
![]() Wings of the Knighthood to appear.
Wings of the Knighthood to appear.
In addition, all party members will receive one ![]() Knight Totem,
ten of which can be exchanged for any Queensknight weapon.
Knight Totem,
ten of which can be exchanged for any Queensknight weapon.
Changelog
- 29 Mar. 2025: Guide added.
More FFXIV Content

This guide has been written by Lyra an accomplished raider in FFXIV and has written raid guides for the game for the past five years. You can follow him on Twitter and he streams raids on Twitch.
- FFXIV - Your Ultimate Cosmic Exploration Guide!
- FFXIV - Seekers of Eternity Patch 7.21 Notes Are Here!
- FFXIV - Invite Your Friend Back and Get Exclusive Rewards With the Callback Campaign!
- FFXIV - When Does the Mobile Version Release?
- FFXIV - Are You Ready for the Hatching Tide?
- FFXIV - Beastmaster Icy Veins Sneak Preview??
- FFXIV - Pre-orders Are Open for the TTRPG Scenario and Gamemaster Guide!
- FFXIV - Seekers of Eternity Patch 7.2 Now Live!