Keybindings and Hotbar Setup for Sage — Dawntrail 7.2
Welcome to our keybinding and controller setup guide for Sage. Here you'll find example setups to play FFXIV for mouse and keyboard configurations, as well as controller users.
Keybindings and UI Introduction
As with all classes, your hotbar arrangement and keybindings are a matter of individual preference. Once you have a feel for the class, you should arrange your hotbar how you see fit. However, it can be useful to have a starting point to work from. This page has some examples of some ways that you might organize your hotbar and keybinds, including options for all sorts of input devices.
Sage Hotbar Setup
A keyboard and mouse allows you to have many buttons, plus multiple modifier keys. In addition, MMO mice allow you to bind ten or more actions directly to mouse buttons. FFXIV allows for a high degree of customization of your controls.
Legacy vs Standard Movement
One choice you have to make is whether you wish to use legacy or standard movement, and whether or not to use auto-face target.
With Legacy movement, moving the camera does not change the direction of your character. Rather, you move your character with WASD (or other keys of your choice), and your character faces in the direction that you move. For example, if you press S, you will face towards and walk towards the camera. In addition, you can bind "strafe" buttons which will move your character side-to-side without turning. Remember that your character needs to face your target to start a cast or use an instant skill. In addition, for casts, you need to be facing the boss when the cast snapshots. As such, with Legacy movement, you should generally leave auto-face target enabled, as it is somewhat clunky to face towards the boss otherwise.
Standard movement, on the other hand, keeps your character facing in the direction of your camera when you hold down the right mouse button. This gives you fine-grained control over the facing angle of the character. In addition, when pressing A or D, you strafe by default, while facing the same direction as the camera. This allows you to maneuver around a boss without facing away from it. However, it does have one glaring disadvantage when compared to Legacy movement - when moving backwards, you walk back slowly, rather than turning around and walking backwards at full speed like with Legacy. When using Standard movement, it is viable to leave auto-face camera disabled, as you can simply point your camera towards the boss in order to face the correct direction. If you have auto-face enabled, you can end up walking in an unexpected direction.
Number of Hotbars and Modifiers
Some people prefer to set most of their bindings up with unmodified keys, especially when using an MMO mouse. Others prefer to use fewer keys, but use more modifiers. Some players, myself included, use unmodified keys for their primary hotbar, and then use the same keys plus a modifier for other bars.
Wynn's Hotbar Setup
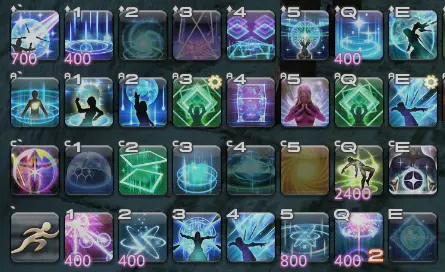
This hotbar is usable for all content, but is set up with a focus on ultimates, hence the GCD heals being more prominent than is usually necessary. In addition, it is set up in such as way that a similar hotbar layout can be used on all healers. It is set up for a standard two-button mouse.
In the first hotbar (bottom), we have ![]() Sprint,
Sprint, ![]() Dosis III,
Dosis III, ![]() Diagnosis,
Diagnosis,
![]() Eukrasia,
Eukrasia,
![]() Icarus,
Icarus, ![]() Prognosis,
Prognosis, ![]() Phlegma III, and
Phlegma III, and
![]() Taurochole. These are mapped to `, 1-5, Q, and E. If you are not doing ultimates, especially
older ones, you
do not need to have as many GCD heals occupying prime hotbar real estate.
Taurochole. These are mapped to `, 1-5, Q, and E. If you are not doing ultimates, especially
older ones, you
do not need to have as many GCD heals occupying prime hotbar real estate.
The final button on the bottom row is a macro to put Kardia on the tank.
Note that macros should not be relied on for anything that
absolutely needs to go off in a timely manner. However, for things like swapping ![]() Kardia, if
it is delayed by
a GCD or two due to the macro not firing as expected, it usually isn't an issue. On the other hand, if you
plan to make a raise macro, then the macro should only announce your intention to raise - the actual
raise action should be a non-macro button.
Kardia, if
it is delayed by
a GCD or two due to the macro not firing as expected, it usually isn't an issue. On the other hand, if you
plan to make a raise macro, then the macro should only announce your intention to raise - the actual
raise action should be a non-macro button.
The second hotbar is oGCD defensives and utility buttons. This bar is bound to the same buttons as the first bar, but with the Control key held down. The third hotbar is once again bound to the same buttons, but with Alt held down. It contains more utility buttons and oGCDs, as well as a couple macros for convenience.
Finally, the top bar has AoE damage abilities, as well as some heals and mitigations. Since these are often very important buttons, I use Shift as the modifier key for this row, as I find it the easiest to reach.
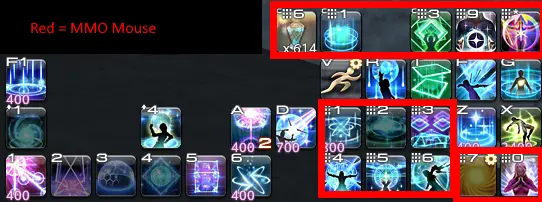
Example MMO Mouse Setup
In this example, the numpad bindings are mapped to the keypad on the side of an MMO mouse. This allows you to keep the keyboard buttons focused "spammable" actions such as filler GCDs, while keeping oGCDs easily accessible without needing to use too many modifier keys to make the setup work.
Example Controller Hotbar Setup
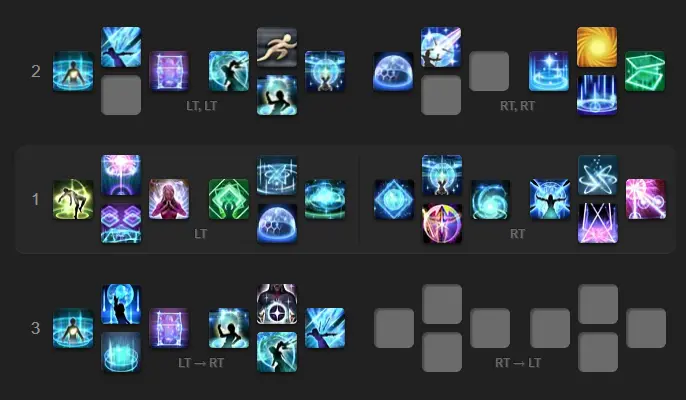
This is an example of a controller cross-hotbar layout. Commonly used GCDs are on the base LT and RT sets (hotbar 1 in the diagram), while other cooldowns are accessible via the WXHB (hotbar 2) and Expanded XHB (hotbar 3). There are a few redundant buttons to allow for more convenient access.
You can access and edit this hotbar using this link. As with all of the options, you should customize these bars to your liking. For example, if you are left-handed, you could consider swapping several of the buttons to the other side.
General Keybind Advice
FFXIV is somewhat unique amongst MMOs in the sense that it not only allows, but actively encourages you to play as many classes as you'd like on the same character. Thus, to avoid having to re-learn all of your muscle memory for every class, you can organize your hotbars in such a way that all healers will have their buttons in similar layouts.
All healer classes have, at a minimum:
- A 30-second damage-over-time instant-cast GCD, which should generally be kept on the boss at all times.
- A 1.5-second cast spammable damage GCD, which is your primary single-target skill and should be used any time you are not refreshing your DoT or casting a GCD heal.
- An AoE GCD, which will be your primary skill against multiple enemies. Depending on the class, this becomes a damage gain over your single-target skill at either two or three targets.
- GCD heals, sometimes with attached shields, both in single-target and AoE forms. While these generally have no cooldown, you should prefer to use oGCD heals so that more GCDs can be used for offensive skills. Some of them may also have a regeneration (heal-over-time) component.
- oGCD heals. As with GCD shields, these vary by class. Some are single target while some are AoE. Some are raw heals, while others have regens or shields.
- Movement tools. All healer classes have tools to allow for more free movement while keeping the GCD rolling.
- Mitigations: in addition to shields, healers also have oGCD abilities that provide a percentage damage reduction.
- Role actions: All healers have access to
 Surecast,
  Swiftcast,
  Lucid Dreaming,
 Esuna,
  Rescue,
  Repose. They also have a class-specific raise ability, but they
all behave identically and differ only in name. Of these, Repose is the only one that has no use in the vast
majority of content.
Knowing this, you can create a hotbar that is both efficient, and flexible enough to work on other classes, with
minimal re-learning required. In general, you should keep the most-frequently used abilities, such as
![]() Dosis and
Dosis and ![]() Kerachole bound to highly-accessible buttons.
Kerachole bound to highly-accessible buttons.
Sage is unique in that it doesn't really have any abilities that are "overshadowed" by other
abilities and become extremely niche, such as ![]() Cure or
Cure or ![]() Physick. There are
abilities which are niche but still situationally useful, such as
Physick. There are
abilities which are niche but still situationally useful, such as ![]() Pepsis. Thus, you need to make sure
you have room on your hotbar for every ability. The good news is that
Pepsis. Thus, you need to make sure
you have room on your hotbar for every ability. The good news is that ![]() Eukrasia allows for more
abilities to be packed into less hotbar space, as you do not need separate binds for the Eukrasia and non-Eukrasia
versions of the same skills.
Eukrasia allows for more
abilities to be packed into less hotbar space, as you do not need separate binds for the Eukrasia and non-Eukrasia
versions of the same skills.
Changelog
- 24 Mar. 2025: Updated for patch 7.2.
- 10 Jul. 2024: Updated for 7.0.
- 18 Apr. 2024: Page added.
Guides from Other Classes

Wynn Dohz is a healer main that has played since 4.4 and raided since 5.0. Originally playing White Mage and later Scholar, Wynn started maining Sage when it was introduced in 6.0. He writes many of the Balance guides for Sage, and can be reached via discord in Sage channels in The Balance Discord, or directly at xp#0001.
- FFXIV - Your Ultimate Cosmic Exploration Guide!
- FFXIV - Seekers of Eternity Patch 7.21 Notes Are Here!
- FFXIV - Invite Your Friend Back and Get Exclusive Rewards With the Callback Campaign!
- FFXIV - When Does the Mobile Version Release?
- FFXIV - Are You Ready for the Hatching Tide?
- FFXIV - Beastmaster Icy Veins Sneak Preview??
- FFXIV - Pre-orders Are Open for the TTRPG Scenario and Gamemaster Guide!
- FFXIV - Seekers of Eternity Patch 7.2 Now Live!


