The Twelfth Circle P12S (Savage) Part One: Athena Raid Guide
This guide aims to prepare players for the Anabaseios: The Twelfth Circle (Savage) door boss by providing detailed explanations of the fight's mechanics, as well as consistent strategies for the purpose of clearing weekly for loot.
Introduction to The Twelfth Circle (Savage)

While Nemjiji is plainly in awe at your bravery and relieved that the realm is saved once more, she seems almost disappointed in your descriptions of the chief keyward's prowess in battle. As you finish your recounting she lets out a despondent sigh before perking up and taking up her quill with aplomb, muttering to herself, “Nothing a little imagination cannot fix...”
Unlock Requirements
The Twelfth Circle (Savage) can be unlocked at level 90 after completing the Normal difficulty of the Anabaseios raid and talking to Nemjiji in Labyrinthos (x8.4, y27.4). It requires a minimum item level of 640 to queue, but this requirement can be bypassed when entering with a full party.
Athena Raid Guide
Athena has a hard enrage of 7:38. The fight has a DPS check of roughly 71,100 raid DPS, or 78,600 with downtime removed.
Raid Preparation
Begin by assigning all players relative clock positions, with tanks and melee DPS in front and healers and ranged DPS in the back. Each tank will have a melee DPS partner beside them, and each healer will have a ranged DPS partner beside them. If players are not using tank invulns on the first Paradeigma, they must split into two light parties.
Waymarks are generally not necessary for this fight, though it is helpful to place ABCD waymarks at north, east, south, and west.
Athena's Main Mechanics
The first Athena fight is split into six major mechanics, with clear progression points between each one.
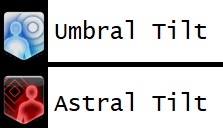
Throughout the fight, players will be afflicted with the debuffs Umbral Tilt and Astral Tilt. While these debuffs are not deadly on their own, players with Astral Tilt (dark) cannot be hit by any dark mechanics or they instantly die. Likewise, players with Umbral Tilt (light) cannot be hit by any light mechanics or they instantly die. Players with these debuffs can soak mechanics from the opposite aspect. Learning to read dark and light debuffs is paramount to progressing through the first half of the fight.
Athena has a few basic mechanics independent of all phases.
- On the Soul: Heavy raidwide magic damage.
- Glaukopis: A heavy magical line AoE tank buster on the #1 aggro that hits twice and inflicts a magic vulnerability debuff. This must be tank swapped twice, as Athena will always follow up with a magic auto on the player who takes the second hit.
- Apodialogos: Shared damage on the closest player to Athena and a shared jumping tank buster on the furthest player to Athena.
- Peridialogos: Shared damage on the furthest player to Athena and a shared jumping tank buster on the closest player to Athena.
- Trinity of Souls: Athena's left or right wings glow in order from top to bottom or bottom to top. She will cleave the side of the room in order of how the wings glowed. However, if the wings glow from bottom to top, she will spin 180 degrees each cleave, meaning the second wing cleave will hit on the opposite side.
Paradeigma 1 and 2
Athena adds the following abilities in this phase.
- Paradeigma: Athena teleports to the middle and summons adds to the
edge of the room, which do a mechanic based on the colour of the add circling
her at the time of cast. The specifics of each Paradeigma set is explained
in the guide below.
- Yellow adds will shoot a line magic AoE towards the two closest players, inflicting a magic vulnerability debuff.
- Blue adds will tether to players with a light or dark tether, dealing magic damage in a line and inflicting a magic vulnerability debuff.
- Red adds will go north and do an untelegraphed line AoE across the arena.
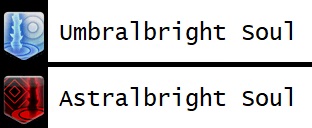
- Engravement of Souls: Athena inflicts players with Astralbright Soul and Umbralbright Soul, which drop dark and light towers that must be soaked by players with the opposite aspect.
The fight begins with On the Soul into the first Paradeigma. Athena summons four yellow adds, which will go to either the north or south side of the arena on opposite ends, two each. The party can choose to either do this mechanic the intended way, or to negate it with tank invulnerabilities.
To do it without tank invulns, players will need to split into two light parties north and south and identify where the adds are. These adds will shoot a line AoE at the closest two players in two waves. The light party where the adds are needs to line up in order to bait the line AoE from the yellow adds. The light party not baiting will stack at max melee range in order to not bait the line AoEs. After the first set of AoEs is fired, both light parties will swap sides and the other light party will bait the line AoE from the remaining yellow adds.
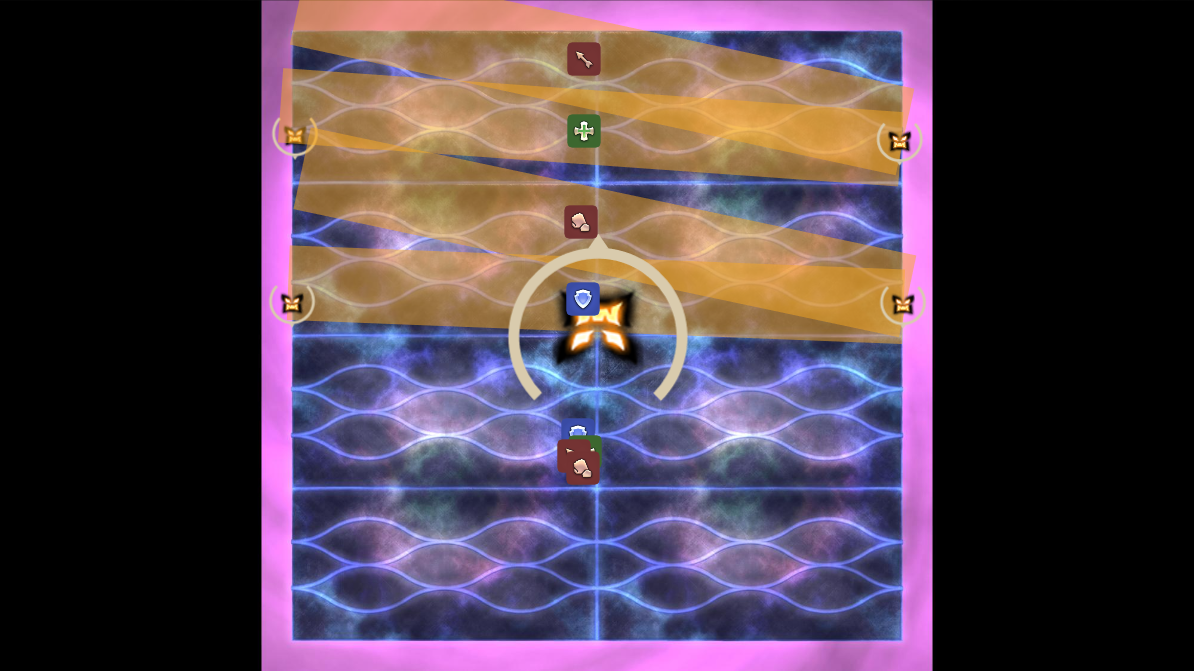
At the same time, Athena will cast Trinity of Souls, always starting bottom to top. Therefore, the safe sides are always opposite of the bottom wing, the same side as the middle wing, and the opposite side of the top wing. Players will have to dodge Trinity of Souls while moving for Paradeigma. However, if it starts from the bottom there will never be a pattern where players have to move twice.
If tanks use their invulnerabilities, they will head to the side the adds are and bait both sets of line AoEs. The rest of the party will go to the opposite side at max melee range and stay. All players will still need to dodge Trinity of Souls. This has the added benefit of tanks not having to ensure that the tank that takes the second set of hits does not have aggro, as Athena will auto attack while they still have a magic vulnerability debuff.
The next set of mechanics is Paradeigma 2, accompanied with Engravement of Souls. Athena summons six adds, four blue and two red. The blue adds go to cardinals and tether to one tank, one healer, and two DPS with a dark or light tether. Two tethers will be dark and two will be light, and these need to be stretched out directly across. At the same time, Engravement of Souls will inflict one support and one DPS each with Astralbright Soul and Umbralbright Soul.
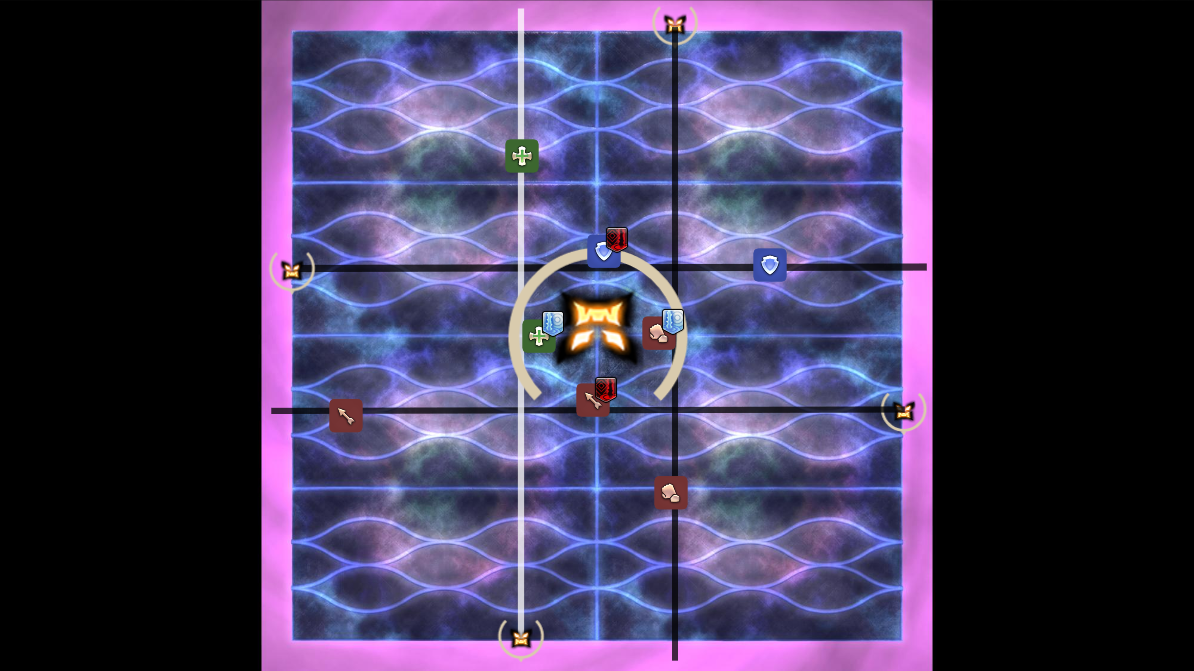
The players with the debuffs will need to stand close to a player with a tether with the opposite colour, and after the tether line AoE goes off the tether player soaks the tower. To determine where debuff players go, split the arena into four quadrants. The tether adds are offset, meaning there will be one player with a tether in each quadrant. As the two supports have opposite debuffs and two DPS have opposite debuffs, use a priority system to determine where to go. Supports will start in the northeast quadrant, and go to the first player that has a tether opposite of their debuff going clockwise. DPS will do the same starting northwest and going counterclockwise.
Players will need to check the adds north that will do a line AoE across the arena. They will either spawn on the first and third column of the arena, or the second and fourth column of the arena.
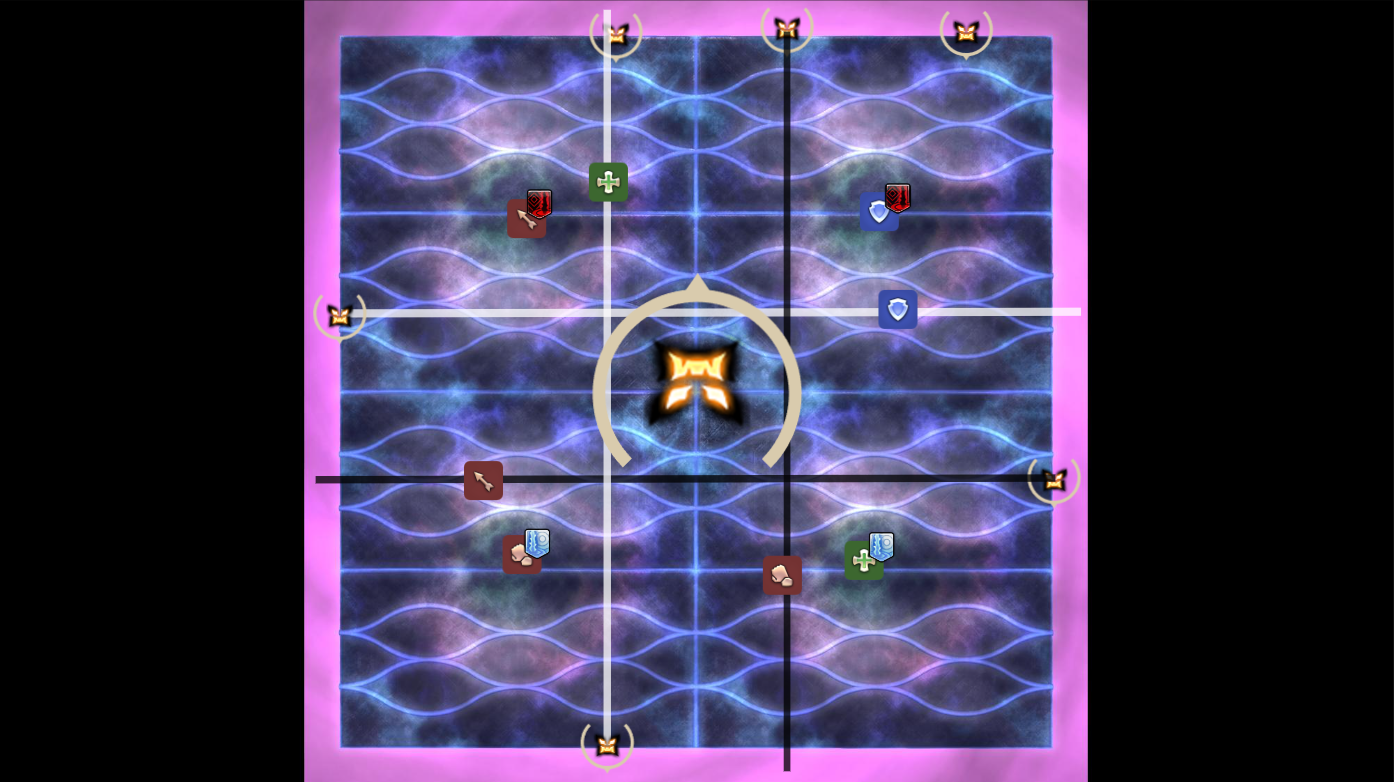
The debuffed players can stay at max melee range and continue to hit the boss while dropping their tower. When the tether line AoE goes off, the players hit will gain Astral Tilt or Umbral Tilt and the debuffed players will drop their towers. The tethered players will soak their towers. All players will then need to dodge the divebomb from the red adds north.
This is followed by On the Soul and Glaukopis. The offtank needs to tank swap during the cast, and the tank that took the first hit needs to provoke again as the offtank takes their hit to ensure they are not hit with a lethal auto-attack.
Superchain Theory I
Athena adds the following abilities in this phase.
- Superchain Theory: Athena summons orbs, and shapes that are chained
to the orbs. The shapes will slowly float towards the orb, and do a mechanic
from the orb when it reaches it. The specifics of each Superchain set is explained
in the guide below.
- Orange spiked ball will make the orb do a conal magic AoE towards all eight players.
- Purple spiked ball will make the orb do a conal magic AoE towards all supports or all DPS that must be shared.
- Blue donut will do a donut AoE around the orb.
- Green orb will do a point-blank AoE around the orb.
- Engravement of Souls: Athena inflicts players with dark and light
debuffs. These are split between DPS and supports.
- Four players of one role will receive Astral or Umbral Tilt as well as Heavensflame Soul, which is an AoE when the debuff expires.
- One player of the other role will receive Astralbright Soul.
- One player of the other role will receive Umbralbright Soul.
- One player of the other role will receive Astralstrong Soul. Athena will fire a dark-aspected line AoE towards the player when this debuff expires. This does damage that must be shared.
- One player of the other role will receive Umbralstrong Soul. Athena will fire a light-aspected line AoE towards the player when this debuff expires. This does damage that must be shared.
Superchain Theory is a series of mechanics emanating from orbs spawned by Athena on the map. Players will have to rotate around the arena while reading the shapes chained to the orbs that spawn.
As Superchain Theory is cast, one orb will spawn at a random intercardinal, with either a orange or purple spiked ball and a blue donut or green orb tethered to it. This is followed by Engravement of Souls. As players get into position for the first orb, they need to read their debuff(s) carefully to ensure they know their positioning for the rest of the mechanics that will occur, as they will resolve at a quick pace.
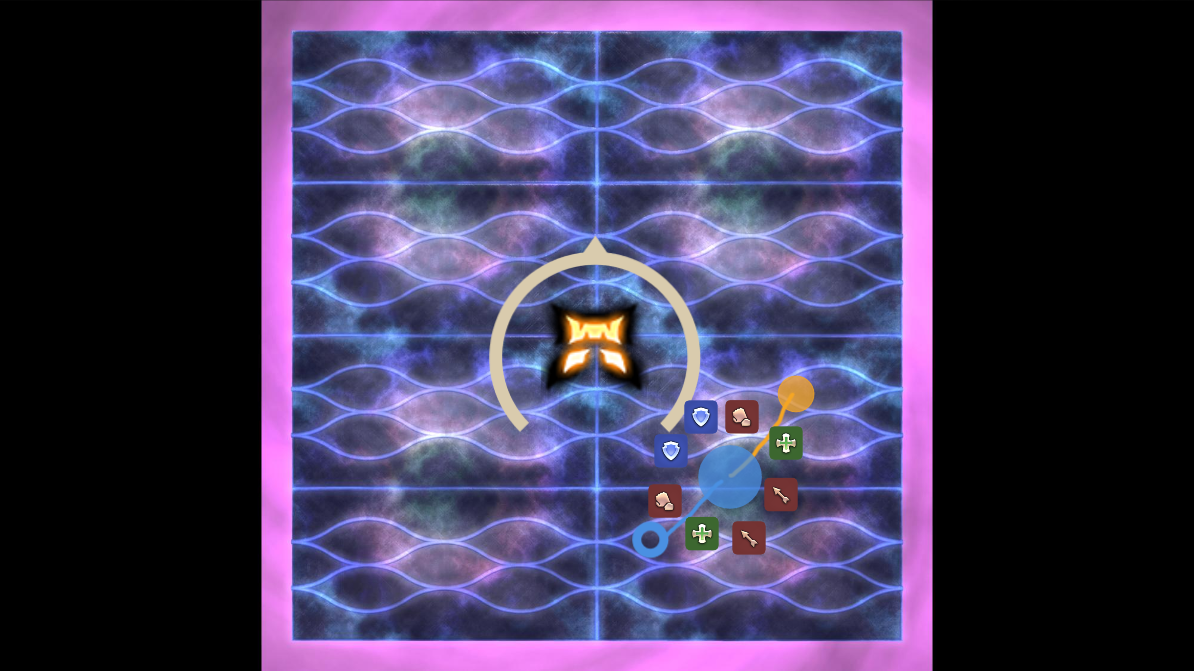
For the first orb, players will either be in their clock positions around the orb relative to the boss if it is a orange spiky ball, or stacked with their partner around the orb relative to the boss if it is a purple spiky ball. Players will be close to the orb or far away from the orb depending on if it is a blue donut or a green orb.
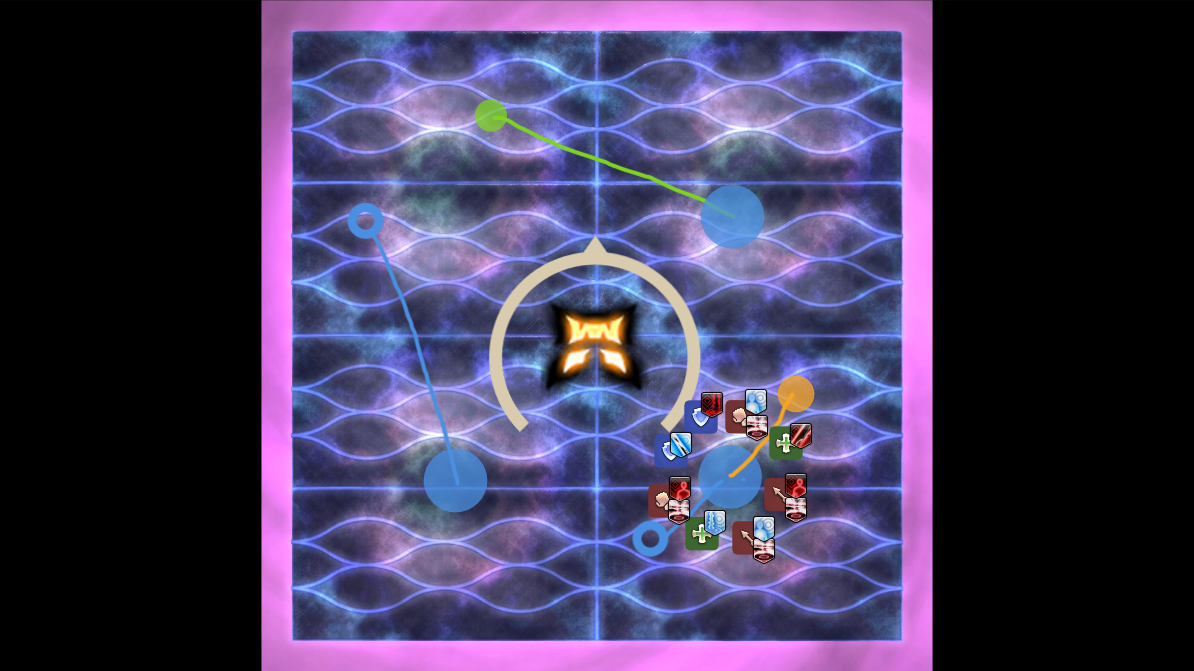
When Engravement of Souls is finished casting, players need to do two things. Identify which role has the Heavensflame Soul debuff - those players will be spreading at the end, and the other role will be dropping towers and soaking them corresponding to their aspected debuff. Each player additionally needs to know the aspect of their debuff, and if they have Astralstrong or Umbralstrong Soul. They will also need to locate the next safe orb, as Athena will spawn two orbs. One will have a blue donut attached to it, and the other has a green orb. Players will rotate to the orb with the donut after the first orb has gone off. This can be either clockwise or counterclockwise.
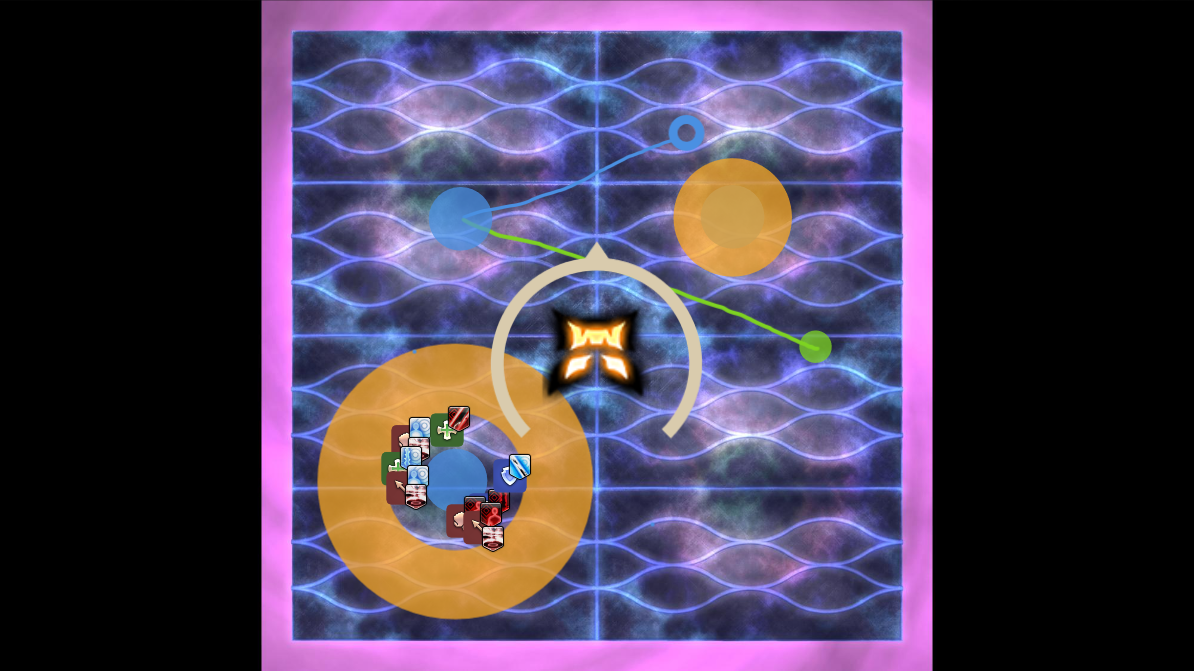
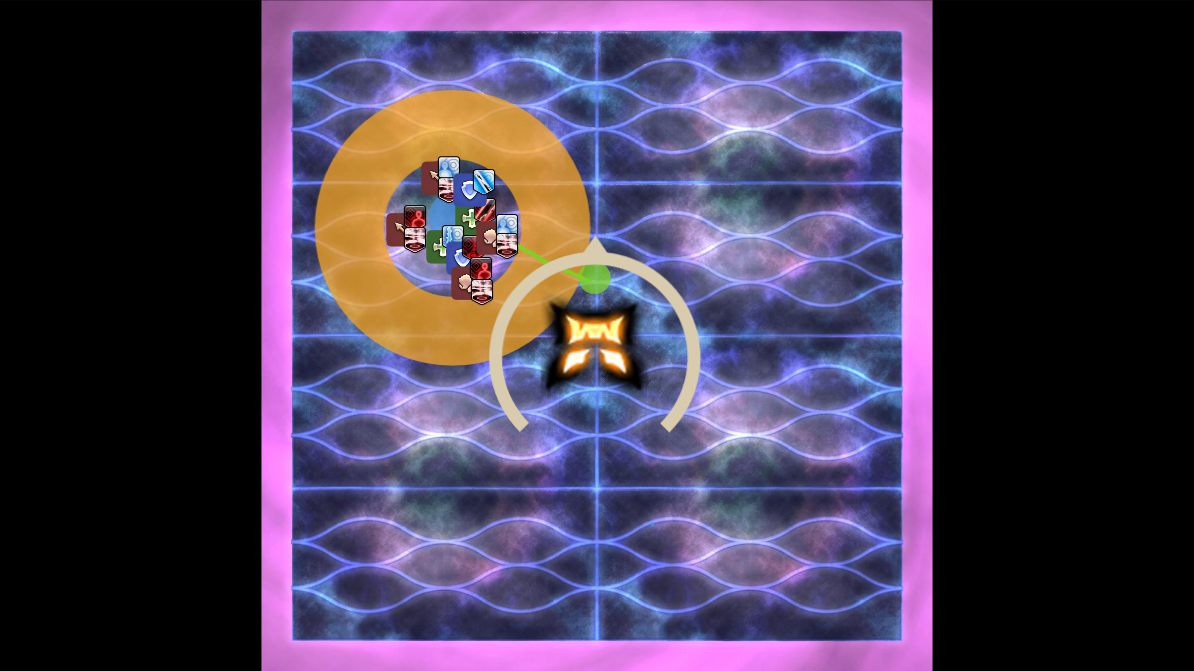
Players with the Astralstrong and Umbralstrong Soul debuffs need to know which side of the safe spot they are going to relative to the boss, as they will receive a shared aspected line AoE. The player with the dark debuff, Astralstrong Soul will go left relative, while the player with the light debuff, Umbralstrong Soul will go right relative. All other players will stack opposite of their debuff. Players with dark red debuffs will go right, and players with light debuffs will go left. Note that unlike in the diagram, the players marked for the stack do not need to be in front. You can remember this with the mnemonic "red right light left."
Next, players will rotate once more in the direction they were going to the final orb. This orb has two tethered shapes: one blue donut and one green orb. One shape has a shorter tether than the other - that shape will resolve first, then the other shape. In addition, the rest of the debuffs will resolve shortly.
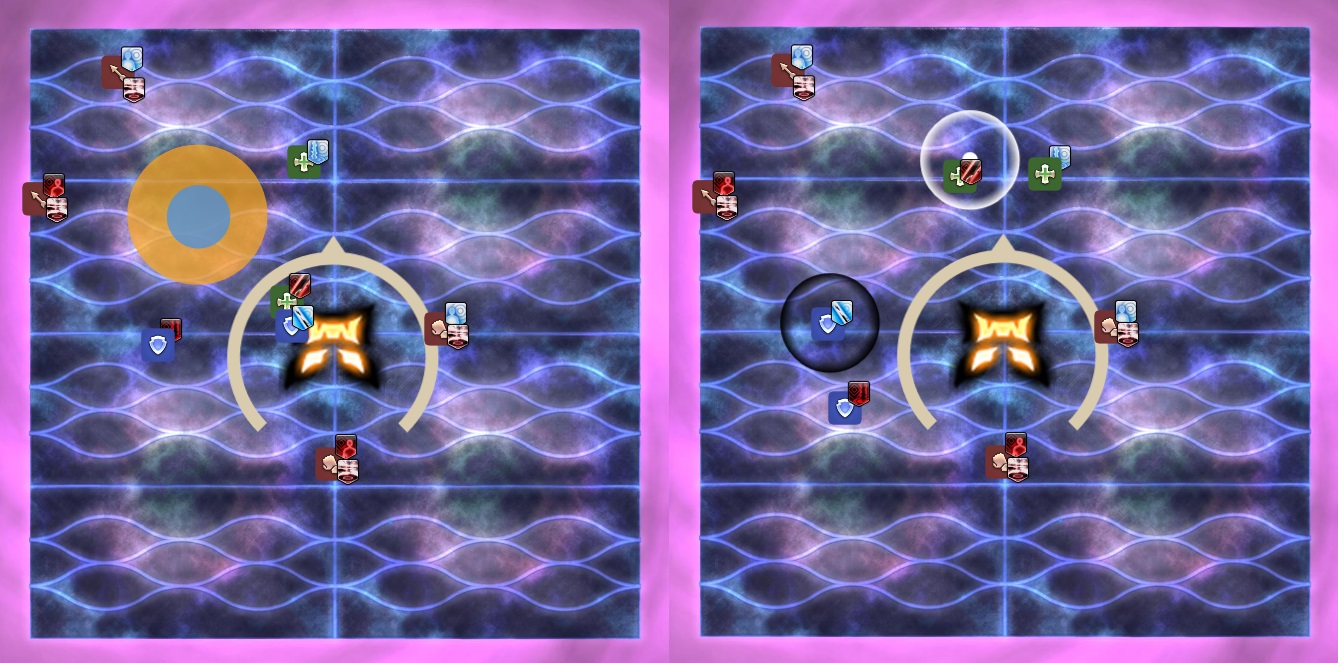
Preposition for the first in or out, and then move out or in, getting ready for the debuffs. The role with the Heavensflame Soul debuff will move out. The ranged players will move back to the edge of the arena left and right relative, and the melee players will move across the boss left and right relative to ensure it is impossible to hit another player with their AoE. The two players with the tower debuff will move out and drop their tower directly left or right of the orb making sure not to clip anyone. The player with the dark red debuff, Astralbright Soul will go right relative, while the player with the light debuff Umbralbright Soul will go left relative. The two players in charge of soaking the towers will stay in the middle or move forward towards the boss, then soak their respective towers.
Immediately after, Athena will cast Trinity of Souls. This one can start from either the top or bottom, and as the main tank was doing a mechanic the boss is likely facing a random direction, so players need to move from side to side carefully. This is followed by either Apodialogos or Peridialogos. If it is the former, tanks need to stand max melee range and the rest of the party needs to stack in the middle of the boss. If it is the latter, tanks need to stand in the middle of the boss and the rest of the party need to stack south relative at max melee range or further. Finally, On the Soul is cast and the next mechanic set begins.
Paradeigma 3
Athena adds the following abilities in this phase.
- Engravement of Souls: Athena inflicts all four supports with
debuffs. Two players will be inflicted with a tower debuff of the same aspect.
One player is inflicted with Quartered Soul, and the final player is inflicted
with X-marked Soul.
- Quartered Soul will place a plus-shaped AoE under the player when the debuff expires, which goes off in a few seconds.
- X-Marked Soul will place an X-shaped AoE under the player when the debuff expires, which goes off in a few seconds.
- Unnatural Enchainment: Athena tethers to platforms on the ground which will disappear at the end of the castbar. All players are unable to jump for the duration of the mechanic.
- Ultima Blade: Untelegraphed heavy raidwide magic damage..
Athena will jump to the middle of the arena and cast Paradeigma. This set has four blue adds and two yellow adds. Blue adds will spawn at the west and east edge of the arena, and yellow adds will spawn at opposite intercardinals. She will then cast Engravement of Souls, inflicting supports with Quartered Soul (+), X-marked Soul (X), and either two Umbralbright Soul or two Astralbright Soul.
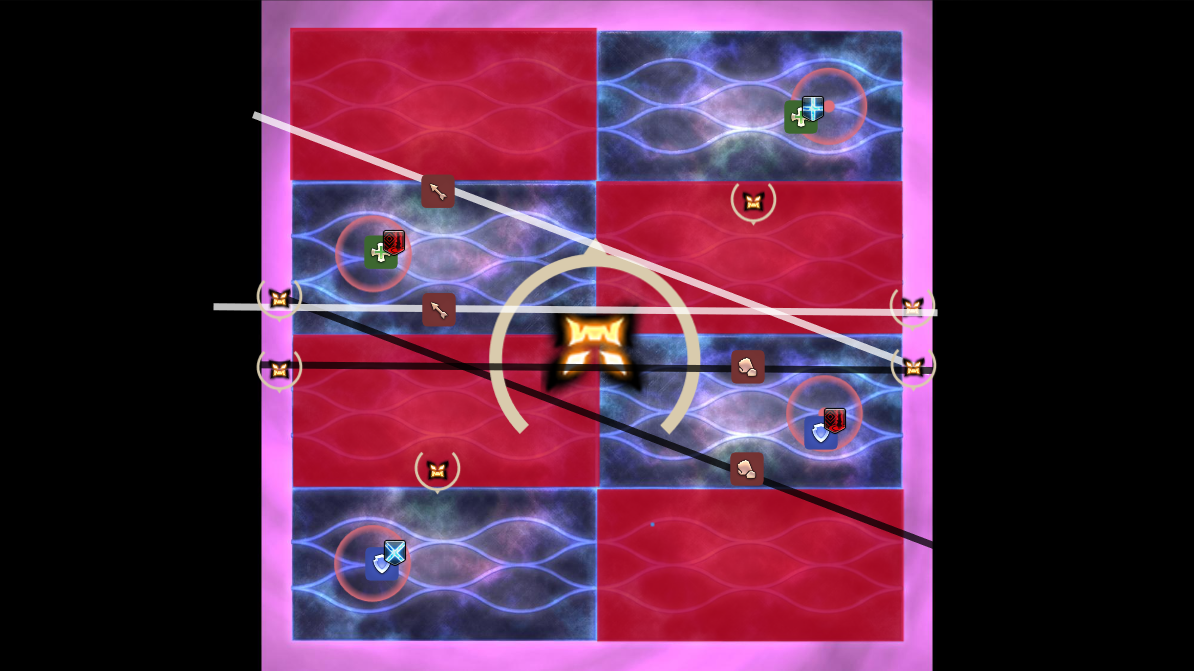
She will then begin casting Unnatural Enchainment, tethering to four diagonal platforms in the arena. At the same time, all DPS will receive a tether which is either dark or light. DPS will need to stretch their tether and go to the safe platform. The support with Quartered Soul will go to the northernmost safe platform, and the support with X-marked Soul will go to the southernmost safe platform. The supports with the tower debuff will go to the middle two safe platforms, with a priority on who goes to each: from west to east, H1 > T1 > T2 > H2, meaning that healers always go to their respective west and east platforms and tanks adjust. Non-aspected towers will appear on these platforms, and supports need to soak them.
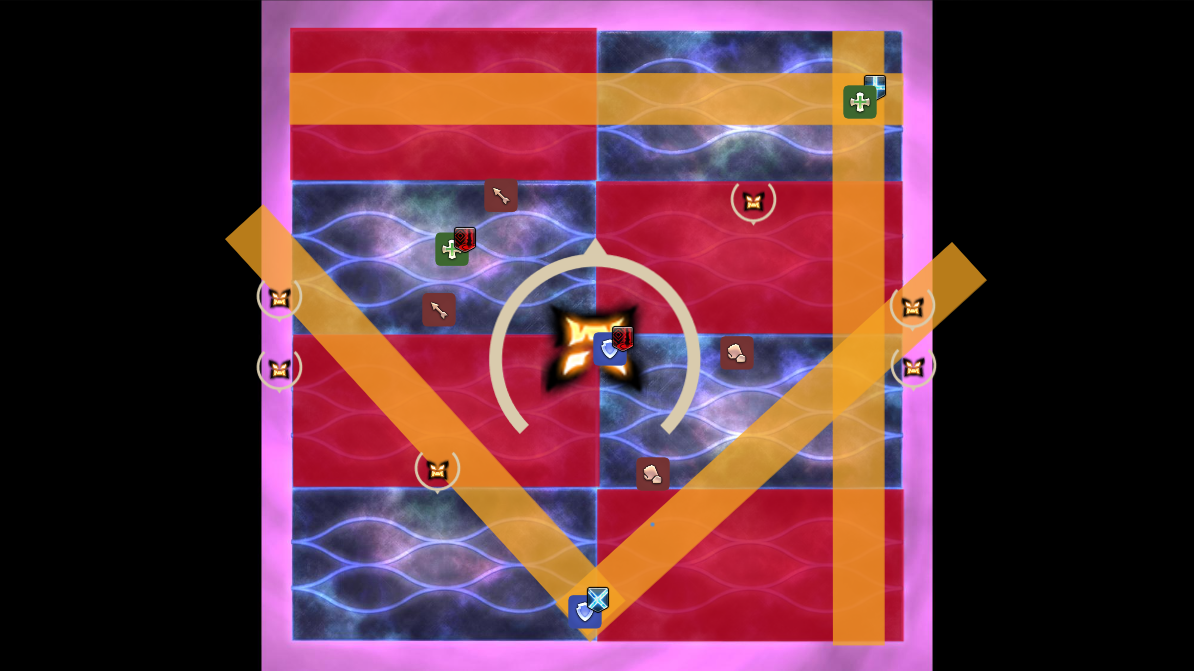
The players with Astralbright Soul or Umbralbright Soul need to drop their towers for DPS to soak. However, both players with the same tether aspect are on the same platform. Therefore, the supports need to identify whether or not they drop their tower near the middle of their safe platform, or in the middle of the arena which is accessible to DPS on the other safe platform. To simplify things, if they have the same debuff aspect as the tether on their platform, then they will have to go to the middle.
At the same time, the supports marked with Quartered Soul and X-marked Soul will have to place their AoEs. The plus-shaped AoE needs to be placed near the corner edge of the arena, while the X-shaped AoE needs to be placed near the cardinal edge of the arena.
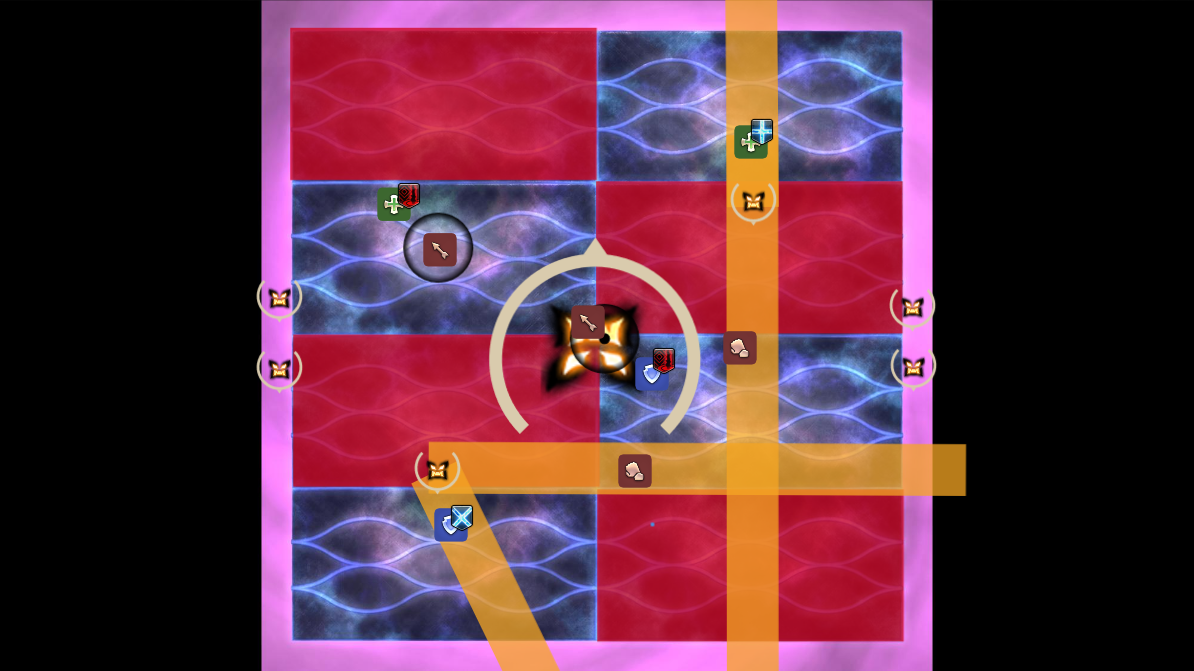
Finally, the DPS on the platform with the aspected towers will soak them. The tether that is being crossed will take the tower in the middle, while the straight tether takes the tower on the platform. Meanwhile, the players with Quartering and X-marked Soul, as well as the DPS who are not soaking towers need to bait the line AoE from the adds that spawned inside the arena. The supports who dropped the towers step aside and make sure they are not in any AoE or tower.
This is followed by On the Soul, which restores the platforms and allows players to jump again. All players need to squeeze in towards the middle while the platforms are still destroyed to ensure they receive healing. There is another cast of Glaukopis. Finally, Athena will turn south and cast Ultima Blade, which is untelegraphed and deals heavy magic damage. She will spawn adds that determine the order of mechanics in the next phase, but those are unnecessary to pay attention to using the conventional strategy.
Palladion (Limit Cut)
Athena uses the following abilities in this phase.
- Palladion: Marks players with Limit Cut numbers from 1 to 8. She will dash to those players in order, dealing proximity damage with a line AoE then a shared circle AoE that leaves behind a puddle which inflicts a bleed DoT. The circle AoE inflicts a short magic vulnerability down debuff.
- White Flame: Adds in the centre will either do a small cleave in the middle of the arena, or shoot a line AoE towards the two closest players. This inflicts a short magic vulnerability down debuff. Eight different adds will do four of each ability.
- Theos's Ultima: Massive raidwide magic damage which is split between all party members alive in the raid.
In this phase, Athena becomes untargetable, invulnerable, and shrinks the arena into an octagon. She will jump to a random cardinal or intercardinal, and mark players with Limit Cut numbers from 1 to 8. Her location is now relative north, and players will have to position based on this location.
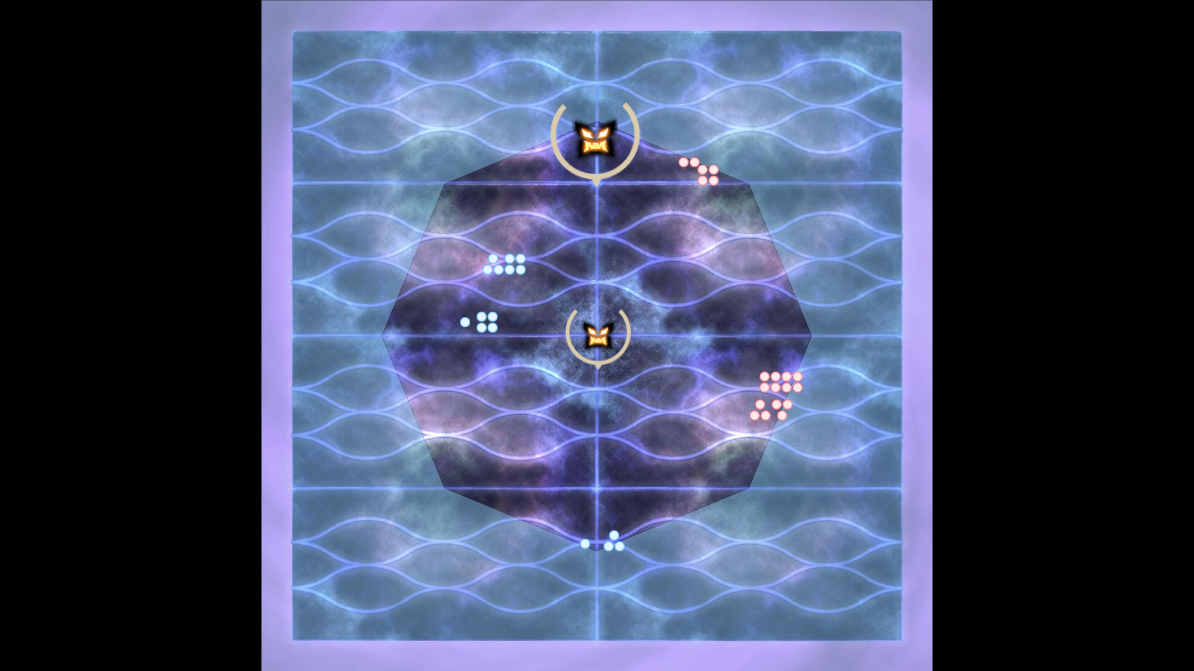
All players are partnered based on their limit cut number: 1 with 3, 2 with 4, 5 with 7, and 6 with 8. This ensures that all players have a partner to soak the shared AoE portion of Palladion while moving together to drop the puddles. They will also bait beams from the middle add with their partner. All players, unless it is their turn to bait the beam, should be directly against the wall.
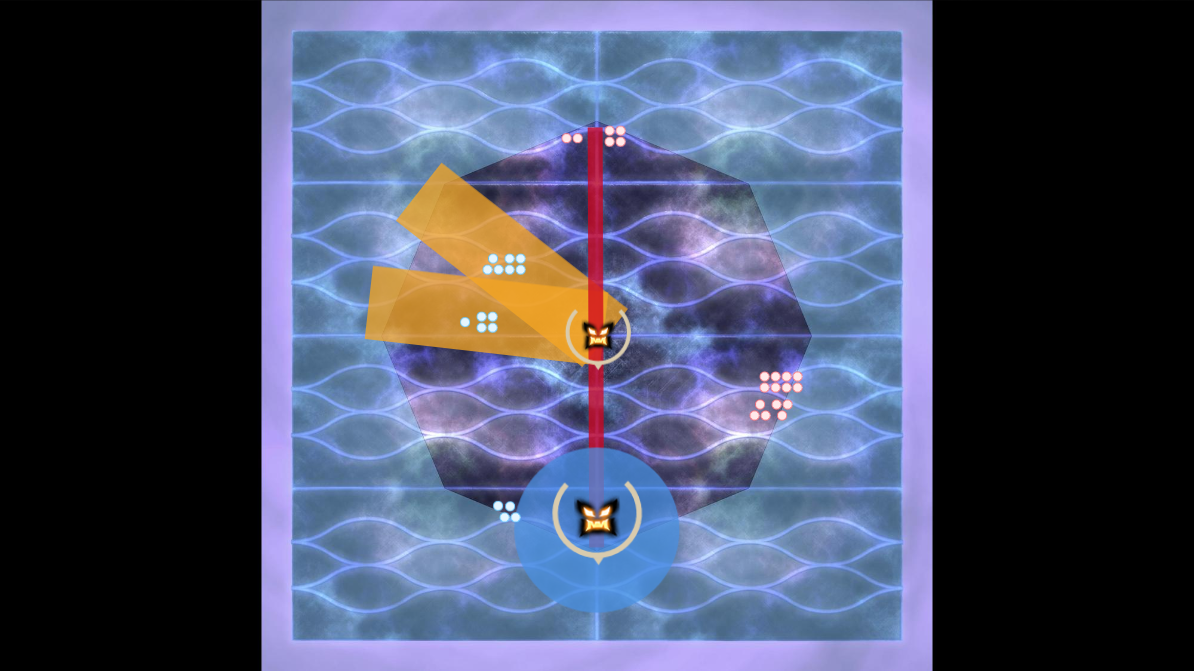
Athena will dash to the 1 marked player, and does an AoE that leaves behind a bleed puddle. The players dashed to will move clockwise right outside of the puddle in order to bait the next set of dashes with sufficient distance. Meanwhile, players marked with 2 and 4 move back north to where the boss dashed from to bait the second set of dashes.
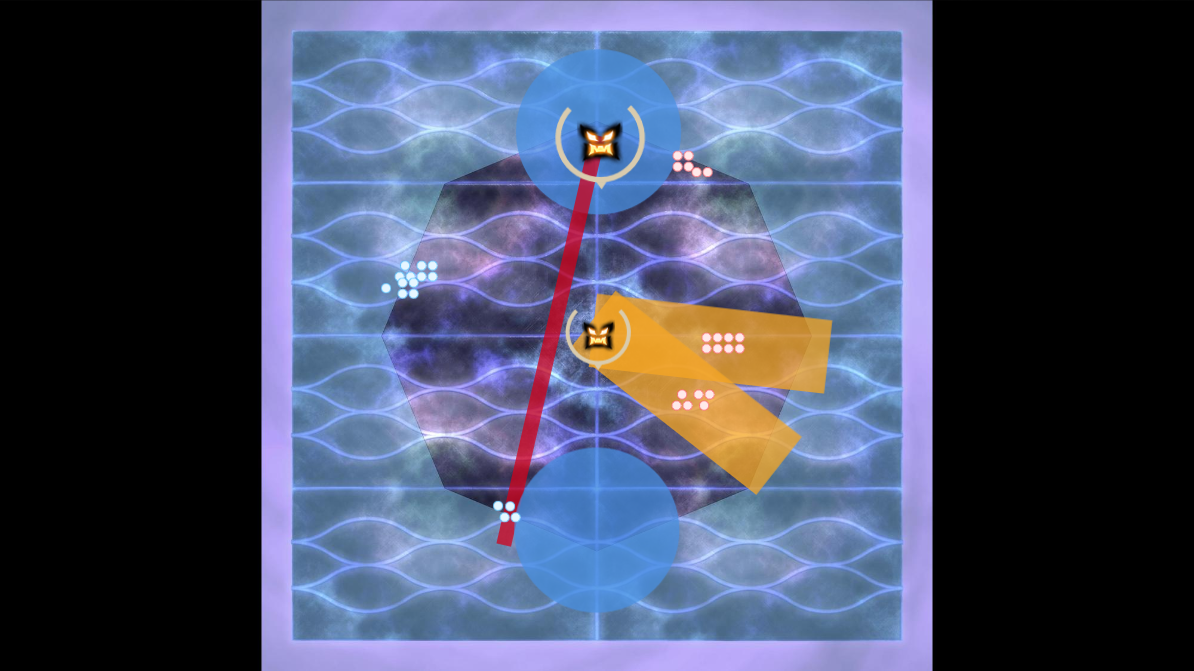
During every dash, the add in the centre will do either a beam baited on the closest two players or a small cleave AoE in the middle. While players can memorize the order of cleaves and beams, it is not necessary. Have the 5 and 7 marked players stand closer to the middle, apart from each other to bait the beams. As soon as they take a beam, they go back to the wall and the 6 and 8 marked players go stand closer to the middle aparrt from each other to bait the beams. Beams are configured to go off twice during the 1 to 4 dashes and twice during the 5 to 8 dashes, meaning that there are always four players readily available to bait a beam.
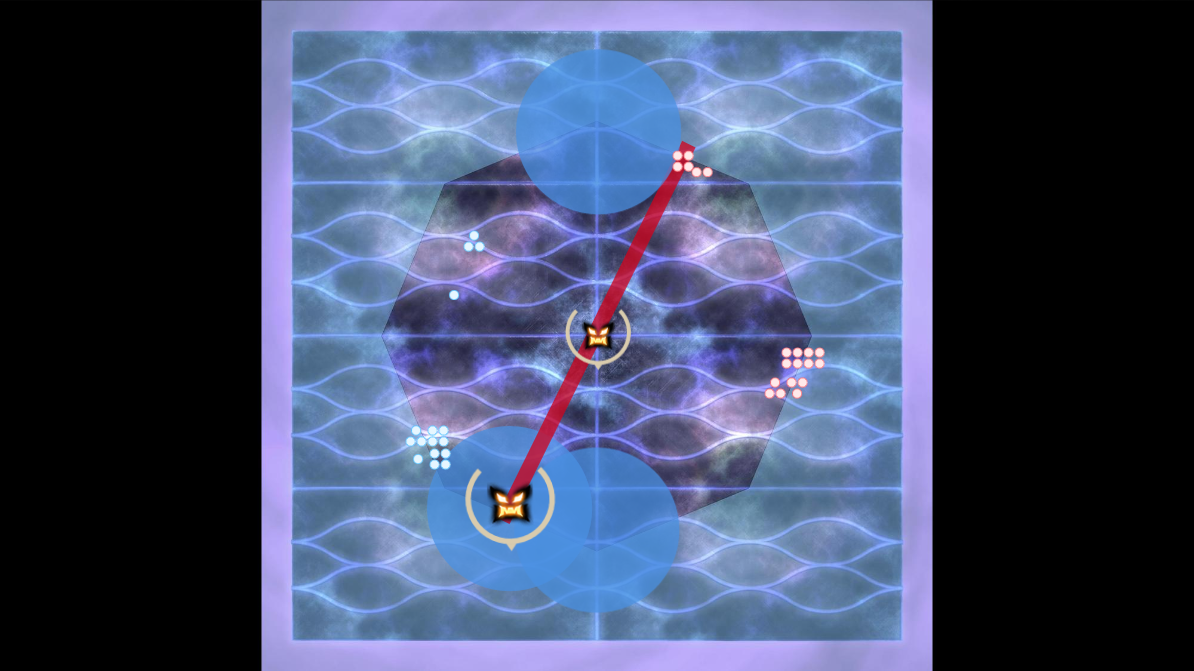
The 3 marked player will be dashed to and take shared damage with the 1 marked player. The 2 and 4 marked players moves clockwise out of the puddle for the 4 marked player's dash. As soon as the 3 dash happens, the 1 and 3 marked players and the 5 and 7 marked players will swap positions - 5 and 7 move just clockwise of the puddle to start baiting their dashes, while 1 and 3 will go northwest to bait beams. Stay at the wall until 6 and 8 have baited their beams.
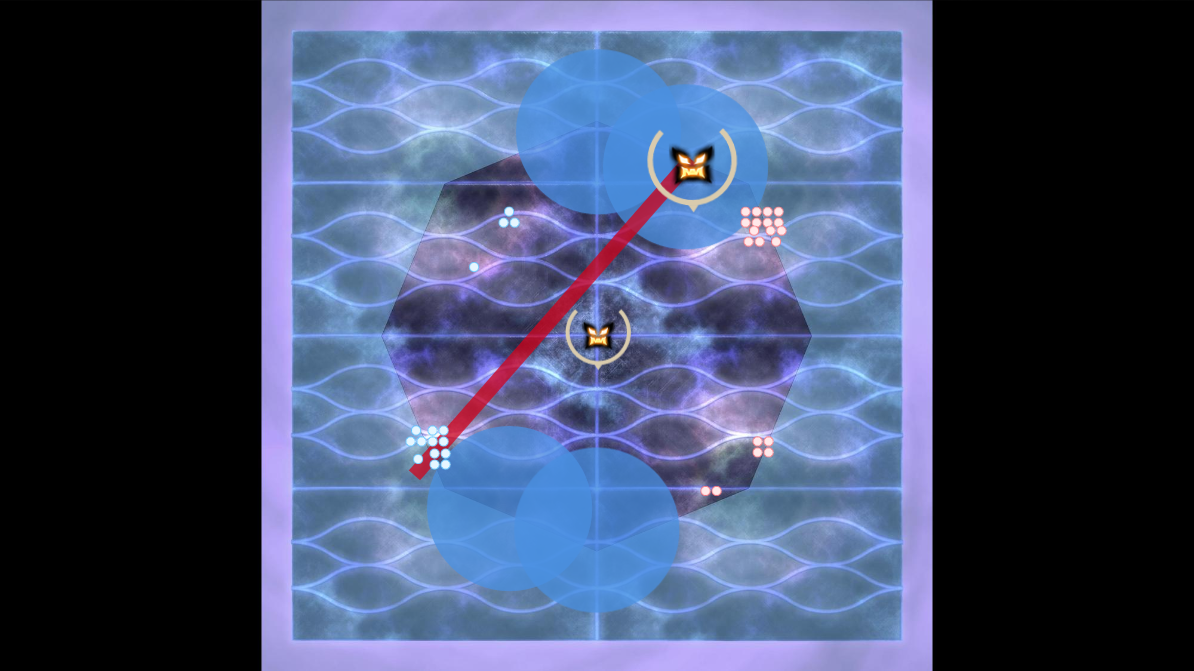
At this point, the even numbered players will mirror the same movement as the odd numbered players. As 2 and 4 take the final dash, they replace 6 and 8 southeast in order to bait the fourth set of beams after 1 and 3 take theirs. 6 and 8 will move just clockwise of the puddle to start baiting their dashes. Repeat this movement until the eighth dash and fourth set of beams. All players will then slowly head north, taking care not to step in any bleed puddle.
Athena will destroy the middle two rows, become targetable again, and begin casting Theos's Ultima. Players need to heal up and mitigate for the heavy AoE and for the next mechanic set, Superchain Theory IIA.
Superchain Theory IIA
This set of Superchain Theory orbs has a large amount of visual clutter, but players only need to identify the shapes attached to the north and south orb.
Athena summons three orbs, one north, one directly in the middle, and one south. Players will have to do partner stacks or clock spreads based on the shapes that spawn, while dodging Trinity of Souls. To do this correctly the main tank needs to point her directly north before the castbar of Superchain Theory IIA.
- The middle orb will always have a short green orb, a medium blue donut, and a long green orb. This means players will have to avoid the middle, move into the middle, and then run out again afterwards.
- The north and south orbs will have two shapes each, one short and one long. There is always one short green orb and one long green orb. There is always one short purple spiked ball either north or south, and the final long shape can be an orange or purple spiked ball either north or south.
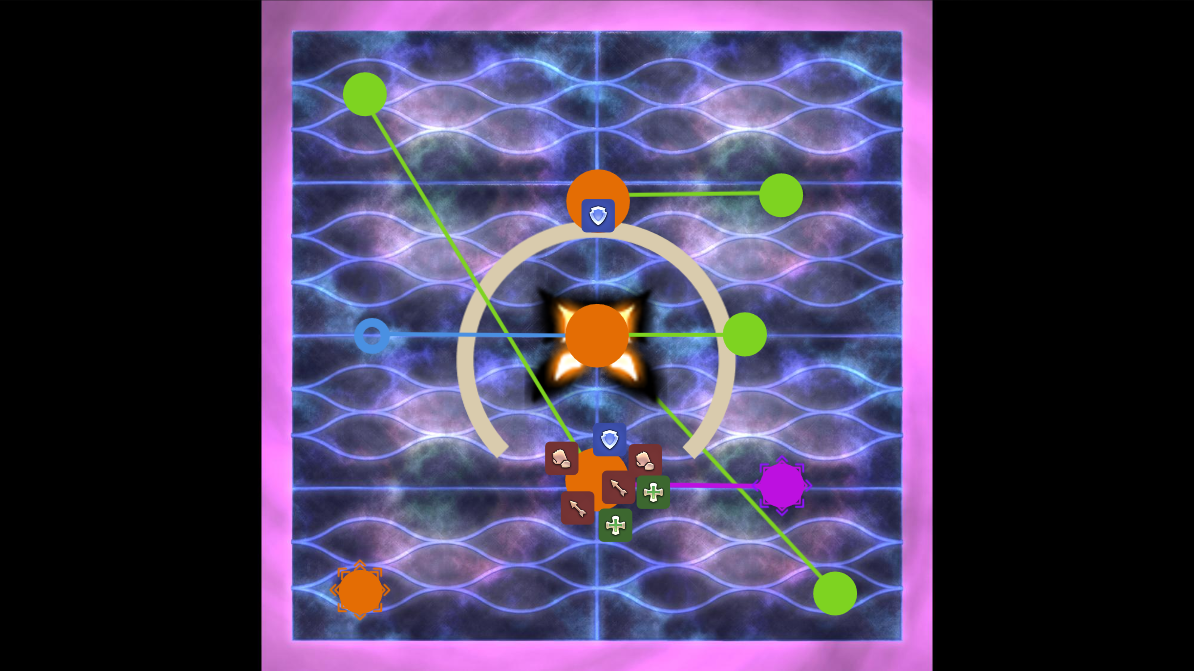
Players have to identify where the short purple ball is tethered to, whether the second spiked shape is orange or purple, and whether it is tethered to the north or south orb. If it is tethered to the north orb, players will have to run north at the end, and if it is tethered to the south orb, players will have to run south at the end. All players should initially position themselves at the orb where the short purple ball is tethered to.
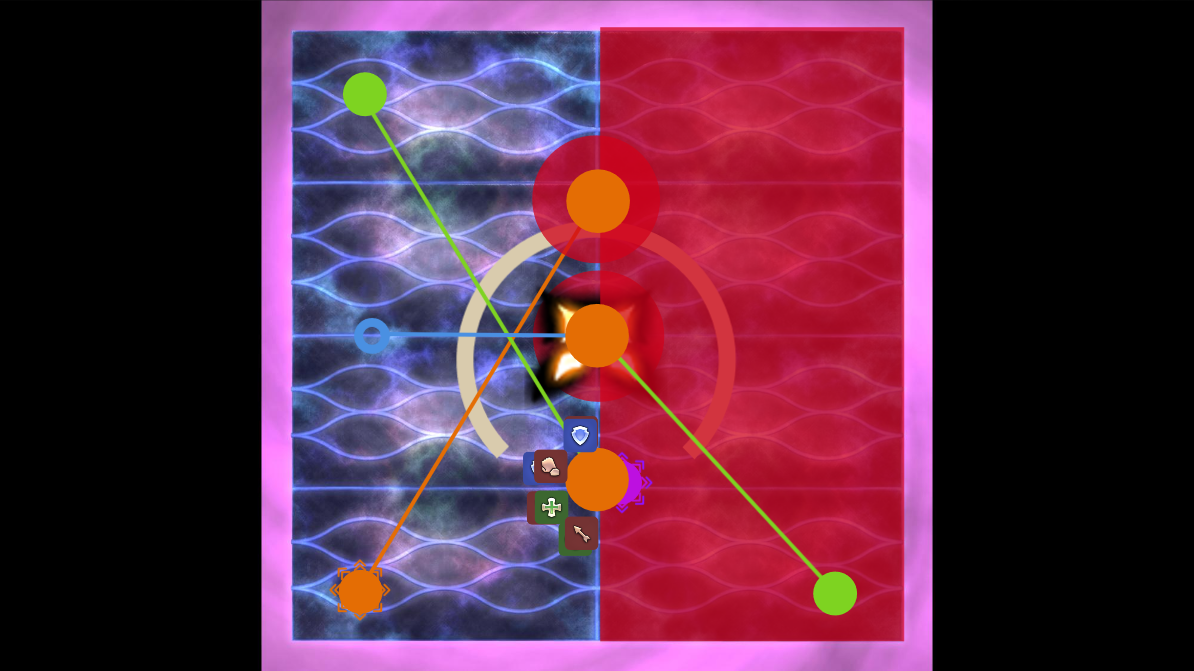
First, players will have to do the partner stack mechanic from the first orb while reading the Trinity of Souls cleaves, being on the safe side of the first cleave. Line up relative to the boss such that T1 and M1 are northmost, T2 and M2 next, H1 and R1 after, and H2 and R2 southmost. The main tank can move to the party after the cast of Superchain Theory IIA.
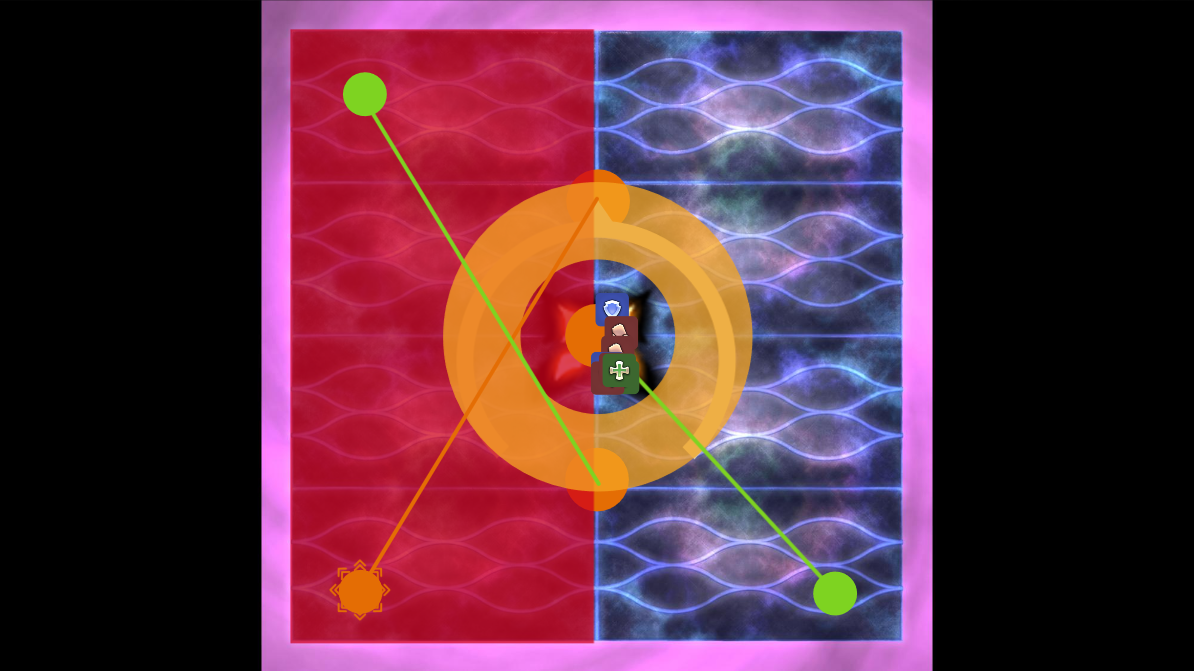
Next, players will have to move into the donut AoE in the centre, staying on the safe side of the second Trinity of Souls cleave. Immediately after the donut goes off, players will need to head towards the final north or south orb with the spiked ball, dodging the third cleave on the way. Players will either need to stack with their partners or go to their clock position relative to the orb, just like in Superchain Theory 1.
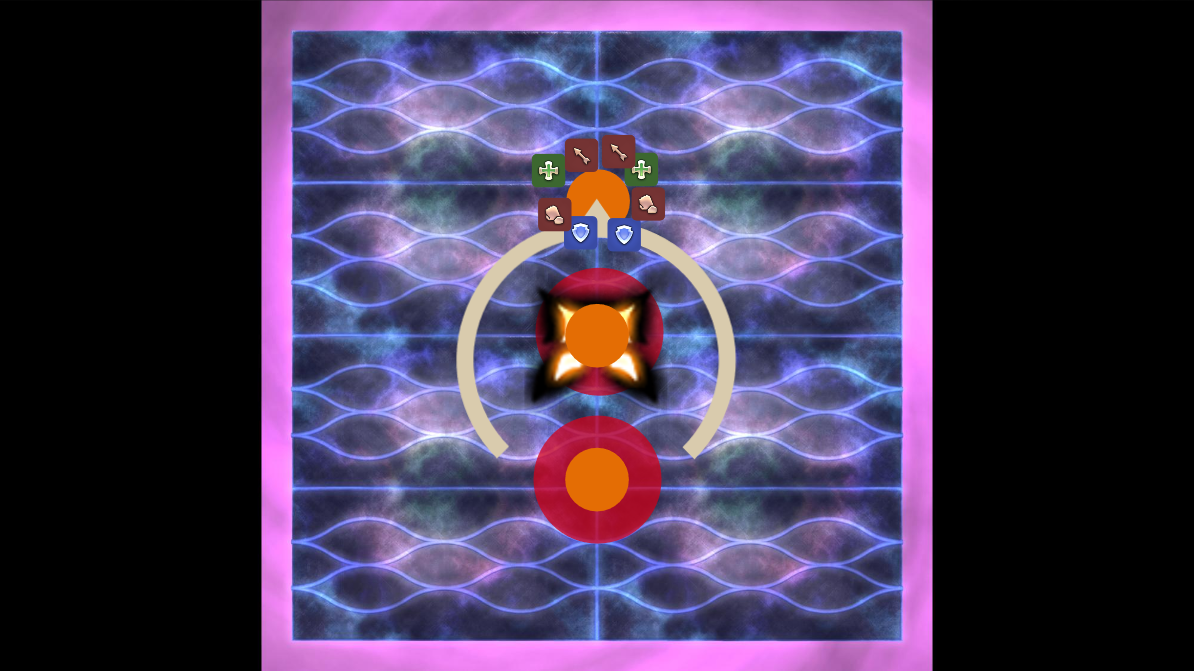
Immediately after the final shape explosion, Athena will cast either Apodialogos or Peridialogos. The party will need to either run in or stay out, and tanks will need to either stay in or run out depending on the mechanic. This is followed by On the Soul, and high mitigation is required. Tanks with short invulns (WAR/DRK) can choose to invuln the party stack and have the other tank use all their mitigation on the buster, lessening mitigaton and healing requirements.
Superchain Theory IIB
Athena gains the following abilities in this phase.
- Parthenos: An untelegraphed line AoE down Athena's hitbox that knocks players back.
This set of Superchain Theory orbs is the final set of mechanics in the fight, and is accompanied with Paradeigma adds as well, so players need to watch out for those. There is a large amount of visual clutter, but they resolve at a slower pace than IIA so players can identify mechanics as they go.
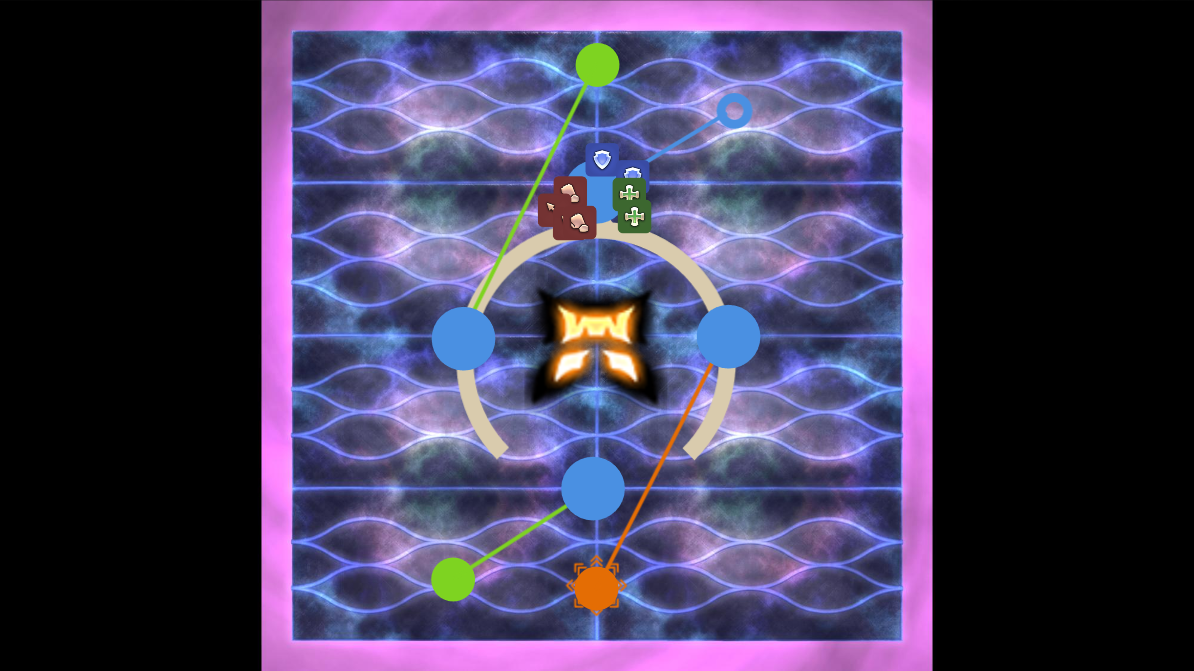
Athena will jump to the middle, face north, and begin casting Superchain Theory IIB. There will be two blue orbs initially spawned in the middle, one north and one south. One will have a blue donut tethered, and the other will have a green orb. All players will go to where the blue donut is and look at the two new orbs that spawned east and west as Athena casts Paradeigma.
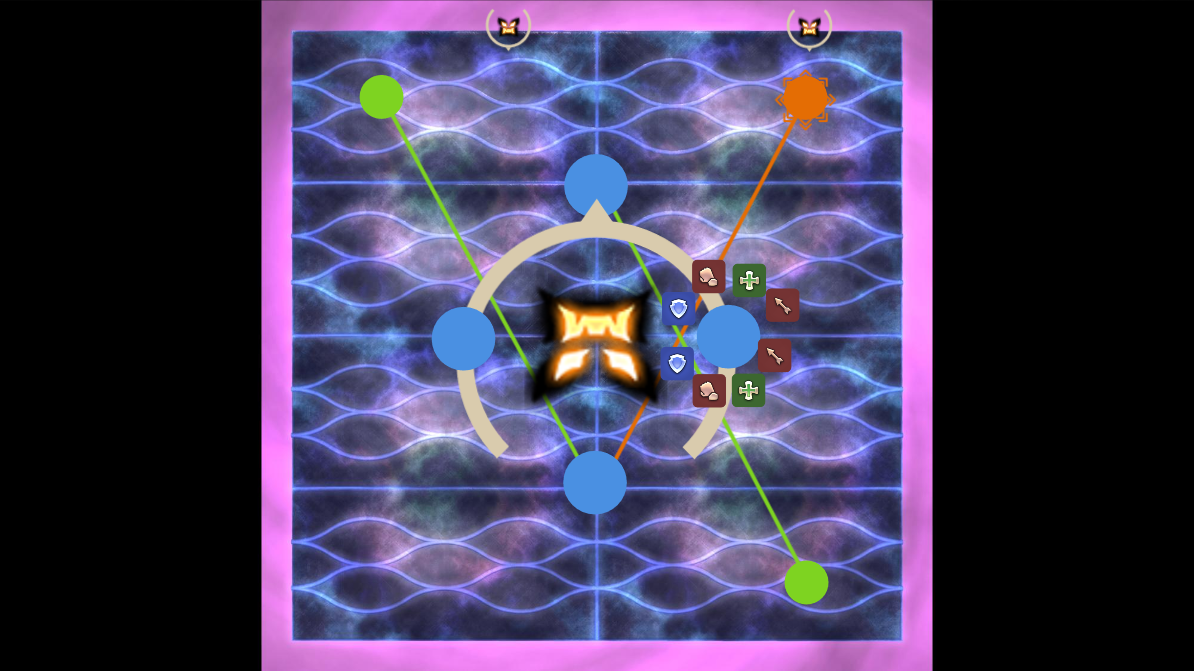
One orb will have a spiked ball tethered to it, and it can be either purple or orange. At the same time, Athena will spawn new shapes tethered to the north and south orbs and begin casting Parthenos. Players need to identify where the spiked ball is tethered to and what colour it is. As the donut AoE goes off, players need to move out of Athena's hitbox towards the spiked ball's side, and then do the spiked ball mechanic. This spread or stack is done the same way as Superchain Theory 1, relative to the boss. When moving, identify where the red Paradeigma adds that spawned north are, as they do a line AoE across the arena. This will go off after the spiked ball mechanic, so dodge after.
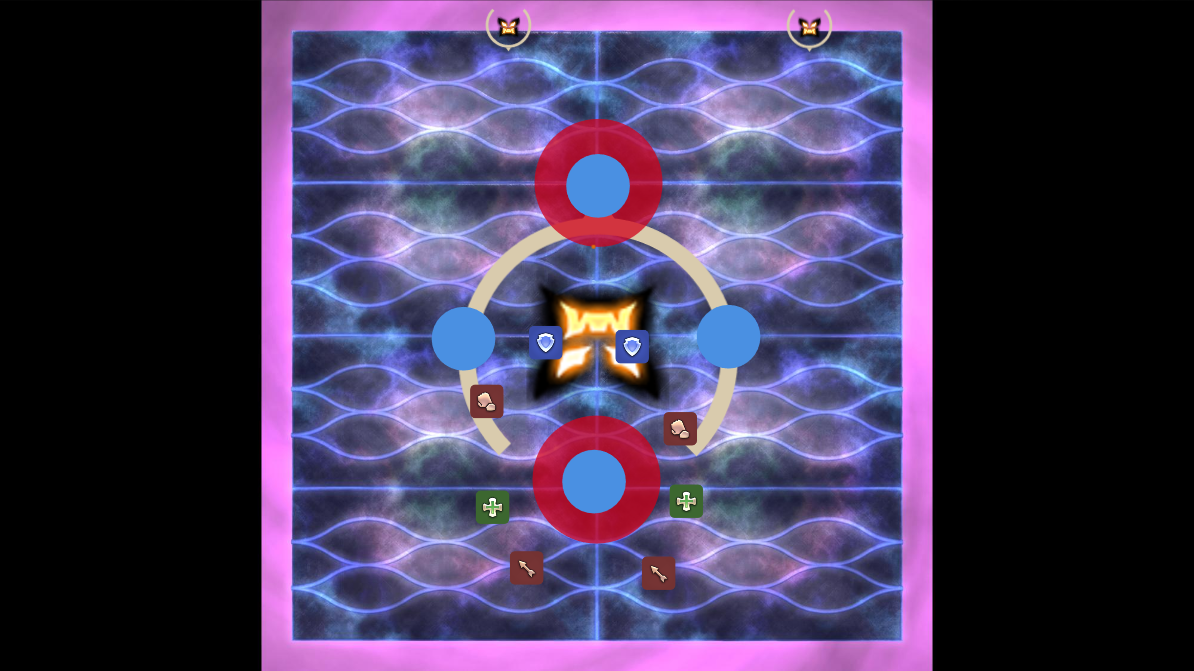
As players are spreading or stacking, they will need to identify where the final orange spiked ball is tethered to, which is either the north orb or the south orb. This is always an orange spiked ball accompanied by a green orb, so players need to head to the correct orb and spread away from the orb. At this time, Athena will begin casting Unnatural Enchainment on seven platforms. The only platform safe is one of the four closest to the orb players are near, so identify it and head to it right after the spread, before the castbar finishes.
Athena will cast On the Soul twice, auto-attack the tank twice, become untargetable, and cast her enrage.
Party Finder Strategies
Different data centres have different strategies, spread positions, and role priorities for the fight. For example, Tuufless Elemental Raid Macros has MT > ST > H1 > H2 priorities for support tower positions during Paradeigma 3. Communicate with your party to ensure you have the correct spread positions and priorities. The default priorities in the guide are used on the North American Aether Data Centre.
Loot
As this is a door boss, no loot is dropped from the encounter until the second phase is defeated.
Changelog
- 19 Jun. 2023: Guide added.
More FFXIV Content

This guide has been written by Lyra an accomplished raider in FFXIV and has written raid guides for the game for the past five years. You can follow him on Twitter and he streams raids on Twitch.
- Savage Catchup: How to Ride Your Way to a Clear in M10S
- First Look at Patch 7.5 Comes This Friday — Here’s What to Know
- Here’s What You’ll Need to Step into The Merchant’s Tale
- Little Ladies’ Day 2026 Ends Soon! Don’t Miss These Free Rewards
- Savage Catchup: All the Must-Knows for Tackling M9S
- FFXIV Players Can Earn Free Glamour Items in Valentione’s Day Event
- Don’t Miss NEW Cosmic Exploration & Phantom Weapons — Out Now!
- Been on Break From FFXIV? Don’t Miss Extra Sub Time with the Free Login Campaign!