Keybindings and Hotbar Setup for Warrior — Dawntrail 7.2
Welcome to our keybinding and controller setup guide for Warrior. Here you'll find example setups to play FFXIV for mouse and keyboard configurations, as well as controller users.
Keybindings and UI Introduction
Hotbar setups in any game tend to be very much personal preference. While the keybindings we have listed here would be considered well thought out, it's understandable that you may want to tweak things to your own liking. These hotbars are meant to be used as a template and give a baseline for you to create your own setup. However, if what we've provided works for you, don't let that stop you from just using these 1:1.
Warrior Hotbar Setup
Controller hotbars can easily be adjusted for personal preference. You can follow a similar
priority system and place your most frequently used buttons on top hotbar and/or face buttons with defensives or AoE
skills placed on second or expanded hotbars. Utilizing shoulder and trigger buttons to quickly
access your WXHB is encouraged and should be tuned to your liking! Additionally, assigning macros for things like ![]() Sprint to your analog
stick presses is one way to make room for other skills without sacrificing accessibility.
Sprint to your analog
stick presses is one way to make room for other skills without sacrificing accessibility.
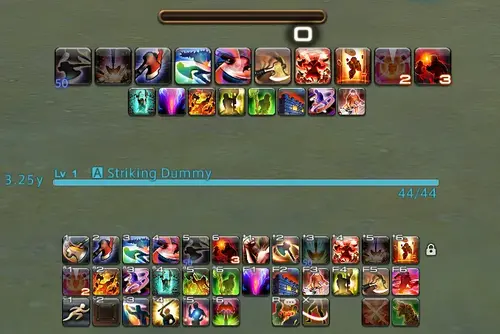
Keyboards and Mouse setups will vary wildly depending on which variation of a keyboard you use. The example below utilizes a QWERTY keyboard and used WASD for movement. This is purely player preference. If you prefer to move with mouse buttons, feel free to do so.
Modifiers such as CTRL and Shift are commonly used, with ALT being a key that's usually not comfortable for some players. A personal solution I have done is to bind my extra mouse buttons to all 3 modifiers and use a combination of clicking, function (F1-F6), alphabetical and number keys to comfortably hit all my skills. Using a priority system of most used to least used buttons determines what bind I give to each skill. Additionally, I use extra hotbars that serve as combo & cooldown trackers that do not have binds assigned near the middle of my screen along with my Beast Gauge. Concentrating most of my information to the center of my screen helps a lot with staying focused. After gaining enough muscle memory, I also hid my binded hotbars to appease to my OCD but also reduce visual clutter.
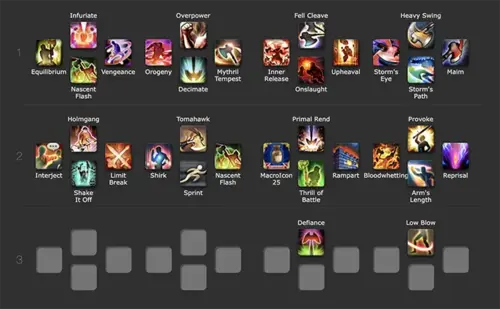
When it comes to keybindings, generally your combo GCDs like ![]() Storm's Path are grouped together for both
clarity and to make it easier to remember what you've assigned skills to. Warrior only has six combo GCDs (including AoE) and one
ranged, being
Storm's Path are grouped together for both
clarity and to make it easier to remember what you've assigned skills to. Warrior only has six combo GCDs (including AoE) and one
ranged, being ![]() Tomahawk. Tomahawk is something you won't quite hit as often as the others,
so where you place it is personal preference. Your Beast Gauge spenders are hit very often in encounters so assigning both
Tomahawk. Tomahawk is something you won't quite hit as often as the others,
so where you place it is personal preference. Your Beast Gauge spenders are hit very often in encounters so assigning both
![]() Fell Cleave and
Fell Cleave and ![]() Decimate within the respective single-target and AoE sections of your hotbars
is recommended. With the plethora of OGCDs we have, it's advised to group damage and defensive ones separately. Grouping
Decimate within the respective single-target and AoE sections of your hotbars
is recommended. With the plethora of OGCDs we have, it's advised to group damage and defensive ones separately. Grouping
![]() Inner Release,
Inner Release, ![]() Onslaught,
Onslaught, ![]() Upheaval and
Upheaval and ![]() Infuriate is one
way to keep track of them easier.
Infuriate is one
way to keep track of them easier.
Going back to having a priority system for most to least used buttons, I personally put defensives
in the order of raid mitigation & short CDs → long CDs → invulnerability, with some changes on this based on how
comfortable I am hitting a specific keybind. Some buttons are clicked in the event I want to make a conscious effort to use that skill,
like ![]() Holmgang. Last but not least, all role actions and universal actions are grouped together, with
Holmgang. Last but not least, all role actions and universal actions are grouped together, with ![]() Limit Break
following the same logic as
Limit Break
following the same logic as ![]() Holmgang.
Holmgang.
General Keybind Advice
FFXIV has a unique problem in the fact the game wants you to play a multitude of different classes in order to fully enjoy its combat system. While all jobs will have differing hotbar setups to some varying degree, there's still some advice to give that will help with the muscle memory when swapping between classes and roles.
- Keep similar actions on the same buttons across all characters. This may not always
be possible, but you'll find most classes in this game can be set up in a very
similar fashion. This includes, but is not limited to:
- Basic combo buttons on easy to reach mappings or controller face buttons.
- Place similar mitigation on the same buttons across Jobs, especially role abilities.
A good example of this is
 Reprisal and
  Rampart.
 - If you use a controller, you can use a cross hotbar to track longer cooldowns such as raid buffs or party mitigation. This may allow you to stay on a singular hotbar for longer and help with eye tracking on the screen.
- Your hotbar should be located on a place on the screen that's easy to see while still being able to keep your attention on your character, the boss, and the arena. This also applies to your buff and debuff bar, your party list, and the target bar. The easier it is to see things in your peripheral vision, the easier time you'll have focusing on the fight rather than being stuck in your hotbar.
- Mobility is important! Ensure your keybinds won't interfere with your ability to move your character. You should be able have full control of your character, even in the middle of your burst rotation.
Changelog
- 24 Mar. 2025: Reviewed for Patch 7.2.
- 17 Apr. 2024: Page added.
Guides from Other Classes

Spin Cycle is a veteran player & writer for Phantasy Star Online 2 and FFXIV. He has been playing Lost Ark since the western release and mains Sharpshooter. He also plays Wardancer, Gunslinger & Soulfist.
- FFXIV - Invite Your Friend Back and Get Exclusive Rewards With the Callback Campaign!
- FFXIV - When Does the Mobile Version Release?
- FFXIV - Are You Ready for the Hatching Tide?
- FFXIV - Beastmaster Icy Veins Sneak Preview??
- FFXIV - Pre-orders Are Open for the TTRPG Scenario and Gamemaster Guide!
- FFXIV - Seekers of Eternity Patch 7.2 Now Live!
- FFXIV - Last Chance: Free Fantasia Disappears with Patch 7.2!
- Final Fantasy XIV - Famitsu Interview with Yoshi P Breakdown!


