Battlefield of Eternity Map Guide
Welcome to our strategy guide for Battlefield of Eternity, a Map in Heroes of the Storm. On this page, you will find everything required to understand how it is designed and how to play it.

Introduction
Battlefield of Eternity is a 2-lane Map belonging to the Diablo universe. The signature Objective of Infernal Shrines consists of Immortals: Ilarian and Beleth. Defeating the enemy Immortal will make the allied Immortal join you in lane to destroy enemy Structures with his powerful attacks.
Draft Strategy
- Displacements into Immortal's Stun
- Poke tools for Objective
- Quests to stack on Heroes
- Race damage for Immortal
- Strong early game
- Vision tools
- Weak early game
Lane Assignments
Here you can find one or more formations that are viable on this Map. Keep in mind that positions in lane are not strict and will often change based on the situation.
Formation 1-4
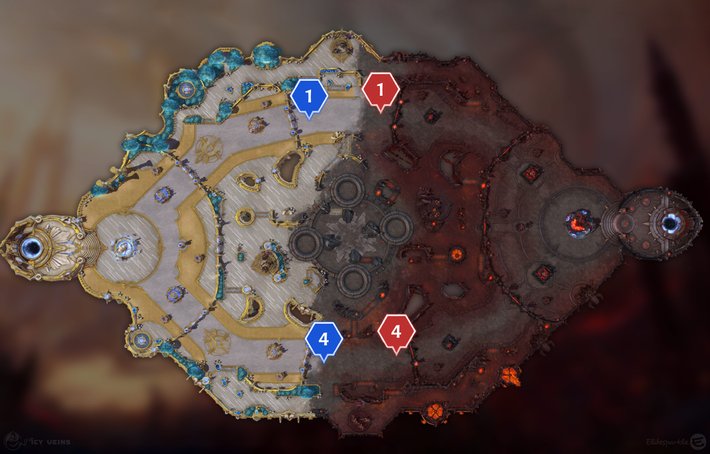
The go-to formation for Battlefield of Eternity is 1-4:
- 1 Hero, the Offlaner, covers the top lane;
- 4 Heroes cover the bottom lane.
Map Strategy
- From 0:30 minutes onwards, especially if your team is struggling in the bottom lane, you could try to sneak-capture the Siege Camp in the offlane with the help of a second Hero that you sent there beforehand. While doing so, do not play for the other Siege Camp because your team is likely outnumbered there.
- From 0:30 minutes onwards, whenever your team has an advantage while there is no Objective to contest, start clearing the Siege Camp in the 4-man lane and capture it as soon as possible.
- At 2:20 minutes or 30-40 seconds before the next Immortals spawn, start clearing the allied Bruiser Camp and capture it slightly before the Immortals appear. To make this Mercenary Camp join the lane together with allied Minions, capture it at 2:45 minutes or 15 seconds after a wave of Minions spawned.
- At 3:00 minutes or whenever the Objective phase starts, you must be already near the Immortals! Being late by 5 seconds is enough to give a 25% Immortal's Health advantage to the enemy team. If you are 10 seconds late, the enemy team can easily bring the Immortal down to 50% Health.
- During the Objective phase, play around the allied Immortal unless you have an advantage. Choose how many Heroes to send on each Immortal depending on the situation.
- If you win the Objective, push together with the allied Immortal while your Offlaner is soaking in the other lane, unless your team is going for a Keep or for the Core, in which case you should stay as 5.
- If you lose the Objective, defend your Structures from the enemy Immortal while your Offlaner is soaking in the other lane, unless the enemy team is going for a Keep or for the Core, in which case you should stay as 5.
Mercenary Camps
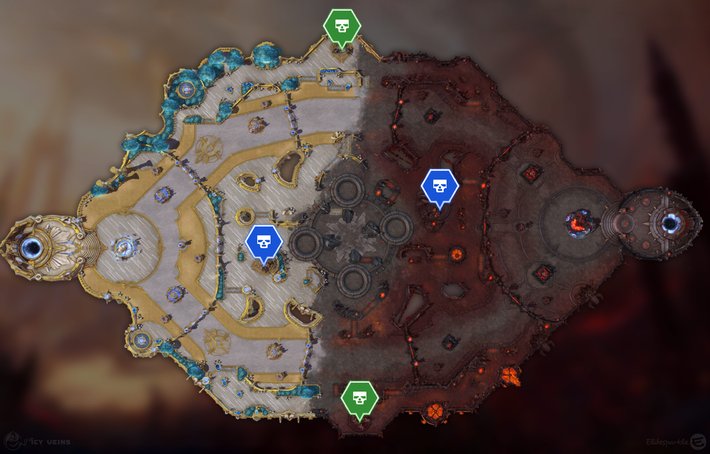
As shown in the image below, Battlefield of Eternity has a total of 4 Mercenary Camps:
- 1 Siege Camp (green icon) in the top lane;
- 1 Bruiser Camp (blue icon) that goes in the top lane for the right-side team;
- 1 Bruiser Camp (blue icon) that goes in the bottom lane for the left-side team;
- 1 Siege Camp (green icon) in the bottom lane.
Mercenary Camps on Battlefield of Eternity disappear from the battlefield once an Immortal goes in lane (unless their Mercenaries are in combat) and reappear when that Immortal dies.
Siege Camp
This type of Mercenary Camp features 3 Impalers. Once captured, it spawns the same units fighting for your team in the corresponding lane. When possible, push with them to get more value.
| Spawn | Respawn |
|---|---|
| 0:30 minutes | 3:00 minutes after its last capture |
Impalers are ranged units that can attack enemies from the distance but lack area of effect damage to quickly clear enemy Minions. Once captured, they are capable of damaging enemy Structures without getting in their range.
Bruiser Camp
This type of Mercenary Camp features 1 Fallen Shaman and 2 Fallen Hounds. Once captured, it spawns the same units fighting for your team in the corresponding lane. When possible, push with them to get more value.
| Spawn | Respawn |
|---|---|
| 0:30 minutes | 4:00 minutes after its last capture |
Once captured, the Fallen Shaman periodically summons 2 Fallen Hounds whenever they die. The most efficient way to clear them in lane is therefore to kill the Fallen Shaman first and the Fallen Hounds after. Fallen Shaman and Fallen Hounds deal 100% increased damage to Minions, Structures and Summons.
Map Objective
The signature Objective of Infernal Shrines consists of Immortals battling each other. Each team is allied with an Immortal: Ilarian, the angelic Immortal, is allied with the left team; Beleth, the demonic Immortal, is allied with the right team.
Defeating the enemy Immortal will give your team a laning Immortal and will spawn 2 Regeneration Globes for your team in the middle of the battlefield. Immortals go in the lane where enemy Structures have the least amount of damage taken in total and have a Shield equal to their remaining Health during the Objective phase.
| Spawn | Respawn |
|---|---|
| 3:00 minutes | 1:45 minutes after the laning Immortal dies |

Engage in Immortal Combat
Two Immortals fight at the center of the map. Help your Immortal prevail, and lay waste to the enemy's Forts.
|

Employ Eternal Tactics
Protect your Immortal by obliterating the opposing team, or descend upon the enemy Immortal with relentless fury.
|

Hire Unique Mercenaries
Bolster your forces with Fallen Shaman and cunning Impalers, who will lend their powers to your cause!
|
Immortals
Immortals are in a conflict with each other, however, they do not deal damage toe ach other. They can only be damaged by players of the opposing team. When one of the Immortal reaches half Health, they take 10 seconds to swap positions. While swapping, they cannot be damaged.
Some great Heroes for damaging the enemy Immortal are:
- Artanis with
 Amateur Opponent at Level 1;
 - Chromie;
- Hanzo with
 Serrated Arrows at Level 4;
 - Li-Ming;
- Greymane;
- Lunara with
 Nature's Culling at Level 4;
 - Raynor with
 Exterminator at Level 1;
 - Sgt. Hammer;
- Tyrande;
- Valla;
- Zul'jin.
While fighting, Immortals use two Abilities: Angelic Cleave or Demonic Cleave (14-second cooldown, increased by 2 seconds in lane) is a 2-second delay Knockback followed by a 0.5-second Stun that one-shots Minions; Angelic Explosions or Demonic Explosions (14-second cooldown, increased by 2 seconds in lane) is a 2-second delay rain of swords that one-shots Minions and Stun for 2 seconds. Both these Abilities display warning indicators on the ground. Dodge them!
There are 5 ways to approach the Objective phase:
- full defense: 5 Heroes defend the allied Immortal;
- defend & race: 4 Heroes defend the allied Immortal, 1 Hero attacks the enemy Immortal;
- defend & soak: 3-4 Heroes defend the allied Immortal, 1-2 Heroes soak in lane;
- harass & race: 1 Hero defends the allied Immortal, 4 Heroes attack the enemy Immortal;
- full race: 5 Heroes attack the enemy Immortal.
Immortals always face each other, either horizontally or vertically. The first Immortal positions are always the same: before the swap Ilarian goes South and Beleth goes North, after the swap Ilarian goes East and Beleth goes West. For the rest of the game, Immortal positions are completely random, with the only rule being that after the swap they will always choose different positions.
| Position | Ilarian | Beleth | |
|---|---|---|---|
| Offensive | Vertical | South | North |
| Horizontal | East | West | |
| Defensive | Vertical | North | South |
| Horizontal | West | East | |
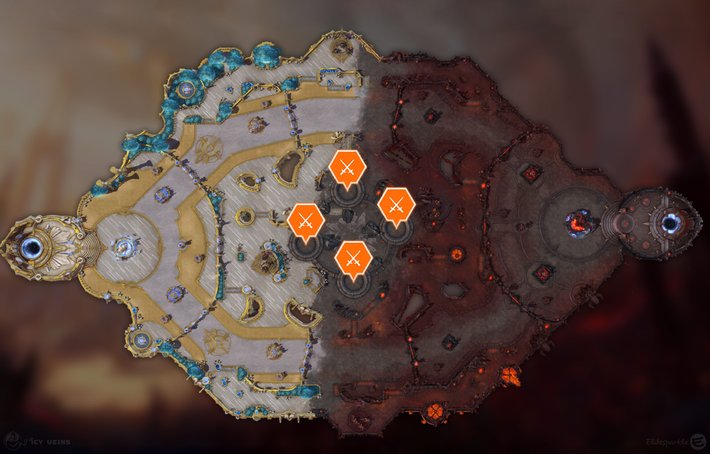
The icons that represent Immortals on the Minimap help players to quickly identify which Immortal to attack and which to defend: the opposing Immortal uses an icon depicting crossed axes, while the allied Immortal displays a shield icon. These icons are visible on the Minimap way before the Objective phase starts.
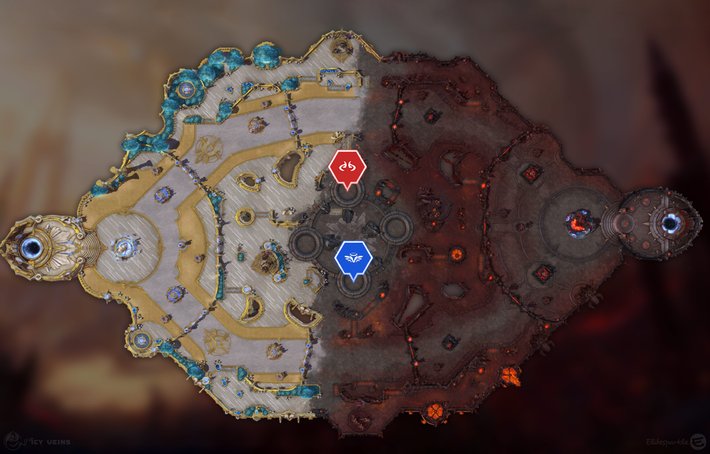
Offensive Vertical
When the Immortals are in these positions, it is easier to race:
- Ilarian (blue icon): South;
- Beleth (red icon): North.
Offensive Horizontal
When the Immortals are in these positions, it is easier to race:
- Ilarian (blue icon): East;
- Beleth (red icon): West.
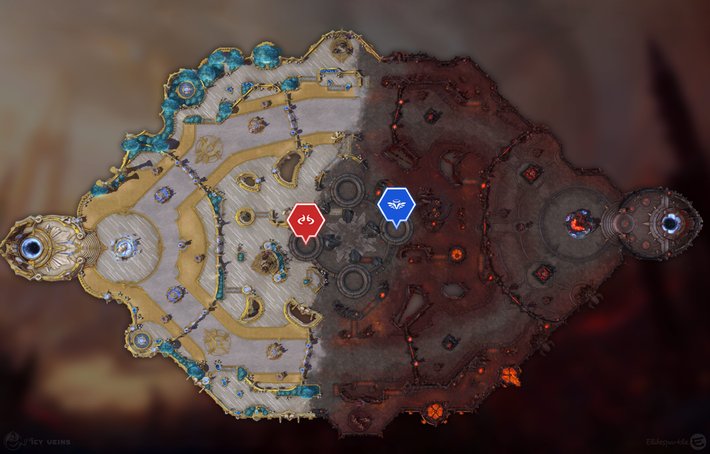
Defensive Vertical
When the Immortals are in these positions, it is easier to defend:
- Ilarian (blue icon): North;
- Beleth (red icon): South.
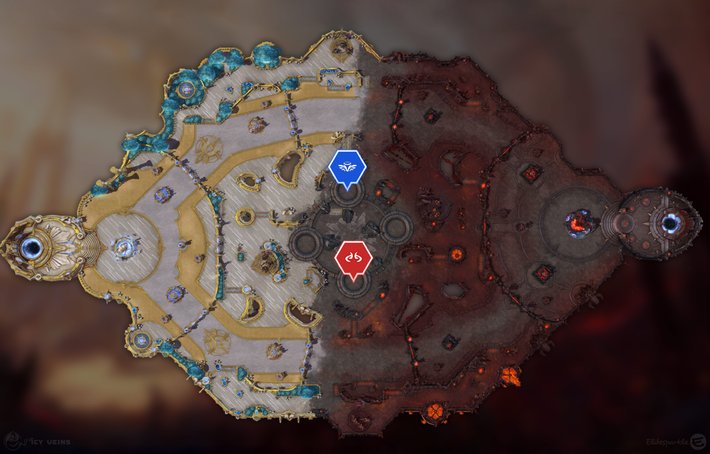
Defensive Horizontal
When the Immortals are in these positions, it is easier to defend:
- Ilarian (blue icon): West;
- Beleth (red icon): East.
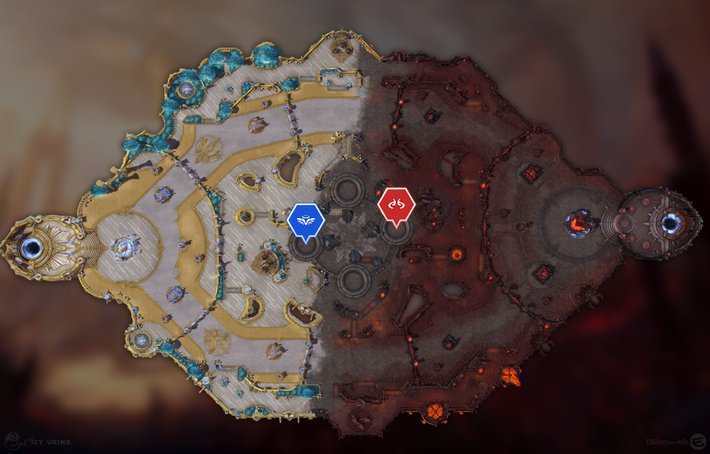
Core Ability
Every 12 seconds, the Core will spawn 2 volleys of Frozen Orbs that explode, dealing 5% maximum Health as damage and Rooting enemy Heroes hit for 1.5 seconds.
Win Conditions
To win the game on Battlefield of Eternity, you should count on any of the following win conditions:
- Map Objective.
Tips and Tricks
- Use the first Healing Fountain (2-minute cooldown) before 1:00 minute because the first Objective on this Map activates at 3:00 minutes, so you will have it back in time for that.
- Use the color of the bushes to identify when it is better to race: when the Immortals are near bushes that match their colors, it is easier to defend; when the Immortals are near bushes that have opposite colors to theirs, it is easier to race.
- While fighting near the allied Immortal, you can use Displacement effects to push enemy Heroes under Angelic Explosions or Demonic Explosions, so that they take a lot of damage and get Stunned for 2 seconds.
Changelog
- 30 Sep. 2025: Guide updated for the latest Map Updates.
- Map Strategy section updated.
- Mercenary Camps section updated.
- 13 Dec. 2024: Guide created.
Elitesparkle has been hooked on Heroes of the Storm since day one in 2015. Over the years, he has consistently competed at Master level across multiple Seasons and has even climbed into Grand Master a couple of times. Known for his logical mindset and love for theorycrafting, he thrives on breaking down the game's mechanics and engaging in high-level strategy discussions with the community.
- Heroes of the Storm Balance Patch Notes: February 19
- Heroes of the Storm Live Patch Notes: February 10
- Heroes of the Storm PTR Update: January 21
- Heroes of the Storm PTR Update: January 16
- Heroes of the Storm PTR Patch Notes: January 14
- Heroes of the Storm Balance Patch Notes: December 12
- Heroes of the Storm Live Patch Notes: December 1
- Heroes of the Storm Live Patch Notes: September 30th
 Free Hero Rotation


