Blackheart's Bay Map Guide
Welcome to our strategy guide for Blackheart's Bay, a Map in Heroes of the Storm. On this page, you will find everything required to understand how it is designed and how to play it.

Introduction
Blackheart's Bay is a 3-lane Map belonging to the Nexus universe. The signature Objective of this Map are Doubloons to collect from Treasure Chests and Mercenary Camps. Whenever a team pays the required amount of Doubloons, Captain Blackheart will use the cannons of his ghost ship to shoot at enemy Structures.
Draft Strategy
- Heroes for clearing Mercenary Camps
- High-tickrate damage to open Treasure Chests
- Double Bruiser
- Global presence
- Offlaner who can double soak
- Point control for Boss Camp
- Split-push
- Vision tools
- Effects relying on impassable terrain
- Quests to stack on Heroes
Lane Assignments
Here you can find one or more formations that are viable on this Map. Keep in mind that positions in lane are not strict and will often change based on the situation.
Formation 1-3-1
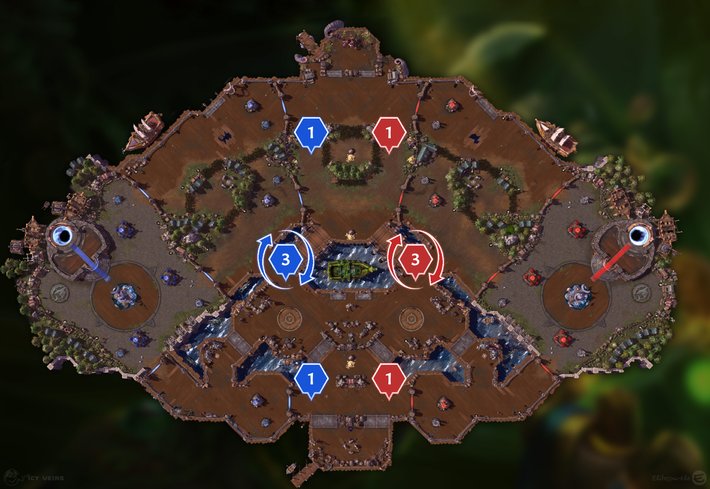
The go-to formation for Blackheart's Bay is 1-3-1:
- 1 Hero, the Offlaner, double-soaks the middle and top lane;
- 3 Heroes collect Doubloons from Mercenary Camps and Doubloon Camps;
- 1 Hero covers the bottom lane.
Formation 1-4
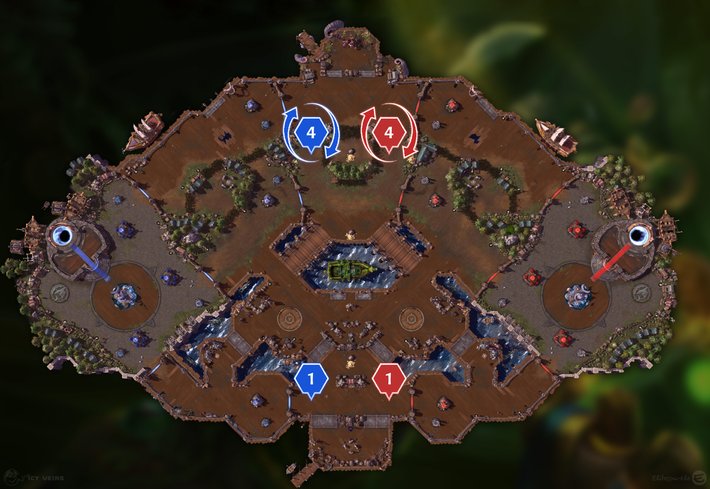
An alternative formation for Blackheart's Bay is 4-1:
Map Strategy
- At 0:30 minutes or 30-40 seconds before the next Objective phase, start clearing the allied Siege Camp and capture it slightly before the next Treasure Chest spawns. To make this Mercenary Camp join the lane behind allied Minions, capture it at 0:45 minutes or 15 seconds after a wave of Minions spawned.
- Right after capturing the allied Siege Camp or whenever available, capture the allied Doubloon Camp nearby.
- Right before 1:30 minutes, send multiple Heroes near the top lane and be ready to get Doubloons from the Treasure Chest that will spawn there.
- At 2:00 minute or whenever available, start clearing the allied Bruiser Camp and capture it as soon as possible. To make this Mercenary Camp join the lane in front of allied Minions, capture it at 2:35 minutes or 5 seconds after a wave of Minions spawned.
- Right after capturing the allied Bruiser Camp or whenever available, capture the allied Doubloon Camp.
- After that, whenever your team has an advantage, turn in Doubloons or start clearing the neutral Bruiser Camp and capture it as soon as possible.
- Use the time during a bombardment for capturing Mercenary Camps. Putting pressure on side lanes will help you turn in Doubloons when the bombardment ends.
- At 4:30-5:00 minutes and every 4:00-4:30 minutes after that, be ready to get Doubloons from the Treasure Chests that will spawn near the top, middle, and/or bottom lane.
- After about 10:00 minutes, whenever your team has an advantage while there is no Objective to contest, you can capture the Boss Camp and either push with it or use it as a distraction for paying Doubloons. Avoid doing it earlier if you do not have a dedicated team composition.
Mercenary Camps
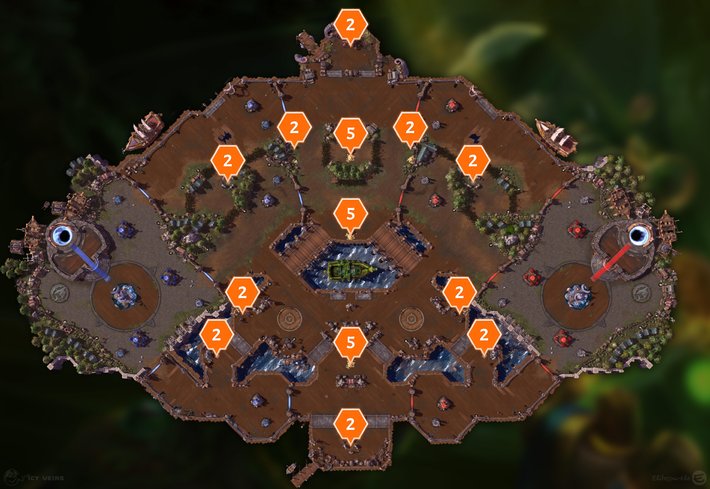
As shown in the image below, Blackheart's Bay has a total of 10 Mercenary Camps:
- 1 Boss Camp (red icon) in the top lane;
- 2 Bruiser Camps (blue icon) in the top lane;
- 2 Doubloon Camps (orange icon) between the top and the middle lanes;
- 2 Doubloon Camps (orange icon) between the middle and the bottom lanes;
- 2 Siege Camps (green icon) in the bottom lane;
- 1 Bruiser Camp (blue icon) in the bottom lane.
Mercenary Camps on Blackheart's Bay are always active, even when Treasure Chests are up or during a bombardment.

Mercenary Camps indicated with a red icon are immune to Bribe effects.
Doubloon Camp
This type of Mercenary Camp features 2 Skeletal Pirates. They are part of the Map Objective and do not go in lane. Once captured, you will get 2 Doubloons from it.
| Spawn | Respawn |
|---|---|
| 0:30 minutes | 2:30 minutes after its last capture |
You should clear these Camps on cooldown in order to get as many Doubloons as possible. They are extremely easy to kill, so any Hero can solo them in a reasonable time.
Siege Camp
This type of Mercenary Camp features 2 Giants. Once captured, it spawns the same units fighting for your team in the corresponding lane. When possible, push with them to get more value. On this Map, you will also get 2 Doubloons from it.
| Spawn | Respawn |
|---|---|
| 0:30 minutes | 3:00 minutes after its last capture |
Instead of attacking enemies with Basic Attacks, Giants throw stones at them. These stones can be dodged, so it is possible to capture them without taking any damage. Once captured, they are capable of damaging enemy Structures without getting in their range. Giants deal 100% bonus damage to Structures.
Bruiser Camp
This type of Mercenary Camp features 3 Knights and 1 Wizard. Once captured, it spawns the same units fighting for your team in the corresponding lane. When possible, push with them to get more value. On this Map, you will also get 2 Doubloons from it.
| Spawn | Respawn |
|---|---|
| 0:30 minutes | 4:00 minutes after its last capture |
Right after being captured and while in lane, the Wizard creates a Spell Armor field around him which reduces some of the damage taken by Minions, Mercenaries, and Heroes within range. Avoid fighting the enemy team if they still have a Wizard helping them!
Boss Camp
This type of Mercenary Camp features 1 Grave Golem. Once captured, it spawns the same unit fighting for your team in the corresponding lane. When possible, push with it to get more value. On this Map, you will also get 2 Doubloons from it.
| Spawn | Respawn |
|---|---|
| 5:00 minutes | 5:00 minutes after its last capture |
While in combat, the Grave Golem will use Mega Smash (10-second cooldown) to damage and Stun all enemies in melee range and Binding Roots (15-second cooldown) to damage and Root enemies who get hit by them.
Due to being Elite, this Mercenary Camp is immune to Bribe
effects (such as ![]() Covert Mission by Nova).
Covert Mission by Nova).
Watch Towers
Blackheart's Bay features 2 Watch Towers: they are located between the middle and the bottom lane, providing vision in the area that leads to Captain Blackheart, where Heroes go to turn in Doubloons.
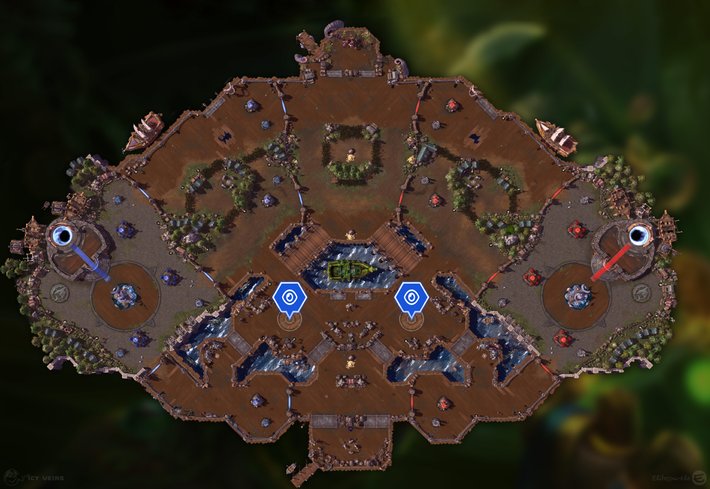
Securing a Watch Tower provides your team with greater vision, allowing you to keep an eye on enemy movements in that part of the battlefield. Watch Towers can be captured by standing in the area until your team gains control. After 45 seconds of not being occupied, they become neutral again. Because of this, they should only be captured when you are playing in that area for other reasons (either to capture Mercenary Camps or for contesting the Objective).
Watch Towers controlled by the enemy team are extremely dangerous, especially when there are bushes nearby, therefore you should think twice before contesting them. If you do not have mobility tools at your disposal and your teammates are not nearby to help you, you should definitely not try to capture a Watch Tower as you will only risk dying for no reason. Staying alive is more important than getting vision.
Map Objective
The signature Objective of Blackheart's Bay consists of Doubloons. Heroes can pay Captain Blackheart in the middle of the battlefield to get his assistance. Each payment requires 8 Doubloons, plus 2 Doubloons for each time that team paid during the game. In order to pay, Heroes have to channel for 5 seconds. As soon as a bombardment ends, it is possible to pay again.
| Spawn | Respawn |
|---|---|
| 1:30 minutes | 3:00 minutes after the Chests are destroyed (paused while Cannonballs are being fired) |

Collect Doubloons
Attack treasure chests, mercenaries, and skeletons to collect doubloons.
|

Turn in Doubloons
Hand your doubloons over to Blackheart or you will drop them all when you die!
|

Bombard Your Enemies
After receiving enough doubloons from your team, Blackheart will bombard your enemy's forts!
|
Treasure Chests
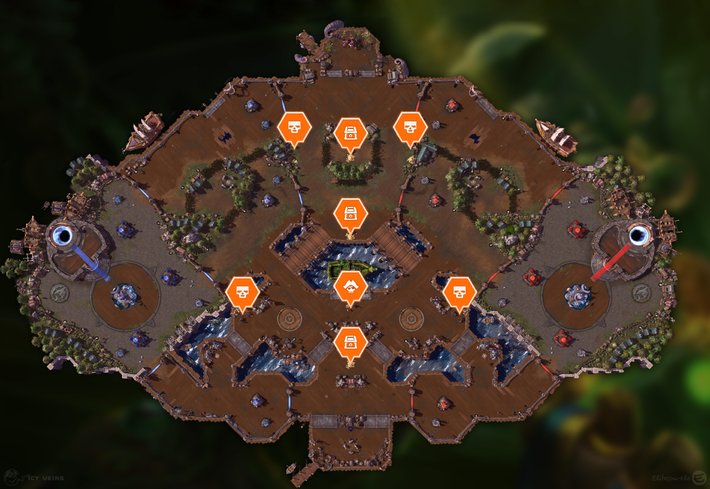
The amount of Treasure Chests per Objective phase goes up during the game: the first time there is only 1 Treasure Chest (always near the top lane), then there are 2 Treasure Chests for 3 times in a row, and then there are 3 Treasure Chests for the rest of the game.
The best Heroes for opening Treasure Chests are the ones who can hit them multiple times in a couple of seconds:
- Alexstrasza, using
 Flame Buffet;
 - Ana, using Basic Attacks;
- Arthas, using
 Frozen Tempest;
 - Azmodan, using
 All Shall Burn;
 - Blaze, using
 Oil Spill
followed by
  Flame Stream to Ignite it;
 - Deathwing, using
 Lava Burst
and/or
  Molten Flame;
 - Dehaka, using
 Dark Swarm;
 - Diablo, using
 Fire Stomp;
 - D.Va, using Mech's Basic Attacks;
- Falstad, using
 Lightning Rod;
 - Genji, using Basic Attacks and/or
 Shuriken;
 - Gul'dan, using
 Drain Life
and/or
  Corruption;
 - Hogger, using a well-placed
 Hogg Wild;
 - Kharazim, using
 Deadly Reach;
 - Kel'Thuzad, using
 Death and Decay;
 - Lucio, using Basic Attacks;
- Lunara, using Basic Attacks;
- Mei, using
 Blizzard;
 - Nazeebo, using
 Corpse Spiders;
 - Qhira, using
 Carnage;
 - Stitches, using Basic Attacks;
- Stukov, using
 Lurking Arm;
 - Sylvanas, using
 Withering Fire
and/or
  Shadow Dagger;
 - Tassadar, using Basic Attacks
and/or
 Psionic Storm;
 - Tracer, using Basic Attacks;
- Tychus, using Basic Attacks;
- Zarya, using Basic Attacks.
Doubloons
Doubloons should preferably be collected by Heroes with mobility because those Heroes can easily escape from unwanted team fights to protect Doubloons from being lost upon death (only half of them, rounded down) and then being collected by enemy Heroes.
Here is a breakdown of all ways to collect Doubloons:
- Treasure Chests contain 5 Doubloons;
- Doubloon Camps have 2 Doubloons;
- Mercenary Camps have 2 Doubloons.
Bombardment
A successful payment results in 12 Cannonballs being fired over 40 seconds. Cannonballs deal 2875 damage (not scaling) directly to Structures and 375 splash damage (not scaling) to everything in a small radius around the impact. Keeps and Core take 20% less damage from Cannonballs.
Bombardments prioritize the top lane, the bottom lane, and then the middle lane. Fort-level Structures are targeted before Keep-level Structures. Forts and Keeps will only be targeted if the respective Towers and Gates have been destroyed. Cores will only be targeted if all Towers, Gates, Forts, and Keeps have been destroyed.
In the early game, bombardments will deal almost enough damage to destroy a Fort even if nearby Towers and Gate are still up. To make sure the Fort falls, you need to destroy 1 Tower before paying, so before Captain Blackheart starts bombarding enemy Structures.
In the late game, if the only Structure left is the Core with 100% Health and 100% Shield, a bombardment will bring it down to around 25% Health remaining. To make sure the Core falls, you should attack it with as many Heroes as possible before its Shield starts regenerating.
Core Ability
Every 4 seconds, the Core will shoot a Cannonball at 2 nearby enemy Heroes, dealing 5% maximum Health as damage, Slowing them by 70% for 1.5 seconds, and Knocking them back.
Win Conditions
To win the game on Blackheart's Bay, you should count on any of the following win conditions:
- Map Objective,
- Boss Camp,
- Split-push.
Tips and Tricks
- On this Map, due to the Objective being always active, you can use the Healing Fountain on cooldown instead of saving it for when the Objective spawns.
- Use effects that can deal damage multiple times in a couple of seconds to quickly open Treasure Chests and have an allied Hero near them to pick up the Doubloons as they fall on the ground.
- Every time you have 5 Doubloons or more, pay to avoid losing them upon death (only half of them, rounded down). Doubloons that fall on the ground do not disappear and can be picked up by enemy Heroes too, causing your team to take more damage on Structures throughout the game.
- You can press Tab to see who has the highest amount of Doubloons among enemy Heroes. Use that information to not let that Hero pay while your team does or to kill them when no other enemy Heroes are nearby to pick up their lost Doubloons.
- The first Objective will almost deal enough damage to take down 2 Towers, 1 Gate, and 1 Fort. To make sure the Fort falls, you need to destroy 1 Tower before paying, so before Captain Blackheart starts bombarding enemy Structures.
- Do not fight unless the enemy team has way more Doubloons than you and your team has an advantage, or they are doing a game-winning play (turning in Doubloons, capturing a Boss Camp when you no longer have a top Keep, or going Core).
Changelog
- 14 Feb. 2026: Guide updated for the latest Map Updates.
- Watch Towers section updated.
- 26 Dec. 2025: Guide reviewed.
- Map Objective section updated.
- Tips and Tricks section updated.
- 16 Dec. 2025: Guide updated for the latest Map Updates.
- Map Objective section updated.
- Tips and Tricks section updated.
- 05 Dec. 2025: Guide updated for the latest Hotfix.
- Map Objective section updated.
- 30 Sep. 2025: Guide updated for the latest Map Updates.
- Map Strategy section updated.
- Mercenary Camps section updated.
- Watch Towers section updated.
- Map Objective section updated.
- Tips and Tricks section updated.
- 25 Aug. 2025: Guide reviewed.
- 22 Nov. 2024: Guide created.

Elitesparkle has been hooked on Heroes of the Storm since day one in 2015. Over the years, he has consistently competed at Master level across multiple Seasons and has even climbed into Grand Master a couple of times. Known for his logical mindset and love for theorycrafting, he thrives on breaking down the game's mechanics and engaging in high-level strategy discussions with the community.
- Heroes of the Storm PTR Patch Notes: March 30
- Heroes of the Storm Balance Patch Notes: February 19
- Heroes of the Storm Live Patch Notes: February 10
- Heroes of the Storm PTR Update: January 21
- Heroes of the Storm PTR Update: January 16
- Heroes of the Storm PTR Patch Notes: January 14
- Heroes of the Storm Balance Patch Notes: December 12
- Heroes of the Storm Live Patch Notes: December 1
 Free Hero Rotation


