Dragon Shire Map Guide
Welcome to our strategy guide for Dragon Shire, a Map in Heroes of the Storm. On this page, you will find everything required to understand how it is designed and how to play it.

Introduction
Dragon Shire is a 3-lane Map belonging to the Nexus universe. The signature Objective of this Map are Shrines that reward a Dragon Knight. The team who controls both Shrines can pilot the Dragon Knight, a powerful Vehicle that can be used to deal heavy damage to enemy Structures.
Draft Strategy
- Anchor
- Heroes for clearing Mercenary Camps
- Effects relying on impassable terrain
- Gankers
- Global presence
- Point control for Objective
- Strong late game
- Sustain damage/healing
- Vision tools
Lane Assignments
Here you can find one or more formations that are viable on this Map. Keep in mind that positions in lane are not strict and will often change based on the situation.
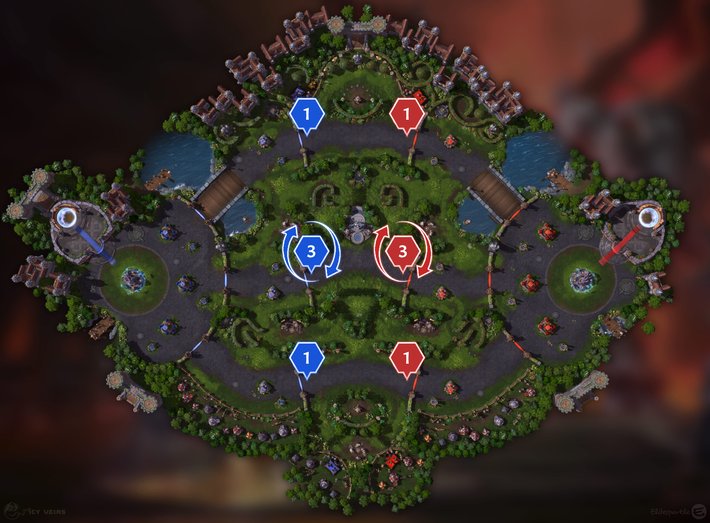
Formation 1-3-1
The recommended formation for Dragon Shire is 1-3-1:
- 1 Hero, the Offlaner, covers the top lane;
- 3 Heroes cover the middle lane and roam as soon as possible;
- 1 Hero, the Anchor, covers the bottom lane.

Map Strategy
- At 0:30 minutes or whenever available, start clearing the allied Siege Camp in the bottom lane and capture it as soon as possible. Watch out for invades! To make this Mercenary Camp join the lane behind allied Minions, capture it at 0:42 minutes or 12 seconds after a wave of Minions spawned.
- At 0:50 minutes or right after capturing the allied Siege Camp in the bottom lane, start clearing the allied Bruiser Camp and capture it as soon as possible. To make this Mercenary Camp join the lane in front of allied Minions, capture it at 1:30 minutes or immediately after a wave of Minions spawned.
- At 1:30 minutes or whenever the Objective phase starts, make sure to have a durable Hero on each Shrine. Secure at least one Shrine and keep control of it for as much as possible without dying.
- Whenever your team gets an advantage, capture the other Shrine and try to get the Dragon Knight in the middle lane. On the other hand, if the enemy team has an advantage, you should retreat.
- After that, whenever your team has an advantage while there is no Objective to contest or right after a Dragon Knight died, you can start clearing the neutral Bruiser Camp in the bottom lane and capture it as soon as possible.
- If your team wins the Objective, the first Dragon Knight should be used to destroy 2 Towers in any lane and ideally a Fort in a side lane, the second one should be used to get a Fort in another side lane, and the following ones should be used to destroy a Keep and eventually go Core. In the early game, the Offlaner should keep soaking.
- If your team loses the Objective, defend your Structures from the Dragon Knight and from enemy Heroes. If the opponents decide to push in multiple lanes at the same time, try to match them with a similar amount of Heroes and save as many Forts and Keeps as possible. In the early game, the Offlaner should keep soaking.
- Whenever you get the chance, you can capture the allied Siege Camp, followed by the neutral Bruiser Camp in the bottom lane, and then the enemy Siege Camp if available. This strategy is as powerful as getting a Boss Camp.
Mercenary Camps
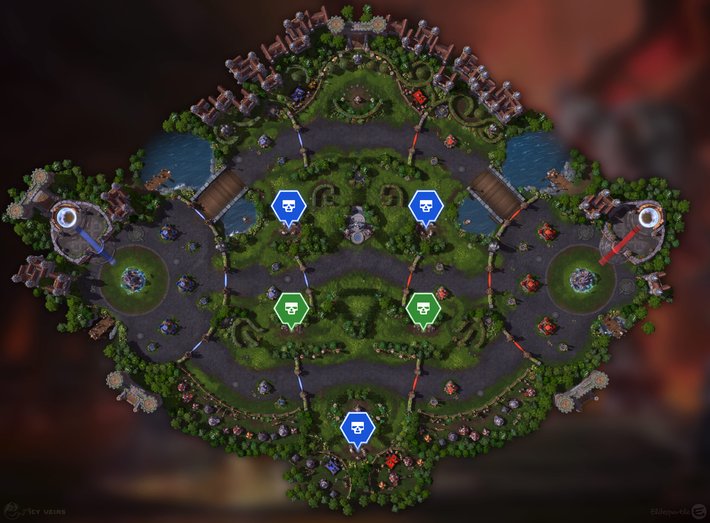
As shown in the image below, Dragon Shire has a total of 5 Mercenary Camps:
- 2 Bruiser Camps (blue icon) in the top lane;
- 2 Siege Camps (green icon) in the bottom lane;
- 1 Bruiser Camp (blue icon) in the bottom lane.
Mercenary Camps on Dragon Shire disappear from the battlefield once the Dragon Knight have been activated (unless their Mercenaries are in combat) and reappear only after the Dragon Knight has been killed.

Siege Camp
This type of Mercenary Camp features 2 Giants. Once captured, it spawns the same units fighting for your team in the corresponding lane. When possible, push with them to get more value.
| Spawn | Respawn |
|---|---|
| 0:30 minutes | 3:00 minutes after its last capture |
Instead of attacking enemies with Basic Attacks, Giants throw stones at them. These stones can be dodged, so it is possible to capture them without taking any damage. Once captured, they are capable of damaging enemy Structures without getting in their range. Giants deal 100% bonus damage to Structures.
Bruiser Camp
This type of Mercenary Camp features 3 Knights and 1 Wizard. Once captured, it spawns the same units fighting for your team in the corresponding lane. When possible, push with them to get more value.
| Spawn | Respawn |
|---|---|
| 0:30 minutes | 4:00 minutes after its last capture |
Right after being captured and while in lane, the Wizard creates a Spell Armor field around him which reduces some of the damage taken by Minions, Mercenaries, and Heroes within range. Avoid fighting the enemy team if they still have a Wizard helping them!
Map Objective
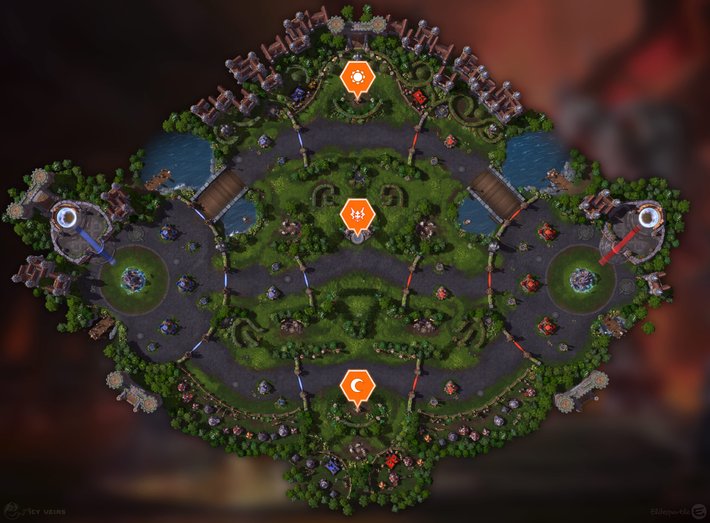
The signature Objective of Dragon Shire consists of Shrines that reward a Dragon Knight. Heroes can claim Shrines to unlock the Dragon Altar in the middle lane, and then an allied Hero can summon the Dragon Knight and pilot it as a Vehicle. Vehicles are Unstoppable. Capturing a Shrine takes 4 seconds if neutral, or 8 seconds if the enemy team has control over it. Summoning the Dragon Knight from the statue in the middle lane takes 3 seconds.
| Spawn | Respawn |
|---|---|
| 1:30 minutes | 2:00 minutes after the Dragon Knight dies |


Control the Shrines
There are two shrines your team needs to control to activate the Dragon Knight's statue.
|

Free the Dragon Knight
While activated, bring a hero to the statue to free the Dragon Knight from his prison!
|

Devastate Enemy Forts
Use the Dragon Knight's immense power to level enemy forts!
|
Once claimed, the Dragon Knight lasts for 55 seconds, plus 2 seconds for each minute of Game Time that has passed. The player controlling the Dragon Knight has access to a dedicated set of Abilities and can decide where to go.
Dragon Knight
The following Abilities can be used by the player who is controlling the Dragon Knight.
Flame Breath

- Cooldown: 6 seconds
Breathe a cone of flame, dealing 85 (+12 per minute) damage and burn the area of effect for an additional 160 (+16 per minute) damage over 4 seconds.
Flame Breath is best used to clear enemy Minions or, if there are no enemy Minions to clear, to hit as many enemy Structures as possible.
Savage Charge

- Cooldown: 10 seconds
After a short delay, charge an enemy Hero to knock them back and deal 450 (+17 per minute) damage.
Savage Charge can be used to stop the best enemy Hero at defending the Dragon Knight from attacking you while pushing, to peel for your team while the enemy team is trying to get a kill, or to crowd control the enemy Hero with the best save tool when your team is going for a kill.
You should avoid using Shadow Charge on enemy Heroes who have mobility tools because the Dragon Knight will follow them with Shadow Charge and either end up in a dangerous position or, if they hide behind their Gate while Side Walls are still up, be stuck mid-animation without being able to use Basic Attacks.
Rubble Maker

Increases damage to Structures and Minions by 100%. Reduce damage from Structures by 60%. The Dragon Knight explodes on death, knocking back nearby enemies.
Rubble Maker is a Trait which makes the Dragon Knight particularly annoying to deal with. Structures and Minions take increased damage from the Dragon Knight, and the Dragon Knight takes reduced damage from Structures. Furthermore, the Dragon Knight explodes on death, Knocking back nearby enemies.
|
!
|
How to use Vehicles |
|---|---|
|
Vehicles have two resources: Health and duration. If they time out with high Health, it means you played too safe. If they get destroyed while there is still a lot of duration remaining, it means you played too aggressive. As a general rule, you want to keep the percentage values of Health and duration balanced. When pushing with a won Objective, you should still avoid being caught alone and not fight when outnumbered, especially when going for Keeps. If your Vehicle gets destroyed deep in the enemy territory, you will not be able to reach a safe area before getting killed unless you have a lot of mobility. In the early game, when multiple enemy Forts are still up, Vehicles can also be used as a distraction, not just for pushing directly. While they clear enemy Minions and threaten enemy Structures, the rest of the team can push in another lane. The enemy team will have to split for defending multiple lanes at the same time. |
|
Core Ability
Every 6 seconds, the Core will throw 2 Boulders at a nearby enemy Hero. Heroes hit are turned to stone, damaged for 5% of their maximum Health, and Stunned for 1.75 seconds.
Win Conditions
To win the game on Dragon Shire, you should count on any of the following win conditions:
- Map Objective,
- Siege Camp plus Bruiser Camp,
- Split-push.
Tips and Tricks
- On this Map, due to the Objective taking a long time to be won, you can use the Healing Fountain on cooldown instead of saving it for when the Objective spawns.
- If your Hero has an Ability which allows them to jump over impassable terrain, you can use it to quickly enter or exit from a Shrine.
- Choose when to contest a Shrine and when to retreat depending on which team has an advantage in that area. If they commit top, try to get bottom (and vice versa).
- Heroes with percent damage
(such as
 Drain Hope by Leoric) are the best
for defending from enemy Vehicles. In case that is your
Offlaner and it is still early game,
you may want to send someone else to soak in the lane they left.
Remember that
  Cursed Bullet by Greymane
and
  Sleep Dart by Ana cannot hit Vehicles.
 - If your team has a Hero with a powerful Quest that requires hitting enemy Heroes
(for example
 Berserker on Zul'jin),
you could let the enemy team get an early game
Dragon Knight to easily get Quest stacks while defending from it.
 - When piloting the Dragon Knight, you should generally use: Fire Breath [Q] for clearing enemy Minions and/or to damage enemy Structures (prioritize Minions, and ideally do both things at the same time); and Savage Charge [W] to Knockback the best enemy Hero at defending the Dragon Knight, to peel for your team, or to interrupt a powerful channeled Ability.
- When defending your Structures from the enemy Dragon Knight, if you ever get targeted by Savage Charge [W], you can use Unstoppable to counter it or mobility tools for dragging the Dragon Knight deeper into your territory.
Changelog
- 30 Sep. 2025: Guide updated for the latest Map Updates.
- Map Strategy section updated.
- Mercenary Camps section updated.
- 25 Aug. 2025: Guide reviewed.
- 01 Nov. 2024: Guide created.
Elitesparkle has been hooked on Heroes of the Storm since day one in 2015. Over the years, he has consistently competed at Master level across multiple Seasons and has even climbed into Grand Master a couple of times. Known for his logical mindset and love for theorycrafting, he thrives on breaking down the game's mechanics and engaging in high-level strategy discussions with the community.
- Heroes of the Storm Balance Patch Notes: February 19
- Heroes of the Storm Live Patch Notes: February 10
- Heroes of the Storm PTR Update: January 21
- Heroes of the Storm PTR Update: January 16
- Heroes of the Storm PTR Patch Notes: January 14
- Heroes of the Storm Balance Patch Notes: December 12
- Heroes of the Storm Live Patch Notes: December 1
- Heroes of the Storm Live Patch Notes: September 30th
 Free Hero Rotation


