Sky Temple Map Guide
Welcome to our strategy guide for Sky Temple, a Map in Heroes of the Storm. On this page, you will find everything required to understand how it is designed and how to play it.

Introduction
Sky Temple is a 3-lane Map belonging to the Nexus universe. The signature Objective of this Map are Temples. When active, Heroes can stand on them to fire laser shots at enemy Structures.
Draft Strategy
- Heroes for clearing Mercenary Camps
- Gankers
- Global presence
- Point control for Boss Camp
- Split-push
- Quests to stack on Heroes
Lane Assignments
Here you can find one or more formations that are viable on this Map. Keep in mind that positions in lane are not strict and will often change based on the situation.
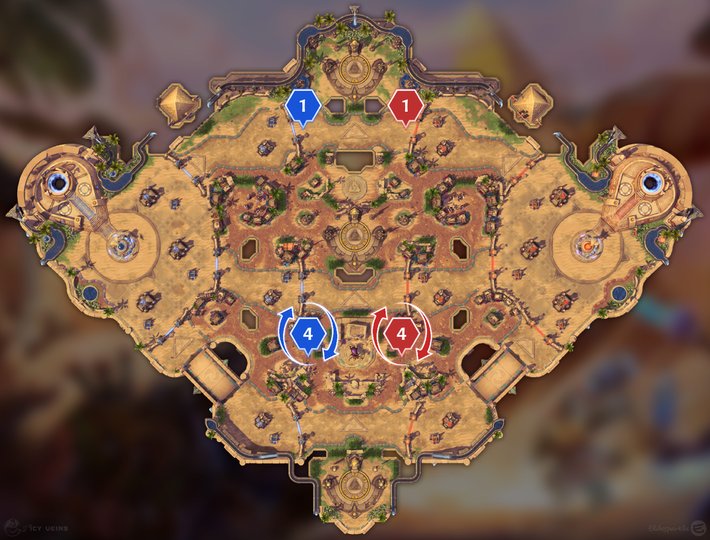
Formation 1-4
The go-to formation for Sky Temple is 1-4:

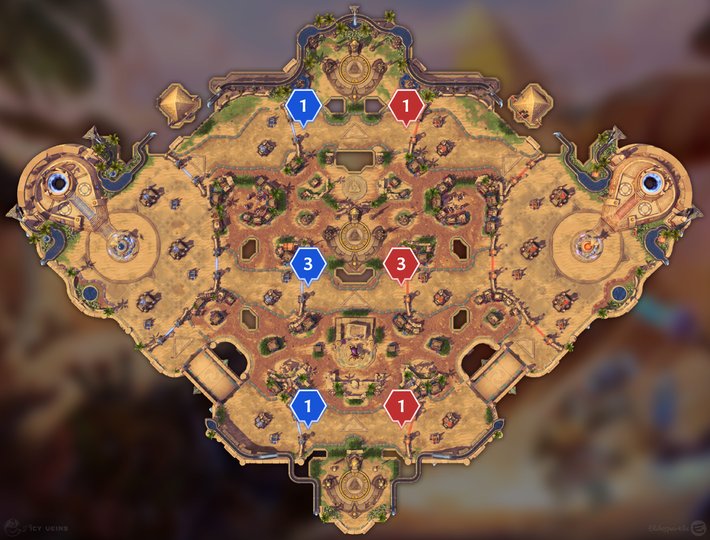
Formation 1-3-1
Another good formation for Sky Temple is 1-3-1:
- 1 Hero, the Offlaner, covers the top lane;
- 3 Heroes cover the middle lane and roam as soon as possible;
- 1 Hero, the Anchor, covers the bottom lane.

Map Strategy
- At 0:30 minutes, start clearing the allied Bruiser Camp, capture it as soon as possible, and push with it. To make this Mercenary Camp join the lane in front of allied Minions, capture it at 1:05 or 5 seconds after a wave of Minions spawned.
- At 2:20 minutes, start clearing the allied Siege Camp and capture it slightly before the next Objective phase starts. To make this Mercenary Camp join the lane behind allied Minions, capture it at 2:50 minutes or 20 seconds after a wave of Minions spawned.
- At 3:00 minutes or whenever the Objective phase starts, you ideally want at least 1 Hero on each Temple, so that you can start shooting at enemy Structures right away. If possible, prioritize the top Temple as a 4-man while the Offlaner keeps soaking other lanes.
- When the top Temple is NOT going to activate and the next Objective phase is approaching, start clearing the allied Bruiser Camp and capture it slightly before the Temples activate. Otherwise, start clearing the allied Bruiser Camp and capture it as soon as possible. To make this Mercenary Camp join the lane in front of allied Minions, capture it 5 seconds after a wave of Minions spawned.
- When the bottom Temple is NOT going to activate and the next Objective phase is approaching, start clearing the allied Siege Camp and capture it slightly before the Temples activate. Otherwise, start clearing the allied Bruiser Camp and capture it as soon as possible. To make this Mercenary Camp join the lane behind allied Minions, capture it 20 seconds after a wave of Minions spawned.
- When ahead in Structures (your team has more of them) or when you want to wait for a better moment to fight, trade Temples (when multiple Temples are active, contest one and ignore the other) and avoid team fights. Do not split too much from the rest of your team, otherwise you will become an easy target!
- When behind in Structures (the enemy team has more of them), gank someone or force a fight at some point. That said, you should avoid fighting if the enemy team has an advantage, except when that is your last chance to stop them from winning the game.
- After about 10:00 minutes, whenever your team has an advantage while there is no Objective to contest or the enemy team is taking the top Temple, you can capture the Boss Camp and push with it. Avoid doing it earlier if you do not have a dedicated team composition.
Mercenary Camps
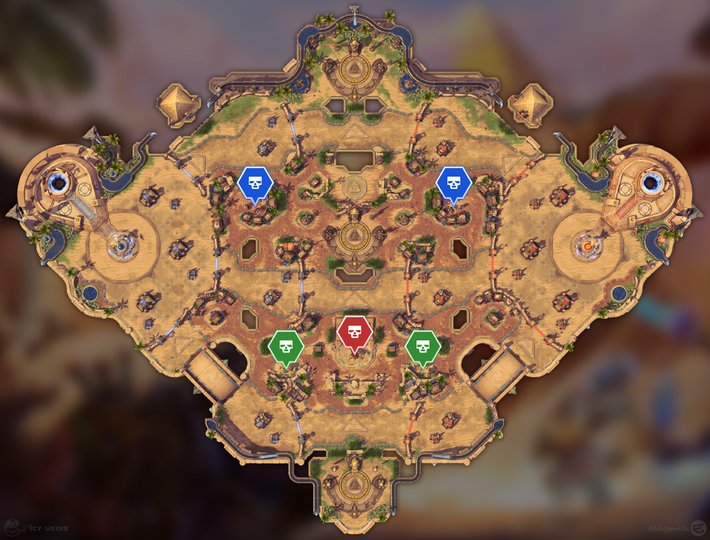
As shown in the image below, Sky Temple has a total of 5 Mercenary Camps:
- 2 Bruiser Camps (blue icon) in the top lane;
- 2 Siege Camps (green icon) in the bottom lane;
- 1 Boss Camp (red icon) in the bottom lane.
Mercenary Camps on Sky Temple are always active, even when Temples are available on the battlefield.

Mercenary Camps indicated with a red icon are immune to Bribe effects.
Siege Camp
This type of Mercenary Camp features 2 Giants. Once captured, it spawns the same units fighting for your team in the corresponding lane. When possible, push with them to get more value.
| Spawn | Respawn |
|---|---|
| 0:30 minutes | 3:00 minutes after its last capture |
Instead of attacking enemies with Basic Attacks, Giants throw stones at them. These stones can be dodged, so it is possible to capture them without taking any damage. Once captured, they are capable of damaging enemy Structures without getting in their range. Giants deal 100% bonus damage to Structures.
Bruiser Camp
This type of Mercenary Camp features 3 Knights and 1 Wizard. Once captured, it spawns the same units fighting for your team in the corresponding lane. When possible, push with them to get more value.
| Spawn | Respawn |
|---|---|
| 0:30 minutes | 4:00 minutes after its last capture |
Right after being captured and while in lane, the Wizard creates a Spell Armor field around him which reduces some of the damage taken by Minions, Mercenaries, and Heroes within range. Avoid fighting the enemy team if they still have a Wizard helping them!
Boss Camp
This type of Mercenary Camp features 1 Sand Golem. Once captured, it spawns the same unit fighting for your team in the corresponding lane. When possible, push with it to get more value.
| Spawn | Respawn |
|---|---|
| 5:00 minutes | 5:00 minutes after its last capture |
While in combat, the Sand Golem will use Mega Smash (10-second cooldown) to damage and Stun all enemies in melee range and Whirling Sands (15-second cooldown) to do slight damage and Knockback enemies who get hit by them.
Due to being Elite, this Mercenary Camp is immune to Bribe
effects (such as ![]() Covert Mission by Nova).
Covert Mission by Nova).
Map Objective
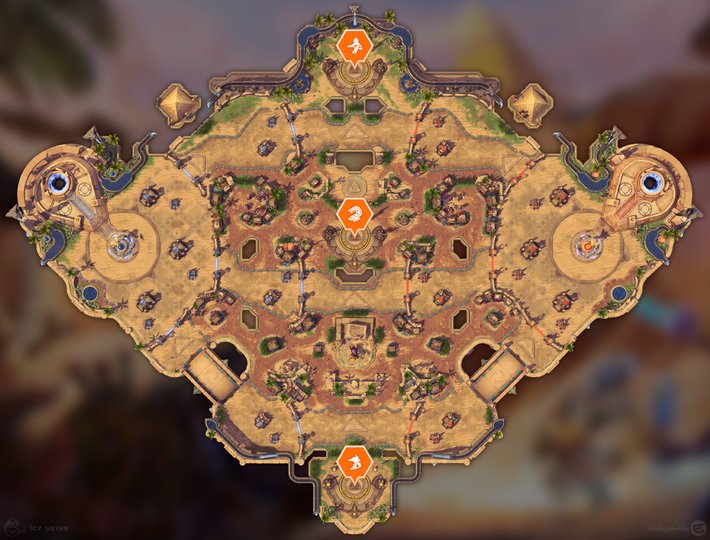
The signature Objective of Sky Temple consists of up to 2 active Temples. Heroes who stand on a non-contested Temple will cause that Temple to fire laser shots at the closest Structures (excluding Healing Fountains, because they are Invulnerable, and Side Walls). Temples will activate 2 seconds after a Hero steps on them, then they will fire once per second over 40 seconds, pausing when contested or abandoned.
| Spawn | Respawn |
|---|---|
| 3:00 minutes | 2:00 minutes after the Temples end |


Capture the Temples
Temples will periodically awaken. Stand within their grounds to capture their power!
|

Hold the Temples
Remain firm and the temple will unleash a blistering onslaught on your enemy's forts!
|

Defend the Temples
Guardians will try to wrest control of their temples from your team. Hold them off to keep the temple's power for yourselves!
|
Temples
Each Temple has a total of 40 shots plus 5 bonus shots that each deal 450 (+20 per minute) damage. The 5 bonus shots will fire automatically and in rapid succession for the team that currently has possession of the Temple once the first 40 shots have been expended. When leaving a Temple, it will always fire 2 more shots before stopping to shoot. This means that Heroes can leave a Temple at 2 shots remaining to automatically fire the 2 last shots and the 5 bonus shots without wasting time. A contested Temple—with Heroes from both teams on it—does not shoot.
Each Temple is initially protected by 1 Guardian and 2 Defenders, then other 2 Defenders spawn. Guardians can Knockback enemies who are in a frontal cone once every 12 seconds. Even though it is not required to kill Guardians and Defenders, by doing so you will take less damage while capturing the Temple. When killed, Guardians will drop a Regeneration Globe but Defenders will not. You should prefer to kill the Defenders that are on your side first, so that you will take less damage whenever enemy Heroes come. After a Temple has been exhausted, Guardians and Defenders will automatically despawn.
Temples will spawn as follows:
- top Temple and middle Temple;
- bottom Temple only;
- top Temple and bottom Temple, or middle Temple and bottom Temple;
- 1 random Temple, or 1 random Temple and the missing Temple from the previous Objective phase;
- up to 2 random Temples, but in a different amount from the previous Objective phase;
- up to 2 random Temples, trying to reach a total of 3-2-2 or 2-3-2 spawns for the respective Temple locations.
Watch Towers
Sky Temple features 1 Watch Tower located between the middle lane and the top lane, giving vision on the middle Temple and on the fastest paths to rotate between the middle and the top lane.

Securing a Watch Tower provides your team with greater vision, allowing you to keep an eye on enemy movements in that part of the battlefield. Watch Towers can be captured by standing in the area until your team gains control. After 45 seconds of not being occupied, they become neutral again. Because of this, they should only be captured when you are playing in that area for other reasons (either to capture Mercenary Camps or for contesting the Objective).
Watch Towers controlled by the enemy team are extremely dangerous, especially when there are bushes nearby, therefore you should think twice before contesting them. If you do not have mobility tools at your disposal and your teammates are not nearby to help you, you should definitely not try to capture a Watch Tower as you will only risk dying for no reason. Staying alive is more important than getting vision.
Core Ability
Every 23 seconds, the Core will spawn 2 sets of 6 Tornadoes which swirl around it, dealing 25 damage to enemy Heroes and Knocking them back.
Win Conditions
To win the game on Sky Temple, you should count on any of the following win conditions:
- Map Objective,
- Boss Camp,
- Split-push.
Tips and Tricks
- Use the first Healing Fountain (2-minute cooldown) before 1:00 minute because the first Objective on this Map activates at 3:00 minutes, so you will have it back in time for that.
- Dealing damage to Structures in the top lane before the first Objective phase helps to take down the top Fort with the top Temple during the first Objective phase. When successfully executed, this move gives you an advantage during the second Objective phase by creating pressure in the top lane.
- If you destroy the top Fort by pushing with the Bruiser Camp in the top lane and by securing the top Temple during the first Objective phase, you will create pressure in the top lane during the second Objective phase by using the Bruiser Camp again and by having a Catapult every third wave in the top lane.
- During the first Objective phase it is fine to get only 1 of the 2 Temples, especially if your team composition has a weak early game. During the second Objective phase, it is important to win because there will be only 1 Temple. After that, trade Temples and avoid fighting when ahead in Structures (your team has more of them) and look for fights when behind in Structures (the enemy team has more of them).
- You can leave a Temple at 2 shots remaining. Temples do not stop shooting immediately, but always fire 2 additional shots before stopping. When the are no more shots left, you automatically get the 5 bonus shots from that Temple right after the last shot.
- After about 10:00 minutes, unless the enemy team has an advantage,
it is advised to keep vision on the Boss Camp,
so that the enemy team cannot capture it uncontested.
You can do this by using a Hero that is hard to kill or with vision tools
(for example
 Time Trap by Chromie).
 - You can bait the Sand Golem's Whirling Sands on the enemy side of the battlefield by staying there right before they spawn. This way, if the enemy team invades the Boss Camp, they will have annoying tornadoes on their path.
- Global Heroes should ideally take care of the lane that is farther away from the next Objective location, so that they can use their global tool to quickly join their team during the next Objective phase.
Changelog
- 14 Feb. 2026: Guide updated for the latest Map Updates.
- Watch Towers section updated.
- 30 Sep. 2025: Guide updated for the latest Map Updates.
- Map Strategy section updated.
- Mercenary Camps section updated.
- 25 Aug. 2025: Guide reviewed.
- 29 Nov. 2024: Guide created.
Elitesparkle has been hooked on Heroes of the Storm since day one in 2015. Over the years, he has consistently competed at Master level across multiple Seasons and has even climbed into Grand Master a couple of times. Known for his logical mindset and love for theorycrafting, he thrives on breaking down the game's mechanics and engaging in high-level strategy discussions with the community.
- Heroes of the Storm Live Patch Notes: April 20
- Heroes of the Storm PTR Update: April 9
- Heroes of the Storm PTR Patch Notes: March 30
- Heroes of the Storm Balance Patch Notes: February 19
- Heroes of the Storm Live Patch Notes: February 10
- Heroes of the Storm PTR Update: January 21
- Heroes of the Storm PTR Update: January 16
- Heroes of the Storm PTR Patch Notes: January 14
 Free Hero Rotation


