Towers of Doom Map Guide
Welcome to our strategy guide for Towers of Doom, a Map in Heroes of the Storm. On this page, you will find everything required to understand how it is designed and how to play it.
Introduction
Towers of Doom is a 3-lane Map belonging to the Nexus universe. The signature Objective of this Map are Altars. Cores have 40 Health and cannot be attacked directly. When captured, Altars deal 1 damage to the enemy Core, increased by 1 for each Bell Tower (Fort or Keep) under your team's control. Bring the enemy Core to 0 Health to win the game.
Draft Strategy
Lane Assignments
Here you can find one or more formations that are viable on this Map. Keep in mind that positions in lane are not strict and will often change based on the situation.
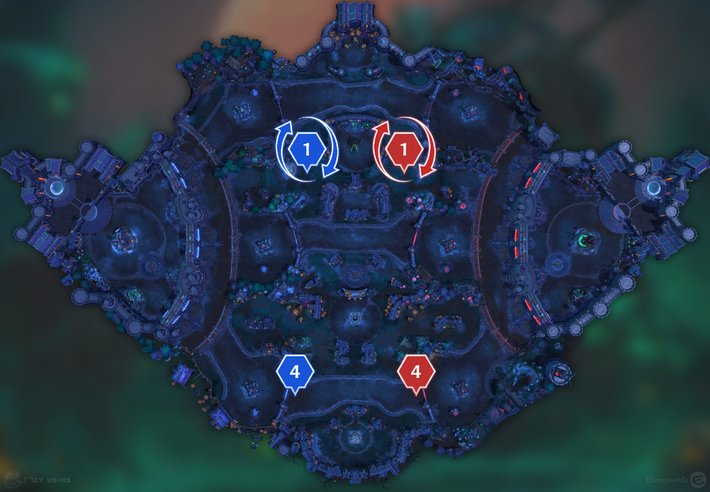
Formation 1-4
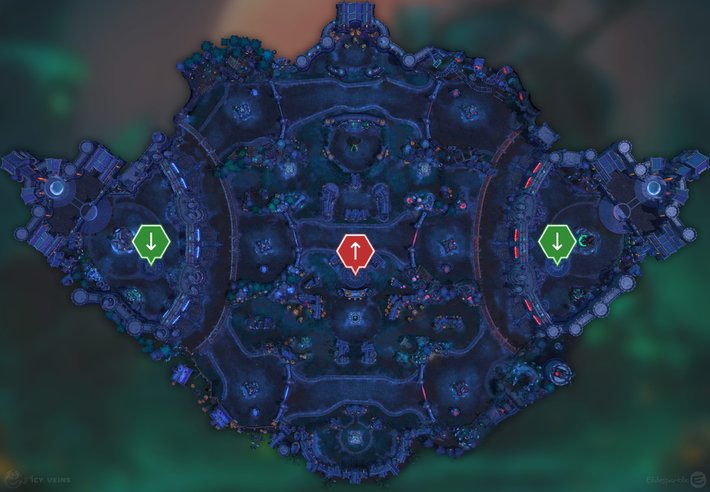
The go-to formation for Towers of Doom is 1-4:
- 1 Hero, the Offlaner, double-soaks the middle and top lanes;
- 4 Heroes cover the bottom lane.
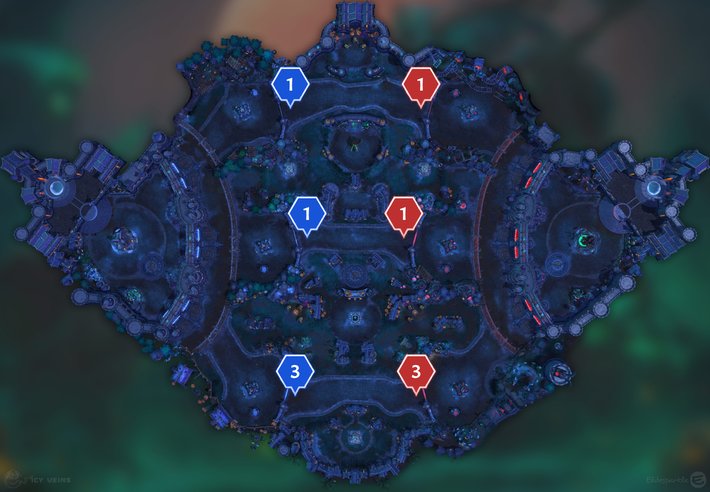
Formation 1-1-3
Another good formation for Towers of Doom is 1-1-3:
- 1 Hero, the Offlaner, covers the top lane;
- 1 Hero covers the middle lane and ganks when possible;
- 3 Heroes cover the bottom lane.
Map Strategy
- At 0:30 minutes or whenever available, start clearing the allied Siege Camp and capture it as soon as possible. Watch out for invades!
- At 3:00 minutes or whenever the next Objective phase starts, make sure to have at least 1 Hero near each allied and neutral Altar. Avoid trying to capture the enemy Altar (the one that is near the top lane and on the enemy side), but feel free to poke whoever is trying to capture it. Send a global Hero to capture the allied Altar (the one that is near the top lane and on the allied side) if you have one.
- If you manage to capture the bottom Bell Tower (Fort or Keep), defend it! You do not want the enemy team to get it back for free before the next Objective phase, especially if there will be one or more Altars nearby.
- If the enemy team manages to capture the bottom Bell Tower (Fort or Keep) and you struggle to get it back, start clearing the neutral Siege Camp and capture it as soon as possible, then push in the middle and/or top lane.
- In the late game, whenever you have a big advantage (at least 3 enemy Heroes are dead), go for a 6-cap: quickly split your team in a way that will cause all enemy Bell Towers (Forts and Keeps) to be captured at the same time.
- Do not capture the Boss Camp unless your team has an advantage and the enemy Core has 4 Health or less, or the enemy team can use it to win the game during the next Objective phase. In all other cases it is better to deal damage to enemy Structures.
Mercenary Camps
As shown in the image below, Towers of Doom has a total of 4 Mercenary Camps:
- 1 Sapper Camp (purple icon) in the top lane;
- 1 Boss Camp (red icon) between the top and the middle lanes;
- 2 Sapper Camps (purple icon) in the bottom lane.
Mercenary Camps on Towers of Doom are always active, even when Altars are available on the battlefield.
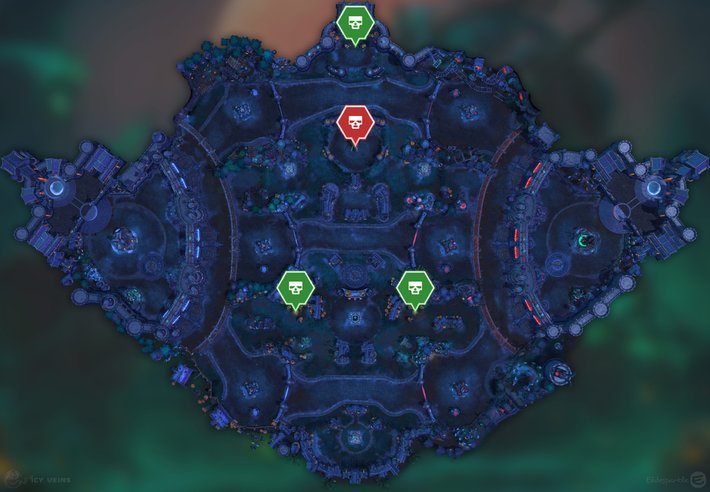
Mercenary Camps indicated with a red icon are immune to Bribe effects.
Sapper Camp
This type of Mercenary Camp features 3 Sappers. Once captured, it spawns the same units fighting for your team in the corresponding lane. When possible, push with them to get more value.
| Spawn | Respawn |
|---|---|
| 0:30 minutes | 2:30 minutes after its last capture |
When in range of an enemy Structure, Sappers will sprint at it and explode. You can interrupt this mechanic by using Stun, Silence, or even Knockback effects. That said, if you do not kill them in time, they will try again immediately after.
On this Map, Sappers have an additional effect: if they enter in the enemy team's Kill Zone, they will launch their head at their Core, dealing 1 point of damage regardless of how many Bell Towers (Forts or Keeps) are under your team's control. Therefore, fully escorting a Sapper Camp will deal 3 damage to the enemy Core.
Boss Camp
This type of Mercenary Camp features 1 Headless Horseman. Once captured, instead of going in lane, he vanishes and deals 4 damage to the enemy Core, regardless of how many Bell Towers (Forts and Keeps) are under your team's control. The damage happens after 5 seconds, over 2 seconds.
| Spawn | Respawn |
|---|---|
| 5:00 minutes | 5:00 minutes after its last capture |
Headless Horseman's Basic Attacks cleave for 100% of the damage in a half-circle in front of him. While in combat, the Headless Horseman will use Horseman's Head (6-second cooldown) to fire a skull that spins around him for a couple of seconds and then hits the ground under an enemy Hero, creating a green pool that deals a lot of damage.
Due to being Elite, this Mercenary Camp is immune to Bribe
effects (such as ![]() Covert Mission by Nova).
Covert Mission by Nova).
Waygate
Towers of Doom has a Waygate connecting each Core to the middle of the battlefield. When clicking on it, after channeling for 2 seconds, you will be teleported near the bush in the middle lane. You cannot use the Waygate in the early game because it is closed.
The passage usually opens at 12:00 minutes but it is delayed if there are Altars active. Once accessible, the tunnel can be used to quickly join the action after dying or using the Hearthstone, but cannot be used to go back to base. Be careful when standing near the exit because multiple enemy Heroes could suddenly get out from the tunnel and kill you.
Map Objective
The signature Objective of Towers of Doom consists of Altars. In order to capture an Altar, Heroes have to channel for 6 seconds. When captured, Altars deal 1 damage to the enemy Core, increased by 1 for each Bell Tower (Fort or Keep) under your team's control. The damage happens after 4 seconds.
| Spawn | Respawn |
|---|---|
| 3:00 minutes | 1:50 minutes after capturing all Altars |

Protected Cores
Both Cores are protected by a barrier that cannot be attacked by Heroes. To be victorious, you must activate Altars.
|

Activate Altars
Periodically Altars will rise across the battlefield. Activate them to have your Bell Towers fire upon the enemy's Core.
|

Claim Bell Towers
Destroy your enemy's Towers to bring them under your team's control. The more Towers you have, the more damage an Altar will do.
|
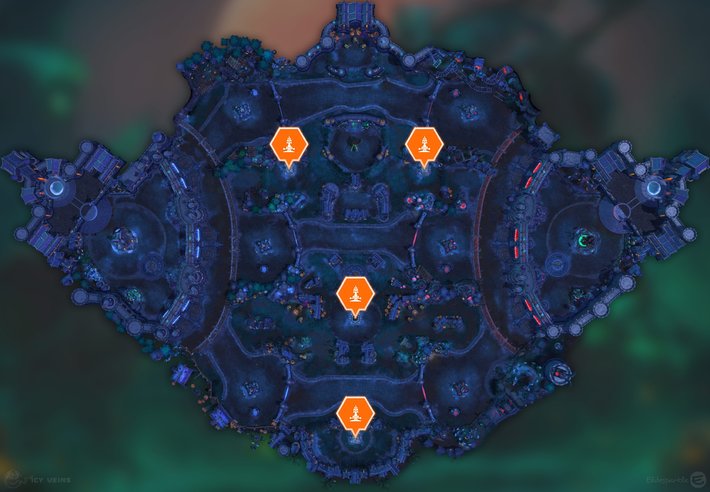
Altars
Altars will spawn based on the following rules:
- the 1st and 5th Altar spawns must have 3 Altars;
- the first 6 Altar spawns are randomly selected from the list above, without repetition;
- the next 4 Altar spawns are randomly selected from the list above, without repetition, excluding the configurations with 3 Altars;
- the following Altar spawns are randomly selected from the list above, with repetition, excluding the configurations with 3 Altars.
This means that, if you keep track of the previous Altar spawns, you will always know the configuration of the 5th, 6th, and 10th Altar spawns way before their locations are displayed on the Minimap.
The possible configurations of Altars are:
- top-left and top-right;
- middle only;
- bottom only;
- middle and bottom;
- top-left, top-right, and middle;
- top-left, top-right, and bottom.
The top 2 Altars always spawn together, with or without another Altar.
Bell Towers
Bell Towers (Forts and Keeps) are what actually deals damage to the enemy Core when capturing an Altar. So, before capturing an Altar, you should try to control as many Bell Towers as possible. For example, if a Bell Tower is almost destroyed, finish it off and then capture Altars.
Bell Towers start as Forts at the beginning of the game and become Keeps when the Waygate opens. This usually happens at 12:00 minutes but it is delayed if there are Altars active. Once they become Keeps, they have more Health and give more Experience.
The lights below each Altar represent Bell Towers. The colors work as follow:
- blue: your team owns the corresponding Bell Tower;
- yellow: the corresponding Bell Tower is changing ownership;
- red: the enemy team owns the corresponding Bell Tower.

If a team controls all Bell Towers (also known as 6-cap), the enemy Core is bombarded until the other team gets one of the Bell Towers back. The first shot hits 8 seconds after you destroy the last Bell Tower, the next 6 shots hit once every 6 seconds, and the following shots hit once every 3 seconds.
| Damage | 1 | 2 | 3 | 4 | 5 | 6 | 7 | 8 | 9 |
| Seconds | 8 | 14 | 20 | 26 | 32 | 38 | 44 | 47 | 50 |
When destroyed, Bell Towers take 2 seconds to change ownership (to count for the other team's Altar or for a 6-cap bombardment to start) and about 20 seconds to become a Structure again (to deal damage and take damage). A stolen Bell Tower (enemy team's side) will not have an Healing Fountain but a retaken Bell Tower (allied team's side) will have it.
Core Ability
Cores are Invulnerable and can only take damage from specific mechanics: Altars, Boss Camp, escorting Sappers into the Kill Zone, or 6-capping (getting all Forts and Keeps). Furthermore, Cores can deal heavy damage to enemies who enter the Kill Zone. A few meters in the Kill Zone, right behind the big gates, there is also an invisible barrier that pushes enemy Heroes away whenever they get past it, similarly to when Heroes enter inside the enemy Hall of Storms.
The so-called Kill Zone is an extremely dangerous area marked by
a visible barrier surrounding each Core on Towers of Doom.
Enemies who enter inside that area take 150 damage (+25 per minute, capping at 900
damage after 30:00 minutes) every 0.5 seconds. Furthermore, each hit
reduces the Armor of enemy Heroes hit by 20, up to 40. Heroes with
Displacement effects (notably
![]() Mighty Gust by Falstad)
can push enemy Heroes inside it to kill them with ease.
Mighty Gust by Falstad)
can push enemy Heroes inside it to kill them with ease.
Being categorized as Physical Damage, the damage done by the Kill Zone
can be reduced by Physical Armor
(such as ![]() Dauntless by Yrel)
or generic Armor (for example,
Dauntless by Yrel)
or generic Armor (for example,
![]() Armor Up by Garrosh),
but not by Spell Armor. In addition to that,
since it behaves like Basic Attacks, you can fully negate its damage
by using Evade (such as
Armor Up by Garrosh),
but not by Spell Armor. In addition to that,
since it behaves like Basic Attacks, you can fully negate its damage
by using Evade (such as ![]() Evasion by Illidan)
and Parry (like
Evasion by Illidan)
and Parry (like ![]() Parry by Varian) effects.
Parry by Varian) effects.
Win Conditions
To win the game on Towers of Doom, you should count on any of the following win conditions:
- Map Objective,
- Split-push.
Tips and Tricks
- Use the first Healing Fountain (2-minute cooldown) before 1:00 minute because the first Objective on this Map activates at 3:00 minutes, so you will have it back in time for that.
- If you happen to lose a Bell Tower (Fort or Keep) and the enemy team is playing near the Kill Zone of your Core, you can use Displacement effects to move them into it, causing them to take a huge amount of damage. This is usually enough to get a kill as most Heroes cannot survive that.
- From a tactical standpoint, Core's Health is a resource that can be used to get value elsewhere. You should only be worried to lose Core's Health when you have 10 or less. For this reason, the Boss Camp should only be captured when either team could use it to immediately win the game.
- Although it is not possible to march towards the enemy Core and end the game there, if your team has a big advantage (at least 3 enemy Heroes are dead), you can still do something equivalent: 6-capping. To do so, quickly split the team in a way that will cause all enemy Bell Towers (Forts and Keeps) to be captured at the same time.
Changelog
- 30 Sep. 2025: Guide updated for the latest Map Updates.
- Map Strategy section updated.
- Mercenary Camps section updated.
- 04 Oct. 2024: Guide created.
Elitesparkle has been hooked on Heroes of the Storm since day one in 2015. Over the years, he has consistently competed at Master level across multiple Seasons and has even climbed into Grand Master a couple of times. Known for his logical mindset and love for theorycrafting, he thrives on breaking down the game's mechanics and engaging in high-level strategy discussions with the community.
- Heroes of the Storm Balance Patch Notes: February 19
- Heroes of the Storm Live Patch Notes: February 10
- Heroes of the Storm PTR Update: January 21
- Heroes of the Storm PTR Update: January 16
- Heroes of the Storm PTR Patch Notes: January 14
- Heroes of the Storm Balance Patch Notes: December 12
- Heroes of the Storm Live Patch Notes: December 1
- Heroes of the Storm Live Patch Notes: September 30th
 Free Hero Rotation


