Forge Guard Smelter's Wrath Endgame Build for Last Epoch (Patch 1.0)
Welcome to our Last Epoch Forge Guard Smelter's Wrath build guide for the Sentinel class. Here you will learn everything about the Forge Guard play style, passives, skills, strengths, and weaknesses to conquer the world of Eterra.
Build Introduction
Due to the changes seen with 1.2 and the increased difficulty scaling, we can no longer suggest this build or concepts related to it. While Smelter's Wrath is still capable of dealing a ton of damage, and will usually one-shot most enemies you encounter, standing still for prolonged periods of time will typically result in your death. Cemetaries and Champions are just too strong to be worth channeling with this build.
Channel immense heat and erupt with the fury of a burning furnace, turning all nearby foes into ash. This Forge Guard build hits like a truck, taking advantage of Fire, Void and Physical Damage to wreck havoc on its enemies.
 Effective HP can easily go over 20,000 with well-rolled gear
 Smelter's Wrath screen clears mobs with a single hit
- Low CPM (Clicks Per Minute)

 Channeled skills feel bad in a game that wants you to be mobile
- Gearing would prefer Legendary Potential in order to start playing the build
- Slower playstyle, not meant for everyone

Skill Selection
This build centers around the damage bonus provided by Eternal Eclipse
in order to buff ![]() Smelter's Wrath. Smelter's Wrath is a channel skill,
which is an important consideration to make, as this build will not
fit the playstyle most players are looking for. However, if you're looking
for a build that is capable of tanking a lot of damage, and deals a lot of
damage in return, then this may be the build for you!
Smelter's Wrath. Smelter's Wrath is a channel skill,
which is an important consideration to make, as this build will not
fit the playstyle most players are looking for. However, if you're looking
for a build that is capable of tanking a lot of damage, and deals a lot of
damage in return, then this may be the build for you!
To facilitate boosting the damage on Smelter's Wrath, ![]() Javelin is taken
in order to auto-cast
Javelin is taken
in order to auto-cast ![]() Smite, which inflicts stacks of Ignite
and increases the damage scaling on Smelter's.
Smite, which inflicts stacks of Ignite
and increases the damage scaling on Smelter's. ![]() Abyssal Echoes serves a similar
purpose, inflicting Ignite and shredding Resistances off nearby enemies. The build
is then rounded out with
Abyssal Echoes serves a similar
purpose, inflicting Ignite and shredding Resistances off nearby enemies. The build
is then rounded out with ![]() Vengeance in order to provide sustain.
Vengeance in order to provide sustain. ![]() Rebuke
is added to the hotbar simply because we have the space for it, and it works as a fail-safe
for poor positioning.
Rebuke
is added to the hotbar simply because we have the space for it, and it works as a fail-safe
for poor positioning.

Class and Skill Passive Trees
Our base class is Sentinel, which fills the role of a knight in Last Epoch. Upon finishing Act 1 in the campaign, your character will be offered an opportunity to select an Advanced Mastery. Each base class has three possible Masteries to choose from. For Sentinel, you can choose between Passive Trees for Paladin, Forge Guard, and Void Knight. Upon selecting a Mastery and placing 20 Passive Points into the Sentinel Tree, you'll then be able to place Passive Points into the Mastery Trees.
Forge Guard is the Advanced Class used for this build, and also where the majority of our Passive Points will come from. The Forge Guard Tree will focus around picking nodes that increase Melee Damage, Critical Strike Multiplier, and bolster our defenses. This build takes quite a few points from Void Knight as well as a way to boost the Void Damage gained through Eternal Eclipse as well as provide a Kill Threshold.
Sentinel Passive Points
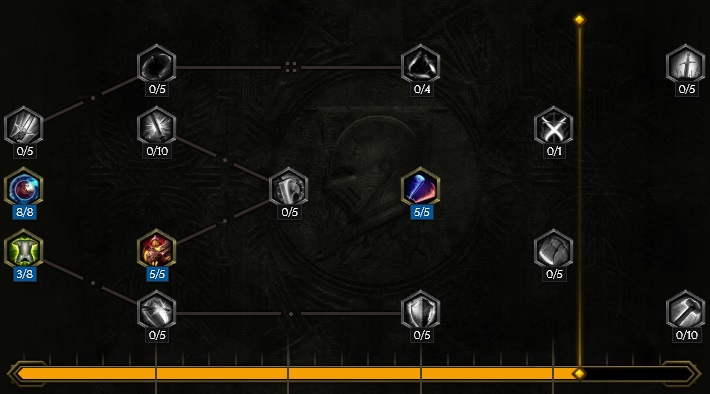
- 8 points into Fearless.
- 2 points into Juggernaut: Used to get 20 points into the Passive Tree, minor Resistance gains.
- 5 points into Armour Clad: 10% Damage Reduction from nearby enemies.
- 5 points into Valiant Charge:
 Void Cleave is converted into a traversal skill, so that is
where the Cooldown Reduction is applied.
Void Cleave is converted into a traversal skill, so that is
where the Cooldown Reduction is applied.
Our base class is Sentinel, which fills the role of a knight in Last Epoch. Upon finishing Act 1 in the campaign, your character will be offered an opportunity to select an Advanced Mastery. Each base class has three possible Masteries to choose from. For Sentinel, you can choose between Passive Trees for Paladin, Forge Guard, and Void Knight. Upon selecting a Mastery and placing 20 Passive Points into the Sentinel Tree, you'll then be able to place Passive Points into the Mastery Trees.
Forge Guard is the Advanced Class used for this build, and also where the majority of our Passive Points will come from. The Forge Guard Tree will focus around picking nodes that increase Melee Damage, Critical Strike Multiplier, and bolster our defenses. This build takes quite a few points from Void Knight as well as a way to boost the Void Damage gained through Eternal Eclipse as well as provide a Kill Threshold.
Forge Guard Passive Points
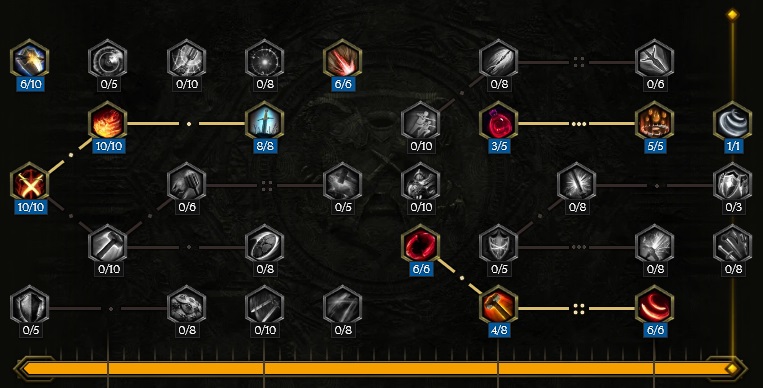
- 10 points into Weapons Master: Strength and Increased Melee Damage.
- 6 point into Battle Hardened: Increases Physical Resistance and Armor upon getting hit.
- 10 points into Fresh from the Forge: Every 3 seconds, your next Melee attack will deal an additional 40 Fire and Physical Damage. This node is very close to the Eternal Eclipse buff cooldown, and will usually line up with each other.
- 8 points into Champion of the Forge: Increased Melee Damage by 80%.
- 6 points into Crushing Blows: Increases Smelter's Wrath damage by 165%, based on the 55 Mana cost.
- 6 points into Might: Added Strength and Health.
- 4 points into Duelist: Purely traversal, we already 100% crit Smelter's Wrath.
- 6 points into Lethal Strikes: Added 60% Critical Strike Multiplier.
- 3 points into Infinite Bulwark: Traversal node.
- 5 points into Liquid Iron: 15% less damage taken from Damage Over Time effects, and increased Physical Resistance. Chugging a potion will double this momentarily.
Our base class is Sentinel, which fills the role of a knight in Last Epoch. Upon finishing Act 1 in the campaign, your character will be offered an opportunity to select an Advanced Mastery. Each base class has three possible Masteries to choose from. For Sentinel, you can choose between Passive Trees for Paladin, Forge Guard, and Void Knight. Upon selecting a Mastery and placing 20 Passive Points into the Sentinel Tree, you'll then be able to place Passive Points into the Mastery Trees.
Forge Guard is the Advanced Class used for this build, and also where the majority of our Passive Points will come from. The Forge Guard Tree will focus around picking nodes that increase Melee Damage, Critical Strike Multiplier, and bolster our defenses. This build takes quite a few points from Void Knight as well as a way to boost the Void Damage gained through Eternal Eclipse as well as provide a Kill Threshold.
Void Knight Passive Points
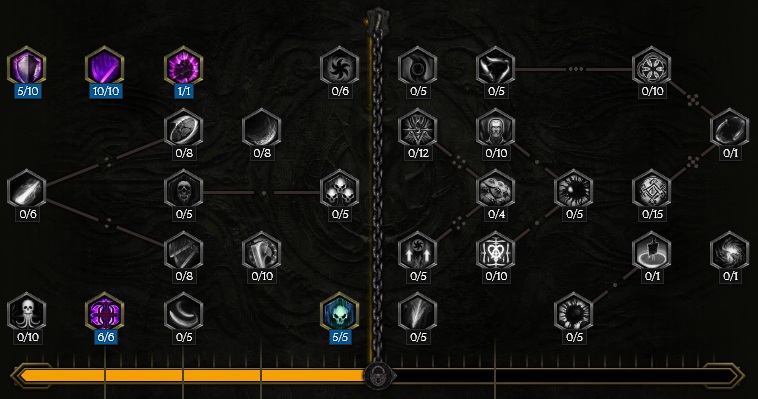
- 5 points into Abyssal Endurance: Forced to take for pathing, but adds Health and Resistances too.
- 10 points into Sorrow and Steel: Increases Physical and Void Damage.
- 6 points into World Eater: Adds Health Leech into Melee and Void Damage dealt.
- 1 point into Void Corruption: Adds 27% Critical Multiplier (based on how many nodes we take in this tree).
- 5 points into Finality: Increased Void Melee Damage, and adds a Kill Threshold.
In this section, we will break down each skill and highlight the key passives we have selected to make the skill shine in the build. While some of these skills do allow for some variation to exist depending on your own custom choices, we recommend utilizing the skill trees as presented until you have a strong understanding of the build itself.
Smelter's Wrath

This entire build revolves around ![]() Smelter's Wrath. This skill definitely comes with its downsides, however
it does hit incredibly hard. The goal of this build is to become so tanky that you can channel this ability without
caring much about what the enemy is doing, save lethal one-shot mechanics. Every cast of Smelter's Wrath should be fully charged
to fully maximize the potential of its damage.
Smelter's Wrath. This skill definitely comes with its downsides, however
it does hit incredibly hard. The goal of this build is to become so tanky that you can channel this ability without
caring much about what the enemy is doing, save lethal one-shot mechanics. Every cast of Smelter's Wrath should be fully charged
to fully maximize the potential of its damage.
Order of Skill Points
- 4 point into Blacksmith's Breadth: Increases the charge speed by 40%.
- 3 points into Stinging Steel: Traversal node.
- 1 points into Vulcanic Mastery: Smelter's Wrath will always critically hit if fully charged.
- 5 point into Whetstone: Increases damage scaled by charge time.
- 3 points into Forge Scale: Adds Armor Shred to Smelter's for each second it's channeled.
- 1 point into Detonation: Turns Smelter's Wrath into a circular AoE.
- 1 points into Brightsmith: Traversal node, we already have 100% Critical Chance for Smelter's Wrath.
- 3 point into Valiance: This skill now deals more damage to bosses.
- 2 points into Heavy Strike: Adds more damage for a full channel, but ultimately this is a traversal node.
- 1 point into Tempered Blows: Smelter's Wrath scales off current Ignite stacks on a target, capping at 10 stacks.
In this section, we will break down each skill and highlight the key passives we have selected to make the skill shine in the build. While some of these skills do allow for some variation to exist depending on your own custom choices, we recommend utilizing the skill trees as presented until you have a strong understanding of the build itself.
Vengeance

![]() Vengeance is how this build solves its Mana problem, and also add some survivability to
the build while not channeling, if required. Time and Faith is taken from the Sentinel Passive Tree
and each hit with Vengeance will supply us with Mana and Health. On top of that, landing a hit
with Vengeance will also increase our Armor and reduce the amount of damage we take by a whopping 25%
for two seconds. This is a great way to give yourself some breathing room when surrounded by mobs and
low on resources.
Vengeance is how this build solves its Mana problem, and also add some survivability to
the build while not channeling, if required. Time and Faith is taken from the Sentinel Passive Tree
and each hit with Vengeance will supply us with Mana and Health. On top of that, landing a hit
with Vengeance will also increase our Armor and reduce the amount of damage we take by a whopping 25%
for two seconds. This is a great way to give yourself some breathing room when surrounded by mobs and
low on resources.
Order of Skill Points
- 2 points into Executioner: Traversal node.
- 5 points into Bolster: Decreases the damage you take, while increasing Armor.
- 1 point into Perfect Riposte: You can not be critically hit if you Riposte a hit.
- 1 point into Faint Strike: Traversal node.
- 4 points into Smelter's Vengeance: Hits from Vengeance apply Armor Shred stacks.
- 4 points into Eviscerating Blades: Increases the Armor Shred effect when applied by Vengeance by 75%.
- 1 point into Molten Riposte: Adds 30% chance to inflict Armor Shred, as per the node Forge Scale on Smelter's Wrath.
- 2 points into Essence of Revenge: Adds a 30% chance to gain a Void Essence when you Riposte a hit.
In this section, we will break down each skill and highlight the key passives we have selected to make the skill shine in the build. While some of these skills do allow for some variation to exist depending on your own custom choices, we recommend utilizing the skill trees as presented until you have a strong understanding of the build itself.
Abyssal Echoes

![]() Abyssal Echoes has a singular purpose for this build, and it is to inflict
as many ailments as possible onto enemies. Through nodes, Abyssal Echoes will now
pulse at a location. Each pulse will inflict Armor Shred,
Void Resistance Shred, and stacks of Ignite.
This will scale
Abyssal Echoes has a singular purpose for this build, and it is to inflict
as many ailments as possible onto enemies. Through nodes, Abyssal Echoes will now
pulse at a location. Each pulse will inflict Armor Shred,
Void Resistance Shred, and stacks of Ignite.
This will scale ![]() Smelter's Wrath tremendously. Keep this on bosses 100% of the time.
Smelter's Wrath tremendously. Keep this on bosses 100% of the time.
Order of Skill Points
- 2 points into Deep Expanse: Traversal node.
- 4 points into Fiery Chasm: Inflicts two stacks of Ignite per pulse.
- 1 points into Potent Corruption: Abyssal Echoes is now a hit, enabling it to apply Void Resistance Shred from Blessings.
- 1 point into Vorpal Explosion: Traversal node, however this disables the chaining Abyssal Echoes normally has.
- 1 point into Screaming Rifts: This is how we get Abyssal Echoes to pulse.
- 2 points into Shrieking Echoes: Rifts will now pulse twice more, for a total of five.
- 1 point into Vorpal Reverberation: Traversal node.
- 5 points into Rippling Corrosion: Each pulse will apply 5 stacks of Armor Shred.
- 3 points into Tides of Rust: Increases the effect from Armor Shred applied by Abyssal Echoes.
In this section, we will break down each skill and highlight the key passives we have selected to make the skill shine in the build. While some of these skills do allow for some variation to exist depending on your own custom choices, we recommend utilizing the skill trees as presented until you have a strong understanding of the build itself.
Javelin

![]() Javelin is used as a way for us to have a movement skill, as well as auto-casting
Javelin is used as a way for us to have a movement skill, as well as auto-casting ![]() Smite on any enemy
within its range. Javelin will also heal us if we're within the AoE by a small amount. However, since we
have so many defensives while channeling, this small amount if actually worth quite a bit of EHP.
Smite on any enemy
within its range. Javelin will also heal us if we're within the AoE by a small amount. However, since we
have so many defensives while channeling, this small amount if actually worth quite a bit of EHP.
Order of Skill Points
- 1 points into Mighty Delivery: Traversal node.
- 1 points into Burning Strength: Traversal node.
- 1 point into Siege Barrage: Javelin now comes down at a target location, and only one can be active at any given time.
- 1 point into Battle Standard: Javelin is now persistant, staying in place for 4 seconds.
- 1 point into Surprise Initiative: Allows you to dash to Javelin's location.
- 4 points into Ardent Symbol: Increases the duration of Javelin to 12 seconds.
- 1 point into Capture the Flag: Javelin will now attach to the first enemy to touch it, making it follow enemies.
- 1 point into Divine Intervention: Enables the auto-casting of Smite.
- 5 points into Righteous Descend: Doubles Smite's frequency off Javelin, and increases the base Critical Hit rate.
- 4 points into Banner of Restoration: Heals us every second Javelin is active.
In this section, we will break down each skill and highlight the key passives we have selected to make the skill shine in the build. While some of these skills do allow for some variation to exist depending on your own custom choices, we recommend utilizing the skill trees as presented until you have a strong understanding of the build itself.
Smite

![]() Smite will never be manually casted. Instead, it casts off
Smite will never be manually casted. Instead, it casts off ![]() Javelin.
The main purpose for Smite is to inflict stacks of Ignite. However Smite
will also heal us in between uses of
Javelin.
The main purpose for Smite is to inflict stacks of Ignite. However Smite
will also heal us in between uses of ![]() Smelter's Wrath and provide a bit of Mana sustain.
Smelter's Wrath and provide a bit of Mana sustain.
Order of Skill Points
- 4 points into Holy Fire: Adds a 100% chance to inflict Ignite on hit.
- 4 points into Holy Wave: Smite heals in a larger area.
- 3 points into Soothing Balm: We cannot regen Health, this is only taken for the Mana.
- 5 points into Grace: 200% extra Healing.
- 4 points into Panacea: Adds a 24% chance to cleanse you when Smite heals.
Build Mechanics and Playstyle
While the playstyle for this build is a bit slow due to the need to channel ![]() Smelter's Wrath, it hits like an absolute truck and
will not require high uptime at all. Smelter's Wrath is scaled through three different damage types; Physical, Void, and Fire Damage. However,
due to Eternal Eclipse, we've added around 250 extra Void Melee Damage to the base of Smelter's Wrath damage, making it by far the biggest contributor
to the damage scaling of the skill. The cooldown between Eternal Eclipse and Smelter's Wrath is very similar, so every cast should be under the buff provided
by the two-handed sword.
Smelter's Wrath, it hits like an absolute truck and
will not require high uptime at all. Smelter's Wrath is scaled through three different damage types; Physical, Void, and Fire Damage. However,
due to Eternal Eclipse, we've added around 250 extra Void Melee Damage to the base of Smelter's Wrath damage, making it by far the biggest contributor
to the damage scaling of the skill. The cooldown between Eternal Eclipse and Smelter's Wrath is very similar, so every cast should be under the buff provided
by the two-handed sword.
To further enable damage scaling, ![]() Abyssal Echoes has been altered to deal Hit Damage, allowing it to inflict
Armor Shred and Void Resistance Shred on every pulse. On top of this,
Abyssal Echoes also inflicts Ignite, which scales
Abyssal Echoes has been altered to deal Hit Damage, allowing it to inflict
Armor Shred and Void Resistance Shred on every pulse. On top of this,
Abyssal Echoes also inflicts Ignite, which scales ![]() Smelter's Wrath damage through the node
Tempered Blows.
Smelter's Wrath damage through the node
Tempered Blows.
To continue inflicting Shred and keep Ignite stacks high, ![]() Javelin is taken
and auto-casts
Javelin is taken
and auto-casts ![]() Smite fairly frequently. Smite has been augmented to heal us for a substantial amount,
this way we are not relying on the Leech from
Smite fairly frequently. Smite has been augmented to heal us for a substantial amount,
this way we are not relying on the Leech from ![]() Smelter's Wrath to live. Being healed by Smite will
boost our Mana Regen as well, helping to sustain our resources when dealing with longer fights.
Smelter's Wrath to live. Being healed by Smite will
boost our Mana Regen as well, helping to sustain our resources when dealing with longer fights.
![]() Smelter's Wrath will Leech enough Health from damage dealth to return our Health back to full
as long as the enemies hit have enough Health themselves to do so; do not be afraid to stand still and take non-lethal
damage in order to get a hit off. While we've done what we can to reduce Damage Over Time effects, ground puddles
are still dangerous and should be avoided.
Smelter's Wrath will Leech enough Health from damage dealth to return our Health back to full
as long as the enemies hit have enough Health themselves to do so; do not be afraid to stand still and take non-lethal
damage in order to get a hit off. While we've done what we can to reduce Damage Over Time effects, ground puddles
are still dangerous and should be avoided.
The filler for this build is ![]() Vengeance. This node is great for ensuring our continued survival between
Vengeance. This node is great for ensuring our continued survival between
![]() Smelter's Wrath casts, as using Vengeance will reduce damage taken and increase Armor from recent usage.
Although it is filler, we benefit from using Vengeance in our rotation since it can generate Void Essences which
increase Void and Melee damage for a short period of time, but long enough for us to take advantage of them for a cast
or two of Smelter's Wrath. Vengeance will eat the buff from Eternal Eclipse, so be mindful of this and try
to time stopping Vengeance spam right before the buff comes back to maximize damage output.
Smelter's Wrath casts, as using Vengeance will reduce damage taken and increase Armor from recent usage.
Although it is filler, we benefit from using Vengeance in our rotation since it can generate Void Essences which
increase Void and Melee damage for a short period of time, but long enough for us to take advantage of them for a cast
or two of Smelter's Wrath. Vengeance will eat the buff from Eternal Eclipse, so be mindful of this and try
to time stopping Vengeance spam right before the buff comes back to maximize damage output.
Equipment and Gear Affixes
To enable high Corruption climbing, this build utilizes a few uniques, preferably with Legendary Potential. Keep this in mind when beginning to play this build, as it is absolutely necessary to have your defensive stats capped so you can tank hits without dying. Since this is a channeling build, you will absolutely take damage, it is unavoidable.
| Gear Slot | Implicits | Modifiers |
|---|---|---|
| Two-handed Sword | Eternal Eclipse | Prefixes Increased Critical Strike Multiplier Void Penetration |
| Head | Armor Reduced Bonus Damage Taken from Critical Strikes |
Prefixes +4 Level of Smelter's Wrath, Increased Melee Damage Increased Damage with Smelter's Wrath Suffixes Needed Resistances Increased Health |
| Amulet | Less Damage Over Time Taken | Prefixes Increased Damage While Channeling Increased Void Damage Suffixes Health Needed Resistances |
| Chest | Titan Heart | Prefixes Increased Damage with Smelter's Wrath Health |
| Belt | Shattered Chains | Prefixes Increased Void Damage |
| Gloves | Armor Endurance |
Prefixes Stregnth Increased Melee Attack Speed Suffixes Needed Resistances Hybrid Health |
| Ring | Movement Speed | Prefixes Increased Void Damage Strength Suffixes Needed Resistances |
| Ring | Siphon of Anguish | Prefixes Strength Increased Void Damage |
| Feet | Darkstride | Prefixes Strength |
| Relic | Melee Void Damage Spell Void Damage |
Prefixes Critical Strike Multiplier Increased Damage While Channeling Suffixes All Resistances While Channeling Health |
A loot filter made specifically for the gear table above may be copied by pressing the button below. Once in the Loot Filter portion of the in-game menu, choose the "Paste Clipboard Contents" option to import the code.
Copy Loot Filter to Clipboard
Uniques
Unlike typical Forge Guard builds, the items required for this one all focus around Void. Due to the nature of channeled builds, it is highly encouraged that the player take the time to get at least Legendary Potential 1 on most of the uniques for this build.
Eternal Eclipse
Eternal Eclipse: This is how we scale ![]() Smelter's Wrath. The cooldown timer on Eternal Eclipse is very close to that of
Smelter's Wrath, meaning that every time you channel the ability, you should be taking advantage of the added 220 Void Damage it provides.
Target farm by killing Rahyeh, The Black Sun. This weapon is considered rare, and the Legendary Potential on this won't make
or break the build. However, if you manage to get lucky, there's a potential for up to 160% Critical Multiplier on this thing. That is
a massive boost, and one of the largest damage increases possible for this build. Keep that in mind.
Smelter's Wrath. The cooldown timer on Eternal Eclipse is very close to that of
Smelter's Wrath, meaning that every time you channel the ability, you should be taking advantage of the added 220 Void Damage it provides.
Target farm by killing Rahyeh, The Black Sun. This weapon is considered rare, and the Legendary Potential on this won't make
or break the build. However, if you manage to get lucky, there's a potential for up to 160% Critical Multiplier on this thing. That is
a massive boost, and one of the largest damage increases possible for this build. Keep that in mind.
Titan Heart
Titan Heart: Taken almost entirely for the mitigative properties it provides. -15% Damage Taken is huge, and required due to the channeling nature of this build. This can be target farmed in the Monolith Timeline "Blood, Frost, and Death".
Shattered Chains
Shattered Chains: This belt is a great addition to the build, scaling off the Doom applied from the ring Siphon of Anguish.
![]() Smite and
Smite and ![]() Abyssal Echoes both count as a hit, with a maximum potential of four stacks on enemies, equating to 20% more Melee Damage dealt.
This belt can be farmed by killing Orobyss at a minimum of 120 Corruption.
Abyssal Echoes both count as a hit, with a maximum potential of four stacks on enemies, equating to 20% more Melee Damage dealt.
This belt can be farmed by killing Orobyss at a minimum of 120 Corruption.
Darkstride
Darkstride: Taken for Movement Speed and Void Damage increases. These boots are fairly common drops, but can be farmed in the Monolith Timeline "Spirits of Fire".
Siphon of Anguish
Siphon of Anguish: Creates synergy with Shattered Chains by enabling Doom application. Increases Leech rate by a substantial amount, which is useful for sustaining against low health mob packs. Overall, expect a 20% More Damage buff from Doom stacks when combined with the belt.
Idols
Idol slots are gained through the campaign, unlocking small bonuses and unique affixes for the player to discover and augment their builds with. The Idol screen consists of a grid system for the player to fill out with different sized Idols, eventually filling in every part of the grid. As the Idol shape increases (1x1, 1x2, 1x3, 1x4, etc.) the stronger an affix you might find for your build.
The majority of the Idols used for this build will be incredibly easy to find. Stock up on Armor and Health-based Small Lagonian Idols, beefing up
our defensives to be able to tank hits while channeling ![]() Smelter's Wrath. The build wants to use two Ornate Solar Idols as well, with Armor
and Increased Melee Void Damage affixes on them.
Smelter's Wrath. The build wants to use two Ornate Solar Idols as well, with Armor
and Increased Melee Void Damage affixes on them.
Blessing
Blessings are permanent buffs that are applied to your character. These come in two different powers, Standard and Grand. Grand blessings are significantly stronger than the Standard Blessings. In total, there are 10 Blessing Slots, one for each Monolith Timeline. When you complete a Monolith and defeat the final boss you will be awarded a choice of three blessing with a random value.
| Blessing Name | Affix | Timeline |
|---|---|---|
| Chance to Shred Void Resistance on Hit | The Black Sun | |
| All Resistances | Reign of Dragons | |
| Increased Mana | Ending the Storm | |
| Endurance | Spirits of Fire | |
| Increased Armor | The Age of Winter |
Changelog
- 21 Mar. 2024: Updated for 1.0. Smite changed to provide more healing and Mana Regen.
- 02 Feb. 2024: Guide added.

GhazzyTV is a professional content creator that knows all about theory crafting builds in Path of Exile and Last Epoch and has been teaching players how to build their characters for over 9 years. He is a huge Blizzard fan with thousands of hours invested into Diablo 3 and 4 and is a frequent World of Warcraft Classic player. His builds will be helpful content for new players and veterans alike. You can find his PoE Vault Guide Hub here and his LE Guide Hub here. You can follow him on Twitch, YouTube or Twitter.
- Last Epoch’s New Paradox: From “All Future Content Free” to Paid Classes
- Last Epoch Confirms Paid DLC Classes With Free Expansion
- Last Epoch Season 3 Overhauls Skills, UI, Monster Behavior & More
- Last Epoch Season 3 Adds Smarter Minions & Big Changes
- Lich & Necromancer Get New Skill, Buffs, and Dark New Builds in Last Epoch!
- Last Epoch Season 3 Explores the Ancient Era!
- Last Epoch Reveals Major Content for Season 3!
- Last Epoch Season 3 Trailer Reveals Major Changes!