Necromancer Abomination Endgame Build for Last Epoch (Patch 1.0)
Welcome to our Last Epoch Necromancer Abomination build guide for the Acolyte class. Here you will learn everything about the Necromancer play style, passives, skills, strengths, and weaknesses to conquer the world of Eterra.
Build Introduction
Command an amalgamation of flesh and bone. A creature straight out of Frankenstein, the Abomination is here to kick butt and take names. This hulking monstrosity will make you feel like a true summoner of the macabre, as you sacrifice every other minion at your disposal to channel life force into the Abomination.
 Dread Shade supplies the Abomination with 100% Critical Hit Rate
Accessible Minion playstyle
Minimal micro-management, just stay alive
Low Life makes the player extremely tanky
If the Abomination dies, summoning it mid-combat is sometimes impossible
Reliant on Abomination for damage, player does zero damage themselves
Hotbar swapping required in order to play this build
Skill Selection
Everything we do for this build is cenetered around ![]() Assemble Abomination.
This Minion is created by combining as many other Minions as possible together into
a single mass. To do this, the build will scale as many Skeletons and Skeleton Mages as
possible. While summoning, both
Assemble Abomination.
This Minion is created by combining as many other Minions as possible together into
a single mass. To do this, the build will scale as many Skeletons and Skeleton Mages as
possible. While summoning, both ![]() Summon Skeleton and
Summon Skeleton and ![]() Summon Skeletal Mage should
both be placed onto the hotbar.
Summon Skeletal Mage should
both be placed onto the hotbar.
Once we've channeled the Abomination into existence, our hotbar will change. For actual combat, we will be replacing our sacrificial
Minions with ![]() Transplant for movement and
Transplant for movement and ![]() Bone Curse in order to boost the damage of the Abomination while he is on
the move.
Bone Curse in order to boost the damage of the Abomination while he is on
the move. ![]() Dread Shade and
Dread Shade and ![]() Infernal Shade are both used to significantly buff the Abomination's damage. The
hotbar below is what should be used while in combat.
Infernal Shade are both used to significantly buff the Abomination's damage. The
hotbar below is what should be used while in combat.

Class and Skill Passive Trees
Our base class is Acolyte, which fills the role of mixed spell caster and minion summoner in Last Epoch. Upon finishing Act 1 in the campaign, your character will be offered an opportunity to select an Advanced Mastery. Each base class has three possible Masteries to choose from. For Acolyte, you can choose between Passive Trees for Lich, Necromancer, and Warlock. Upon selecting a Mastery and placing 20 Passive Points into the Mage Tree, you'll then be able to place Passive Points into the Mastery Trees.
Necromancer is the Advanced Class used for this build, and also where the majority of our Passive Points will come from. The Necromancer Tree will focus around picking nodes that increase our Minion's Health, Attack Speed, Physical Damage, and Critical Multiplier. In true summoner fashion, we will be ignoring both the Lich and Warlock Passive Trees.
Acolyte Passive Points
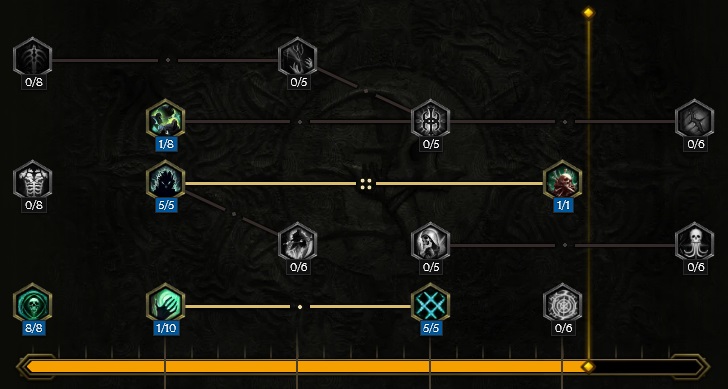
- 8 points into Forbidden Knowledge: Boost to Necrotic Resistance and Intelligence.
- 5 points into Dark Rituals: Taken specifically for Minion Attack Speed.
- 1 points into Stolen Vitality: Taken to proceed into the Passive Tree.
- 1 point into Mania of Mortality: Taken to proceed into the Passive Tree.
- 5 points into Unnatural Preservation: Taken for Ward Retention, but also supplies important Resistances.
- 1 point into Soul Aegis: Minion Armor scaling off our own character's level.
Our base class is Acolyte, which fills the role of mixed spell caster and minion summoner in Last Epoch. Upon finishing Act 1 in the campaign, your character will be offered an opportunity to select an Advanced Mastery. Each base class has three possible Masteries to choose from. For Acolyte, you can choose between Passive Trees for Lich, Necromancer, and Warlock. Upon selecting a Mastery and placing 20 Passive Points into the Mage Tree, you'll then be able to place Passive Points into the Mastery Trees.
Necromancer is the Advanced Class used for this build, and also where the majority of our Passive Points will come from. The Necromancer Tree will focus around picking nodes that increase our Minion's Health, Attack Speed, Physical Damage, and Critical Multiplier. In true summoner fashion, we will be ignoring both the Lich and Warlock Passive Trees.
Necromancer Passive Points
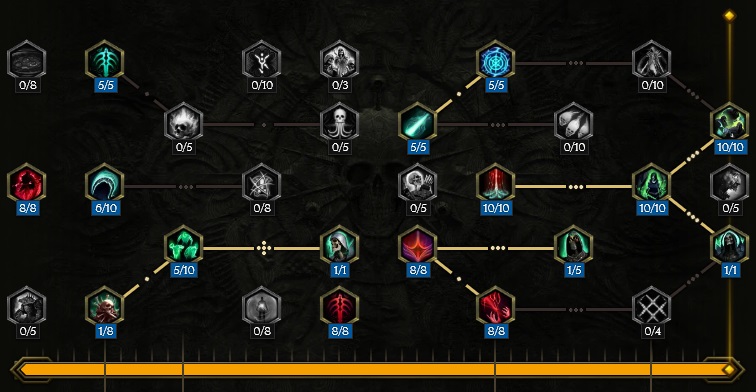
- 8 points into Risen Army: Minion Damage and Attack Speed.
- 6 points into Cursed Blood: Increases to the Abomination's Physical Damage.
- 1 point into Blood Armor: Traversal node.
- 5 points into Reclamation of Souls: Taken specifically for Ward Retention.
- 5 points into Mortal Tether: Significant boost to the Abomination's Health, but taken in order to access the following node.
- 1 point into Unbound Necromancy: +1 Skeleton.
- 8 points into Unearthed Arms: Add and Increased Minion Physical Damage.
- 5 points into Frantic Summons: Minion Attack Speed boost.
- 8 points into Tyrant: 24% increased Health, converted into Ward.
- 8 points into Cling To Life: Vitality, used for Ward, and extra Resistances for the Abomination.
- 1 point into Tyrant's Legion: +1 Skeleton.
- 10 points into Moonlight Pyre: Adds flat Necrotic and Fire Damage for the Abomination.
- 5 points into River of Bones: Very useful for Minion Leech Rate, but Critical Chance is unnecessary due to nodes in skill trees.
- 10 points into Rite of Undeath: Major increases to Resistances and Minion Necrotic Damage.
- 10 points into Blades of the Forlorn: Crit Multipler for the Abomination.
In this section, we will break down each skill and highlight the key passives we have selected to make the skill shine in the build. While some of these skills do allow for some variation to exist depending on your own custom choices, we recommend utilizing the skill trees as presented until you have a strong understanding of the build itself.
Assemble Abomination
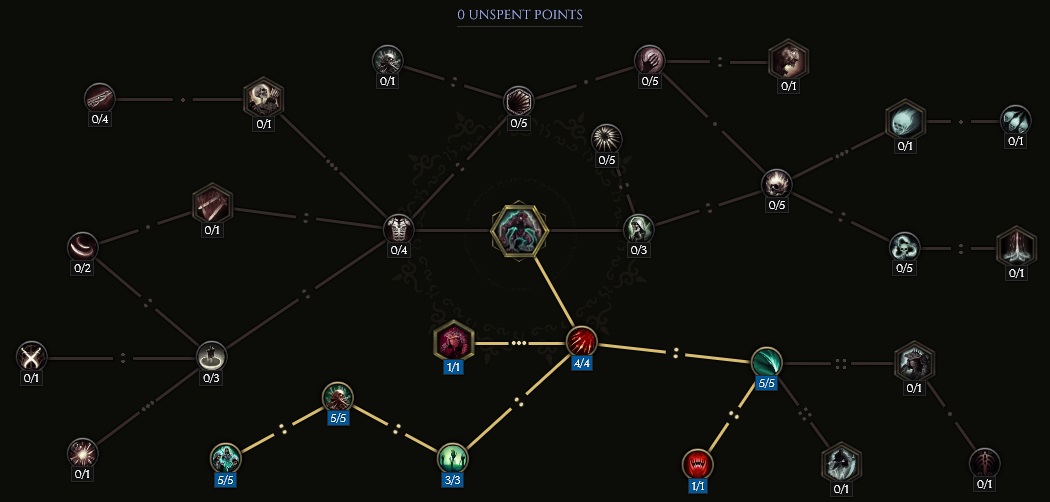
![]() Assemble Abomination is the main source of damage for this build, and it is what every other skill we
specialize in aims to bolster. The goal with this build was to make the Abomination as easy to use as possible, and as such
we have completely killed his Health Decay. This also means he can only consume Skeleons and Skeletal Mages. This massive
beast takes a while to summon, so ensure you do so out of combat, prior to entering an Echo or Dungeon.
Assemble Abomination is the main source of damage for this build, and it is what every other skill we
specialize in aims to bolster. The goal with this build was to make the Abomination as easy to use as possible, and as such
we have completely killed his Health Decay. This also means he can only consume Skeleons and Skeletal Mages. This massive
beast takes a while to summon, so ensure you do so out of combat, prior to entering an Echo or Dungeon.
In order to scale the Abomination properly, we will be relying on Minion Health, unique Minion types, and maximum Minion count.
Order of Skill Points
- 4 points into Domination: Adds multiplicative damage to the Abomination's attacks.
- 1 point into Age of Undeath: You can only use Skeletons and Skeletal Mages to summon the Abomination, but Health Decay is removed.
- 5 points into Unholy Reach: Significantly enhances the range of the Abomination's melee attacks.
- 1 point into Meat Grinder: The Abomination will gain a stack of Meat Grinder every time an enemy is killed that grants Increased Damage. This can reach 10 stacks.
- 3 points into Engorgement: Adds multiplicative damage per Minion consumed while summoning.
- 5 points into Epicurean: The Abomination gains more damage if the types of Minions absorbed are different.
- 5 points into Death in the Family: Significantly increases the Abomination's Attack Speed if he consumes at least 5 different types of Minions.
In this section, we will break down each skill and highlight the key passives we have selected to make the skill shine in the build. While some of these skills do allow for some variation to exist depending on your own custom choices, we recommend utilizing the skill trees as presented until you have a strong understanding of the build itself.
Summon Skeletal Mage
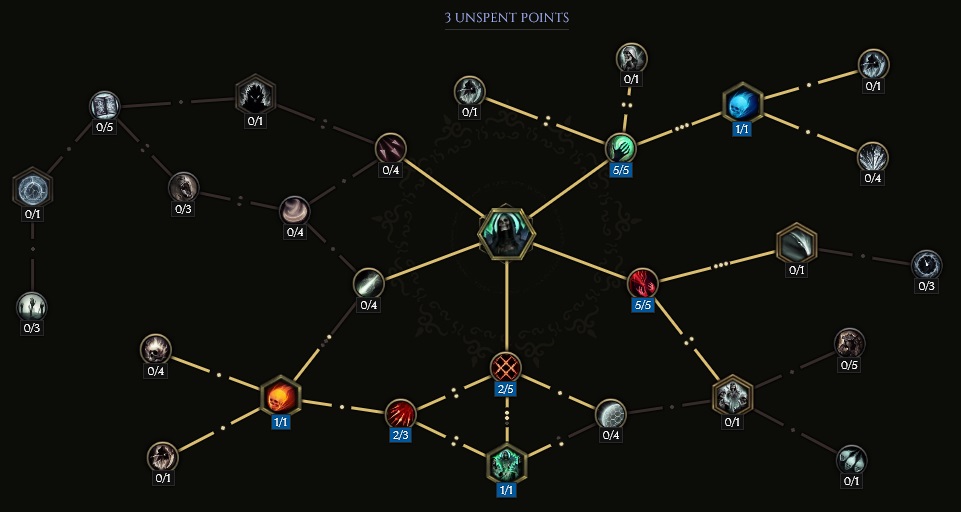
![]() Summon Skeletal Mage exists for a single reason; to be used as fodder for the Abomination. Since we want as
many different types of Minions as possible, we force this skill to summon three types of Mages; Cold, Fire, and Necrotic.
All 20 points won't be used for this, so the image above only shows the mandatory points in order to maximize your summon count
and Health.
Summon Skeletal Mage exists for a single reason; to be used as fodder for the Abomination. Since we want as
many different types of Minions as possible, we force this skill to summon three types of Mages; Cold, Fire, and Necrotic.
All 20 points won't be used for this, so the image above only shows the mandatory points in order to maximize your summon count
and Health.
Order of Skill Points
- 5 points into Gravetide: Increases Spell Damage.
- 1 point into Cryomancers: Adds a Cryomancer to the pool of Mages that can be summoned.
- 5 points into Leech Life: Increases Mage Health by 75%.
- 2 points into Celer Mortis: Taken to progress to other nodes.
- 2 points into Grey Merchant: Taken to progress to other nodes.
- 1 point into Pyromancers: Adds a Pyromancer to the pool of Mages that can be summoned.
- 1 point into Order of Death: This node allows us to summon all three Mage types at the same time by increasing the summon count.
In this section, we will break down each skill and highlight the key passives we have selected to make the skill shine in the build. While some of these skills do allow for some variation to exist depending on your own custom choices, we recommend utilizing the skill trees as presented until you have a strong understanding of the build itself.
Summon Skeleton
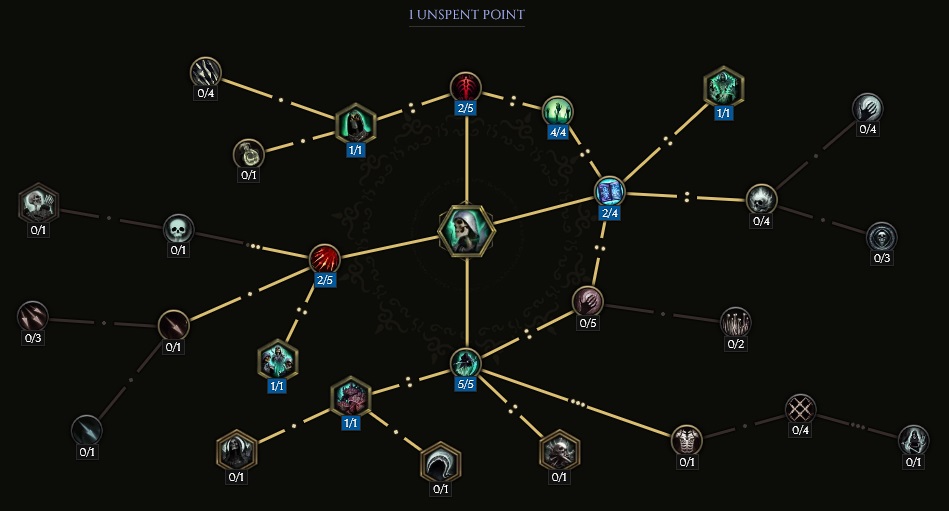
As with the Mages, ![]() Summon Skeleton has a singular purpose, to be fed to the Abomination. While we
use the Necromancer Passive Tree to increase the limit on Skeletons, we can also use this Skill Tree as well.
We do not need to utilize all points for this skill, so we will be highlighting the mandatory ones instead.
Summon Skeleton has a singular purpose, to be fed to the Abomination. While we
use the Necromancer Passive Tree to increase the limit on Skeletons, we can also use this Skill Tree as well.
We do not need to utilize all points for this skill, so we will be highlighting the mandatory ones instead.
There is a special node in this tree, Immortal, which has a random chance to resummon a Skeleton after it dies. This applies to being absorbed into the Abomination and adds a bit of RNG to the strength of the Minion. However, it is always a net positive, so it is always worth taking in this case.
Order of Skill Points
- 2 points into Unholy Rage: Taken to progress to the next node.
- 1 point into Marrow Walkers: Increases Skeleton count by 1.
- 5 points into Necrotic Conviction: Increases Warrior Skeleton Health.
- 1 point into Hollow Walkers: Increases Skeleton count by 1.
- 2 points into Unbound Necromancy: Taken to progress the tree.
- 4 points into Immortal: Adds a 40% chance to resummon a Skeleton when it is absorbed.
- 2 points into Sweeping Strikes: Taken to traverse the tree.
- 1 point into Skeleton Rogue: Adds Rogues to possible Skeletons, raising our unique Skeleton count to three.
In this section, we will break down each skill and highlight the key passives we have selected to make the skill shine in the build. While some of these skills do allow for some variation to exist depending on your own custom choices, we recommend utilizing the skill trees as presented until you have a strong understanding of the build itself.
Dread Shade
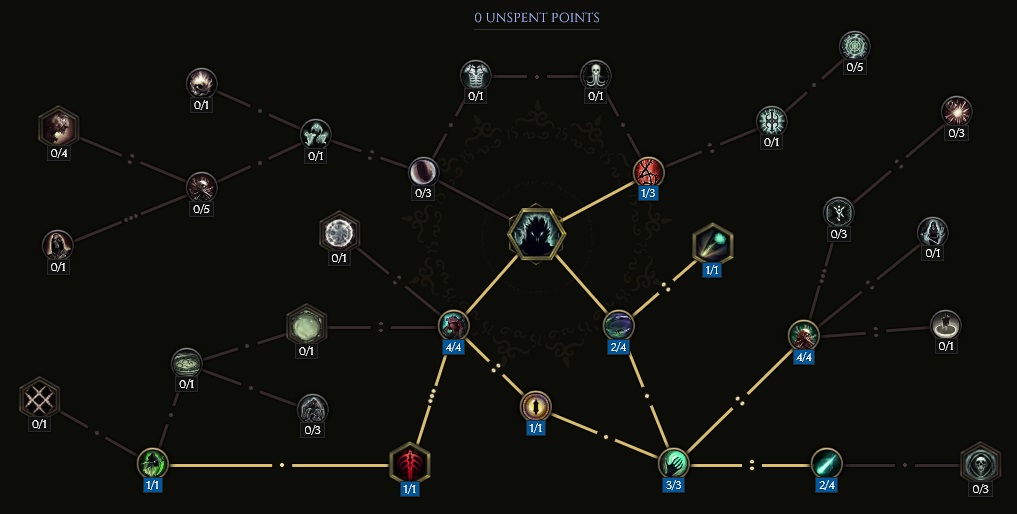
![]() Dread Shade is used to buff a singular, specific Minion for this build. Coincidentally, we only
use one Minion, making this skill perfect for us. Normally Dread Shade decays Health, however we have removed
that aspect of it. There is a time limit on how long this stays active, so you will need to reapply it every so often.
It can be kept on with 100% uptime.
Dread Shade is used to buff a singular, specific Minion for this build. Coincidentally, we only
use one Minion, making this skill perfect for us. Normally Dread Shade decays Health, however we have removed
that aspect of it. There is a time limit on how long this stays active, so you will need to reapply it every so often.
It can be kept on with 100% uptime.
Order of Skill Points
- 2 points into Spectral Presence: Taken to traverse the tree.
- 1 point into Lone Watcher: This limits Dread Shade to a single Minion and removes Health Decay.
- 3 points into Dying Coven: Increases the Attack Speed of the Abomination.
- 4 points into Grim Fate: Increases the damage bonus given to Minions through Dread Shade.
- 4 points into Lingering Doom: Adds base Necrotic Damage to the Abomination.
- 1 point for All For One: Increases Dread Shade damage, but removes the aura from it. Since we only have one Minion, this won't have a negative effect.
- 1 point into Egoism: When under the effect of Dread Shade, the Abomination has 100% Critical Hit Chance.
- 1 point into Flesh Harvest: Increases the Abomination's damage based off its missing Health.
In this section, we will break down each skill and highlight the key passives we have selected to make the skill shine in the build. While some of these skills do allow for some variation to exist depending on your own custom choices, we recommend utilizing the skill trees as presented until you have a strong understanding of the build itself.
Infernal Shade
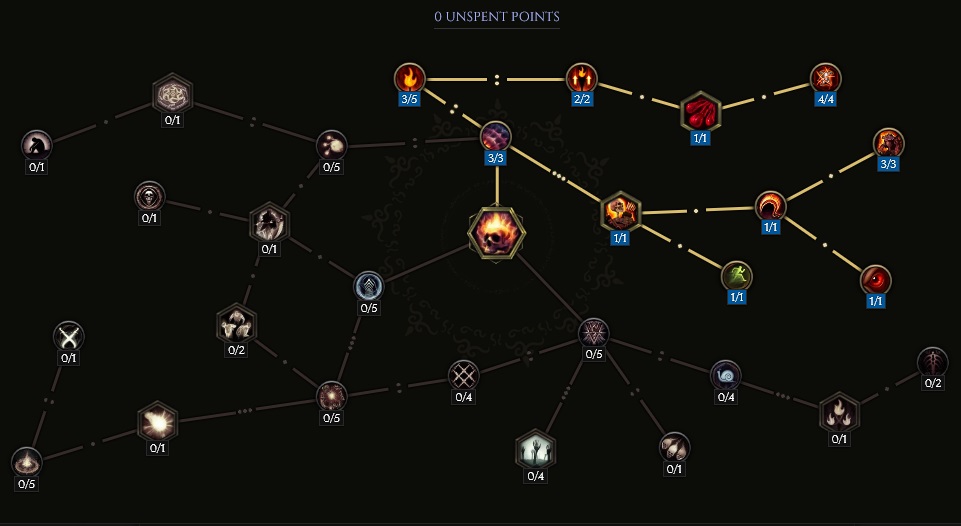
![]() Infernal Shade servers a similar purpose as Dread Shade does. It provides a direct buff to the Minion
its applied to. In this case, the Abomination. The difference here is that instead of being a limited duration, Infernal
Shade is permanent... until it kills your Minion. As time goes on, Infernal Shade will continue to deal more and more
damage to the Minion you have placed it on. Eventually, even with infinite Health Leech, your Minion will die as
it will tick high enough to one-shot. This is extremely dangerous with this build, since summoning the Abomination
is no small feat. Ensure you re-apply Infernal Shade if you see the damage ticks getting too high to be comfortable.
Infernal Shade servers a similar purpose as Dread Shade does. It provides a direct buff to the Minion
its applied to. In this case, the Abomination. The difference here is that instead of being a limited duration, Infernal
Shade is permanent... until it kills your Minion. As time goes on, Infernal Shade will continue to deal more and more
damage to the Minion you have placed it on. Eventually, even with infinite Health Leech, your Minion will die as
it will tick high enough to one-shot. This is extremely dangerous with this build, since summoning the Abomination
is no small feat. Ensure you re-apply Infernal Shade if you see the damage ticks getting too high to be comfortable.
Order of Skill Points
- 3 points into Influence: Taken to move into the Minion nodes.
- 1 point into Devour in Flames: Infernal Shade can only attach to your Minions.
- 1 point into Burn Trail: Infernal Shade now gives the Abomination Haste.
- 1 point into Subjugation: Not important, since we don't rely on Infernal Shade to deal damage on its own.
- 3 points into Manic Pyre: Increases Movement Speed and Attack Speed for the attached Minion.
- 1 point into Soulfire: Infernal Shade no longer has a time limit and will last indefinitely.
- 3 points into Torment Beacon: We do not rely on Infernal Shade's direct damage. This is taken to move along in the tree.
- 2 points into Baneful: Just like the previous node, taken for tree traversal.
- 1 point into Blood Shade: Converts Infernal Shade into a Physical Skill.
- 4 points into Corrosion: Infernal Shade will Shred the Armor of nearby enemies.
Build Mechanics and Playstyle
If you're looking for a build where your Minion will slap Julra into next week, the Abomination might be for you. In fact,
this thing hits so hard that you may find summoning him takes longer than the actual fights do. Aside from the summoning
aspect, this build is very hands off. The most you can do as the player is inflict enemies with ![]() Bone Curse for a slight
buff in the Abomination's damage dealt. The biggest concern for this build is what to do if your Abomination dies. In the event you're
just doing Echo maps, try to get somewhere safe and resummon away from combat. If you're in a Boss fight... it won't be so easy.
You're likely better off just dying and trying again. Keeping your Abomination alive is of the utmost importance, only after keeping
yourself alive.
Bone Curse for a slight
buff in the Abomination's damage dealt. The biggest concern for this build is what to do if your Abomination dies. In the event you're
just doing Echo maps, try to get somewhere safe and resummon away from combat. If you're in a Boss fight... it won't be so easy.
You're likely better off just dying and trying again. Keeping your Abomination alive is of the utmost importance, only after keeping
yourself alive.
In order to summon the Abomination, you will need to change your hotbar a bit. ![]() Bone Curse and
Bone Curse and ![]() Transplant should be removed
from your skill bar and be replaced with
Transplant should be removed
from your skill bar and be replaced with ![]() Summon Skeleton and
Summon Skeleton and ![]() Summon Skeletal Mage. You'll want maximum Minions summoned, as well
as all three types of Skeletons and all three types of Mages, in order to boost the Abomination's damage to maximum. Begin channeling the Abomination,
and hope you get a few re-summons on Skeletons. Once summoned, your hotbar may be returned to normal by taking the Skeletons and Mages off it and
placing Bone Curse and Transplant instead. We will not be running extra Skeletons to aid the Abomination, for one main reason;
Summon Skeletal Mage. You'll want maximum Minions summoned, as well
as all three types of Skeletons and all three types of Mages, in order to boost the Abomination's damage to maximum. Begin channeling the Abomination,
and hope you get a few re-summons on Skeletons. Once summoned, your hotbar may be returned to normal by taking the Skeletons and Mages off it and
placing Bone Curse and Transplant instead. We will not be running extra Skeletons to aid the Abomination, for one main reason; ![]() Dread Shade.
As you add more Minions to the field, it becomes increasingly harder to place Dread Shade on the proper target. The Abomination alone is enough
to get you through Corruption.
Dread Shade.
As you add more Minions to the field, it becomes increasingly harder to place Dread Shade on the proper target. The Abomination alone is enough
to get you through Corruption.
Equipment and Gear Affixes
The gear listed below is specifically for the Low Life version of this build. We've ran the numbers, and before you're able to run Low Life, it is possible to run a normal full Health / Endurance version of this. However, do take note that the Endurance gearing of this build will cap out atound 8,000 EHP, while the Low Life version can run as high as 19,000. Effort should be made to go Low Life when possible.
Additionally, the table includes the Frostbite Shackles for gloves. These are not mandatory, however they add about 25% of the builds defensive layering. Prior to getting these, once you have converted to Low Life, running gloves with the experimental Affix that converts Health Lost into Ward Gain is enough to climb Corruption. Legendary Potential Frostbite Shackles are quite the investment, but they're useful on dozens of builds and can be moved around interchangably with the same modifier we have put on them in this build.
| Gear Slot | Implicits | Modifiers |
|---|---|---|
| Two-handed Axe | Melee Damage Increased Physical Damage Increased Minion Physical Damage |
Prefixes Parry Chance Suffixes Minion Melee Damage, Minion Bow Damage Minion Melee Damage, Minion Spell Damage Sealed Affix Physical Penetration, Minion Physical Penetration |
| Head | Armor Increased Cooldown Recovery Minion Increased |
Prefixes Intelligence Vitality Suffixes Increased Health Critical Strike Avoidance |
| Amulet | Death Rattle | Legendary Potential Increased Minion Damage Health |
| Chest | Exsanguinous | Legendary Potential Intelligence Flat Health |
| Belt | Poison Resistance Cold Resistance |
Prefixes Increased Minion Damage Increased Minion Health Suffixes Cold Resistance Hybrid Health |
| Gloves | Frostbite Shackles | Legendary Potential Current Health Lost per second, Missing Health gained as Ward per second |
| Ring | Ribbons of Blood | Legendary Potential Intelligence Health |
| Ring | Increased Minion Damage Minion Critical Strike Multiplier Increased Minion Health |
Prefixes Intelligence Increased Minion Damage Suffixes Health Needed Resistances |
| Feet | Last Steps of the Living | Legendary Potential Increased Minion Damage, Minions Teleported around you after you use a Traversal Skill |
| Relic | Poison Resistance Ward per Second |
Prefixes +4 Level of Assemble Abomination, Increased Minion Health Increased Minion Damage Suffixes Cold Resistance Needed Resistances |
A loot filter made specifically for the gear table above may be copied by pressing the button below. Once in the Loot Filter portion of the in-game menu, choose the "Paste Clipboard Contents" option to import the code.
Copy Loot Filter to Clipboard
Uniques
The items listed below are required to run the build in Low Life. You may find uses for other uniques if you choose to run it in a different way. The items required for the Abomination are Death Rattle, Ribbons of Blood, and Lethal Concentration.
Lethal Concentration
Lethal Concentration: This adds a massive modifier to the Abominations Melee Damage, with two 200% Increased Damage affixes. This is a common drop, but can be farmed in the Monolith Timeline "The Reign of Dragons" Unique or Set Axe, Mac or Spear Rewards.
Exsanguinous
Exsanguinous: One part of how we will generate Ward, this chest piece drains Health while converting the amount of missing Health we have into Ward. This unique chest piece can be target farmed in the Monolith Timeline "Blood, Frost, and Death".
Last Steps of the Living
Last Steps of the Living: Just as Exsanguinous does, these boots also drain Health in exchange for supplying Ward for the amount of missing Health. When both of these items are combined, they will be converting around 30% of your Health per second into Ward. Target farm on the Monolith Timeline "Blood, Frost, and Death".
Frostbite Shackles
Frostbite Shackles: One of the strongest items in the game, these gloves are build enabling for a lot of builds. They provide a massive amount of Ward Retention, allowing Low Life builds to reach high amounts of Ward per Second. These gloves are a rare drop from Frost Lich Formosus which is the boss in the Monolith Timeline "Blood, Frost and Death".
Death Rattle
Death Rattle: Simply put, this amulet provides a lot of bonuses for the Abomination, with the most important one being a potential for an increased 100% Critical Hit Multiplier on a good roll. This amulet can be target farmed in the Timeline Monolith "The Age of Winter".
Ribbons of Blood
Ribbons of Blood: This ring alone provides a substantial amount of survivability for the Abomination, making him self sufficient with Leech, as well as making him immune to Critical Strikes. As an additional bonus, this ring also supples the Abomination with flat Melee Physical Damage. This ring has an extremely high drop rate at 50% from killing the Abomination in the Monolith Timeline "Fall of the Outcasts".
Idols
Idol slots are gained through the campaign, unlocking small bonuses and unique affixes for the player to discover and augment their builds with. The Idol screen consists of a grid system for the player to fill out with different sized Idols, eventually filling in every part of the grid. As the Idol shape increases (1x1, 1x2, 1x3, 1x4, etc.) the stronger an affix you might find for your build.
All Idols for this build should focus on Health increases for us. This can be accomplished with either Stout Lagonian Idols or Large Immortal Idols. A single Large Immortal Idol should have Chance to Marked for Death on Minion Hit, if possible. The chance is low, but is mostly used for boss fights to enable your Abomination to deal more damage briefly.
Blessing
Blessings are permanent buffs that are applied to your character. These come in two different powers, Standard and Grand. Grand blessings are significantly stronger than the Standard Blessings. In total, there are 10 Blessing Slots, one for each Monolith Timeline. When you complete a Monolith and defeat the final boss you will be awarded a choice of three blessing with a random value.
| Blessing Name | Affix | Timeline |
|---|---|---|
| Cold Resistance | The Age of Winter | |
| Ward per Second | Ending the Storm | |
| Critical Strike Avoidance | Reign of Dragons | |
| Increased Minion Damage | Spirits of Fire |
Changelog
- 13 Mar. 2024: Build Planner added.
- 02 Mar. 2024: Guide added.


GhazzyTV is a professional content creator that knows all about theory crafting builds in Path of Exile and Last Epoch and has been teaching players how to build their characters for over 9 years. He is a huge Blizzard fan with thousands of hours invested into Diablo 3 and 4 and is a frequent World of Warcraft Classic player. His builds will be helpful content for new players and veterans alike. You can find his PoE Vault Guide Hub here and his LE Guide Hub here. You can follow him on Twitch, YouTube or Twitter.
- Last Epoch Season 4: Shattered Omens Adds Corruption Crafting, a New Pinnacle Boss, and More!
- Delaware Courts Just Proved Last Epoch’s Real Risk Isn’t Failure, But Success
- Last Epoch’s New Paradox: From “All Future Content Free” to Paid Classes
- Last Epoch Confirms Paid DLC Classes With Free Expansion
- Last Epoch Season 3 Overhauls Skills, UI, Monster Behavior & More
- Last Epoch Season 3 Adds Smarter Minions & Big Changes
- Lich & Necromancer Get New Skill, Buffs, and Dark New Builds in Last Epoch!
- Last Epoch Season 3 Explores the Ancient Era!

