Necromancer Golem Betrayal Endgame Build for Last Epoch (Patch 1.1)
Welcome to our Last Epoch Necromancer Golem Betrayal build guide for the Acolyte class. Here you will learn everything about the Necromancer play style, passives, skills, strengths, and weaknesses to conquer the world of Eterra.
Build Introduction
The Necromancer Golem Betrayal build is massive damage and defensive generating build. It focuses on
friendly fire, or betraying, our Golem to cause him to erupt several instances of Bone Shatter. As a true Necromancer, we do not do
much damage. Our Golem on the other hand wipes the screen clean. The Golem and his spell-slinging skeletal side-kicks will tear off massive
amounts of Armor from any enemy caught in their path. This build scales our minion's Physical Damage, while Cursing them adds
even more damage. This build is also scaled with an ability to cull any enemy at 12% or lower with the same Curse. In 1.1 a movement skill
was added through the functionality of ![]() Summon Skeletal Mage. This makes sure not only is our big friend with us, but all of your minions are
transported at once with you. When you aquire the uniques, you'll be able to punish any timeline you choose, as this
is arguably one of the strongest builds seen in Last Epoch. With the right gear, even
Aberroth folds to this build, but you cannot face tank his abilities.
Keep in mind, you will need to manually dodge and move minions about in his arena.
Summon Skeletal Mage. This makes sure not only is our big friend with us, but all of your minions are
transported at once with you. When you aquire the uniques, you'll be able to punish any timeline you choose, as this
is arguably one of the strongest builds seen in Last Epoch. With the right gear, even
Aberroth folds to this build, but you cannot face tank his abilities.
Keep in mind, you will need to manually dodge and move minions about in his arena.
 Incredible boss and clear damage
- Ward and Health generation is outstanding
- Built in Movement with summoning skill
- Armor and Critical Strike defensive layers are strong
- Able to face tank a large portion of content

 Golem AI is wonky
- Build can be seen as mundane, as playstyle will never change regardless of the situation
- Low Gear will cause minions to die easily

Skill Selection
The skill selection for this build focuses around maximizing our Cast Speeds while returning massive
amounts of Health, and Ward per hit on our ![]() Summon Bone Golem. We maximize the number of
Summon Bone Golem. We maximize the number of ![]() Summon Skeletal Mage we can
have, ensuring they are appling as much Armor Shred as possible.
Summon Skeletal Mage we can
have, ensuring they are appling as much Armor Shred as possible. ![]() Dread Shade is more than
doubling the amount of damage the Golem is doing, while ramping up this damage the closer the Golem gets to death.
We generate significant Ward and Health on every spell hit on our Golem, which allows a massive gain even more Ward from
Twisted Heart of Uhkeiros. This relic uses our current Health, not our maximum health, to convert into Ward. We
are only able to do this by converting
Dread Shade is more than
doubling the amount of damage the Golem is doing, while ramping up this damage the closer the Golem gets to death.
We generate significant Ward and Health on every spell hit on our Golem, which allows a massive gain even more Ward from
Twisted Heart of Uhkeiros. This relic uses our current Health, not our maximum health, to convert into Ward. We
are only able to do this by converting ![]() Rip Blood to Necrotic damage.
Rip Blood to Necrotic damage.

Class and Skill Passive Trees
Our base class is the Acolyte, which acts as a generic spell caster and summoner. Our character will be offered an opportunity to select a Mastery class once we have completed the first act of the campaign. Each base class has three possible masteries to choose from, for the Acolyte we have access to the Mastery Tree Passives for Necromancer, Lich and Warlock. Upon selecting a Mastery and placing 20 Passive Points into the Acolyte Tree, you'll then be able to place Passive Points into the Mastery Trees.
For Golem Betrayal, Necromancer is our chosen Mastery. We will be utilizing the majority of our Passive Points in the Necromancer Passive tree and a small portion into the Warlock tree. Our passive points will be targeting augments for our Minions and boosting their survivability and damage output. Each of the Passive Trees and their points are broken down below.
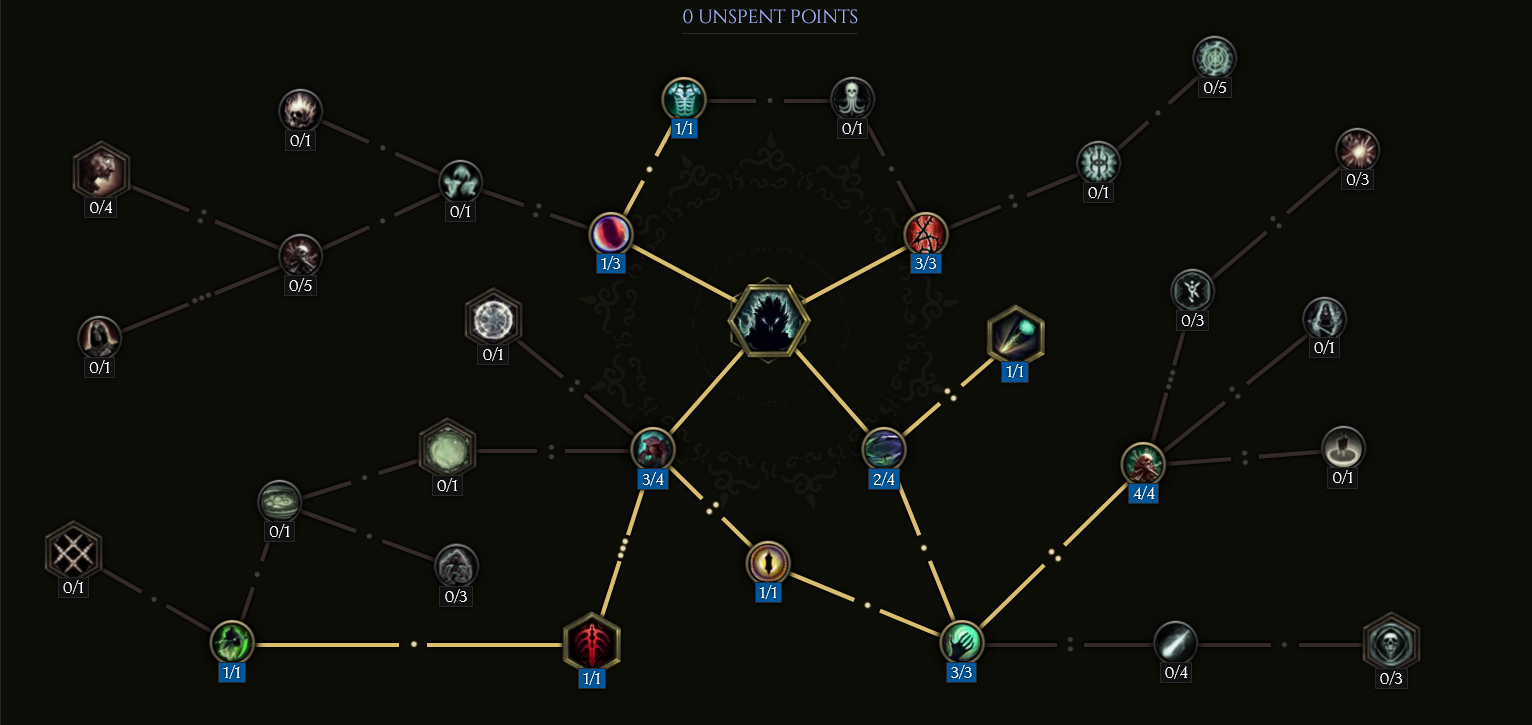
Acolyte Passive Points

- 8 points into Forbidden Knowledge: Increases our Intelligence and Necrotic Resistances.
- 7 points into Stolen Vitality: Increases Health pools for both the player and minions.
- 4 points into Dark Rituals: Increases our minion's Attack Speed.
- 1 point into Mania of Mortality: Taking a point to move further into the tree.
- 5 points into Unnatural Preservation: Gives us Ward Retention and Resistances.
- 1 point into Soul Aegis: Grants our minions increased Armor per player level.
Our base class is the Acolyte, which acts as a generic spell caster and summoner. Our character will be offered an opportunity to select a Mastery class once we have completed the first act of the campaign. Each base class has three possible masteries to choose from, for the Acolyte we have access to the Mastery Tree Passives for Necromancer, Lich and Warlock. Upon selecting a Mastery and placing 20 Passive Points into the Acolyte Tree, you'll then be able to place Passive Points into the Mastery Trees.
For this Golem Betrayal build, Necromancer is our chosen Mastery. We will be utilizing the majority of our Passive Points in the Necromancer Passive tree and a small portion into the Warlock tree. Our passive points will be targeting augments for our Minions and boosting their survivability and damage output. Each of the Passive Trees and their points are broken down below.
Necromancer Passive Points

- 8 points into Risen Army: Minion Damage and Attack Speed.
- 5 points into Grave Thorns: Increases our minions' Armor, Health and gives them the ability to reflect damage.
- 4 points into Cursed Blood: Increases our Minion Damage.
- 8 points into Aegisfall: This is massive portion of our damage scaling, which allows all minions to gain Armor Shred at 200%.
- 5 points into Frantic Summons: Increases both our Attack and Cast Speed, as well as our Minions'.
- 8 points into Tyrant: Bonus Health for your character.
- 5 points into River of Bones: Increases our Critical Strike Chance and our Minions, adding a Health leech for our Minions.
- 3 points into Heresy: Increases our Intelligence and Minion's Critical Strike Chance.
- 10 points into Blades of the Forlorn: Increases Minion Critical Strike Multiplier.
- 8 points into Cling To Life: Provides the player Vitality and gives 16% to all Resistances for minions.
- 4 points into Empty The Graves: Increases your Health Regen and Armor based on how many minions you have.
- 1 point into Disciples of Necromancy: Adds an additional Skelletal Mage to our pool, making it a Total of 5.
Our base class is the Acolyte, which acts as a generic spell caster and summoner. Our character will be offered an opportunity to select a Mastery class once we have completed the first act of the campaign. Each base class has three possible masteries to choose from, for the Acolyte we have access to the Mastery Tree Passives for Necromancer, Lich and Warlock. Upon selecting a Mastery and placing 20 Passive Points into the Acolyte Tree, you'll then be able to place Passive Points into the Mastery Trees.
For Golem Betrayal, Necromancer is our chosen Mastery. We will be utilizing the majority of our Passive Points in the Necromancer Passive tree and a small portion into the Warlock tree. Our passive points will be targeting augments for our Minions and boosting their survivability and damage output. Each of the Passive Trees and their points are broken down below.
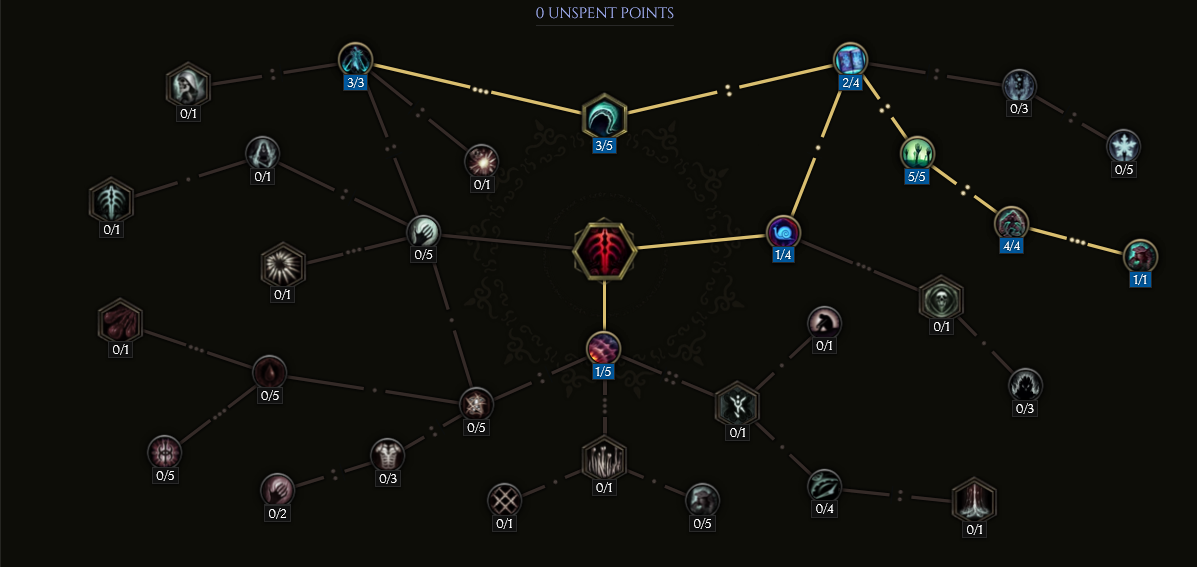
Warlock Passive Points

- 5 points into Chaos Flames: Increases Necrotic Damage to you and your minions.
- 5 points into Occultist's Mind: Gives base Intelligence and grants mana per Intelligence.
- 5 points into Ward of Malevolence: Gain Ward Decay Threshold, and Ward on Kill.
- 3 points into Imperishable: Gives us base Vitality, and gives us a Ward Decay Threshold per 1% Necrotic Resistance.
In this section, we will break down each skill and highlight the key passives we have selected to make the skill perform as best as possible in the build. While some of these skills do allow for some variation to exist depending on your own custom choices, we recommend utilizing the skill trees as presented until you have a strong understanding of the build itself.
Rip Blood

![]() Rip Blood is the most important skill we have. With this skill we betray our
Rip Blood is the most important skill we have. With this skill we betray our ![]() Summon Bone Golem,
and cause him to pour out immense amounts of damage. At the same time, we will be healing and generating Ward.
This is a click-heavy skill.
Summon Bone Golem,
and cause him to pour out immense amounts of damage. At the same time, we will be healing and generating Ward.
This is a click-heavy skill.
Note: The node Arcane Fortress could be skipped if the player is noticing they cannot maintain near full Health. However the changes to Twisted Heart of Uhkeiros from 1.0 and into 1.1 should make this manageable. If the player is having Mana problems, release a single point from Splatter and place it into Mana Feast.
Order of Skill Points
- 5 points into Hemomancer: Increases the Cast Speed of Rip Blood.
- 5 points into Quenching: Grants you additional health from the Rip Blood Cast.
- 1 point into Marrow Drinker: This enables us to hit our
 Summon Bone Golem, and doubles Health gain from Rip Blood.
 - 1 point into Hematology: Allows you to restore more Health per point of Intelligence you have.
- 2 points into Arcane Absorption: This is a pathing point, we do not care about the damage.
- 1 point into Rip Spirit: This converts Rip Blood into a Necrotic Spell, enabling the functionality of our Twisted Heart of Uhkeiros.
- 2 point into Splatter: This gives us a 20% chance to have
 Blood Splatter take effect around our Summon Bone Golem.
 - 2 points into Crimson Flood: Increases the area of effect of our Blood Splatter.
- 1 point into Blood Infusion: This grants any minion hit with Blood Splatter to deal 15% more damage.
- 1 point into Arcane Fortress: Causes Rip Blood to now give you Ward, rather than health. Only get when you have Twisted Heart of Uhkeiros.
The skill points go above the stadard 20 points because we have converted ![]() Rip Blood to Necrotic damage.
From the implicits on Twisted Heart of Uhkeiros, this gives the skill +1, because it is now considered a Necrotic Spell
after we spec into Rip Spirit.
Rip Blood to Necrotic damage.
From the implicits on Twisted Heart of Uhkeiros, this gives the skill +1, because it is now considered a Necrotic Spell
after we spec into Rip Spirit.
In this section, we will break down each skill and highlight the key passives we have selected to make the skill perform as best as possible in the build. While some of these skills do allow for some variation to exist depending on your own custom choices, we recommend utilizing the skill trees as presented until you have a strong understanding of the build itself.
Summon Bone Golem

![]() Summon Bone Golem is going to be the sacrificial lamb in our build. This monster will cast
Summon Bone Golem is going to be the sacrificial lamb in our build. This monster will cast ![]() Bone Shatter
as fast as you can cast
Bone Shatter
as fast as you can cast ![]() Rip Blood. Thanks to the Betrayal node, this happens 120% of the time. Bone Shatter will
also pierce, ensuring any enemy unfortunate enough to be in his vicity will be pelted by the fractures of his unholy body. To add insult to injury,
the Bone Golem has a 40% chance to retaliate with the same Bone Shatter when he is attacked. He has incredible survivability between
passives and his base Health, sporting somewhere in the vicinity of 10,000 Health. Hunger will heal both him and you for about 100 Health per
hit, including the hits from Bone Shatter. This obviously outpaces the damage you are dealing to him with Rip Blood.
Rip Blood. Thanks to the Betrayal node, this happens 120% of the time. Bone Shatter will
also pierce, ensuring any enemy unfortunate enough to be in his vicity will be pelted by the fractures of his unholy body. To add insult to injury,
the Bone Golem has a 40% chance to retaliate with the same Bone Shatter when he is attacked. He has incredible survivability between
passives and his base Health, sporting somewhere in the vicinity of 10,000 Health. Hunger will heal both him and you for about 100 Health per
hit, including the hits from Bone Shatter. This obviously outpaces the damage you are dealing to him with Rip Blood.
Order of Skill Points
- 5 points into Amalgam of Mages: Gives
 Bone Shatter 75% more damage.
 - 5 points into Bone Hail: Adds an addition 25% chance to retaliate with Bone Shatter and adds another 75% more damage.
- 1 point into Betrayal: This triples the chance to retaliate with Bone Shatter when he is attacked by you.
- 1 point into Flight of the Femurs: Allows Bone Shatter to pierce and increases the projectiles speed and range.
- 4 points into Amalgam of Sentinels: Massively increases the Golems Health and Armor.
- 1 point into Unnatural Speed: Increases the Golem's Movement Speed, and the other minions in his vicinity.
- 5 points into Hunger: Allows the Golem to heal you and itself, on every hit (spell or melee) it lands.
Please note, you may not have as many skill points to use until you have the required prefix on the helmet. Split the difference if none can be found. With a +1, a player should prioritize Hunger over Amalgam of Sentinels. If the player has none at all, the player must remove 1 point from Amalgam of Sentinels and 1 from Hunger. The armor from this affix also plays a major roll for our Minions.
In this section, we will break down each skill and highlight the key passives we have selected to make the skill perform as best as possible in the build. While some of these skills do allow for some variation to exist depending on your own custom choices, we recommend utilizing the skill trees as presented until you have a strong understanding of the build itself.
Summon Skeletal Mage

Our ![]() Summon Skeletal Mage will be crucial to tearing off multiple stacks of Armor from an enemy thanks to our passive Aegisfall.
They will be in the rear with you and should never be anywhere near your Bone Golem. The AI for the
Skeletons is better than the Golem and you will have less issues keeping them by your side. They will also kill on their own accord, but
are not our main source of dps, just a way to increase the DPS of our Bone Golem's damage through Shred Armor. It
would not be uncommon for your Undead Spell Casters to slay a non-rare pack on their own, amplifying clear speeds. Be sure to use this skill
as your movement ability, as it will summon and transport all of your minions with you.
Summon Skeletal Mage will be crucial to tearing off multiple stacks of Armor from an enemy thanks to our passive Aegisfall.
They will be in the rear with you and should never be anywhere near your Bone Golem. The AI for the
Skeletons is better than the Golem and you will have less issues keeping them by your side. They will also kill on their own accord, but
are not our main source of dps, just a way to increase the DPS of our Bone Golem's damage through Shred Armor. It
would not be uncommon for your Undead Spell Casters to slay a non-rare pack on their own, amplifying clear speeds. Be sure to use this skill
as your movement ability, as it will summon and transport all of your minions with you.
Order of Skill Points
- 1 point into Splintered Dominion: This gives all of our mages a chance to split shot.
- 4 points into Argonautic Speed: This increases the cast rate of our Mages. (only take 2 points at start, fill in the other 2 when all nodes are completed.)
- 2 points into Ossein Frenzy: This gives our mages a chance to gain Frenzy.
- 1 point into Forbidden Arcana: Our mages get more damage, based on our Maximum Mana.
- 1 point into Grave Passage: This will now be a movement skill, teleporting us to the position where we summon the mage.
- 2 points into Death's Cavalry: We can now transport with up to 6 minions, you and the 6 are transported with you.
- 5 points into Celer Mortis: The base critical strike chance and movespeed of our Mages increases drastically.
- 3 points into Grey Merchant: The critical strike multiplier for Mages is increases, and they gain 15% of thier health upon critically striking (this will be often).
- 1 point into Order of Death: We gain an additional Skeletal Mage to our pool.
Alternate Scaling: As a player increases the Corruption of an area, you may notice the ![]() Summon Skeletal Mage begin to die
rather quickly when in combat if not geared with enough Minion Life. One could choose to instead scale
Summon Skeletal Mage begin to die
rather quickly when in combat if not geared with enough Minion Life. One could choose to instead scale ![]() Transplant with a generic
Bone Armor node while maxing Apostasy. When tested, this did not feel very good, as Traversing without
your Golem will always feel bad. Your personal damage is fairly low, making Transplant awkward at best as an option for movement. It is best
to just have the minions as additive armor shred and use the movement skill with
Transplant with a generic
Bone Armor node while maxing Apostasy. When tested, this did not feel very good, as Traversing without
your Golem will always feel bad. Your personal damage is fairly low, making Transplant awkward at best as an option for movement. It is best
to just have the minions as additive armor shred and use the movement skill with ![]() Summon Skeletal Mage. However, if you decide you'd
like to try and use
Summon Skeletal Mage. However, if you decide you'd
like to try and use ![]() Transplant, we recommend taking the aformentioned nodes and working to max Cursed Exile with Reign of Blood
and Doom Bringer to capitalize on self damage. Be sure to convert your damage to Necrotic with Ethereal Body as
Necrotic Damage is scaled slightly better for us. An example is listed below.
Transplant, we recommend taking the aformentioned nodes and working to max Cursed Exile with Reign of Blood
and Doom Bringer to capitalize on self damage. Be sure to convert your damage to Necrotic with Ethereal Body as
Necrotic Damage is scaled slightly better for us. An example is listed below.

In this section, we will break down each skill and highlight the key passives we have selected to make the skill perform as best as possible in the build. While some of these skills do allow for some variation to exist depending on your own custom choices, we recommend utilizing the skill trees as presented until you have a strong understanding of the build itself.
Dread Shade
![]() Dread Shade is a massive increase to our
Dread Shade is a massive increase to our ![]() Summon Bone Golem damage output, but also his and our own health gain.
The massive increase to his attack speed will keep you and him healthy from Hunger.
Summon Bone Golem damage output, but also his and our own health gain.
The massive increase to his attack speed will keep you and him healthy from Hunger.
Order of Skill Points
- 2 points into Spectral Presence: Increases the Area your Shade can buff minions.
- 1 point into Lone Watcher: Eliminates decay on the minions the Shade is near.
- 3 points into Dying Coven: Increases Attack and Cast Speed buff.
- 4 points into Grim Fate: Increases Shade's Damage buff and Area.
- 3 points into Lingering Doom: Increases Necrotic Damage buff.
- 1 point into All For One: Adds a massive damage boost, but now only effects the target minion of
 Dread Shade which should always be the Golem.
 - 1 point into Egoism: Causes the Golem to always crit; this includes Bone Shatter that we are triggering through
 Rip Blood.
 - 3 points into Flesh Harvest: Increases Shade's buff based on minion's missing health.
- 1 point into Blind Fury: Increases the Attack Speed of the Golem, which increases his rate of heal through Hunger.
- 1 point into Wisdom of the Dead: Decreases the Mana cost of Dread Shade.
- 1 point into Martyrdom: This gives the target minion of Dread Shade 25 Armor per Vitality you have.
The skill points go above the stadard 20 points because we have ![]() Dread Shade is a base Necrotic Spell.
From the implicits on Twisted Heart of Uhkeiros, this gives the skill +1.
Dread Shade is a base Necrotic Spell.
From the implicits on Twisted Heart of Uhkeiros, this gives the skill +1.
In this section, we will break down each skill and highlight the key passives we have selected to make the skill perform as best as possible in the build. While some of these skills do allow for some variation to exist depending on your own custom choices, we recommend utilizing the skill trees as presented until you have a strong understanding of the build itself.
Bone Curse
![]() Bone Curse is of the of the few ways we can effectively kill enemies. Upon casting Bone Curse, we are empowered
with the node Cursed Limbs for 3 seconds. Because
Bone Curse is of the of the few ways we can effectively kill enemies. Upon casting Bone Curse, we are empowered
with the node Cursed Limbs for 3 seconds. Because ![]() Blood Splatter has a hit component, it will count for applying
Bone Curse. We also utilize Bone Curse to empower our minions. With both Merciless and Barbed Construct,
our Golem will do double his Physical Damage when Cursed, lasting 4 seconds.
Blood Splatter has a hit component, it will count for applying
Bone Curse. We also utilize Bone Curse to empower our minions. With both Merciless and Barbed Construct,
our Golem will do double his Physical Damage when Cursed, lasting 4 seconds.
Order of Skill Points
- 1 points into Crippling Anguish: This is a pathing node.
- 2 points into Cultist's Fervor: Increases the Cast Speed and decreases Mana cost of Bone Curse.
- 5 points into Merciless: Adds 50% more Physical Damage to minions hit with Bone Curse.
- 4 points into Spiked Bones: Gives effected minions the ability to reflect 45 damage to enemies when attacked.
- 1 point into Barbed Construct: Doubles the effect of the previous nodes for the Bone Golem exclusively.
- 3 points into Cursed Limbs: Allows the player, after casting Bone Curse manually, to gain Curse on hit for 3 seconds.
- 3 points into Brittle Bones: Instantly Kills any enemy with 12% health or less.
- 1 point into Conflation: Increased the area of the curse when casted by 30%.
Build Mechanics and Playstyle
The Golem Betrayal build will approach almost every single encounter the same way with a few exceptions, bar manually evading extremely high damage mechanics. However, the build is very defensive in its nature with well-rounded Resistances, capped Crit Avoidance, about 450% Ward Retention, and Armor Mitigation nearing 60%; all high end content should be handled quite well. Mana cost reduction should be collected in our weapon, and with that, there should be no mana issues in the build either. Our Health should rarely be other than full, and if it is not max, just attack the Golem a few times for an instant return of Health and a massive gain in Ward. The Golem sometimes decides he wants to go frolic in some random direction, so be prepared to manually reel him back with the "A" key.
A special note about this Golem Betrayal build; it is played without the movement skill ![]() Transplant. That being said, going anywhere as a Necromancer without your minions
is typically not in your best intrest. Although using the experimental affix that would port your minions with you was an option, the loss
of significant amounts of Shred from
Transplant. That being said, going anywhere as a Necromancer without your minions
is typically not in your best intrest. Although using the experimental affix that would port your minions with you was an option, the loss
of significant amounts of Shred from ![]() Summon Skeletal Mage was detrimental to our damage output. The only upside to using
Summon Skeletal Mage was detrimental to our damage output. The only upside to using
![]() Transplant was to automate
Transplant was to automate ![]() Bone Curse and add
Bone Curse and add ![]() Bone Armor (Bone Armor being the only true upside to this). However,
traditional movement makes it significantly easier to manipulate the movement of our Bone Golem, thus no Transplant. We decide to go with
Bone Armor (Bone Armor being the only true upside to this). However,
traditional movement makes it significantly easier to manipulate the movement of our Bone Golem, thus no Transplant. We decide to go with ![]() Summon Skeletal Mage
to alleviate both problems, keeping our minions with us and having access to a movement skill.
Summon Skeletal Mage
to alleviate both problems, keeping our minions with us and having access to a movement skill.
Noteable Defensive Mechanics
The Necromancer recieves a significant portion of defense from gear. This can be mildly over looked for sometime, as long as you have the core component uniques (as listed in the Gear section). However, you will receive damage in this game. Because of the way the build is played, you may have less than ideal positioning from time to time, implying you will get hit. Capping our Reduced bonus damage from Critical Strikes is key to not getting 1-shot; at the same time, pushing your Armor will help this as well. Resistances should not be overlooked, as it is free EHP, as ample slots and Idols are reserved for such Resistances. In all, if you are not attacking your Golem, you are not healing and not generating Ward. You should always be attacking your Golem, even from pack to pack, to keep up Ward.
Equipment and Gear Affixes
For this build, we will be focusing on several main affixes for each piece of non-unique gear, as well as working towards acquiring the specific uniques needed to make this build operate correctly. Our equipment will focus on these specific affixes for the Implicits and Modifier stats.
| Gear Slot | Implicits | Modifiers |
|---|---|---|
| Sceptre | Melee Damage Spell Damage Increasesd Minion Damage |
Prefixes Increased Cast Speed Increased Spell Damage/-# Spell Mana Cost Suffixes +Minion Melee Damage/+Minion Spell Damage +Minion Spell Damage/+Minion Bow Damage |
| Off-Hand | Intelligence Ward Per Second Ward Retention |
Prefixes Increased Cast Speed Increased Minion Damage Suffixes Needed Resistances |
| Head | Armor Spell Damage Minion Spell Damage |
Prefixes Levels to Bone Golem Vitality Intel Suffixes Health % Incrased Armor |
| Amulet | Death Rattle | - |
| Chest | Armor % of Damage Leeched as Health % of Minion Damage Leeched as Health |
Prefixes Increased Minion Health Intel Suffixes Health % Incrased Armor |
| Belt | Ward Decay Threshold Potion Slots |
Prefixes Increased Minion Damage Increased Minion Health Suffixes Hybrid Health Reduced Damage taken from Critical Strikes |
| Ring | Minion Damage Minion Health Minion Crit Multiplier |
Prefixes Increased Minion Health Intelligence Suffixes Needed Resistances |
| Ring | Ribbons of Blood | - |
| Gloves | Armor Armor Mitigation applies to Damage over time |
Prefixes Increased Cast Speed Intelligence Suffixes Hybrid Health Reduced Damage taken from Critical Strikes |
| Feet | Movement Speed Reduced Damage taken from Critical Strikes |
Prefixes Movement Speed Intelligence Movement Speed Suffixes Hybrid Health Increased Armor |
| Relic | Twisted Heart of Uhkeiros | - |
A loot filter made specifically for the gear table above may be copied by pressing the button below. Once in the Loot Filter portion of the in-game menu, choose the "Paste Clipboard Contents" option to import the code.
Copy Loot Filter to Clipboard
Uniques
Now, let's look at the required uniques for this build.
Twisted Heart of Uhkeiros
Twisted Heart of Uhkeiros: The main driver of this build, and the build is difficult to run without it. This item will convert up to 13% of
our current health into ward. Since we will likely instantly heal this 8% through ![]() Rip Blood, we will constantly be on full life, with ward
covering us as well. It would not be uncommon to see your self in the 6,7 or 8k ward range in a fight. This unique can be aquired from
the Monolith boss "Emperor of Corpses" in the "Reign of Dragons" Timeline. If found with Legendary Potential, adding the prefix of Increased Cast Speed would be ideal.
Rip Blood, we will constantly be on full life, with ward
covering us as well. It would not be uncommon to see your self in the 6,7 or 8k ward range in a fight. This unique can be aquired from
the Monolith boss "Emperor of Corpses" in the "Reign of Dragons" Timeline. If found with Legendary Potential, adding the prefix of Increased Cast Speed would be ideal.
Ribbons of Blood
Ribbons of Blood: This ring serves as a massive defensive bonus to both you and your minions. Your ![]() Summon Bone Golem will gain
a base of up 7 physical damage for his melee attacks and leech up to 4% of these melee attacks as health. All minions will benefit from the
increased leach rate and Critical Strike Immunity. For you, it can increase your health by up to 10% and supply up to 45% fire resistance.
This unique can be aquired from the Monolith boss "The Abomination" in the "Fall of the Outcasts" Timeline. If found with Legendary Potential, it would be best
rolled with Intelligence, Minion Damage, or Minion Health (in that order).
Summon Bone Golem will gain
a base of up 7 physical damage for his melee attacks and leech up to 4% of these melee attacks as health. All minions will benefit from the
increased leach rate and Critical Strike Immunity. For you, it can increase your health by up to 10% and supply up to 45% fire resistance.
This unique can be aquired from the Monolith boss "The Abomination" in the "Fall of the Outcasts" Timeline. If found with Legendary Potential, it would be best
rolled with Intelligence, Minion Damage, or Minion Health (in that order).
Death Rattle
Death Rattle: This amulet has a very wide roll value for its most important stat. It can give up to 65% to Minion Critical Strike Multipliers. Adding an insane amount of crit damage to our minions attacks. This will also cause your minions to take increased damage, so try to keep use one with a lower value if possible. It will also add to our already impressive Intelligence stat. This item can be target farmed in the Timeline called "The Age of Winter" at the "Unique or Set Amulet" echo rewards. If you find this item with Legendary Potential, adding the prefix of Minion Damage or Minion Health would be best.
Idols
Idol slots are gained throughout the campaign, unlocking small bonuses and unique affixes for the player to discover and augment their builds with. The Idol screen consists of a grid system for the player to fill out with different sized idols, eventually filling in every part of the grid. As the Idol shape increases (1x1, 1x2, 1x3, 1x4, etc.) it will open up different affixes for you to use. This can be a great way to add some more customization to your build.
For this particular build, we will be focusing on few different idols. We will be using (4) 3x1 Large Immortal Idols all with the prefix of "Increased Health". For the suffix, we should be looking for "+# Health", you can get away with "% Critical Strike for you and your minions" or even just "Ward retention". If you are suffering from lack of Resistances, you can pick up either Poison, Physical, or Necrotic Resistances from these same Idols. We will also utitlize (2) 1x3 Grand Bone Idols, which must have the prefix of "Critical Strike Chance for Skeltons"; for both prefixes we are looking for "Physical Resistance", this suffix will be vital to capping your physical resistance. The remaining Idol(s) can be used to boost health or use it to repair some remaining Resistances.
Blessing
Blessings are permanent buffs that are applied to your character. These come in two different powers, Standard and Grand. Grand blessings are significantly stronger than the Standard Blessings. In total, there are 10 Blessing Slots, one for each Monolith Timeline. When you complete a Monolith and defeat the final boss you will be awarded a choice of three blessing with a random value. For the purpose of this guide, we are highlighting five major slots that can be filled with our recommendations, leaving the others for some personal preference.
| Blessing Name | Affix | Timeline |
|---|---|---|
| +#% Void Resistance | The Black Sun | |
| +#% Lightning Resistance | Ending the Storm | |
| #% Increased Armor | The Age of Winter | |
| +# Armor | Spirits of Fire | |
| + Necrotic Resistance | Reign of Dragons |
The Blessings listed above cover the most important slots for this build, with the remaining Blessing Slots being filled with whatever the player may be lacking for stats.
Changelog
- 15 Jul. 2024: Changed from Bow Minions to Mages to add movement skill. Minimal Functionality changes. EHP increased and Small DPS Gain through Gear Changes.
- 21 Jan. 2024: Loot Filter added.
- 30 Nov. 2023: Guide added.

EMP1241 is a Marine veteran who is currently pursuing higher education in Aerospace Engineering. He spends much of his time outside of his studies playing ARPGs, Builders, and MOBAs. He is frequently seen on his Twitch channel discussing science, space, or video games.
- Last Epoch Season 4: Shattered Omens Adds Corruption Crafting, a New Pinnacle Boss, and More!
- Delaware Courts Just Proved Last Epoch’s Real Risk Isn’t Failure, But Success
- Last Epoch’s New Paradox: From “All Future Content Free” to Paid Classes
- Last Epoch Confirms Paid DLC Classes With Free Expansion
- Last Epoch Season 3 Overhauls Skills, UI, Monster Behavior & More
- Last Epoch Season 3 Adds Smarter Minions & Big Changes
- Lich & Necromancer Get New Skill, Buffs, and Dark New Builds in Last Epoch!
- Last Epoch Season 3 Explores the Ancient Era!