Life Staff AoE Healing PvP Build for New World
The following is a PvP Area of Effect healing build for Life Staff in New World. That takess advantage of healing over time abilities from the Life Staff and Void Gauntlet to contribute significant overall healing to all members in an army. While the build lacks defensive utility, it makes up for it with potent healing effects. This build is beginner friendly and one of the most easy to master.
Build Overview
The Area of Effect (AoE) PvP healing build is a more simplistic Life Staff build that solely focuses on pumping as much healing out as possible. It's a solo focused gameplay style that acts like a glass healing cannon.
You should be opting for lower amounts of Constitution and trading it for extremely high Focus in order to maximize your healing effectiveness. As a AoE Healer, your positioning is everything. You need to make sure you are positioned behind your group members, and more importantly, away from your opponents.
This build excels at healing output, but lacks defensiveness. Its ease and lack of complexity makes it a very beginner-friendly build. While it is needed in large-scale PvP scenarios, there is only room for a few of this role in an army, and it's overshadowed by targeted group healers in the PvP META.
Life Staff Build
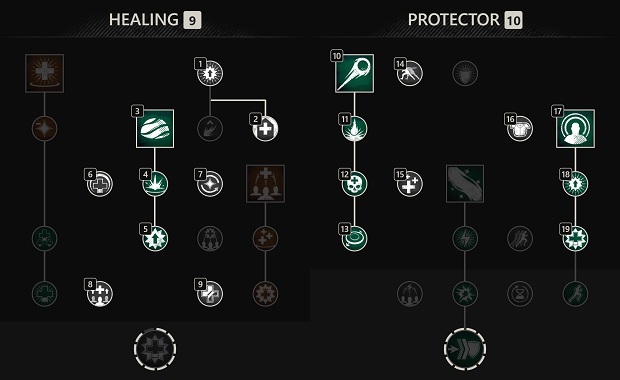
This build relies on healing over time abilities to heal large groups. It is best paired with ![]() Refreshing
due to high cooldown abilities, and by using the
Refreshing
due to high cooldown abilities, and by using the ![]() Heceta Life Staff artifact, allowing you to spam heavy attacks when your abilities
are on cooldown to support your group members even further with addtional buffs. This build is best used for large-scale PvP situations, such
as Outpost Rush or Wars.
Heceta Life Staff artifact, allowing you to spam heavy attacks when your abilities
are on cooldown to support your group members even further with addtional buffs. This build is best used for large-scale PvP situations, such
as Outpost Rush or Wars.
 Sacred Ground — Can be freely placed on the ground to heal large "clumps" of players where the highest
concentration of players are located. It is best to preemptively place it to counter enemy AoE damage and crowd control.
It also amplifies the healing received of any player in the zone through
Sacred Ground — Can be freely placed on the ground to heal large "clumps" of players where the highest
concentration of players are located. It is best to preemptively place it to counter enemy AoE damage and crowd control.
It also amplifies the healing received of any player in the zone through  Anointed.
  Orb of Protection — Projectile that is aimed at friendly players and provides a small burst of healing
with long healing over time effects and a 10% fortify to reduce damage taken. Aim this on the most concentrated "clumps" of
players to provide a long-duration heal over time to large groups. The more players with the heal will increase
the amount of times you will receive Mending Protection.
Orb of Protection — Projectile that is aimed at friendly players and provides a small burst of healing
with long healing over time effects and a 10% fortify to reduce damage taken. Aim this on the most concentrated "clumps" of
players to provide a long-duration heal over time to large groups. The more players with the heal will increase
the amount of times you will receive Mending Protection. Beacon — Projectile that is aimed and will stick to the first player or surface it touches.
This can be used on the ground when large damage is occurring, but it is best placed on front-line melee players
so that the healing area continues to move to the action.
Beacon — Projectile that is aimed and will stick to the first player or surface it touches.
This can be used on the ground when large damage is occurring, but it is best placed on front-line melee players
so that the healing area continues to move to the action.
Secondaries
In almost all cases with this build you will be taking the Rapier for mobility and survivability. But if you are looking for an alternative that also increases healing output you can use the Void Gauntlet.
Rapier (Defensive Option)

Rapier is the premier PvP secondary as it offers defensiveness and mobility with all of its abilities
to help escape enemies and reposition. ![]() Riposte will stun targets and completely block and incoming attack.
Riposte will stun targets and completely block and incoming attack.
![]() Evade allows for dodging abilities, a quick invulnerability frame, and a way to get haste and stamina back.
Evade allows for dodging abilities, a quick invulnerability frame, and a way to get haste and stamina back.
![]() Fleche dashes a far distance to escape and quickly reposition.
Fleche dashes a far distance to escape and quickly reposition.
Void Gauntlet (Preferred Option)
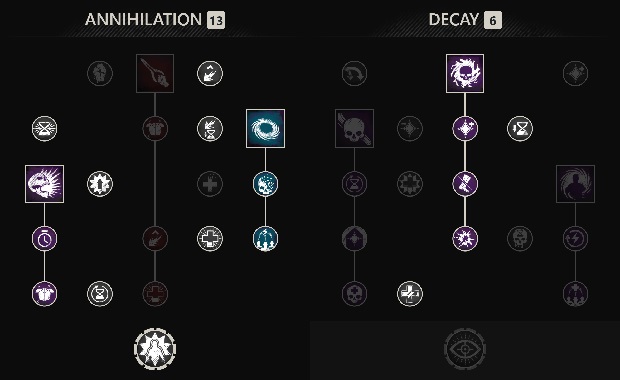
While this is the preferred AoE healing option, do not underestimate your need for defensiveness while playing with very low Constitution. Often times it is better to play with 50-100 Constitution and use a rapier so that you can have an escape. Void Gauntlet can be dangerous if you are dove on and locked down while playing with little health. If using a Void Gauntlet prioritize positioning and timing your healing abilities to stay out of combat.
Void Gauntlet offers healing over time and burst healing through ![]() Orb of Decay. It allows you to root
enemies in place with
Orb of Decay. It allows you to root
enemies in place with ![]() Petrifying Scream for defensive utility and to set up kills for teammates. You can also use
Petrifying Scream for defensive utility and to set up kills for teammates. You can also use ![]() Oblivion
to increase damage output, stamina and mana regeneration, and remove enemy buffs.
Oblivion
to increase damage output, stamina and mana regeneration, and remove enemy buffs.
Attributes
100 Constitution will be your baseline for having optimal healing output. With that being said, if you are not comfortable playing this low, then you can play 150 or even 200 Constitution. The rest of your attributes should go directly into Focus to maximize your heals.
Gearing
| Slot | Perks | Gem | Weight | Attribute | Source |
|---|---|---|---|---|---|
| Life Staff ( |
|
- | Magnify | Artifact | |
| Rapier | - | Focus | Crafted/BoE | ||
| Helmet ( |
Heavy | Magnify | Crafted | ||
| Gloves ( |
Heavy | Magnify | Crafted | ||
| Chest ( |
Light | Magnify | Artifact | ||
| Pants | Light | Focus | Crafted/BoE | ||
| Boots | Light | Focus | Crafted/BoE | ||
| Amulet | - | Focus | Crafted/BoE | ||
| Ring | - | Focus | Crafted/BoE | ||
| Earring | - | Focus | Crafted/BoE |
Please note:: If you have access to artifacts, it is most effective to use the ![]() Featherweight light chest, allowing you to then wear two pieces of the Heavy Frigid Dawn
set for maximum defensive capabilties. This is the current meta for healers in large-scale PvP content, such as OPR and wars.
Featherweight light chest, allowing you to then wear two pieces of the Heavy Frigid Dawn
set for maximum defensive capabilties. This is the current meta for healers in large-scale PvP content, such as OPR and wars.
Perk Breakpoints
When running ![]() Freedom you should run 4 stacks for the most
optimal crowd control reductions.
Freedom you should run 4 stacks for the most
optimal crowd control reductions.
In PvP combat it is best to run 5 stacks of ![]() Enchanted Ward for maximum
damage reduction to light and heavy attacks.
Enchanted Ward for maximum
damage reduction to light and heavy attacks.
![]() Refreshing is valuable, and it's important to ensure you use the full 4 stacks across all of your pieces
to minimize the cooldowns of your healing abilities as much as possible.
Refreshing is valuable, and it's important to ensure you use the full 4 stacks across all of your pieces
to minimize the cooldowns of your healing abilities as much as possible.
Gem Optimization and Consumables
For more specific information on optimizing your gems and consumables, please refer to our dedicated Life Staff Gems and Consumables guide.
Heartrune
![]() Minor Heartrune of Stoneform is the most defensive and useful option a
healer has. It allows you to freely break out of crowd control effects, become
immune to stagger, and obtain defensive buffs.
Minor Heartrune of Stoneform is the most defensive and useful option a
healer has. It allows you to freely break out of crowd control effects, become
immune to stagger, and obtain defensive buffs.
![]() Stalwart Heartrune of Stoneform is the best pick as it not
only gives a 10% Fortify, but a healing over time effect as well. This
is our best option after the changes to Fortify in Season One.
Stalwart Heartrune of Stoneform is the best pick as it not
only gives a 10% Fortify, but a healing over time effect as well. This
is our best option after the changes to Fortify in Season One.
Heartrune Usage Tips
Your Heartrune will be used similarly in PvP and PvE scenarios. As such, please refer to the Heartrune section of our Life Staff guide for tips on how it can be used most effectively.
Rotation
The theoretical healing rotation for this build is as follows:
- (If Chosen) Stack
 Intensify 1-3 stacks depending on combat
 - Dodge to receive
 Bend Light
 - Cast Orb of Protection to obtain the Mending Protection buff, fortify, and apply healing over time.
- Cast Sacred Ground to increase the target's healing received through Anointed.
- Cast Beacon to provide additional AoE healing coverage.
- Light attack as a filler ability when cooldowns are not up, or not needed, this provides healing through
 Blissful Touch.
 - Repeat
Gameplay Tips
When using the Life Staff in PvP and PvE there are many similar nuances to a healer's mechanics and gameplay decisions. To learn more about how you can improve your gameplay, use certain secondary weapons, or additional information on specific abilities, please refer to the gameplay section of the Life Staff guide.
FAQ
For more information on the most frequently asked Life Staff questions please refer to the FAQ section of the Life Staff guide for answers on PvP and PvE topics!
Changelog
- 04 Feb. 2025: Guide updated with additional perk recommendations.
- 23 Jan. 2025: Guide updated with new recommendations, including new Heceta life staff artifact.
- 22 Oct. 2023: Guide updated for expansion.
- 28 Mar. 2023: Updated builds, gearing, gems, and heartrune.
- 18 Jan. 2023: Guide added.
Savvvo is a full-blown MMORPG try-hard who overthinks every build, min-maxes every stat, and theorycrafts like his life depends on it. If there’s a meta, he’s dissecting it. If there isn’t, he’s creating one.
You can take a closer look at his guides and content on YouTube.
- New World Aeternum 2026 Roadmap Revealed
- Can New World Be Saved? Offers Are Starting to Pop Up.
- The Last Day of New World: Aeternum
- New World Server Mergers (Again)
- What Else Was Planned for New World: Aeternum?
- Global Storage Search is Now Live in New World: Aeternum
- Daggers Are Officially Live in New World: Aeternum
- New World Team Sneaks in New Dual Dagger Skill Tree In-Game