Sword and Shield Guide and Builds for New World
Welcome to our guide for Sword and Shield, a weapon in New World. Within these pages, you will find everything required to understand how best to play with this weapon in both PvE and PvP.
- 10. Rotation and Gameplay
- 11. Rotation and Priority List
- 12. Gameplay Tips
- 13. FAQ - Sword and Shield
- 14. What Armor Weight Should I Be to Tank?
- 15. What Should I Use For Cooldown Reduction?
- 16. What Kind of Shield Should I Use?
- 17. What Gems Do I Put In My Gear?
- 18. What Magic Damage Should I Use For Runeglass, Attunement, and Chain Damage?
Sword and Shield Overview
The Sword and Shield are the only "dual" wielded weapons in New World. They are the primary main tanking option for PvE. It is equipped with incredibly utility and defensiveness both through its abilities and passives. While being a tank is its primary use, it can be built as a lethal backline assassin that takes advantage of its fantastic crowd-control combinations. The weapon is overall very versatile and allows for the player to adapt it to many environments.
Sword and Shield Strengths and Weaknesses
Highly defensive in any build
Very mobile if built properly
Great crowd-control
Necessary for PvE
Sub-par damage output
Can be very immobile depending on build
Cooldown reliant
Unforgiving if mistakes are made
Lacks AoE damage
Sword and Shield Builds
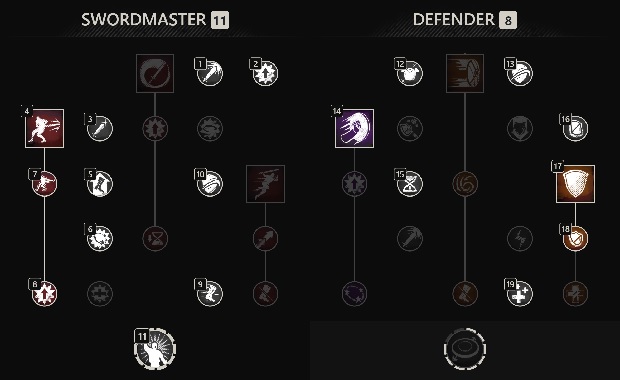
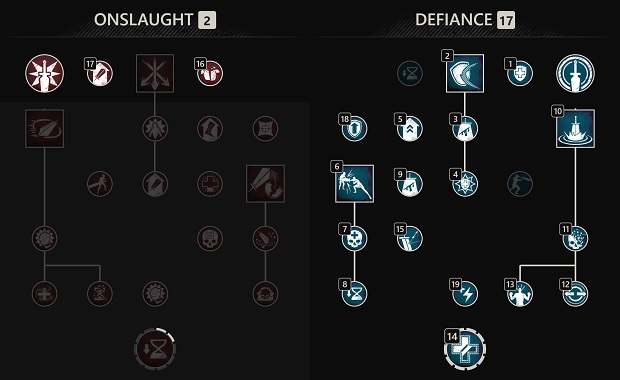
Leadership - Shield Bash (PvE Tank)
 Upheaval — An upward slash that can deal massive damage to your opponent. This ability
has GRIT.
 Shield Bash — This ability is a taunt and CC tool. You do not need its passives as
its damage is not important and it will always taunt the targets it hits.
 Defender's Resolve — Potent damage reduction tool that should be maintained as
needed, but it also acts as an AoE taunt. Use this to maintain aggro.
This is build embraces optimal defensive passives and an ability loadout that add even more
defensiveness, as well as, damage, cooldown reduction, and threat management abilities. It can
be used in PvP if you want to be a point tank, but it would be suggested to take ![]() Leaping Strike
instead of
Leaping Strike
instead of ![]() Upheaval.
Upheaval.
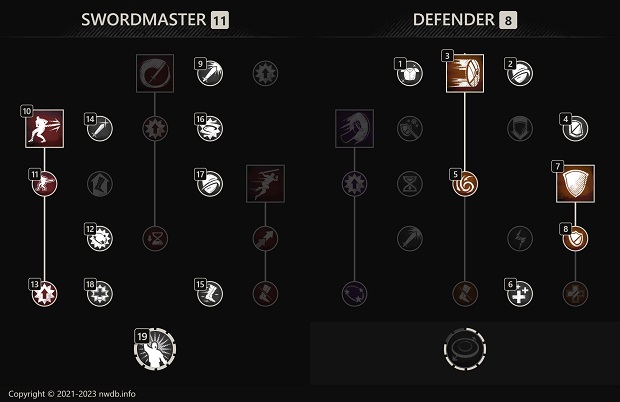
Leadership - Shield Rush (PvE Tank)
 Shield Rush — This ability will apply a weaken to your targets to make them
deal less damage, and it will apply a fortify with its perk.
Play a build like this allows you to have a consistent way to reduce incoming damage from
one or more enemies, and have a constant fortify. If you prefer having another taunt option
use the ![]() Shield Bash build.
Shield Bash build.
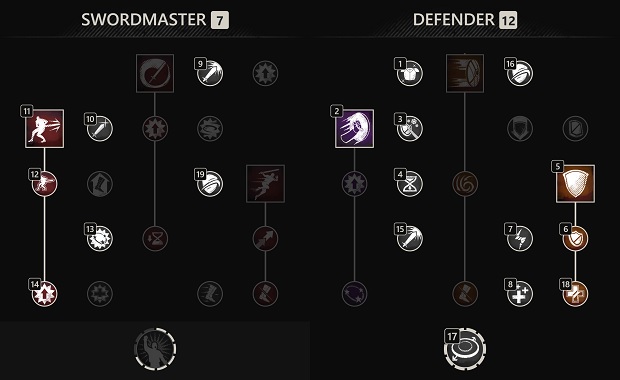
Defensive Formation Tank
Play this in PvE if you want to take advantage of ![]() Defensive Formation and be the most
defensive tank possible.
Defensive Formation and be the most
defensive tank possible.
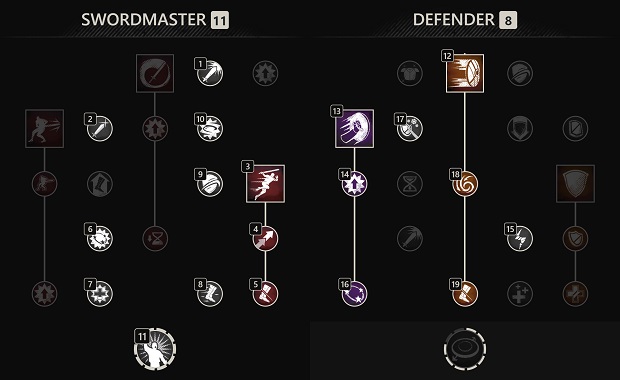
PvP
Shield Rush
 Leaping Strike — This will be used to initiate a CC combo, or to just get yourself into combat. It will
deal a large amount of damage if you hit an enemy from behind, and add a slowing effect. This can also be used for a
quick escape.
 Shield Bash — This is needed for any chain CC combos. It is powerful ability for locking down a
priority target, or interrupting abilities due to its quick casting speed.
 Shield Rush — This will provide a stagger that initiates a CC chain and quick damage. It also will
add an AoE slowing effect. So when used on a clump, it can result in great utlity to secure several kills.
Second Weapon
Hatchet
For a thorough breakdown on the Hatchet and how it can be used, please refer to our Hatchet guide.
PvP
This is the standard build option in PvP. It provides survivability and CC escape with ![]() Berserk and
Berserk and
![]() Social Distancing. It also has single-target CC with
Social Distancing. It also has single-target CC with ![]() Feral Rush and
Feral Rush and ![]() Social Distancing to
lockdown players who are trying to escape. This is commonly seen as a utility secondary in PvP that is only
used for its abilities. It can be paired with CC for high damage bursts.
Social Distancing to
lockdown players who are trying to escape. This is commonly seen as a utility secondary in PvP that is only
used for its abilities. It can be paired with CC for high damage bursts.
PvE
This will give you a secondary taunt option and a way to have extra survivabilty with ![]() Defy Death.
Defy Death.
War Hammer
For more detailed information on War Hammer usage and other aspects of its gameplay, please refer to our War Hammer guide.
The War Hammer paired with Sword and Shield in PvP provides a player with an arsenal of crowd-control that can set up single-target combos that prevent a player from moving and guarantee a kill.
In PvE, this secondary can be very effective in grouping enemies together to gather threat, and providing AoE crowd-control.
Greatsword
PvP Dive
This is a great assassin build that can be used for surprise initiations with ![]() Leaping Strike. You
can then get a target caught in a CC chain ending with
Leaping Strike. You
can then get a target caught in a CC chain ending with ![]() Shield Bash. This then opens up a major single-target
damage opportunity with the Hatchet to burst down priority targets.
Shield Bash. This then opens up a major single-target
damage opportunity with the Hatchet to burst down priority targets.
PvE Tank
This provides a high damage secondary weapon with many defensive buffs and additional taunting options. It can be used as a tanking secondary weapon, or in some cases it can be used a primary tanking weapon that will spam heavy attacks and rotate through its abilities. It has a passive block while charging heavy attacks and has many damage reduction options with self-healing capabilities.
Great Axe
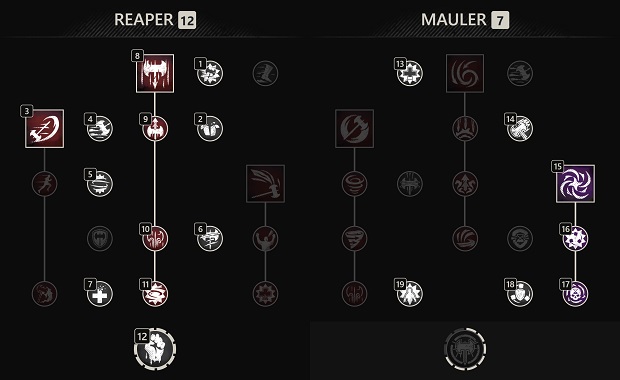
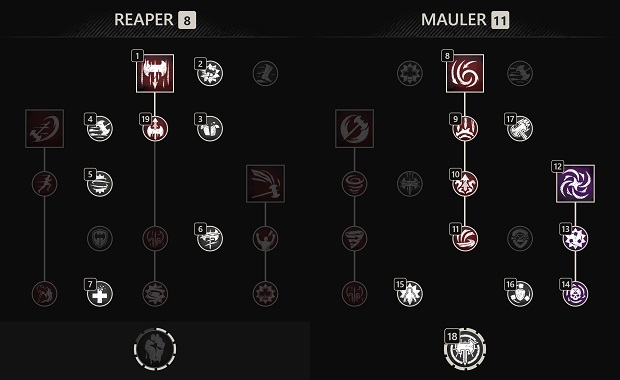
Reap Bloodlust PvP
Use this while in light armor build when playing in a dive team, or a heavier setup where you are wanting more crowd-control. This is best for applying pressure to a single target.
PvE AoE Damage
This can be used with a Sword and Shield in PvE to group enemies together and deal fantastic AoE damage on non-boss enemies. It helps with clumping up enemies to maintain aggro and easily use an AoE taunt.
Spear
For more detailed information on Spear usage and other aspects of its gameplay, please refer to our Spear guide.
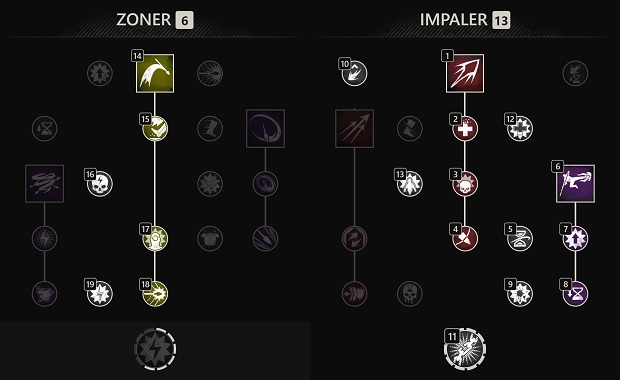
Javelin PvP
Sweep PvP
PvE Damage
It is commonly debated as to whether or not you should take ![]() Sweep or
Sweep or ![]() Vault Kick. Having
the AoE crowd-control for trash packs with a
Vault Kick. Having
the AoE crowd-control for trash packs with a ![]() Sweep is typically better than single-target stuns.
Sweep is typically better than single-target stuns.
Attributes
Strength Bruiser - PvE/PvP
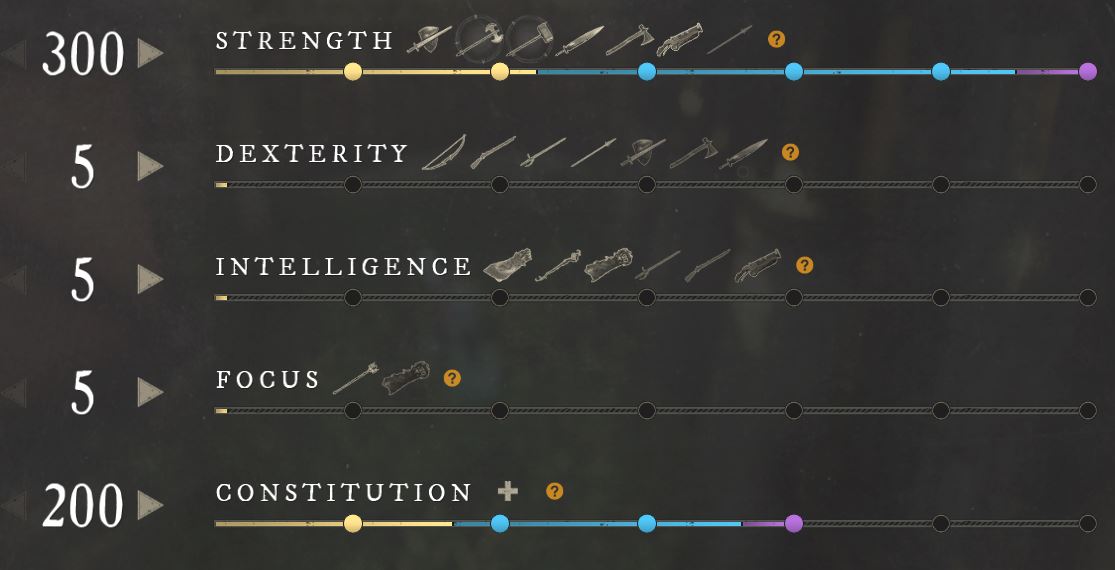
This is the standard tanking attribute distribution. You will not need more than 200 Constitution and this is plenty for any armor weight that you choose.
In PvP, this setup is best used when players are wanting to always have Grit, or when you play with a Great Axe or War Hammer
Max Damage - PvP
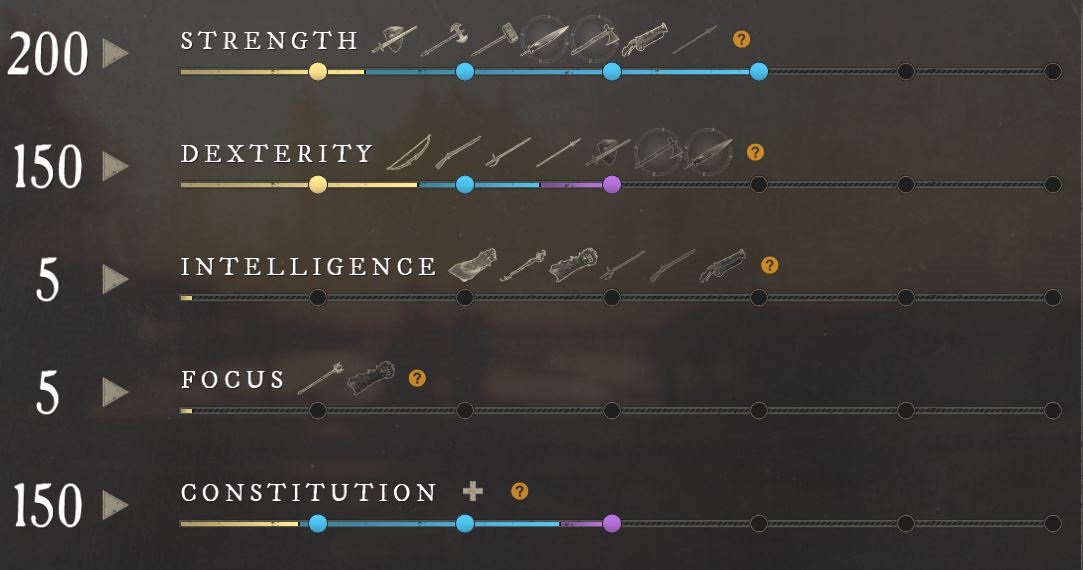
Whenever using the Sword and Shield as your primary weapon, or as a secondary with another weapon that scales with both Strength and Dexterity, this will be your most optimal attribute allocation. It provides some of the best damage passives and results in maximized sheet damage due to diminishing returns.
PvE
In competitive PvE environments, many tanks may play in lighter armor weights with as low as 50 Constitution. This is solely up to you as a player and depends on your skill and comfort. As always, you can lower your Constitution if you are looking to deal more damage.
Important Perks
Ability Perks
Most perks for the Sword and Shield are utility options and are not needed to play its builds.
 Empowering Leaping Strike — (Weapon - PvP) This perk is essential in any assassin PvP
build as it will provide a significant increase to your damage.
 Fortifying Shield Rush — (Utility) This perk can be a defensive utility option if you
are able to fit it into your build.
Weapon Perks
 Keenly Empowered — This will add great burst damage to any damage-oriented
build. The Sword and Shield have very high critical hit chance so this will be active frequently.
Keenly Empowered — This will add great burst damage to any damage-oriented
build. The Sword and Shield have very high critical hit chance so this will be active frequently.- Attunement Perks — This adds a great burst of damage to every attack.
 Refreshing Move — (PvE) Needed for tanks to maximize cooldown reduction.
- Bane Perks — (PvE) Use a Bane perk instead of
 Plagued Strikes in PvE.
Shield Perks
Your shield will allow you to apply 6 total perks to your weapon, making builds have incredibly high offensive or defensive potential.
Damage
 Keen — Free critical strike that does not have to be applied to your
primary weapon perks. It gives you more possible weapon damage.
 Vicious — Free critical strike damage that does not have to be applied
to your primary weapon perks. It gives you more possible weapon damage.
 Keenly Jagged — Adds a DoT to all critical strikes. It is not
incredibly strong, but will help with extra damage pressure.
Defensive
 Fortifying Shield Rush
 Sturdy — Lessens stamina damage from blocks, allowing you to block
more attacks.
 Sturdy Energy — Provides increased stamina regeneration when you
go below 30% stamin while blocking. This allows you to block more attacks.
 Refreshing — Max cooldown reduction.
 Hated — Extra threat.
- Shield Ward Perks — There are some physical or elemental protection perks that can only roll on shields that can add to your defensiveness.
PvP Perks
 Health — This provides free damage reduction against all sources and is one of the most beneficial PvP options.
 Shirking Heals — Incredible source of self-healing and allows for great survivability regardless of build.
 Shirking Fortification — Can be a great complement to
  Shirking Heals. Will add increased armor to
improve overall defensiveness.
 Freedom — This will allow you to play more aggressively by reducing the duration of crowd-control. You should
play with either 3 or 5 stacks.
 Elemental Aversion — Use this perk for elemental damage reduction from weapons like the Fire Staff.
 Refreshing — This can be an optional third perk when you want a source of cooldown reduction in your build.
- Harnessing Perks — Stack these for increased damage if you chose to forgo defensive options.
 Mortal Empowerment — This will be the preferred option for maximum damage output in PvP.
Mortal Empowerment vs. Invigorated Punishment
In most light armor builds, or ranged builds, it can be very strong to snowball kills with ![]() Mortal Empowerment,
and drastically increase your damage potential. With that being said, it is important to note that this will not stack if
a the weapons have persistent damage source, or DoT, deal the final blow. This means if Attunement or any Runeglass gem
secure the kill, you will not receive a stack. This makes it inconsistent and not worth using in some builds.
Mortal Empowerment,
and drastically increase your damage potential. With that being said, it is important to note that this will not stack if
a the weapons have persistent damage source, or DoT, deal the final blow. This means if Attunement or any Runeglass gem
secure the kill, you will not receive a stack. This makes it inconsistent and not worth using in some builds.
When making this decision you also have to think about your likliness to be killed. If you are playing a light armor
build, or one that is frequently diving into melee, you have high chances of dying. At that point if you lose your stacks,
it is a wasted perk, especially if this happens multiple times, or in the middle of building stacks. As such, it may be
more advantageous to use ![]() Invigorated Punishment.
Invigorated Punishment.
TLDR: If you are medium armor, want more consistent damage, or you have a high chance of death,
![]() Invigorated Punishment is the better option. If you want to snowball and have insanely high damage,
you have a pocket healer, you are a dedicated ranged build, or you simply do not care and want to gamble,
Invigorated Punishment is the better option. If you want to snowball and have insanely high damage,
you have a pocket healer, you are a dedicated ranged build, or you simply do not care and want to gamble,
![]() Mortal Empowerment is the better option.
Mortal Empowerment is the better option.
PvE Perks
 Elemental Aversion — This perk is a viable alternative in PvP as well, but is overshadowed by other PvP options.
It provides great defensein mutated expeditions to help mitigate magical effects.
 Physical Aversion — Only projectiles that do physical damage will be mitigated by this perk. As such, it can
be useful in PvE as another potential option. It alsoprovides a small amount of PvP value, but
  Elemental Aversion and
enemy Ward perks are certainly more defensive options.
Jewelry Perks
Amulet
 Health — This is the standard pick for all builds, it is free health that will add to the defensiveness of
your kit.
 Divine — This is important for PvE tanking, it will drastically increase incoming heals which can save your
life. It can also be useful at times in PvP.
 Stamina Recovery — This is a backpocket save when being focused and taking heavy damage.
You will receive a burst of stamina that will allow you to potentially get a quick dodge that can save your iife and continue
the fight.
 Slash Protection — This acts as a third perk slot that provides more defensiveness against Greatswords,
Great Axes, Hatchets, and Swords.
Ring
Earring
Artifacts
Weapon
Armor
Jewelry
Heartrune
For most builds that are looking to dive backlines, it is best to use ![]() Minor Heartrune of Stoneform to help
with having additional survivability in addition to your Hatchet passives. This will save your life and allow for
you to escape frequently. It can also be used as a tank in PvE.
Minor Heartrune of Stoneform to help
with having additional survivability in addition to your Hatchet passives. This will save your life and allow for
you to escape frequently. It can also be used as a tank in PvE.
There are two viable upgrade options:
 Cunning Heartrune of Stoneform provides two defensive buffs to reduce damage.
 Stalwart Heartrune of Stoneform provides one defensive buff and a significant healing
over time effect.
![]() Brutal Heartrune of Grasping Vines is a great PvE tanking option when trying to clump
enemies together or apply Rend.
Brutal Heartrune of Grasping Vines is a great PvE tanking option when trying to clump
enemies together or apply Rend.
![]() Brutal Heartrune of Detonate should be used when you are prioritizing burst damage.
Brutal Heartrune of Detonate should be used when you are prioritizing burst damage.
Heartrune Usage Tips
When using ![]() Cunning Heartrune of Stoneform, or other variants, you should save this for times where you are stunned
or affected by other forms of CC. Alternatively, you can use this right before pushing through a doorway or chokepoint to
negate the potential of being affected by CC.
Cunning Heartrune of Stoneform, or other variants, you should save this for times where you are stunned
or affected by other forms of CC. Alternatively, you can use this right before pushing through a doorway or chokepoint to
negate the potential of being affected by CC.
When using ![]() Brutal Heartrune of Grasping Vines make sure to use this on as many targets as
possible in PvE. This will apply a Rend and allow you to group them more easily. In PvP, this
same concept applies, but it can be used to lockdown a priority target or group of enemies.
Brutal Heartrune of Grasping Vines make sure to use this on as many targets as
possible in PvE. This will apply a Rend and allow you to group them more easily. In PvP, this
same concept applies, but it can be used to lockdown a priority target or group of enemies.
Try to avoid using ![]() Brutal Heartrune of Detonate while you have low health or are being focused on.
The goal is to start the ability and wait a short duration and attempt to dive in right as
the ability detonates so you can catch enemies off guard and not be bursted down.
Brutal Heartrune of Detonate while you have low health or are being focused on.
The goal is to start the ability and wait a short duration and attempt to dive in right as
the ability detonates so you can catch enemies off guard and not be bursted down.
You can activate your Detonate and then use ![]() Charge or another movement ability to "deliver"
your explosion and time it right as you meet a clump of players. This will catch them off guard and
will not be dodged in many cases.
Charge or another movement ability to "deliver"
your explosion and time it right as you meet a clump of players. This will catch them off guard and
will not be dodged in many cases.
Save your Detonate for when there are multiple targets stacked on top of one another. Preferably the targets will
already be under some kind of CC effect, or exhausted and unable to dodge out of them. It is best paired with something
like ![]() Gravity Well or
Gravity Well or ![]() Shockwave.
Shockwave.
When using Detonate try to time it right as you hit an enemy with another burst damage weapon ability, or something
that will CC the target, like ![]() Shockwave or
Shockwave or ![]() Wrecking Ball. When pairing this
with a Great Axe, use something
to again burst the target, or pull them toward you, like
Wrecking Ball. When pairing this
with a Great Axe, use something
to again burst the target, or pull them toward you, like ![]() Maelstrom or
Maelstrom or ![]() Reap. This can
result in a kill even when the target is full health.
Reap. This can
result in a kill even when the target is full health.
Take advantage of down time to charge your heartrune. For instance if you are far away you might as well continue to try hitting targets or structures to build charge.
Your heartrune will charge fast. While it is obviously beneficial to hold for times where there are large clusters of enemies. Do not wait too long and continue to waste your cooldown when you would have had the time to get another one recharged. Get familiar with how quickly you can get it back online and do not hesitate to use it to secure high priority kills.
A Heartrune in PvE is significantly different than PvP. This will charge incredibly fast due to the sustained damage output on
single targets. When using something like ![]() Brutal Heartrune of Detonate this is best used on large numbers of enemies instead of
single target. With that being said, use this as many times as possible in a boss fight since it will be available and otherwise
wasted.
Brutal Heartrune of Detonate this is best used on large numbers of enemies instead of
single target. With that being said, use this as many times as possible in a boss fight since it will be available and otherwise
wasted.
Gems and Consumables
For more information on how to manage your cooldown hotbar, what consumables to use, what foods should be eaten, or tips on how to be more effective with your consumables in PvP and PvE, please refer to Sword Consumables guide.
Gems
Weapon Gems
In PvE you will be using ![]() Cut Pristine Carnelian to maximize threat and access taunt compatible abilities.
Cut Pristine Carnelian to maximize threat and access taunt compatible abilities.
For any type of PvP damage build it will be best to use any Runeglass variant of ![]() Cut Pristine Opal that applies
a damage over time effect. For example :
Cut Pristine Opal that applies
a damage over time effect. For example : ![]() Runeglass of Arboreal Opal
Runeglass of Arboreal Opal
PvP Gems
In PvP combat your optimal resistance distribution is going to prioritize Slash resistance, then Physical, and lastly Elemental. This is the standard for any build where you will frequently be in melee range.
At times, it may not be beneficial to use a full Runeglass setup, for example using:
![]() Runeglass of Punishing Onyx. This results in marginal offensive gains for some because of
hidden internal cooldown effects. As such, it is preferred to take the defensive gains instead.
(See FAQ).
Runeglass of Punishing Onyx. This results in marginal offensive gains for some because of
hidden internal cooldown effects. As such, it is preferred to take the defensive gains instead.
(See FAQ).
To hit a 22.5 (Slash)/12.5 (Physical)/7.5 (Elemental) resistance setup you will need:
 Cut Pristine Onyx x5 +
  Cut Pristine Opal x3 +
  Slash Protection on Amulet
When using Runeglass, you will want to use a 20 (Slash)/10 (Physical)/7.5 (Elemental) setup:
 Runeglass of Punishing Onyx x5 +
  Cut Pristine Opal x3 +
  Slash Protection on Amulet
PvE Gems
In PvE combat, more specifically mutators, elemental resistance is the main concern.
You can use the following gems in your gear:
- Elemental Resistance Gem x8 + Amulet Protection Perk (Based on mutator elemental effect.)
Consumables
For more information on how to manage your cooldown hotbar, what consumables to use, what foods should be eaten, or tips on how to be more effective with your consumables in PvP and PvE, please refer to Sword Consumables guide.
Rotation and Gameplay
In PvP, a Sword and Shield will most likely be an assassin trying to maximize crowd-control abilities to setup a kill on a priority target.
Rotation and Priority List
PvE
- Light attack, use an ability, or secondary ability, to gather threat.
- Use
 Shield Bash as a taunt.
 - Use
 Defender's Resolve and maintain its defensive buff. This can also be a taunt.
 - Light attack and block when necessary. Do not dodge and waste stamina.
PvP - Shield Bash
- Open on a target with
 Leaping Strike and attempt to hit them in the back.
 - Use
 Shield Rush to do damage, slow, and stagger the target.
 - Use
 Shield Bash to do damage and stun the target.
 - Swap to primary damage weapon and continue dealing damage.
Secondary Weapon Priority List and Build Rotation
To learn how to use your second weapon properly, and complete rotation, please refer to our PvE and PvP build pages:
Gameplay Tips
Threat Management
It is important to understand what options you have for taunting and maintaining threat, especially when things go wrong or get out of hand. You will typically want to save AoE taunting abilities when there are multiple enemies and you are not prepared for a pull. Single-target taunting abilities should be used to maintain and put into your general rotation.
It is crucial to understand what abilities are taunt compatible on your secondary weapon. This can help ease threat management on trash packs. Your secondary weapon preference will typically depend on how you play and what taunt options or utility yo prefer.
If you struggle with threat, feel free to try using armor and weapon perks, such as ![]() Hated
to help.
Hated
to help.
Stamina Management
In PvE, you will want to do your best to prioritize blocking instead of dodging. A dodge will take a large amount of stamina compared to blocking multiple attacks and benefitting from blocking passives. It is generally almost never worth dodging on a boss fight. This is a crucial skill to learn as a new tank.
Buff Management
It is important to recognize periods of increased damage. Do not use abilities like ![]() Defender's Resolve
without thinking first. You should try and use this right before large damage windows or specific boss
mechanics.
Defender's Resolve
without thinking first. You should try and use this right before large damage windows or specific boss
mechanics.
Positioning
When you are tanking in PvE be sure to properly position bosses and trash packs in a way that allow your DPS to hit enemies from behind. This is also important to reduce any chance they receive unnecessary damage.
In general, but especially when tanking, be sure to stand in healing abilities such as ![]() Sacred Ground.
Many players are positionally unaware in combat, and taking the time to make sure you are in a healing
ability can be the difference between life and death.
Sacred Ground.
Many players are positionally unaware in combat, and taking the time to make sure you are in a healing
ability can be the difference between life and death.
Defender's Resolve Usage
![]() Defender's Resolve has a very long cooldown, but thanks to
Defender's Resolve has a very long cooldown, but thanks to ![]() Refreshing Move
this can be heavily reduced and maintained frequently. You should obviously not use this cooldown at all times, rather
you should try to make use of it the most as an AoE taunting option and way to maintain high threat. Altneratively,
use this as a way to pull more enemies than normal, to prepare for large spikes of damage, or to avoid mechanics.
It does have a long duration and it is possible to have it active again right after its buffs fall off.
Refreshing Move
this can be heavily reduced and maintained frequently. You should obviously not use this cooldown at all times, rather
you should try to make use of it the most as an AoE taunting option and way to maintain high threat. Altneratively,
use this as a way to pull more enemies than normal, to prepare for large spikes of damage, or to avoid mechanics.
It does have a long duration and it is possible to have it active again right after its buffs fall off.
Feinting
You can feint attacks with melee weapons, such as any weapon you may pair with the Hatchet in PvP, to try and bait an enemy into dodging and wasting their stamina. This can be done to try an exhaust enemies so that you can get free hits in. To do so, charge a heavy attack and block before the attack is initiated. This will make it look like you are swinging, and then you cancel the attack until you can strike at the correct opportunity.
Movement
Effective movement is incredibly important in a build like this, especially when playing in medium. Do not panic and use your entire stamina bar and exhaust yourself, as it may result in death. You can take advantage of jumping, diving (going prone while moving), and changing direction by quickly moving your mouse or taking advantage of quick inputs on your movement keys.
There are many movements in New World that will stagger you in place for a moment when quickly changing direction. If you move left and right or if you jump left and right you will notice there is a momentwhere you will be standing still. To prevent this you will need to use a key input while your character is in the animation. For example, if you hold your left directional key and jump then right before you land you hit your right directional key and jump, you will quickly jump left and right. If you simply run left and right using your directional keys your character will respond similarly. To avoid this you can move left and then right before you pivot to go right, hit the backward directional key and instantly follow up with your right directional key. If you continue doing this back and forth you will avoid the sliding animation.
Hatchet Usage
To learn more about ability usage and how to use the Hatchet, please refer to our Hatchet guide.
Greatsword
When deciding to use a Greatsword, you can use the engage and crowd-control of the Sword and Shield to setup for large windows of burst damage. It can also be used for PvE tanking.
Please refer to our Greatsword tips for more on this playstyle.
War Hammer Usage
The War Hammer is a great PvP or PvE complement when you want to have multiple crowd-control options at your disposal.
To learn more about ability usage and the intracies of the War Hammer, please refer to our War Hammer guide.
Great Axe Usage
The Great Axe has phenomenal AoE damage that can be used to clear trash packs before boss fights.
It does have PvP potential too when playing in light armor and focusing on a ![]() Reap playstyle with
Reap playstyle with
![]() Blood Lust
Blood Lust
Please refer to our Great Axe tips for more on this playstyle.
Spear Usage
The Spear can be a very effective PvP complement to maximize opportunistic damage windows between your plethora of crowd-control options.
Please refer to our Spear tips for how to use it properly.
FAQ - Sword and Shield
What Armor Weight Should I Be to Tank?
Typically it is the standard that a Tank plays in heavy armor. With that being said, to maximize damage and speed, many tanks will play in light armor. This is obviously prone to taking more damage so you have to play more carefully. No matter what, you should typically play with 200 Constitution, armor weight is your choice.
In medium or heavy armor you may see more benefit from ![]() Refreshing Ward but this is up to your preference.
This will work even if you block an ability.
Refreshing Ward but this is up to your preference.
This will work even if you block an ability.
What Should I Use For Cooldown Reduction?
Generally, in any light armor weight build you will see the most benefit from ![]() Refreshing. This can
also be a PvE option.
Refreshing. This can
also be a PvE option.
In medium or heavy armor you may see more benefit from ![]() Refreshing Ward but this is up to your preference.
This will work even if you block an ability.
Refreshing Ward but this is up to your preference.
This will work even if you block an ability.
What Kind of Shield Should I Use?
In light armor loadouts you will always be using a Round shield. In heavy armor builds you should always use a Tower shield. There is almost never a time that a Kite shield will be used unless you need a specific perk in your build.
What Gems Do I Put In My Gear?
When playing a physical damage build it will be tempting to use ![]() Runeglass of Punishing Onyx. While this will provide a damage increase, there is
an internal cooldown which will only allow it to proc every other hit. So, this will not actually be as much of a damage increase as it was thought to be.
In most cases, just use regular gems for more defensiveness. The marginal damage loss will be made up for by survivability.
Runeglass of Punishing Onyx. While this will provide a damage increase, there is
an internal cooldown which will only allow it to proc every other hit. So, this will not actually be as much of a damage increase as it was thought to be.
In most cases, just use regular gems for more defensiveness. The marginal damage loss will be made up for by survivability.
What Magic Damage Should I Use For Runeglass, Attunement, and Chain Damage?
It is best practice to use a magic damage type that is the least likely to be countered. While most players tend not to focus on a specific magic damage type like they do for physical damage, it is still possible. In most cases, players may use extra Ice damage protection due to the Ice Gauntlet, or Fire due to the Fire Staff or Blunderbuss. As such, Nature, Arcane, or Lightning damage can be beneficial options. Nature specifically is beneficial because it will always work in PvE environments because it is never weak to any enemy types.
Changelog
- 25 Nov. 2024 (PvP builds page): Guide updated for expansion.
- 25 Nov. 2024 (PvE builds page): Guide updated for expansion.
- 25 Nov. 2024 (abilities page): Guide updated for expansion.
- 25 Nov. 2024 (this page): Guide updated for expansion.
- 22 Oct. 2023 (PvP builds page): Guide updated for expansion.
- 22 Oct. 2023 (PvE builds page): Guide updated for expansion.
- 22 Oct. 2023 (gems page): Guide updated for expansion.
- 22 Oct. 2023 (perks page): Guide updated for expansion.
- 22 Oct. 2023 (abilities page): Guide updated for expansion.
- 22 Oct. 2023 (this page): Guide updated for expansion.
- 29 Mar. 2023 (gems page): Updated PvE Gems.
- 29 Mar. 2023 (perks page): Updated tiers for Season One.
- 29 Mar. 2023 (this page): Updated perks and gems.
- 16 Feb. 2023 (PvP builds page): Guide added.
- 16 Feb. 2023 (PvE builds page): Guide added.
- 16 Feb. 2023 (gems page): Guide added.
- 16 Feb. 2023 (perks page): Guide added.
- 16 Feb. 2023 (abilities page): Guide added.
- 16 Feb. 2023 (this page): Guide added.
More Weapon Guides
Savvvo is a New World Aeternum content creator with over 5,000 hours of gameplay. He specializes in developing leveling and gold-making guides, PvP builds, and discovering fun, new ways to enhance your New World experience. If you can not find him in Aeternum, he is probably somewhere on YouTube.
Additionally, Savvvo runs the Fighter Discord for Ashes of creation, which can be joined by following this link.
- The Rabbit's Revenge Event Returns to New World: Aeternum
- The Future of New World's Next OPR Map - Coral Divide
- The Legacy of Crassus Event Returns to New World: Aeternum
- Future Seasonal Worlds in New World: Aeternum
- Incoming: New World Aeternum Server Mergers
- A New Outpost Rush Map is Finally Coming to New World: Aeternum
- The Siege of Sulfur Event is Returning to New World: Aeternum
- New World: Aeternum Introduces the First of Many Double XP Events


