Hellfire Ramparts Dungeon Guide
The recommended level range to run this dungeon on Normal is 59-63. Heroic
mode will require Level 70 and the ![]() Flamewrought Key to enter.
Flamewrought Key to enter.
This dungeon will take approximately 20-30 minutes to complete with an average group. Hellfire Ramparts is commonly abbreviated as "ramps".
In this guide, we will cover dungeon quests, the layout of the dungeon, an overview of trash mobs, tactics for each boss, loot that can be obtained, and ideal group compositions.
Hellfire Ramparts Quests
Before heading into Ramparts, we advise you to get all the dungeon quests related to it. To make this process easier, we have written a separate guide for the quests and their chains.
Hellfire Ramparts Entrance Location
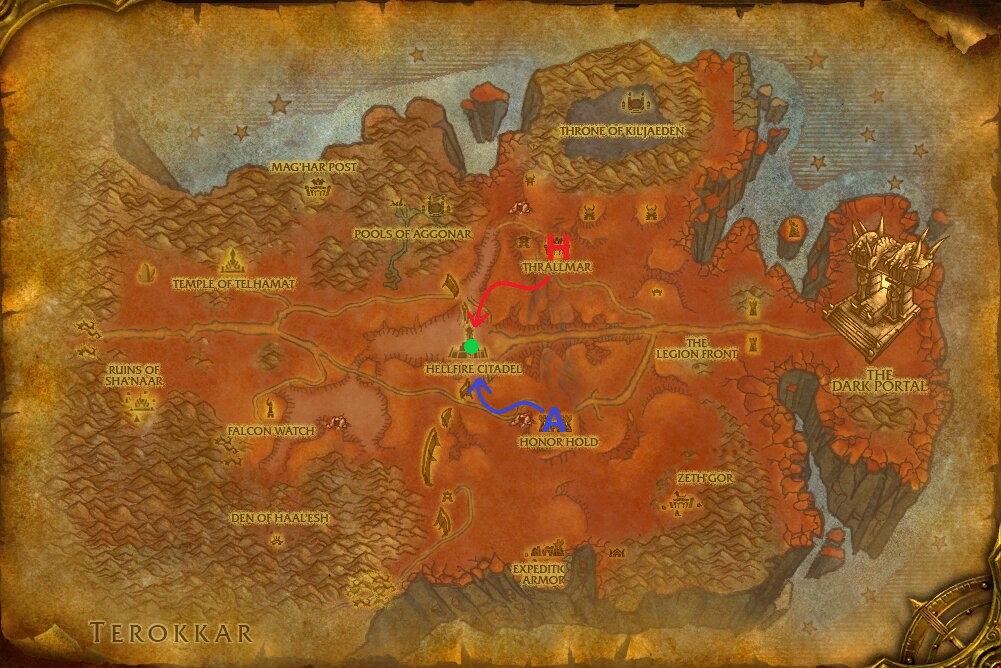
Conveniently, all dungeons in Hellfire Peninsula are located in one centralized location: Hellfire Citadel. This structure can be easily found in the very center of the map and can be reached by using one of the two connecting bridges on either the north or south side.
The dungeon portal is located at coordinates (47,53). The summoning stone is located directly next to the Hellfire Ramparts dungeon portal.
Layout of Hellfire Ramparts
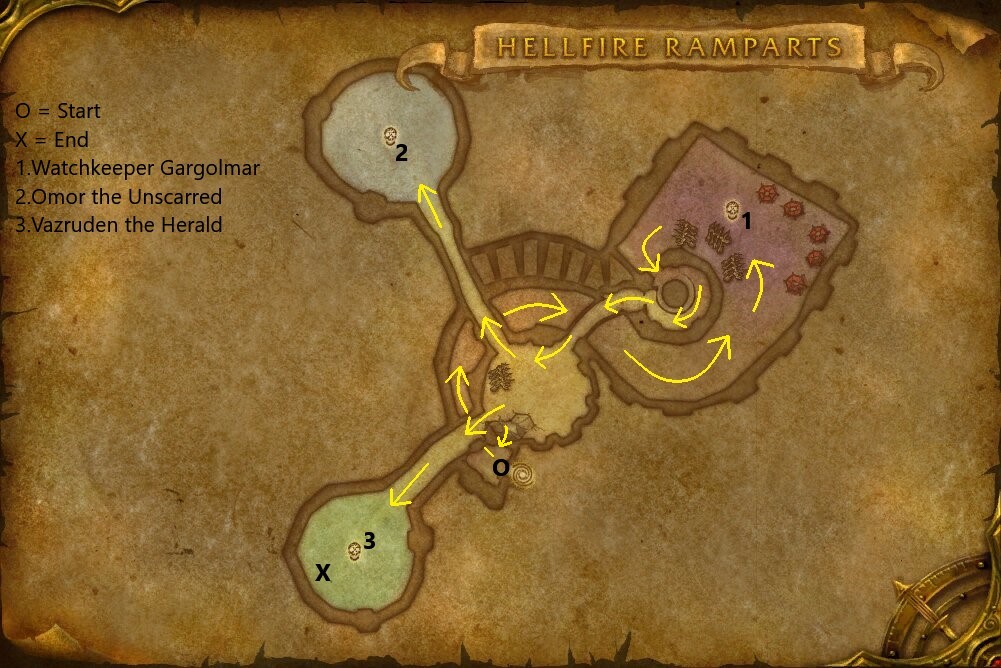
The layout of Hellfire Ramparts is fairly straightforward, following a linear path until the very end where you can decide which of the last two bosses you wish to fight first.
Reputation From Ramparts
Killing monsters in this instance grants either Thrallmar or Honor Hold reputation.
Normal Difficulty
- Orcs grant 5 reputation each.
- Wolves grants 2.5 reputation each.
- Each boss grants 50 reputation.
- A Normal Hellfire Ramparts run will give around 500 reputation.
- Reputation gains in Normal stop at (5999/6000) Friendly, including bosses.
Heroic Difficulty
- Orcs grant 15 reputation each.
- Wolves grants 7.5 reputation each.
- Each boss grants 250 reputation.
- A Heroic Hellfire Ramparts run will give around 1,700 reputation.
Notable Ramparts Trash
In this section, we will briefly go over each of the trash mobs that may pose a threat to you in this dungeon.
Bonechewer Hungerer

Be mindful of your threat if using a Warrior tank as an early
![]() Disarm can make it difficult to pick these up.
Disarm can make it difficult to pick these up.
Bonechewer Ravener

Try to pull these separately from other packs as the stun can make you take much more damage if tanking multiple mobs.
Bonechewer Destroyer

It is recommended to either kill these first or manage them with some form of
crowd control as the ![]() Mortal Strike deals heavy damage and cuts healing
received in half. Try to tank with your back against a wall to avoid the knockback.
Mortal Strike deals heavy damage and cuts healing
received in half. Try to tank with your back against a wall to avoid the knockback.
Bleeding Hollow Scryer

Carefully utilize line-of-sight with these packs as you will be dealing with
four of these at a time. ![]() Curse of Tongues, interrupts, crowd control,
and general stuns are advised for these as a well-timed
Curse of Tongues, interrupts, crowd control,
and general stuns are advised for these as a well-timed ![]() Fear on your
healer or tank can lead to either deaths or a wipe.
Fear on your
healer or tank can lead to either deaths or a wipe.
Bonechewer Beastmaster

 Uppercut
- If not killed quickly enough, 3 Shattered Hand Warhounds will also be summoned to aid them.
These enemies are immune to most forms of crowd control. They should be focused down quickly to avoid summoning the wolves. CC other mobs on the pull and focus the Bonechewer Beastmaster.
Hellfire Sentry

These are linked with the final boss. When you kill the last Sentry, the boss will fly down and engage you.
Overview of Ramparts Bosses
Here we will give you a full rundown of what you can expect from each of the bosses found here on both Normal and Heroic difficulties as well as the items they drop.
Watchkeeper Gargolmar

This boss is fairly easy with ![]() Mortal Wounds serving as a
sort of DPS check.
Mortal Wounds serving as a
sort of DPS check. ![]() Surge can be avoided by stacking up behind the
boss or spreading out as ranged DPS. Melee attackers should be cautious to avoid
dying to
Surge can be avoided by stacking up behind the
boss or spreading out as ranged DPS. Melee attackers should be cautious to avoid
dying to ![]() Retaliation when the boss reaches low health.
Retaliation when the boss reaches low health.
Hellfire Watcher

Two of these adds come when Watchkeeper Gargolmar is engaged. Either
use crowd control on them or kill them first as they will do a large amount of
healing over time. Prioritize interrupting their ![]() Heal.
Heal.
Loot from Normal
| Item | Required Level | Item Type | Slot |
|---|---|---|---|
| 60 | Cloth | Shoulder | |
| 60 | Plate | Chest | |
| 60 | Leather | Wrist | |
| 60 | Legs | ||
| 60 | One-Handed Sword | Main-Hand |
Loot from Heroic
| Item | Required Level | Item Type | Slot |
|---|---|---|---|
| 70 | Cloak | Back | |
| 70 | Plate | Wrist | |
| 70 | Feet | ||
| 70 | Cloth | Feet | |
| 70 | Shield | Off-Hand | |
| BoP | Gem | Misc | |
| BoP | Gem | Misc |
Omor the Unscarred

Make sure to spread out properly to avoid taking damage from the
debuff applied by ![]() Treacherous Aura. Melee players need to be aware if
they have the debuff to avoid damaging other melees, including the tank.
Treacherous Aura. Melee players need to be aware if
they have the debuff to avoid damaging other melees, including the tank.
The Fiendish Hounds can quickly pile up and become a problem if not
handled properly. It is possible to CC them with spells such as ![]() Banish
or
Banish
or ![]() Intimidating Shout, but you will still need to deal with them after
the boss. The most ideal thing to do is to just keep killing them as they spawn
in.
Intimidating Shout, but you will still need to deal with them after
the boss. The most ideal thing to do is to just keep killing them as they spawn
in.
If you spread out to avoid unnecessary damage from the aura and keep the Felhounds under control, this fight is very easy.
Loot from Normal
| Item | Required Level | Item Type | Slot |
|---|---|---|---|
| 60 | Accessory | Neck | |
| 60 | Accessory | Neck | |
| 60 | Hands | ||
| 60 | Plate | Waist | |
| 60 | Two-Handed Mace | Weapon | |
| 60 | Staff | Weapon |
Loot from Heroic
| Item | Required Level | Item Type | Slot |
|---|---|---|---|
| 70 | Cloth | Helm | |
| 70 | Accessory | Neck | |
| 70 | Plate | Shoulder | |
| 70 | Plate | Chest | |
| 70 | Cloth | Wrist | |
| 70 | Cloth | Hands | |
| 70 | Waist | ||
| 70 | Leather | Feet | |
| 70 | Accessory | Finger | |
| 70 | One-Handed Mace | Weapon | |
| 70 | Dagger | Weapon | |
| 70 | Off-Hand Weapon | Off-Hand | |
| BoP | Gem | Misc | |
| BoP | Gem | Misc |
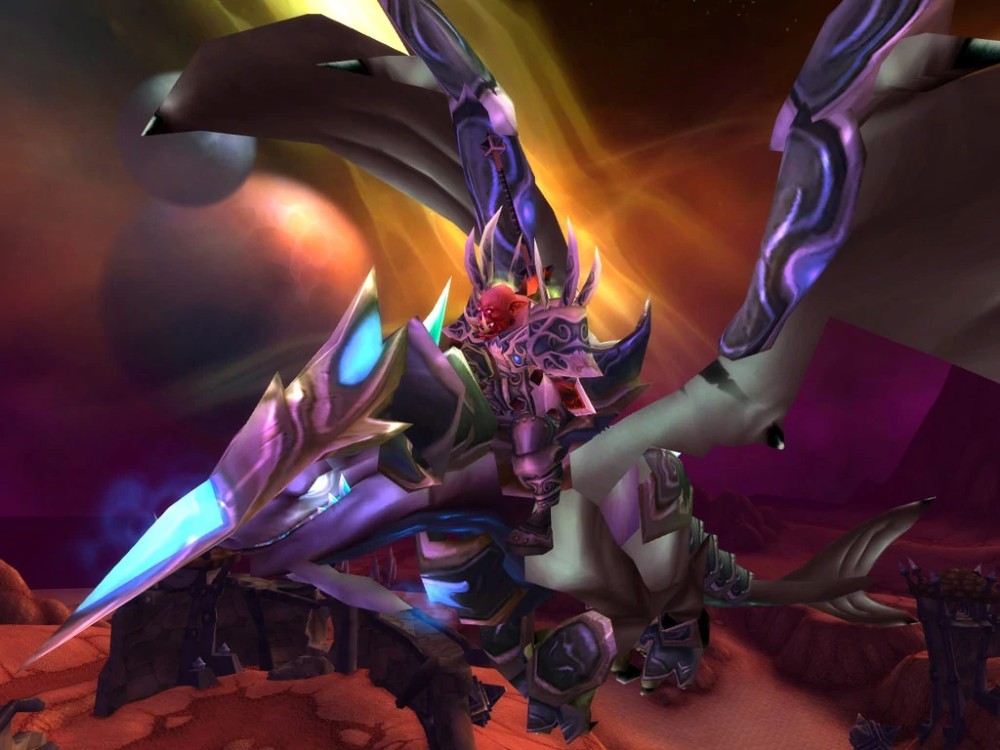
Vazruden the Herald / Nazan
 Vazruden's Mark — While Vazruden the Herald is alive,
he will mark targets for Nazan to attack.
Vazruden's Mark — While Vazruden the Herald is alive,
he will mark targets for Nazan to attack. Fireball
 Cone of Fire
 Bellowing Roar
Nazan will fly around casting ![]() Fireballs until
Vazruden the Herald reaches 50% health. Make sure to quickly focus down
Vazruden as Nazan is landing. If Vazruden is alive and uses
Fireballs until
Vazruden the Herald reaches 50% health. Make sure to quickly focus down
Vazruden as Nazan is landing. If Vazruden is alive and uses ![]() Vazruden's Mark
while Nazan is on the ground, this will cause Nazan to fixate on a target and
melee attack them, ignoring the tank completely. Make sure to avoid fire
patches on the ground, don not be in front of the dragon, and keep the tank topped
up before the
Vazruden's Mark
while Nazan is on the ground, this will cause Nazan to fixate on a target and
melee attack them, ignoring the tank completely. Make sure to avoid fire
patches on the ground, don not be in front of the dragon, and keep the tank topped
up before the ![]() Bellowing Roars come out. After killing both bosses
you will be able to loot the chest in the back and claim your rewards.
Bellowing Roars come out. After killing both bosses
you will be able to loot the chest in the back and claim your rewards.
Loot from Normal
| Item | Required Level | Item Type | Slot |
|---|---|---|---|
| 60 | Cloak | Back | |
| 60 | Leather | Waist | |
| 60 | Cloth | Legs | |
| 60 | Legs | ||
| 60 | Plate | Feet | |
| 60 | Accessory | Finger | |
| 60 | Accessory | Finger | |
| 60 | Accessory | Finger | |
| 60 | Polearm | Weapon | |
| 60 | Staff | Weapon |
Loot from Heroic
| Item | Required Level | Item Type | Slot |
|---|---|---|---|
| 70 | Plate | Helm | |
| 70 | Shoulder | ||
| 70 | Leather | Chest | |
| 70 | Leather | Chest | |
| 70 | Cloth | Wrist | |
| 70 | Plate | Wrist | |
| 70 | Hands | ||
| 70 | Plate | Hands | |
| 70 | Leather | Waist | |
| 70 | Plate | Waist | |
| 70 | Legs | ||
| 70 | Accessory | Finger | |
| 70 | Accessory | Finger | |
| 70 | Dagger | Weapon | |
| BoP | Gem | Misc | |
| BoP | Gem | Misc |
Recommended Hellfire Ramparts Group Composition
While not required, having one form of crowd control will make things go smoother. Bonechewer Destroyers are the ideal target of any available CC to help sustain healer Mana. This is especially important when doing Heroic in lower gear.
The pulls in Hellfire Ramparts are generally small, so no significant amount
of AoE is needed. Having at least one form of reliable interrupt is an added
bonus for the packs of four Bleeding Hollow Scryers. ![]() Tremor Totem
from a Shaman also helps with those packs, as well as with Nazan.
Tremor Totem
from a Shaman also helps with those packs, as well as with Nazan.
Changelog
- 16 Jun. 2021: Added images of enemies.
- 26 May 2021: Guide added.
This guide has been written by Abide, TBC veteran for nearly a decade. Abide is a Warrior tank and multi-class expert currently playing on Faerlina as Horde. You can find him in the the Icy Veins Discord. You can also see him live on Twitch.
- UI Updates: Burning Crusade Classic Hotfixes, July 17th
- The Best Camelot Theory Yet Connects Classic+ to WoW’s Original Design
- Classic Era’s New UI Could Break Nameplate and Raid Frame Addons
- Icy Veins is Looking for Dedicated WoW Classic Writers
- WoW Classic+ Leak Claims Deadmines, Death Knights, and Karazhan Are Coming
- WoW Classic on a Phone?! This Player Shows It Actually Works
- Blizzard Confirms No Fresh Season of Discovery Servers, Fueling Classic+ Rumors
- XP Blocker Moves: Season of Discovery Hotfixes, June 25th