Blackwater Behemoth Strategy Guide in The Eternal Palace Raid
Welcome to our strategy guide for the encounter with Blackwater Behemoth in The Eternal Palace raid. Here, you will first find the strategy to defeat the boss, followed by a detailed analysis of the abilities.
To familiarize yourself with the encounter, we suggest you watch this short video guide from Hazel Nutty.
Fight Overview
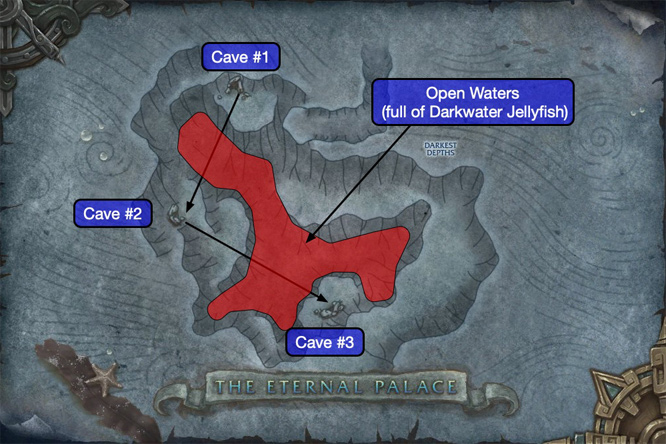
The encounter against the Blackwater Behemoth is comprised of three different parts, which we will refer to as "phases", although they are not different phases in the strict sense of the word, since there is no difference in mechanics at all throughout the entire fight. In fact, the fight that takes place in front of 3 different caves (hence the 3 phases), during which you will only fight the boss (two types of adds do exist in the fight, but they are mostly non-threatening).
We start out by giving you an overview of the fight, before going through more specific, but important points. We finish with a detailed presentation of the abilities.
The fight revolves around its unique underwater mechanics, and relies on good positioning and movement in order to achieve success.
Strategy / Fight Summary
In order to execute the fight correctly, your raid members will have to understand a few important guidelines.
- Players will have to avoid being in open water (more on that below) at all times, but
especially when affected by
 Bioluminescence.
 - You will have to kill one Shimmerskin Pufferfish at the start of
each phase, to create a
 Bioluminescent Cloud, and then
kill the second Shimmerskin Pufferfish once players' Bioluminescence
debuffs from the first cloud are running out.
Bioluminescent Cloud, and then
kill the second Shimmerskin Pufferfish once players' Bioluminescence
debuffs from the first cloud are running out. - Players will have to be careful in making sure they receive the
Bioluminescence debuff from the clouds, as otherwise they cannot receive
healing.
- During transition phases, players must get to the new fighting area as quickly as possible, ensuring that they do not touch any Darkwater Jellyfish on the way.
On Heroic and Mythic difficulties, there is added complexity in making sure
that players' ![]() Bioluminescence (from the
Bioluminescence (from the ![]() Bioluminescent Clouds)
debuffs do not persist in the transitions (so, the timing of going into the
clouds to receive the debuffs must be precise), as this would lead to
Bioluminescent Clouds)
debuffs do not persist in the transitions (so, the timing of going into the
clouds to receive the debuffs must be precise), as this would lead to
![]() Gaze from Below and consequently, deaths.
Gaze from Below and consequently, deaths.
In the sections that follow, we will look at the various parts of the fight.
Handling Darkest Depths
Throughout the fight, all raid members will need to "manage" the
![]() Darkest Depths debuff, which prevents any healing on them. In reality,
this is quite simple.
Darkest Depths debuff, which prevents any healing on them. In reality,
this is quite simple.
- The raid will have to kill one of the two
Shimmerskin Pufferfish present at the start of each phase, which will
create a Bioluminescent Cloud lasting 20 seconds.
- All raid members should move through the cloud to receive the
Bioluminescence debuff, which negates the effects of
 Darkest Depths for 45 seconds.
- Because stacking is discouraged due to
 Bioelectric Feelers, players
should avoid all rushing into the cloud at the same time, and should instead
stagger their movement somewhat.
Bioelectric Feelers, players
should avoid all rushing into the cloud at the same time, and should instead
stagger their movement somewhat.
- Because stacking is discouraged due to
- Once players' 45-second debuffs from the first cloud begin to expire, the second Shimmerskin Pufferfish should be killed, creating a new cloud.
- Players should repeat step 2 and re-gain their Bioluminescence
debuffs.
- When their second 45-second debuffs expire, the boss will be transitioning
to the next fighting area, at which point players will need to swim through
open water to the next platform.
- It is crucial that players no longer have the
Bioluminescence debuff when they begin moving over open water (though
on LFR and Normal mode this is not really a concern as the
 Slipstreams players use to move through the water will automatically
remove the debuff).
Slipstreams players use to move through the water will automatically
remove the debuff).
- It is crucial that players no longer have the
- The raid will then repeat these steps during the second phase of the fight, and one last time in the third and final phase.
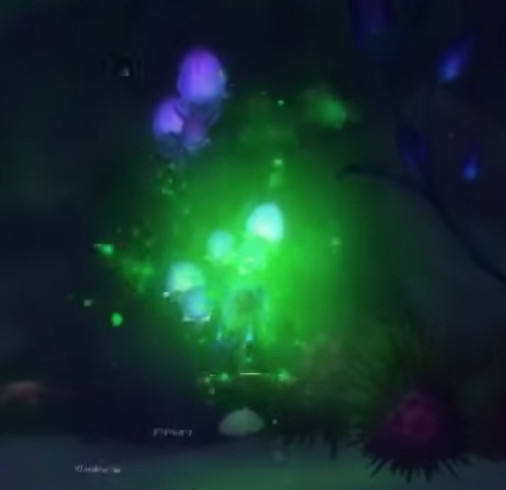
Pictured below is a ![]() Bioluminescent Cloud.
Bioluminescent Cloud.
Tanks do not need to worry about any of this, as the boss will always
debuff the active tank with ![]() Radiant Biomass for 15 seconds, allowing
them to receive healing.
Radiant Biomass for 15 seconds, allowing
them to receive healing.
If the Blackwater Behemoth is not killed before the second ![]() Bioluminescence debuff runs
out on the third platform, you need to finish the encounter without being able to heal.
Bioluminescence debuff runs
out on the third platform, you need to finish the encounter without being able to heal.
Transition Phases
There are two transition phases in this fight, the first happening 90 seconds after the start of the fight and the second one happening 90 seconds after that.
During the transition phases, players will need to use the
![]() Slipstreams present at the back of the fighting area to increase their
swim speed and move to the next fighting area, in order to interrupt the
boss's
Slipstreams present at the back of the fighting area to increase their
swim speed and move to the next fighting area, in order to interrupt the
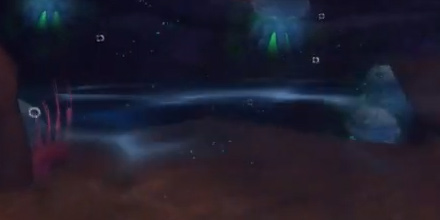
boss's ![]() Cavitation cast. You can see what the
Slipstream effect looks like below (milky effect at the edge of the platorms).
Cavitation cast. You can see what the
Slipstream effect looks like below (milky effect at the edge of the platorms).
As stated above, it is important that players avoid heading out into the
open water if they still have the ![]() Bioluminescence debuff (except for
LFR and Normal modes, where the Slipstreams will automatically remove it).
Bioluminescence debuff (except for
LFR and Normal modes, where the Slipstreams will automatically remove it).
Moreover, players will need to avoid coming into contact with the
Darkwater Jellyfish present along the way, as these deal damage and
apply ![]() Bioluminescence.
Bioluminescence.
Once all players have reached the new fighting area, the boss's
![]() Cavitation cast should be interrupted. It is not
necessary that all players be in position, though, so the cast should
be interrupted before it starts dealing damage to the raid, in any case.
Cavitation cast should be interrupted. It is not
necessary that all players be in position, though, so the cast should
be interrupted before it starts dealing damage to the raid, in any case.
Tank Concerns
The Shimmerskin Pufferfish present in each fighting area do not need to be tanked, so tanks only need to worry about the Blackwater Behemoth.
A simple tank switch roughly every 15 seconds, to reset the boss's
![]() Feeding Frenzy stacks, is all that tanks need to worry about.
Feeding Frenzy stacks, is all that tanks need to worry about.
Open Water / Gaze from Below
Another important part of the fight is avoiding the open water, because this
can get you killed if you have the ![]() Bioluminescence debuff. This is not
at all complicated, and it just means that outside of the transition phases,
you should never be over open water and instead just stand over the ground.
Bioluminescence debuff. This is not
at all complicated, and it just means that outside of the transition phases,
you should never be over open water and instead just stand over the ground.
The boss's ![]() Shock Pulse will push all players back whenever it is
cast, so if players are too far away from the boss to begin with and/or if
they fail to run against the effect, they may end up over open water. That
said, the 5-second grace period before
Shock Pulse will push all players back whenever it is
cast, so if players are too far away from the boss to begin with and/or if
they fail to run against the effect, they may end up over open water. That
said, the 5-second grace period before ![]() Gaze from Below kills you
should provide enough time to get back into position.
Gaze from Below kills you
should provide enough time to get back into position.
During transition phases, ![]() Gaze from Below should not cause any
issues, provided that everyone waits for their
Gaze from Below should not cause any
issues, provided that everyone waits for their ![]() Bioluminescence debuffs
to expire before venturing out over open water.
Bioluminescence debuffs
to expire before venturing out over open water.
Spreading Out / Bioelectric Feelers
To avoid unnecessary damage from ![]() Bioelectric Feelers, all raid
members should be at least 5 yards apart from one another throughout the
fight (except during transition phases, when this ability is not used).
Bioelectric Feelers, all raid
members should be at least 5 yards apart from one another throughout the
fight (except during transition phases, when this ability is not used).
One useful note is that since the fight takes place underwater, you can make use of the vertical space as well in order to spread out — indeed, given the rather limited amount of space in the second and third phases of the fight, you will most likely be forced to make use of vertical space there to spread out properly.
Other Damage
The only other ability in the fight is ![]() Toxic Spine, which simply
deals some unavoidable damage to certain raid members. This must be healed
through, and its only purpose, other than adding a bit of difficulty, seems to
be ensuring that everyone must properly counteract the
Toxic Spine, which simply
deals some unavoidable damage to certain raid members. This must be healed
through, and its only purpose, other than adding a bit of difficulty, seems to
be ensuring that everyone must properly counteract the
![]() Darkest Depths debuff.
Darkest Depths debuff.
Heroism / Bloodlust / Time Warp
We recommend using ![]() Heroism/
Heroism/![]() Bloodlust/
Bloodlust/![]() Time Warp
at the start of the fight. This is when you can get the most DPS out of it
(since all cooldowns and potions will be active). The first part of the fight
is also probably the easiest in terms of movement and positioning, since the
first fighting area is a single solid area, allowing players to more easily
avoid the open water.
Time Warp
at the start of the fight. This is when you can get the most DPS out of it
(since all cooldowns and potions will be active). The first part of the fight
is also probably the easiest in terms of movement and positioning, since the
first fighting area is a single solid area, allowing players to more easily
avoid the open water.
Since the transitions are time-based, by doing as much damage to the boss during the first part of the fight, you will reduce the amount of time you spend in the final fighting area.
Summary for Tanks
- Perform a tank switch roughly every 15 seconds to reset the boss's
 Feeding Frenzy buff.
 - Make sure to always be in melee range of the boss, as it is stationary and could otherwise hit other players.
Summary for Healers and DPS
- Avoid being in open water if affected by Bioluminescence.
- Kill the Shimmerskin Pufferfish, one at a time, 45 seconds apart,
to create a Bioluminescent Cloud and then run through it to pick up
the Bioluminescence debuff that allows you to be healed.
- During transition phases, get to the new fighting area without touching any
Darkwater Jellyfish on the way. Use the Slipstream to increase
your swim speed.
- Always be more than 5 yards away from other raid members (except during
transition phases) to avoid taking damage from
Bioelectric Feelers.
Abilities
As mentioned above, this fight is realistically single-phase (the abilities of the boss do not change), but since there are two effective transition phases and the location where the fight changes after each one, it is as though it as three phases.
Before we look at the abilities of the boss, we will first look at the fight area and a few of the peculiarities it has.
Underwater Mechanics and Encounter Area
The entire encounter takes place underwater. To mitigate the normal problems that occur when underwater (limited amount of "breath" before you start taking damage, and reduced movement speed), all players can receive a permanent buff at the start of the fight. In order to receive this buff, players must click to interact with an Oxygen-Rich Membrane (of which several are present where the fight starts), gaining immunity to going out of breath and 100% increased movement speed under water.
Being underwater brings with it a few other considerations. By default,
all players are always debuffed by ![]() Darkest Depths, which reduces all
healing taken by 100%. Obviously, this would make the fight impossible, but
there are two ways of countering it and temporarily removing the
debuff.
Darkest Depths, which reduces all
healing taken by 100%. Obviously, this would make the fight impossible, but
there are two ways of countering it and temporarily removing the
debuff.
- The active tank will always have the
 Radiant Biomass debuff
applied to them, which deals Nature damage over time but which also removes
the application of Darkest Depths, allowing them to receive
healing.
Radiant Biomass debuff
applied to them, which deals Nature damage over time but which also removes
the application of Darkest Depths, allowing them to receive
healing. - Other raid members can remove their Darkest Depths debuff by
stepping into a Bioluminescent Cloud and receiving the 45-second
Bioluminescence debuff (which has no negative effects, and just
counters Darkest Depths).
- A Bioluminescent Cloud spawns when a
Shimmerskin Pufferfish is killed (2 are present in each phase, see the
sub-section below), and lasts for 20 seconds.
- A
The final "underwater" element of the fight is that each of the 3 areas where the fight takes place are surrounded by open water. Essentially, this is denoted by areas where there is no ground/rock beneath the players, and instead simply dark water. It is worth noting here that there are some differences between the 3 fighting areas, in the sense that the first area is mostly a solid mass of ground and the open water is found at the back, whereas the whereas the other two areas are more fragmented, with the solid ground being found in the form a few platforms, surrounded by open water.
When players are above open water while affected by ![]() Bioluminescence,
they will receive a 5-second debuff (
Bioluminescence,
they will receive a 5-second debuff (![]() Gaze from Below), which will
cause them to instantly die when it expires. This debuff is removed if the
players move back from the open water (by being above the ground again), or
if the Bioluminescence debuff expires before the end of the Gaze from Below
debuff.
Gaze from Below), which will
cause them to instantly die when it expires. This debuff is removed if the
players move back from the open water (by being above the ground again), or
if the Bioluminescence debuff expires before the end of the Gaze from Below
debuff.
Transitions
After 90 seconds, the boss will quickly move very far away from the raid,
onto a different platform, and begin casting
![]() Cavitation. This ability has a 30-second cast time
and, once complete, the boss will channel it, dealing extremely high
raid-wide damage every 2 seconds.
Cavitation. This ability has a 30-second cast time
and, once complete, the boss will channel it, dealing extremely high
raid-wide damage every 2 seconds.
The objective of the raid will be to move to the new platform (across open water) and reach the boss in time to interrupt this cast before it kills raid members.
To aid players in getting to the new platforms, several ![]() Slipstreams
form at the back of the current platform. Moving into one of these water
currents buffs the player's swim speed by 150%, and also pushes them
forward forcefully.
Slipstreams
form at the back of the current platform. Moving into one of these water
currents buffs the player's swim speed by 150%, and also pushes them
forward forcefully.
Moreover, on LFR and Normal difficulties, moving into a
![]() Slipstream also removes
Slipstream also removes ![]() Bioluminescence from players,
essentially ensuring that they are in no danger from
Bioluminescence from players,
essentially ensuring that they are in no danger from ![]() Gaze from Below
while traversing the open water. On Heroic and Mythic difficulties, however,
Bioluminescence is not removed and instead players will have to time the
acquisition of the Bioluminescence debuff in such a way that they do not have it
when it is time to move to the new platform.
Gaze from Below
while traversing the open water. On Heroic and Mythic difficulties, however,
Bioluminescence is not removed and instead players will have to time the
acquisition of the Bioluminescence debuff in such a way that they do not have it
when it is time to move to the new platform.
In the open water between platforms, there are a multitude of
Darkwater Jellyfish adds. These adds do nothing (they do not need to
be tanked or attacked), but coming into contact with them applies
the ![]() Glowing Stinger 8-second Nature damage DoT. Moreover, in Heroic
and Mythic difficulties, this causes the affected players to also receive
Glowing Stinger 8-second Nature damage DoT. Moreover, in Heroic
and Mythic difficulties, this causes the affected players to also receive
![]() Bioluminescence (putting them in danger from
Bioluminescence (putting them in danger from
![]() Gaze from Below).
Gaze from Below).
Blackwater Behemoth Abilities
Aside from everything we described so far, the boss itself has a number of abilities you must handle.
Tank Abilities (Feeding Frenzy / Radiant Biomass)
When the boss attacks the same target, it stacks ![]() Feeding Frenzy on
itself, increasing its attack speed by 8% for each consecutive attack. As soon
as the boss attacks a different target, the buff is reset.
Feeding Frenzy on
itself, increasing its attack speed by 8% for each consecutive attack. As soon
as the boss attacks a different target, the buff is reset.
Moreover, we remind you that the boss's current target is affected by
![]() Radiant Biomass — dealing damage over time but permitting
healing by disabling
Radiant Biomass — dealing damage over time but permitting
healing by disabling ![]() Darkest Depths.
Darkest Depths.
It is also worth mentioning that the boss is stationary, and that there must always be a target (a tank) in its melee range. If the tank is not in melee range of the boss, it will attack another player who is (likely killing them), and if no one is in melee range of the boss, it will deal high raid-wide damage.
Toxic Spine
![]() Toxic Spine is a simple ability that places a 12-second Nature
damage DoT to a number of raid members (about 30% of the raid), regularly
throughout the fight.
Toxic Spine is a simple ability that places a 12-second Nature
damage DoT to a number of raid members (about 30% of the raid), regularly
throughout the fight.
Shock Pulse
![]() Shock Pulse is an ability that the boss casts regularly throughout
the fight. For about 5 seconds, the boss pushes all raid members away from it
(running towards the boss counters this effect somewhat), and at the end of
the 5 seconds, it deals raid-wide Nature damage, with the damage being lower the
farther away players are from the boss.
Shock Pulse is an ability that the boss casts regularly throughout
the fight. For about 5 seconds, the boss pushes all raid members away from it
(running towards the boss counters this effect somewhat), and at the end of
the 5 seconds, it deals raid-wide Nature damage, with the damage being lower the
farther away players are from the boss.
Bioelectric Feelers
Throughout the fight (except during transition phases, when
![]() Cavitation is being cast), the boss will constantly
(about every 4 seconds) check if there are any players within 5 yards of each
other. Any time players are found to be within 5 yards, they receive a moderate
amount of Nature damage from
Cavitation is being cast), the boss will constantly
(about every 4 seconds) check if there are any players within 5 yards of each
other. Any time players are found to be within 5 yards, they receive a moderate
amount of Nature damage from ![]() Bioelectric Feelers. Note that this effect
does not chain, so even if someone has multiple players within 5 yards of them,
they will only take one instance of damage.
Bioelectric Feelers. Note that this effect
does not chain, so even if someone has multiple players within 5 yards of them,
they will only take one instance of damage.
Heroic Difficulty Changes
As stated earlier, there are two changes to abilities between LFR/Normal
and Heroic. The first is that on Heroic mode, the ![]() Slipstreams no
longer remove the
Slipstreams no
longer remove the ![]() Bioluminescence buffs, and the second difference
is that the Darkwater Jellyfish present during the
transition phases also apply Bioluminescence if you come in contact with
them.
Bioluminescence buffs, and the second difference
is that the Darkwater Jellyfish present during the
transition phases also apply Bioluminescence if you come in contact with
them.
Mythic Difficulty
Mythic Difficulty Changes
The only addition to Mythic mode is an ability called
![]() Piercing Barb. The boss uses this to sometimes target a random
raid member and then, a short time later, send out a beam towards that
player. The beam will deal lethal damage to the player, but this damage is
split between all players who are in the beam's path.
Piercing Barb. The boss uses this to sometimes target a random
raid member and then, a short time later, send out a beam towards that
player. The beam will deal lethal damage to the player, but this damage is
split between all players who are in the beam's path.
Aside from this, the boss and the adds have increased health and deal increased damage, compared to Heroic mode.
Mythic Strategy
The Mythic strategy for the fight remains the same as the Heroic mode one,
with the addition of having each ![]() Piercing Barb cast properly soaked.
Essentially, the player targeted by Piercing Barb should use the amount of time
they have between being marked by the boss and the beam being cast to position
themselves in such a way that the beam hits as many raid members as possible.
Other raid members should adjust their positioning as well, if needed, to
move into the beam.
Piercing Barb cast properly soaked.
Essentially, the player targeted by Piercing Barb should use the amount of time
they have between being marked by the boss and the beam being cast to position
themselves in such a way that the beam hits as many raid members as possible.
Other raid members should adjust their positioning as well, if needed, to
move into the beam.
Players who have immunities (such as ![]() Ice Block or
Ice Block or
![]() Divine Shield) could soak the
Divine Shield) could soak the ![]() Piercing Barb on their own if
targeted by it, to further reduce raid damage.
Piercing Barb on their own if
targeted by it, to further reduce raid damage.
All players must make sure not stay more than 5 yards apart to avoid
triggering ![]() Bioelectric Feelers.
Bioelectric Feelers.
Loot
| Item> | Type | Slot |
|---|---|---|
| Axe | One Hand | |
| Dagger | ||
| Cloth Armor | Shoulders | |
| Cloth Armor | Feet | |
| Leather Armor | Chest | |
| Leather Armor | Hands | |
| Leather Armor | Waist | |
| Mail Armor | Head | |
| Mail Armor | Legs | |
| Mail Armor | Feet | |
| Plate Armor | Shoulders | |
| Plate Armor | Hands | |
| Plate Armor | Legs | |
| Accessory | Trinket | |
| Accessory | Trinket | |
| Pet |
For more information, please refer to our Eternal Palace Loot and Essence guide.
Class-specific Advice for Blackwater Behemoth
Changelog
- 15 Jul. 2019: Added Mythic mode section.
- 08 Jul. 2019: Added loot.
- 05 Jul. 2019: Guide added.
Raid Guides
BfA Guides
Patch 8.3 Profession Changes
- Farming Cobalt Assembly Rep Has Never Been Easier — 200% Bonus Now Active
- Nightfall Event Bugged After Patch 11.1.5—Here’s How to Tell and What to Do
- Customize Blizzard’s Cooldown Manager in Patch 11.1.5 With This Simple Addon
- 9.6 Million Gold Discount: Another Zulian Tiger From BMAH Box
- Season of Discovery Hotfixes: April 23rd
- Liberation of Undermine Tuning: Mug’Zee Nerf
- Personal Cooldowns Gone from Resource Bar Fix Coming
- A 12-Year Secret Revealed: Three NPC Tributes to a Player