

Mythic+ Affixes
When you reach level 4 in your Mythic+ dungeons, you will start to see affixes attached to the keystone which add additional effects to enemies within the dungeon. Each tier (4, 7, and 10) cannot be duplicated within one keystone, so you will have one of each at higher levels and they will cycle each week. Combinations can vary in difficulty and how much they synergise with each other and the instance in question, but all of them have an impact and have to be dealt with in different ways.
Tier 1 Affixes (Active at 4+ Keystones)
Raging. When targets reach 30% health, they Enrage, and deal 100% bonus damage. This encourages burning enemies down individually when they reach this point, or saving hard crowd control like stuns for when they reach this point during AoE.
Bolstering. Whenever an enemy dies, it buffs other enemies in combat with an additional 20% health and damage, which heavily encourages killing them at the same time, or within a small window of each other. In larger groups, this can be deadly if mis-managed. Note this does not, however, interact with adds summoned via boss mechanics.
Sanguine. When enemies die, they leave a small pool on the ground which deals damage to players and heals enemies standing within them. This increases the awareness requirement, and means you need to reposition groups quickly around them.
Teeming. The dungeon itself will generate additional lesser adds, which increases the number of targets in pulls. This mostly increases the difficulty of pulls as additional enemies will be active in each pack.
Bursting. When minions die within the dungeon, all party members inside will receive a stacking debuff that deals 5% of their maximum health every 2 seconds for 4 seconds. This requires the party to kill targets in a staggered fashion to prevent it stacking too high and killing off players, and for the healer to be acutely aware of the state of the party health when it is applied.
Tier 2 Affixes (Active at 7+ Keystones)
Volcanic. This causes random patches on the ground to spawn that will deal high pulsing damage if standing within them. Managing this is mostly on players avoiding them whenever they appear, and will by extension result in reduced DPS due to players avoiding them.
Necrotic. All enemies will apply a stacking debuff that deals flat ticking damage, and reduces healing/absorption received by 3%, stacking up to 10 with additional hits. This increases the intensity of tank healing and adds an additional component to the damage they receive.
Skittish. Enemies will randomly drop all threat on their current target. This makes it significantly more dangerous for DPS and adds an extra factor for tanks to account for, as dangerous mobs will require additional attention to keep in check.
Explosive. Enemies will occasionally spawn Explosive Orbs nearby with a small amount of health. These will detonate after 6 seconds if not killed, dealing 50% of the all party members' maximum health. These orbs are immune to AoE and crowd control, so need to be switched to and killed quickly throughout the dungeon.
Quaking. All players will periodically cause a Shockwave 8 yards around their character, dealing 20% of players' maximum health to any players standing inside it after 3 seconds and interrupting casts. Players should remain spread to avoid taking more than one hit.
Grievous. Any players that falls below 90% health will be afflicted by a Grievous Wound, dealing a percentage of the player's maximum health every 3 seconds, stacking up to 5 times. This is permanent throughout the dungeon, so the healer needs to be aware of the stacks and heal players back above 90% to remove the debuff.
Tier 3 Affixes (Active at 10+ Keystones)
Tyrannical. Increases the health of boss targets by 40%, and their damage by 20%. This intensifies bosses significantly and must be noted when dealing with some of the more dangerous ones, as it also affects abilities alongside extending the duration of the fights in question.
Fortified. Increases the health of minions within the dungeon by 20%, and the damage they deal by 40%. This intensifies the trash pulls significantly and in some cases can limit how many extra you can pull at once, which will slow your pace between bosses.
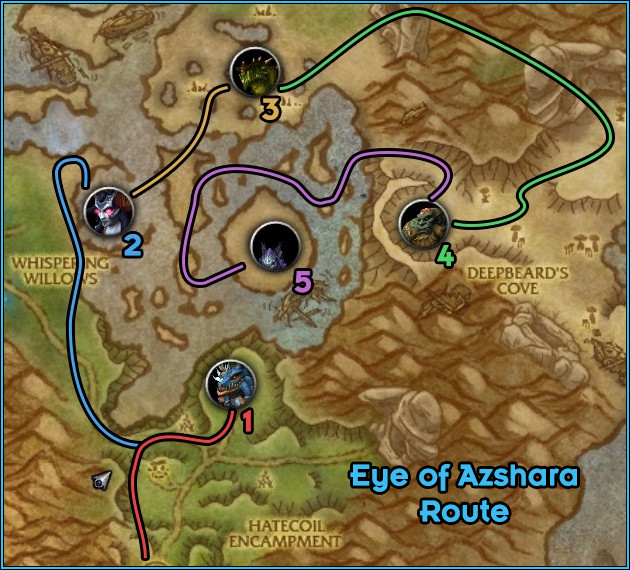
Eye of Azshara Timer: 36 Minutes
Due to Eye being largely an open, free-form dungeon that allows you to do bosses in any order (excluding the final boss), you can approach it in a number of ways. We would, however, advise taking the left after Warlord Parjesh, and moving in a circle around the dungeon to end at King Deepbeard.
There is a variety of paths you can take, but below you can move between a lot of excess groups by cutting through some side areas:
Warlord Parjesh
Important Trash to Note
A majority of the trash between the entrance of the dungeon and Warlord Parjesh can be skipped, in a variety of ways. The easiest is to move down the left, which will limit the number of pulls down to two or three, depending on your strategy.
Hatecoil Stormweaver/Hatecoil Warrior
Hatecoil Stormweavers and Hatecoil Warriors will spawn on
the left side together, one of each. You should pull and kill the first group,
and watch for the Stormweaver's casts. ![]() Storm should be the highest
priority, as it deals a great deal of AoE damage to the group, and any spare
interrupts should be spent on
Storm should be the highest
priority, as it deals a great deal of AoE damage to the group, and any spare
interrupts should be spent on ![]() Arc Lightning, which will chain between
players. Try not to waste any on
Arc Lightning, which will chain between
players. Try not to waste any on ![]() Lightning Blast, if possible; healers
should try to deal with these casts. Hatecoil Warriors will use a frontal cone
that leaves a bleed called
Lightning Blast, if possible; healers
should try to deal with these casts. Hatecoil Warriors will use a frontal cone
that leaves a bleed called ![]() Coral Slash, which means they should always
be faced away from the group (and the melee in particular). At 50% health, the
Warriors will
Coral Slash, which means they should always
be faced away from the group (and the melee in particular). At 50% health, the
Warriors will ![]() Enrage, but these adds are a lower
priority in comparison to the Stormweaver.
Enrage, but these adds are a lower
priority in comparison to the Stormweaver.
Hatecoil Oracle/Hatecoil Wrangler
Only one Hatecoil Oracle will spawn alongside a
Hatecoil Wrangler in the following pull, which will be a high priority
target. ![]() Rejuvenating Waters should be interrupted as the highest
priority, and stuns should be liberally used here to manage the frequent casts
from both adds.
Rejuvenating Waters should be interrupted as the highest
priority, and stuns should be liberally used here to manage the frequent casts
from both adds. ![]() Arcane Bolt from the Oracle is less important, but
spare interrupts can be thrown on this. Wranglers will cast
Arcane Bolt from the Oracle is less important, but
spare interrupts can be thrown on this. Wranglers will cast ![]() Hooked Net
on a random non-tank player, rooting them and dealing moderate Physical damage.
They will also cast
Hooked Net
on a random non-tank player, rooting them and dealing moderate Physical damage.
They will also cast ![]() Lightning Prod that will deal heavy Nature damage
to all players in range, and also aggro any of the neutral
Wandering Shellbacks nearby and
Lightning Prod that will deal heavy Nature damage
to all players in range, and also aggro any of the neutral
Wandering Shellbacks nearby and ![]() Enrage them, so position
these accordingly, as it cannot be interrupted.
Enrage them, so position
these accordingly, as it cannot be interrupted.
Hatecoil Crusher
The Hatecoil Crusher patrols down the path heading to
Lady Hatecoil, and can be pulled with the
Hatecoil Oracle/Hatecoil Stormweaver. This deals high tank
damage alongside casting a sequence of ![]() Mighty Slam for high tank
damage, and then
Mighty Slam for high tank
damage, and then ![]() Thundering Stomp dealing group damage and knocking
players back. The latter can and should be interrupted, but do not do so at the
expense of not interrupting
Thundering Stomp dealing group damage and knocking
players back. The latter can and should be interrupted, but do not do so at the
expense of not interrupting ![]() Rejuvenating Waters.
Rejuvenating Waters.
Warlord Parjesh Encounter
Quick TL;DR
Prioritise killing the Hatecoil Crestrider, interrupt
![]() Restoration and
Restoration and ![]() Bellowing Roar. Try to hit adds with
Bellowing Roar. Try to hit adds with
![]() Impaling Spear, avoid
Impaling Spear, avoid ![]() Crashing Wave and
Crashing Wave and
![]() Quicksand left behind. Parjesh enrages at 30% health remaining.
Quicksand left behind. Parjesh enrages at 30% health remaining.
Overview
Parjesh is a fight centered around management of the extra Naga he spawns,
alongside dealing with some fairly simple, yet dangerous targeted mechanics.
The first of these is a ranged hit that will be applied to a random non-tank
player, ![]() Throw Spear, which deals high Physical damage and a
subsequent DoT. This should be healed through, and defensive cooldowns can be
considered if you feel in danger.
Throw Spear, which deals high Physical damage and a
subsequent DoT. This should be healed through, and defensive cooldowns can be
considered if you feel in danger.
He will routinely spawn two additional Naga, a Hatecoil Crestrider
(caster) and a Hatecoil Shellbreaker (melee). The latter should
naturally be stacked on top of the boss with the tank, and the Crestrider
should be interrupted and brought close for cleave damage. The Crestrider
should be burned down as it both casts offensively and can heal Parjesh, which
is extremely dangerous. Incidental cleave should be used on the Shellbreaker,
and whoever Parjesh targets with ![]() Impaling Spear should then move
behind the Shellbreaker to block it and deal damage to the add, ideally
finishing it off. The Shellbreaker's
Impaling Spear should then move
behind the Shellbreaker to block it and deal damage to the add, ideally
finishing it off. The Shellbreaker's ![]() Bellowing Roar should also
ideally be interrupted, but this is a lower priority than the
Bellowing Roar should also
ideally be interrupted, but this is a lower priority than the
![]() Restoration from Crestriders.
Restoration from Crestriders.
The ![]() Impaling Spear will be announced to the marked player, who
will have 5 seconds to move and react, ideally positioning themselves so that
there is an add between them and the boss or, alternatively, so that there is
no one between them and the boss and using a powerful defensive cooldown to
survive the hit and DoT. The small red arrow underneath Parjesh will indicate
the direction the spear will be thrown, so melee should take extra care to not
stand in line with this.
Impaling Spear will be announced to the marked player, who
will have 5 seconds to move and react, ideally positioning themselves so that
there is an add between them and the boss or, alternatively, so that there is
no one between them and the boss and using a powerful defensive cooldown to
survive the hit and DoT. The small red arrow underneath Parjesh will indicate
the direction the spear will be thrown, so melee should take extra care to not
stand in line with this.
Roughly every 30 seconds, Parjesh will cast ![]() Crashing Wave, which
causes him to rush forward for massive Frost damage after a 2.5 second cast,
and as such all player should move from his path. It will then leave behind a
patch of
Crashing Wave, which
causes him to rush forward for massive Frost damage after a 2.5 second cast,
and as such all player should move from his path. It will then leave behind a
patch of ![]() Quicksand in the area that was rushed over, which will
deal high Nature damage every 2 seconds to players standing in it, also slowing
their movement speed by 35%; it should be avoided.
Quicksand in the area that was rushed over, which will
deal high Nature damage every 2 seconds to players standing in it, also slowing
their movement speed by 35%; it should be avoided.
Finally, at 30% health Parjesh will ![]() Enrage, gaining 30%
Haste until the end of the encounter. You can consider saving cooldowns for
this burn, but given that Mythic+ is timed, using it at the start when you have
more time to freely hit the boss is likely preferable, unless your tank is
regularly dying to the added pressure.
Enrage, gaining 30%
Haste until the end of the encounter. You can consider saving cooldowns for
this burn, but given that Mythic+ is timed, using it at the start when you have
more time to freely hit the boss is likely preferable, unless your tank is
regularly dying to the added pressure.
Lady Hatecoil
Important Trash to Note
Engaging Lady Hatecoil requires killing two of the
Hatecoil Arcanists that are providing ![]() Arcane Shielding. Once
this is done you can engage the boss. These are the only trash you should need
to pull to move on. The pack of neutral Saltsea Globules in the boss
area should ideally be pulled with the boss and burned down quickly.
Arcane Shielding. Once
this is done you can engage the boss. These are the only trash you should need
to pull to move on. The pack of neutral Saltsea Globules in the boss
area should ideally be pulled with the boss and burned down quickly.
Hatecoil Arcanist
Hatecoil Arcanists can be pulled with additional mobs nearby to help
with the creature count in Mythic+ if necessary, however as an enemy these are
mostly interrupt-heavy. There are three separate casts, the most important of
which to interrupt is ![]() Aqua Spout, which will spawn Frost damage
telegraphs that will knock players into the air if not avoided.
Aqua Spout, which will spawn Frost damage
telegraphs that will knock players into the air if not avoided.
![]() Arcane Rebound deals a moderate amount of Arcane damage to her target
and then bounces to nearby targets within 5 yards. This is the lowest priority,
and you should just remain spread out to mitigate it. Finally,
Arcane Rebound deals a moderate amount of Arcane damage to her target
and then bounces to nearby targets within 5 yards. This is the lowest priority,
and you should just remain spread out to mitigate it. Finally,
![]() Polymorph: Fish crowd controls a target for 8 seconds, and whilst this
is disruptive, it can be dispelled by the healer.
Polymorph: Fish crowd controls a target for 8 seconds, and whilst this
is disruptive, it can be dispelled by the healer.
Lady Hatecoil Encounter
Quick TL;DR
The Lady Hatecoil encounter revolves around the group shifting their
positioning between being in and out of water during Lady Hatecoil's casts of
![]() Focused Lightning and
Focused Lightning and ![]() Static Nova, respectively, whilst
managing some other small mechanics.
Static Nova, respectively, whilst
managing some other small mechanics.
Overview
When casts of ![]() Static Nova occur, all players should immediately move
to a Sand Dune and remain there until the cast completes, as remaining in water
will deal massive Nature damage and stun them for 5 seconds, and is usually
lethal.
Static Nova occur, all players should immediately move
to a Sand Dune and remain there until the cast completes, as remaining in water
will deal massive Nature damage and stun them for 5 seconds, and is usually
lethal.
Once the ![]() Static Nova cast is complete, players should then move back
into the water in anticipation of
Static Nova cast is complete, players should then move back
into the water in anticipation of ![]() Focused Lightning, which will
destroy any Dunes players are standing on when it completes. It will also deal
high Nature damage, and splash to any nearby players, so you should remain
spread during this cast.
Focused Lightning, which will
destroy any Dunes players are standing on when it completes. It will also deal
high Nature damage, and splash to any nearby players, so you should remain
spread during this cast.
This cycle will continue throughout the fight, beginning with
![]() Static Nova as the first cast that will come roughly 15 seconds into
the fight. You should adjust to the pattern and know whether you should be in
or out of the water for the next cast, and prepare accordingly. Additionally,
casters can begin the fight on a Sand Dune to mitigate some movement.
Static Nova as the first cast that will come roughly 15 seconds into
the fight. You should adjust to the pattern and know whether you should be in
or out of the water for the next cast, and prepare accordingly. Additionally,
casters can begin the fight on a Sand Dune to mitigate some movement.
Finally, ![]() Monsoon tornadoes will periodically spawn throughout the
fight and fixate on the nearest player, destroying any Sand Dunes caught in the
way and knocking up players they come into contact with; they should be kited
around Dunes and players to avoid these things happening.
Monsoon tornadoes will periodically spawn throughout the
fight and fixate on the nearest player, destroying any Sand Dunes caught in the
way and knocking up players they come into contact with; they should be kited
around Dunes and players to avoid these things happening.
Between these casts, roughly every 40 seconds, there will be a
![]() Beckon Storm cast, which will spawn 5 Saltsea Globules, one by
each player. These should be brought to the melee and grouped, then players
should quickly spread back out to deal with other mechanics. It should be noted
that when these adds die, they will detonate with
Beckon Storm cast, which will spawn 5 Saltsea Globules, one by
each player. These should be brought to the melee and grouped, then players
should quickly spread back out to deal with other mechanics. It should be noted
that when these adds die, they will detonate with ![]() Watery Splash,
dealing low Frost damage in a 5-yard radius and slowing the movement speed of
affected players by 20% for 6 seconds, stacking, so melee should try to avoid
this. If the tank is affected by it, they can be dispelled or they can use a
snare-removing ability so that they can safely make it to a Dune in time for
the next
Watery Splash,
dealing low Frost damage in a 5-yard radius and slowing the movement speed of
affected players by 20% for 6 seconds, stacking, so melee should try to avoid
this. If the tank is affected by it, they can be dispelled or they can use a
snare-removing ability so that they can safely make it to a Dune in time for
the next ![]() Static Nova cast.
Static Nova cast.
![]() Curse of the Witch will periodically be cast on a random number of
players in the group, which will do nothing for the 12-second duration of the
debuff, but when it expires or is dispelled, will launch out a 30-yard cone in
front of the player. This will deal no damage to players (but it will one-shot
Saltsea Globules) but it will knock any players caught within it back
15 yards, and is particularly dangerous if it knocks players into or out of
water when other mechanics are occurring, so you should always face away from
the group.
Curse of the Witch will periodically be cast on a random number of
players in the group, which will do nothing for the 12-second duration of the
debuff, but when it expires or is dispelled, will launch out a 30-yard cone in
front of the player. This will deal no damage to players (but it will one-shot
Saltsea Globules) but it will knock any players caught within it back
15 yards, and is particularly dangerous if it knocks players into or out of
water when other mechanics are occurring, so you should always face away from
the group.
![]() Curse of the Witch can be decursed, so bear that in mind if you are a
Shaman or Druid. This blast can also be used to effectively one-shot groups of
Saltsea Globules. The knockback from dispelling this will also knock
back the Globules' tank, allowing them to avoid being hit by the dying
Globules'
Curse of the Witch can be decursed, so bear that in mind if you are a
Shaman or Druid. This blast can also be used to effectively one-shot groups of
Saltsea Globules. The knockback from dispelling this will also knock
back the Globules' tank, allowing them to avoid being hit by the dying
Globules' ![]() Watery Splash, but be very careful when doing this as it can
quickly cause dangerous positional problems. You can also do this on the timer,
but usually this coincides with a Lightning cast, so is very risky to pull off
without using a stun first to lock them in place, and moving accordingly.
Watery Splash, but be very careful when doing this as it can
quickly cause dangerous positional problems. You can also do this on the timer,
but usually this coincides with a Lightning cast, so is very risky to pull off
without using a stun first to lock them in place, and moving accordingly.
Serpentrix
Important Trash to Note
The area surrounding Serpentrix is filled with extra trash that should be cleared up to create space for the encounter. If any of the more dangerous groups are left up it will almost guarantee a wipe if pulled with the boss.
Stormwake Hydra
There are two Stormwake Hydras that will patrol around the boss, one
on the left and right, that must absolutely be pulled as they present the most
group damage. These should be faced away from the group by the tank due to the
frontal cone bounces from ![]() Roiling Storm, that will deal high Nature
damage. At the same time, all group members should watch for the telegraphs
generated by
Roiling Storm, that will deal high Nature
damage. At the same time, all group members should watch for the telegraphs
generated by ![]() Chaotic Tempest, which also deals high Nature damage to
anyone remaining in the area after 2 seconds, and bounce again twice, creating
additional damage areas.
Chaotic Tempest, which also deals high Nature damage to
anyone remaining in the area after 2 seconds, and bounce again twice, creating
additional damage areas.
Mak'rana Hardshell
Mak'rana Hardshells are the blue Mak'rana, which present a high
threat for tanks. These can be pulled with other mobs, in particular in
conjunction with AoE packs such as Seaspray Crabs, however be careful
of the danger they will still present. ![]() Armorshell casts apply a high
absorption shield that detonates when it is broken
(
Armorshell casts apply a high
absorption shield that detonates when it is broken
(![]() Armorshell Shrapnel), dealing high damage to the entire group, so
interrupting Armorshell is a priority. Finally, the Mak'rana Hardshell will use
Armorshell Shrapnel), dealing high damage to the entire group, so
interrupting Armorshell is a priority. Finally, the Mak'rana Hardshell will use
![]() Clobbering Claws which will cleave other targets within 5 yards, so
players should stay clear of the tank.
Clobbering Claws which will cleave other targets within 5 yards, so
players should stay clear of the tank.
Seaspray Crabs
Seaspray Crabs come in groups of 6, which should be picked up
usually with another larger creature in the bay. They are a simple group of
mobs that will also attack with ![]() Jagged Claws, which will leave a light
DoT to the targets hit (usually the tank). These should be AoEd down quickly
though before it becomes an issue.
Jagged Claws, which will leave a light
DoT to the targets hit (usually the tank). These should be AoEd down quickly
though before it becomes an issue.
Cove Seagull
Finally,there are a number of Cove Seagulls in the area that are
non-hostile. These should still be pulled, as if they are accidentally drawn
into combat during the Serpentrix encounter or when fighting
Stormwake Hydras, they will present a massive threat.
![]() Blinding Peck will disorient their target and any other enemies
currently fixated on the tank will run loose, likely instantly killing any
melee players in range.
Blinding Peck will disorient their target and any other enemies
currently fixated on the tank will run loose, likely instantly killing any
melee players in range.
Serpentrix Encounter
Quick TL;DR
Move from ![]() Poison Spit patches, drop
Poison Spit patches, drop ![]() Toxic Wound puddles away
from the group and boss.
Toxic Wound puddles away
from the group and boss. ![]() Submerge comes at 66%/33% health, kill
additional heads (the priority is Blazing Hydra Spawn >
Arcane Hydra Spawn), and, interrupt casts of
Submerge comes at 66%/33% health, kill
additional heads (the priority is Blazing Hydra Spawn >
Arcane Hydra Spawn), and, interrupt casts of ![]() Blazing Nova and
Blazing Nova and
![]() Arcane Blast as much as possible.
Arcane Blast as much as possible.
Overview
Serpentrix starts out in the center of the arena, and the fight
revolves around managing the additional heads that appear and the abilities
each of them use after ![]() Submerge occurs, as well as efficiently
moving to each head and to Serpentrix himself.
Submerge occurs, as well as efficiently
moving to each head and to Serpentrix himself.
Initially, you are just dealing with the Poison head which will cast two
main abilities, the first being ![]() Poison Spit. This will create two
swirling green circles on the ground, where after 2 seconds a projectile will
land dealing moderate damage. During
Poison Spit. This will create two
swirling green circles on the ground, where after 2 seconds a projectile will
land dealing moderate damage. During ![]() Violent Winds this speeds up,
making it more difficult to avoid if you do not move with the winds. When this
cast begins, you should start moving to avoid it as effectively as
possible.
Violent Winds this speeds up,
making it more difficult to avoid if you do not move with the winds. When this
cast begins, you should start moving to avoid it as effectively as
possible.
The second ability used by the Poison head is ![]() Toxic Wound, which
will be applied to any non-tank player roughly every 25-30 seconds. This will
make the affected player drop a
Toxic Wound, which
will be applied to any non-tank player roughly every 25-30 seconds. This will
make the affected player drop a ![]() Toxic Puddle at their feet every second
for 6 seconds, and they will remain on the ground until the encounter is over.
Due to this, the affected player should try to stack them in a small area
whilst moving around the edge, to minimise space wasted without creating an
extremely high damage stacked puddle in one place. Melee should be especially
careful to not coat the outer circle of the boss in these pools.
Toxic Puddle at their feet every second
for 6 seconds, and they will remain on the ground until the encounter is over.
Due to this, the affected player should try to stack them in a small area
whilst moving around the edge, to minimise space wasted without creating an
extremely high damage stacked puddle in one place. Melee should be especially
careful to not coat the outer circle of the boss in these pools.
At 66% and 33% health, Serpentrix will cast ![]() Submerge,
re-emerging at a different gap in the arena and beginning a cast of
Submerge,
re-emerging at a different gap in the arena and beginning a cast of
![]() Rampage. Alongside this he will spawn one
Blazing Hydra Spawn, and one Arcane Hydra Spawn. The tank must
immediately move to the new location of the Poison head and interrupt
Rampage. Alongside this he will spawn one
Blazing Hydra Spawn, and one Arcane Hydra Spawn. The tank must
immediately move to the new location of the Poison head and interrupt
![]() Rampage, then remain with that head. The DPS however must split,
usually with 2 moving to the Blazing Hydra Spawn to interrupt
Rampage, then remain with that head. The DPS however must split,
usually with 2 moving to the Blazing Hydra Spawn to interrupt
![]() Blazing Nova and burn it down, and one at the Arcane Hydra Spawn to
interrupt
Blazing Nova and burn it down, and one at the Arcane Hydra Spawn to
interrupt ![]() Arcane Blast as much as possible. Ranged can do this
particularly effectively, being able to interrupt the Arcane head whilst still
helping to kill the Blazing Hydra Spawn, as the kill order will always be
Blazing > Arcane due to the high AoE damage
Arcane Blast as much as possible. Ranged can do this
particularly effectively, being able to interrupt the Arcane head whilst still
helping to kill the Blazing Hydra Spawn, as the kill order will always be
Blazing > Arcane due to the high AoE damage ![]() Blazing Nova
represents.
Blazing Nova
represents.
Interrupt rotations should be set up on both these heads, making sure to use Ranged interrupts on the Arcane head to maximise your ability to burn down the Blazing Hydra Spawn quickly with your entire group.
It is also worth noting that any damage dealt to either of the additional
heads spawned during ![]() Submerge will also deal damage to Serpentrix,
so it is always worth dealing with them first.
Submerge will also deal damage to Serpentrix,
so it is always worth dealing with them first.
Lastly, note that Cove Seagulls can sometimes be missed due to not being hostile; if they are accidentally pulled during the encounter they are of the highest priority to burn down, as a disorient on the tank is particularly lethal for DPS.
King Deepbeard
Important Trash to Note
Again, a majority of the trash leading to King Deepbeard can be skipped, and only one large pack of Murlocs and Gilblin will be pulled in the cave. This will culminate in a pull of two Skrogs on the path leading up to the boss. One Cove Seagull can spawn in his arena, however, and should be pulled and killed quickly if your group has passive AoE.
Bitterbrine Slave
A large group of Bitterbrine Slaves will be waiting at the end of
the cave, and should be pulled and AoEd down quickly. Ideally, make use of
group stun effects to reduce the poison applications on the tank. There are 3
poisons, ![]() Lethargic Toxin reducing movement speed,
Lethargic Toxin reducing movement speed, ![]() Numbing Toxin
reducing Haste, and finally
Numbing Toxin
reducing Haste, and finally ![]() Sea-Brine Toxin applying a Nature DoT. If
possible, these should be dispelled.
Sea-Brine Toxin applying a Nature DoT. If
possible, these should be dispelled.
Saltscale Skulker/Lurker
A group of Saltscale Skulker and Saltscale Lurker Murlocs
will patrol through the cave and will likely be pulled, containing one
Saltscale Skulker and 7 other Saltscale Lurkers. They will all apply
![]() Tearing Bite to their current target, increasing all damage taken by
10% and stacking up, so killing these quickly is important.
Tearing Bite to their current target, increasing all damage taken by
10% and stacking up, so killing these quickly is important.
Skrog Wavecrasher/Skrog Tidestomper
A single Skrog Wavecrasher will be accompanied by a
Skrog Tidestomper on the ramp leading up to Deepbeard's arena, each of
which have different abilities to manage. The Wavecrasher will cast
![]() Rising Fury every 20 seconds, dealing high Nature damage to the group
and stunning them for 1 second, alongside increasing the damage of further
Rising Fury every 20 seconds, dealing high Nature damage to the group
and stunning them for 1 second, alongside increasing the damage of further
![]() Rising Fury casts. Due to this ability, the Tidestomper is a priority
to kill. The Skrog Tidestomper will also cast
Rising Fury casts. Due to this ability, the Tidestomper is a priority
to kill. The Skrog Tidestomper will also cast ![]() Massive Quake
every 20 seconds, which will create a number of
Massive Quake
every 20 seconds, which will create a number of ![]() Quake patches
underneath players that will detonate after 3 seconds dealing high Physical
damage. These will continue to spawn for the 7-second channel, and spawn 3
Saltscale Murlocs over the duration, which should be kept together with
the two Skrogs and cleaved down.
Quake patches
underneath players that will detonate after 3 seconds dealing high Physical
damage. These will continue to spawn for the 7-second channel, and spawn 3
Saltscale Murlocs over the duration, which should be kept together with
the two Skrogs and cleaved down.
King Deepbeard Encounter
Quick TL;DR
Spread out during ![]() Quake, and avoid cracks for
Quake, and avoid cracks for
![]() Aftershock. Use those to break
Aftershock. Use those to break ![]() Gaseous Bubbles to avoid
large AoE damage. Move out of
Gaseous Bubbles to avoid
large AoE damage. Move out of ![]() Ground Slam, and be mindful of the
Ground Slam, and be mindful of the
![]() Enrage at 30% health.
Enrage at 30% health.
Overview
King Deepbeard is a punishing, high damage encounter and you should pay particularly high attention to dealing with each individual mechanics correctly, as mistakes are very punishing for the healer and they can quickly fall behind.
The first and most noticeable ability is ![]() Quake, which will deal
moderate Physical damage to all members of the group and then deal splash
damage to nearby other friendly players, requiring you to spread. Cracks will
also spawn in the arena, which after 4 seconds will trigger
Quake, which will deal
moderate Physical damage to all members of the group and then deal splash
damage to nearby other friendly players, requiring you to spread. Cracks will
also spawn in the arena, which after 4 seconds will trigger
![]() Aftershock. These deal high Physical damage every second to players
who remain in the dust spawned above them for 5 seconds.
Aftershock. These deal high Physical damage every second to players
who remain in the dust spawned above them for 5 seconds.
![]() Call the Seas will spawn a series of circular patches on the ground
that will move erratically around the arena. These do low Frost damage every
0.3 seconds whilst inside a circle, but are mostly an annoyance and a low
priority compared to the more lethal mechanics.
Call the Seas will spawn a series of circular patches on the ground
that will move erratically around the arena. These do low Frost damage every
0.3 seconds whilst inside a circle, but are mostly an annoyance and a low
priority compared to the more lethal mechanics.
Players will have to deal with a large ground AoE in ![]() Ground Slam,
which after 2.5 seconds will deal high Physical damage, ignoring armor, to
anyone remaining in the circular telegraph. Tanks should also move out of this
when the cast begins, as Deepbeard will not turn or track his target. Deepbeard
will also
Ground Slam,
which after 2.5 seconds will deal high Physical damage, ignoring armor, to
anyone remaining in the circular telegraph. Tanks should also move out of this
when the cast begins, as Deepbeard will not turn or track his target. Deepbeard
will also ![]() Enrage at 30% health, increasing his attack speed by
100%, making it even more pertinent for the tank to avoid extra unnecessary
damage.
Enrage at 30% health, increasing his attack speed by
100%, making it even more pertinent for the tank to avoid extra unnecessary
damage.
Most importantly for DPS and the healer, Deepbeard will cast
![]() Gaseous Bubbles roughly every 30 seconds on two players. This absorbs a large
amount of damage taken by the players while affected. This debuff will detonate
with Gaseous Explosion if it times out, dealing damage equal to the
remaining absorb shield to all players if you do not take enough damage to
remove it. This can most effectively be done so by taking damage during the
encounter with the following mechanics:
Gaseous Bubbles roughly every 30 seconds on two players. This absorbs a large
amount of damage taken by the players while affected. This debuff will detonate
with Gaseous Explosion if it times out, dealing damage equal to the
remaining absorb shield to all players if you do not take enough damage to
remove it. This can most effectively be done so by taking damage during the
encounter with the following mechanics:
- taking a combined hit of
 Quake and Aftershock
damage. You will always have enough time to take this before the bubble
expires. Take note to move out quickly when the bubble absorb ends.
Quake and Aftershock
damage. You will always have enough time to take this before the bubble
expires. Take note to move out quickly when the bubble absorb ends. - if you miss the Quake and are in desperate need to remove it,
you can either stand in
 Lightning Strike casts on the ground, or as
a last resort move into a
Lightning Strike casts on the ground, or as
a last resort move into a  Ground Slam. The latter will definitely
deplete the shield, but is more risky.
Ground Slam. The latter will definitely
deplete the shield, but is more risky.
![]() Call the Seas is a poor choice to try to remove your
Call the Seas is a poor choice to try to remove your
![]() Gaseous Bubbles, as the high movement to stay in them and low damage
they deal will mean you are chasing them for an extended period of time. This
impacts your damage/healing, and puts more strain on the group. You should
instead try to remove the bubble as efficiently as possible with the effects
noted above.
Gaseous Bubbles, as the high movement to stay in them and low damage
they deal will mean you are chasing them for an extended period of time. This
impacts your damage/healing, and puts more strain on the group. You should
instead try to remove the bubble as efficiently as possible with the effects
noted above.
Wrath of Azshara
Important Trash to Note
Leading up to the Wrath of Azshara, 4 named summoners will stand spaced out around it, channelling. These must all be defeated to activate the boss encounter.
Naga Summoners
All 4 different summoners will share two abilities,
![]() Lightning Blast and
Lightning Blast and ![]() Arcane Bomb, alongside each having a
separate extra spell depending on the summoner. Arcane Bomb operates the same
as the ability from Wrath of Azshara itself, and Lightning Blast will do
the same as Hatecoil Stormweavers, dealing moderate Nature damage.
Arcane Bomb, alongside each having a
separate extra spell depending on the summoner. Arcane Bomb operates the same
as the ability from Wrath of Azshara itself, and Lightning Blast will do
the same as Hatecoil Stormweavers, dealing moderate Nature damage.
Ritualist Lesha will cast ![]() Aqua Spout, the same as
Hatecoil Arcanists. This should be interrupted as a priority, as it
spawns a large number of blue telegraphs on the ground that will detonate for
moderate Frost damage.
Aqua Spout, the same as
Hatecoil Arcanists. This should be interrupted as a priority, as it
spawns a large number of blue telegraphs on the ground that will detonate for
moderate Frost damage.
Channeler Varisz will gain ![]() Polymorph: Fish, which should be
either be interrupted or dispelled by the healer if the interrupt is
missed.
Polymorph: Fish, which should be
either be interrupted or dispelled by the healer if the interrupt is
missed.
Binder Ashioi will cast ![]() Magic Binding, which will root all
nearby players and deal heavy damage every second. This should be dispelled,
especially on melee players who are in dangerous positions. Root breaks such as
Magic Binding, which will root all
nearby players and deal heavy damage every second. This should be dispelled,
especially on melee players who are in dangerous positions. Root breaks such as
![]() Spirit Walk will also remove this on yourself, and cleanse the damaging
debuff at the same time.
Spirit Walk will also remove this on yourself, and cleanse the damaging
debuff at the same time.
Mystic Ssa'veh will gain the ![]() Storm ability, shared with
Hatecoil Stormweavers. This deals high Nature damage every second in a
circle around the caster, and should be interrupted quickly.
Storm ability, shared with
Hatecoil Stormweavers. This deals high Nature damage every second in a
circle around the caster, and should be interrupted quickly.
Wrath of Azshara Encounter
Quick TL;DR
Avoid ![]() Tidal Wave and
Tidal Wave and ![]() Mystic Tornado. Avoid
Mystic Tornado. Avoid
![]() Massive Deluge, move out with
Massive Deluge, move out with ![]() Arcane Bomb for the healer to
dispel, and stack up for
Arcane Bomb for the healer to
dispel, and stack up for ![]() Crushing Depths.
Crushing Depths.
Overview
Wrath of Azshara, the end boss, presents a very high awareness fight that requires players to pay attention to multiple ground effects. The encounter begins with the boss at 20% health, so execute-style effects are in play for the entire fight.
Each melee attack caused by the Wrath of Azshara will also splash
onto the entire party, dealing low unavoidable Physical damage that healers
should take note of. The boss will also be surrounded by rotating
![]() Tidal Waves and
Tidal Waves and ![]() Mystic Tornados, that will slowly move around
the boss and should be avoided. Note that due to their slow-moving nature,
they can be easy to mis-judge, but the boss has a very large hitbox so do not
be afraid of moving further out to manage your position. Group position should
ideally be clumped in one position relatively close, and you should rotate
slowly around in one direction with each
Mystic Tornados, that will slowly move around
the boss and should be avoided. Note that due to their slow-moving nature,
they can be easy to mis-judge, but the boss has a very large hitbox so do not
be afraid of moving further out to manage your position. Group position should
ideally be clumped in one position relatively close, and you should rotate
slowly around in one direction with each ![]() Massive Deluge.
Massive Deluge.
![]() Massive Deluge will be cast in front of the boss around the tank,
which creates a large blue zone that will deal massive Frost damage to any
players still in the area when it ends, knocking them back. This should be
avoided as the highest priority by the entire group, including the tank, and
the 5-second cast time should be more than enough to do so.
Massive Deluge will be cast in front of the boss around the tank,
which creates a large blue zone that will deal massive Frost damage to any
players still in the area when it ends, knocking them back. This should be
avoided as the highest priority by the entire group, including the tank, and
the 5-second cast time should be more than enough to do so.
Note that any time a mechanics is failed and a player is hit by a spell from
the boss, they will gain a stack of either ![]() Magic Resonance (from Arcane
damage) or
Magic Resonance (from Arcane
damage) or ![]() Frost Resonance (from Frost damage), lasting for 5 minutes
and stacking. This lasts effectively for the remainder of the encounter, and
as such this makes it even more important to avoid everything you can to ease
stress on your healer.
Frost Resonance (from Frost damage), lasting for 5 minutes
and stacking. This lasts effectively for the remainder of the encounter, and
as such this makes it even more important to avoid everything you can to ease
stress on your healer.
Next, ![]() Arcane Bomb will be cast on any non-tank player. This will
cause a slowly descending bomb to drop onto the targeted player, and when
dispelled, this will no longer track the afflicted player and land where they
were standing. When this lands, it will deal high damage and stun any players
in the area for 6 seconds. The player affected should move out of the group
quickly and when safe, should be dispelled and then move back into
the group.
Arcane Bomb will be cast on any non-tank player. This will
cause a slowly descending bomb to drop onto the targeted player, and when
dispelled, this will no longer track the afflicted player and land where they
were standing. When this lands, it will deal high damage and stun any players
in the area for 6 seconds. The player affected should move out of the group
quickly and when safe, should be dispelled and then move back into
the group.
Finally ![]() Crushing Depths will be applied to a random non-tank player,
creating a large targeted circle around them. This will deal 60% of the player's
health in Physical damage after 6 seconds. This percentage will be split with
any other players in the circle. Ideally this should be soaked by the
entire group (as long as the tank can mitigate some of this, as they will
be taking noticeably more damage due to its percentage-based hit).
Crushing Depths will be applied to a random non-tank player,
creating a large targeted circle around them. This will deal 60% of the player's
health in Physical damage after 6 seconds. This percentage will be split with
any other players in the circle. Ideally this should be soaked by the
entire group (as long as the tank can mitigate some of this, as they will
be taking noticeably more damage due to its percentage-based hit).
At 10% health, ![]() Cry of Wrath will be cast, which will intensify the
frequency of both
Cry of Wrath will be cast, which will intensify the
frequency of both ![]() Tidal Wave and
Tidal Wave and ![]() Mystic Tornado. On top of this
Mystic Tornado. On top of this
![]() Violent Winds will return, which is quite dangerous due to the
requirement to dodge effects. It will also bring back
Violent Winds will return, which is quite dangerous due to the
requirement to dodge effects. It will also bring back ![]() Lightning Strikes
into the area, causing blue patches on the ground that will detonate after 3
seconds for high Nature damage.
Lightning Strikes
into the area, causing blue patches on the ground that will detonate after 3
seconds for high Nature damage.
After 10% the intensity of the avoidable mechanics ramps up significantly, so
consider saving large cooldowns for this time to expedite this phase. The caveat is
that movement required is also increased a great deal with extra mechanics, so
capitalising on cooldowns is more difficult. A judgment call must be made on
whether time is needed to beat the Mythic+ timer, in which case you should use
![]() Heroism/
Heroism/![]() Bloodlust when you pull, or doing the fight
cautiously, in which case you should save the cooldown for 10% health.
Bloodlust when you pull, or doing the fight
cautiously, in which case you should save the cooldown for 10% health.