Garothi Worldbreaker Strategy/Tactics for Normal/Heroic
Table of Contents
General Information
On this page, you will find a working strategy to defeat Garothi Worldbreaker in Antorus, the Burning Throne for both Normal and Heroic modes, which usually only differ by the tuning of the boss.
Here, we assume that you have read our descriptions of the abilities for this encounter.
The other pages of our Garothi Worldbreaker guide can be accessed from the table of contents on the right.
Positioning and Strategy
The Garothi Worldbreaker is a stationary boss, locked in place to
his starting position. Melee range by at least 1 player must be maintained
whenever the boss is not casting mechanics to avoid casts of ![]() Carnage.
The melee are free to stand where they choose, though it is generally best to
have the tanks occupy one side of the boss while the melee camp groups up on
the opposite side.
Carnage.
The melee are free to stand where they choose, though it is generally best to
have the tanks occupy one side of the boss while the melee camp groups up on
the opposite side.
Ranged DPS and Healers should form a loose spread around the middle of the
room, allowing them to easily spread to soak casts of ![]() Annihilation.
It is important to reform that loose grouping after each soak, however, to
give players targeted with
Annihilation.
It is important to reform that loose grouping after each soak, however, to
give players targeted with ![]() Decimation space to spread out. Ideally,
Decimation targets should spread to the edges of the room, allowing them to
maintain range on their targets but leaving the center of the room clear for
the rest of the group to perform their roles safely.
Decimation space to spread out. Ideally,
Decimation targets should spread to the edges of the room, allowing them to
maintain range on their targets but leaving the center of the room clear for
the rest of the group to perform their roles safely.
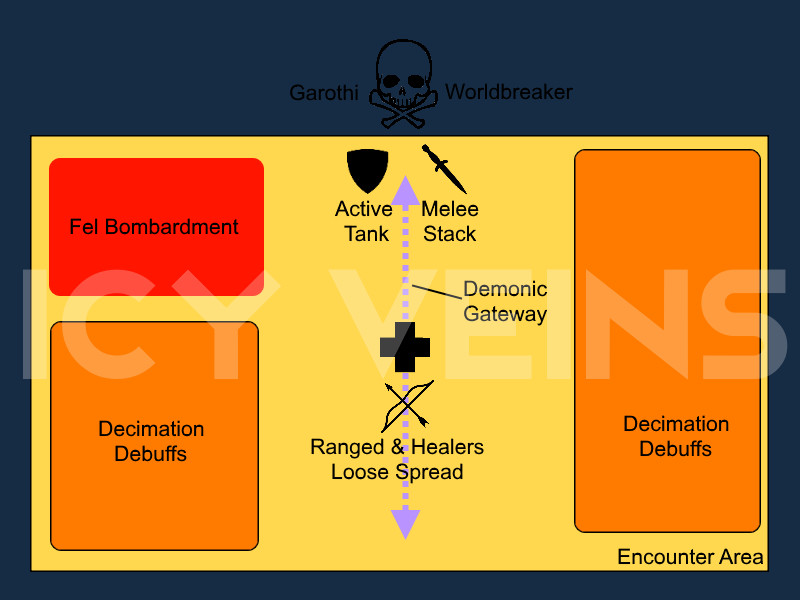
Tanks should perform a taunt swap following the application of
![]() Fel Bombardment. The debuffed Tank should make their way to the edge
of the room and ensure all the incoming missiles are avoided. Mobility
cooldowns may be necessary, and less mobile Tanks (such as Death Knights)
may want to stay clear of the very edge to avoid being accidentally knocked
off the platform if they make a mistake. Tanks should always go to the same
side of the room with Fel Bombardment for consistency, and this area must be
designated off limits for the placement of other mechanics. Namely, any melee
targeted with
Fel Bombardment. The debuffed Tank should make their way to the edge
of the room and ensure all the incoming missiles are avoided. Mobility
cooldowns may be necessary, and less mobile Tanks (such as Death Knights)
may want to stay clear of the very edge to avoid being accidentally knocked
off the platform if they make a mistake. Tanks should always go to the same
side of the room with Fel Bombardment for consistency, and this area must be
designated off limits for the placement of other mechanics. Namely, any melee
targeted with ![]() Decimation should stay clear of the Tanks' Bombardment
zone.
Decimation should stay clear of the Tanks' Bombardment
zone.
At 65% and 25% the Garothi Worldbreaker will enter a
pseudo-intermission phase, beginning ![]() Apocalypse Drive. The Garothi
Worldbreaker will become untargetable, and its 2 weapons, the Annihilator
and the
Apocalypse Drive. The Garothi
Worldbreaker will become untargetable, and its 2 weapons, the Annihilator
and the ![]() Decimator, will appear. Destroying one of the weapons will
interrupt the cast of Apocalypse Drive and prevent a raid wipe and remove a
mechanic from the encounter.
Decimator, will appear. Destroying one of the weapons will
interrupt the cast of Apocalypse Drive and prevent a raid wipe and remove a
mechanic from the encounter.
For the first ![]() Apocalypse Drive, it is recommended you destroy the
Annihilator, removing the
Apocalypse Drive, it is recommended you destroy the
Annihilator, removing the ![]() Annihilation mechanic entirely,
which is the most disruptive. On Heroic difficulty and above, the raid will
also have to avoid
Annihilation mechanic entirely,
which is the most disruptive. On Heroic difficulty and above, the raid will
also have to avoid ![]() Surging Fel, which can simply be dodged on either
side. During the second
Surging Fel, which can simply be dodged on either
side. During the second ![]() Apocalypse Drive, only the
Apocalypse Drive, only the ![]() Decimator
will remain and it will then be destroyed.
Decimator
will remain and it will then be destroyed.
If the raid successfully destroys a weapon system before the conclusion
of ![]() Apocalypse Drive, the boss will return and recommence its assault
on the group. Be aware, however, that this will begin with a single cast of
Apocalypse Drive, the boss will return and recommence its assault
on the group. Be aware, however, that this will begin with a single cast of
![]() Eradication each time Apocalypse Drive ends. The entire raid should
escape to the back of the room.
Eradication each time Apocalypse Drive ends. The entire raid should
escape to the back of the room. ![]() Demonic Gateway, in particular, is
very useful for achieving this easily. Healing cooldowns may be necessary,
however, as long as everyone is at maximum range there should be no issues
with survivability.
Demonic Gateway, in particular, is
very useful for achieving this easily. Healing cooldowns may be necessary,
however, as long as everyone is at maximum range there should be no issues
with survivability.
Additionally, damage will be increased by 20% each time a weapon is destroyed
via ![]() Empowered, resulting in a 40% damage increase by the time the
fight concludes.
Empowered, resulting in a 40% damage increase by the time the
fight concludes.
Tank Concerns
The major tank concern on this encounter is ![]() Fel Bombardment. The
debuffed tank must always be careful to ensure they are not knocked off the
platform when dealing with this debuff, avoiding as many missiles as possible
each time. The melee and ranged must also keep the designated area free of
Fel Bombardment. The
debuffed tank must always be careful to ensure they are not knocked off the
platform when dealing with this debuff, avoiding as many missiles as possible
each time. The melee and ranged must also keep the designated area free of
![]() Decimation debuffs, as the extra damage could be lethal or force the
use of unnecessary cooldowns.
Decimation debuffs, as the extra damage could be lethal or force the
use of unnecessary cooldowns.
Tanks can also assist with ![]() Annihilation soaking when possible,
as there are generally several spawns within melee range.
Annihilation soaking when possible,
as there are generally several spawns within melee range.
Healing Concerns
There are not many points of significant threat to the raid throughout
this encounter. ![]() Eradication is the main ability that will cause a
large spike in group health, however, there is little follow up damage meaning
deaths are unlikely unless they are killed in a single hit. Later Eradication
casts in particular should be managed with raid cooldowns, due to the buff
from
Eradication is the main ability that will cause a
large spike in group health, however, there is little follow up damage meaning
deaths are unlikely unless they are killed in a single hit. Later Eradication
casts in particular should be managed with raid cooldowns, due to the buff
from ![]() Empowered.
Empowered.
Useful Tips
Pay special attention to:
- dropping
 Decimation on the edges of the room;
 - soaking every cast of
 Annihilation;
 - avoiding
 Surging Fel on Heroic difficulty;
 - focusing down one weapon during
 Apocalypse Drive;
 - getting at least 40 yards from the boss during
 Eradication.
Overall, this boss is very straightforward and should pose little trouble to most groups.
Bloodlust/Heroism/Time Warp
We advise you to use ![]() Bloodlust/
Bloodlust/![]() Heroism/
Heroism/![]() Time Warp
as the fight begins. The group should have no trouble destroying a weapon
without the use of Bloodlust, and despite the damage buff from
Time Warp
as the fight begins. The group should have no trouble destroying a weapon
without the use of Bloodlust, and despite the damage buff from
![]() Empowered, the removal of mechanics makes the fight progressively
simpler with each
Empowered, the removal of mechanics makes the fight progressively
simpler with each ![]() Apocalypse Drive.
Apocalypse Drive.
Changelog
- 15 Oct. 2017: Page added.


- WoW’s FOMO Problem Is Getting Worse — Miss It Once, Lose It Forever
- Five Bosses Down! Midnight Season 1 Race to World First, Day 2
- Raid, Delves, and Quests: Midnight Hotfixes, March 25th
- New Dracthyr Transformation Toggle, Evoker, Rogue and Warrior Tuning: Midnight Patch 12.0.5 PTR Development Notes
- An 85% Success Rate at Level 10 Makes Midnight the Easiest WoW Season Ever
- WoW Players Can Get a Limited-Time Transmog From an IGN Promotion
- WoW Players Can Skip the Voidspire Raid and Still See the Ending
- The Great Vault Best-in-Slot Picks for Every Specialization in Midnight Season 1