How To Improve As Discipline Priest — Midnight Season 1
On this page, you will find out how you can improve at playing Discipline Priest in World of Warcraft — Midnight Season 1. We list the common mistakes that you should try to avoid and the small details that can greatly improve your performance.
Discipline Priest Log Analysis: The Next Crucial Step to Improvement
Logs can be used for many things, but I will be focusing on two primary functions: pre-planning cooldown usage and self-improvement.
How to Log
The primary tool the World of Warcraft community uses to log encounters is WarcraftLogs. They have put together a wonderful guide on how to get started with their tool, found here: Getting Started with Warcraft Logs.
Planning Your Cooldowns In Advance
When approaching a new boss as a Discipline Priest, one of the most important things you can do is research the damage patterns of the boss to determine where your cooldowns will be most effective. Having knowledge of when the damage is going to happen is crucial to playing Discipline well. Start by opening the log of an encounter.

Once you see this screen, select the "Damage Taken" tab and change the "Taken By Friendly" selection to "Taken From Ability".

Once you have these selected, you should see a graph showing the damage the raid in the log took from the encounter and what abilities caused them. On the graph itself, de-select "Total" and instead select the top 1-3 abilities shown on the list below the graph. You should end up with a graph similar to the following.
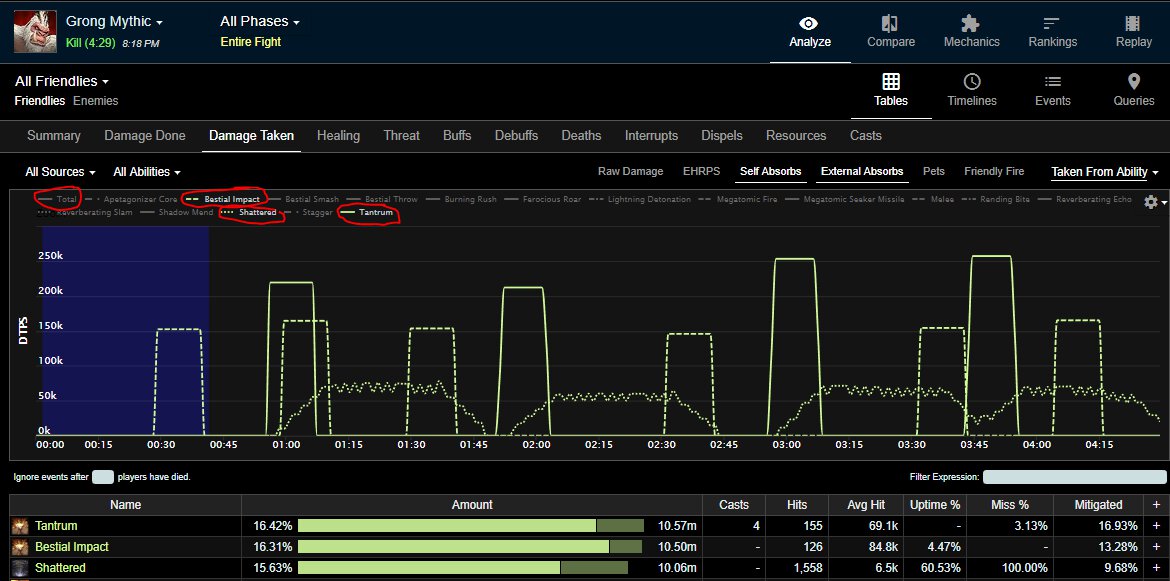
Now that you have a decent idea of what the fights damage pattern looks like, you can extract timings out of the log. To find the times in which an ability happens within a log, you can follow the following procedure.
- Pick whichever ability you are looking for the timings for. In this example Mythic Grong Log, I will look for the timings in which the ability "Tantrum", the largest source of damage in the encounter, occurred.
- Select a single player in the encounter, as shown below. Ensure
the selected player was alive for the entire fight, or your timings may be
inaccurate.

- Select the ability you chose in step one, as shown below.

- Change the view from a Table to an Events list.

By following this process, you should end up with a chart similar to the following, which shows the exact times that the ability in question occurred:
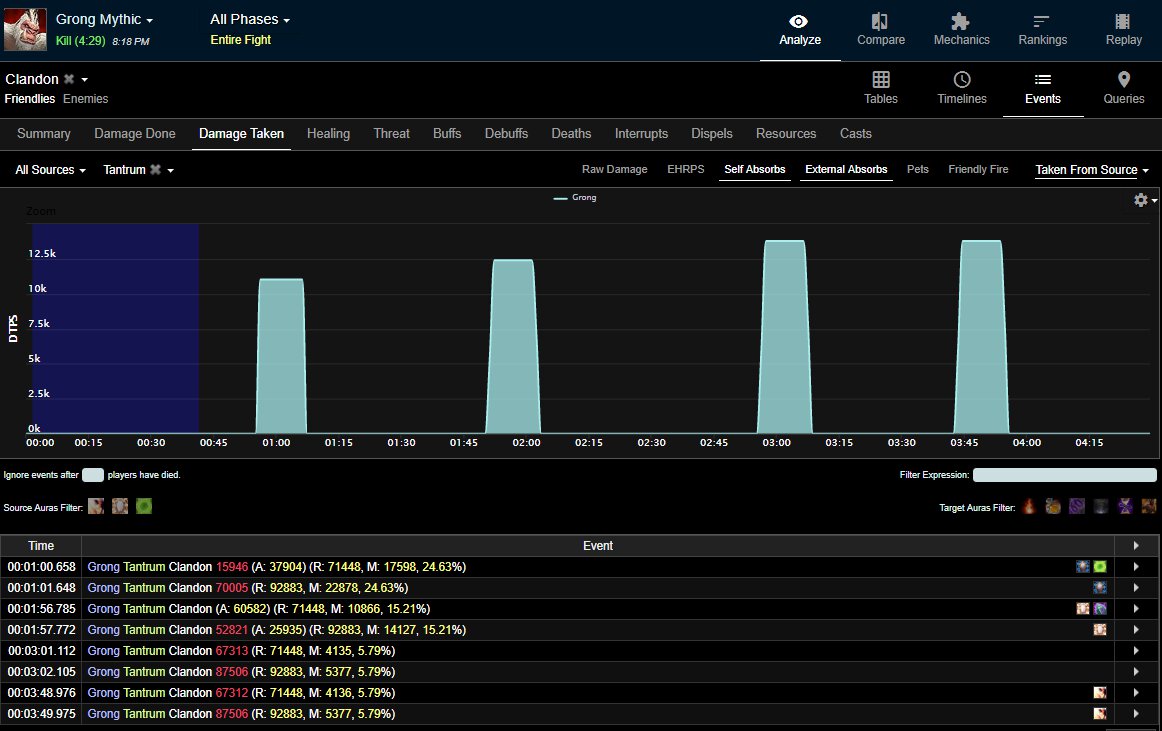
By doing this process for the most relevant damage events in a single encounter, you can build out a damage pattern timeline of sorts, which you can use to plan your cooldowns in advance.
Analyzing Your Own Performance
The first step to analyzing your own performance within a single encounter is to understand an extremely basic Query in Warcraft Logs. Start by clicking on the "Queries" button on the far right of the header. You should see this screen below.
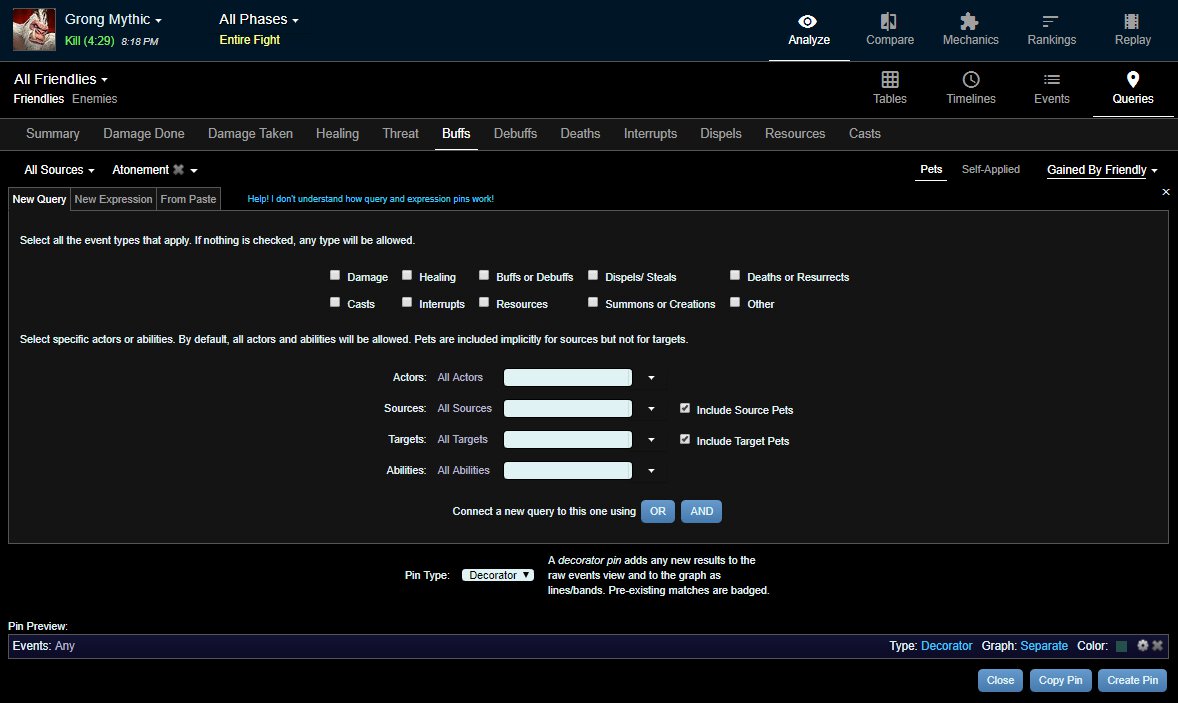
If you would like more information than what I am about to walk you through, Warcraft Logs offers plenty of information about how to get much, much more out of this feature. For now, we will stick to the basics. The first thing I want to see is when the "Tantrum" ability happened, as that is the ability I had previously decided I wanted to cover with my cooldowns. I can check off the "Damage" check box and type in "Tantrum" into the "Abilities" box and click "Create Pin".
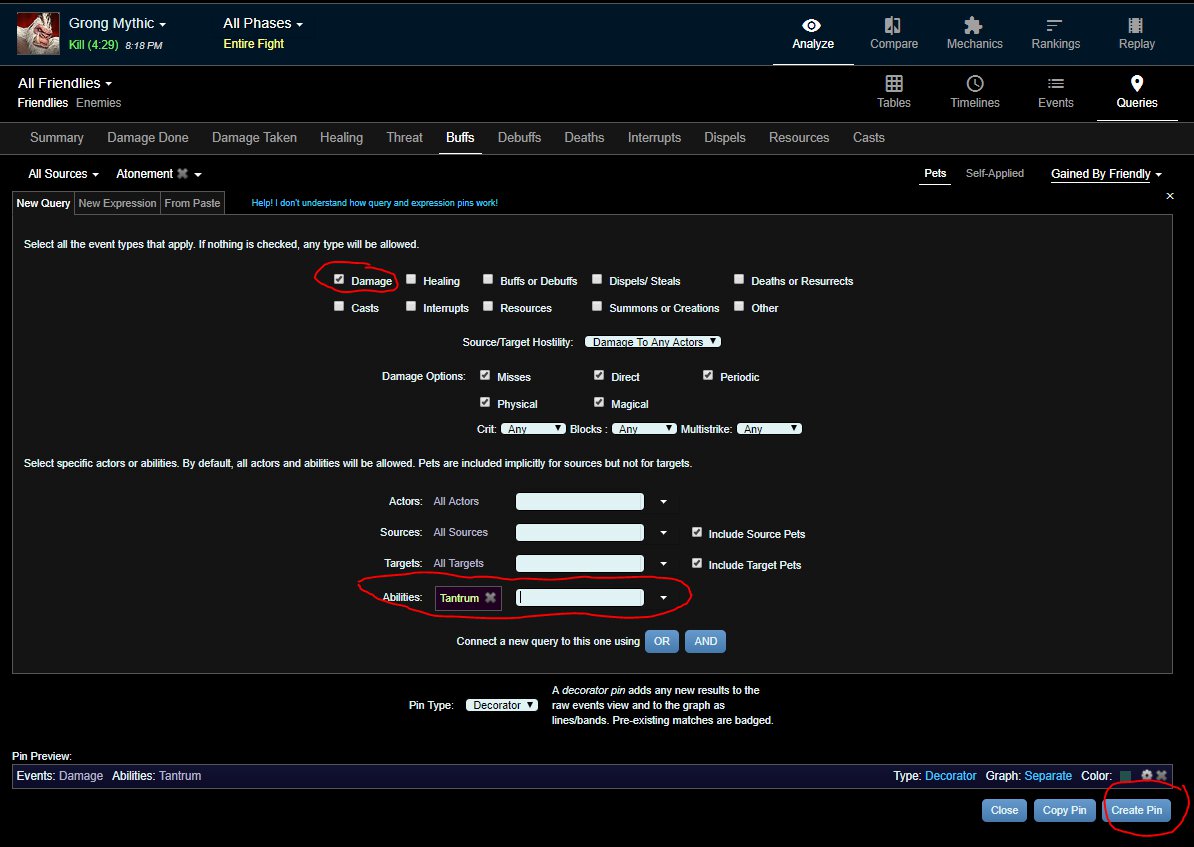
The results of this query should look like the following.

Next, we will look at when I used my major cooldown, ![]() Evangelism, in
relation to Tantrum. Start by clicking on the Queries button again within the
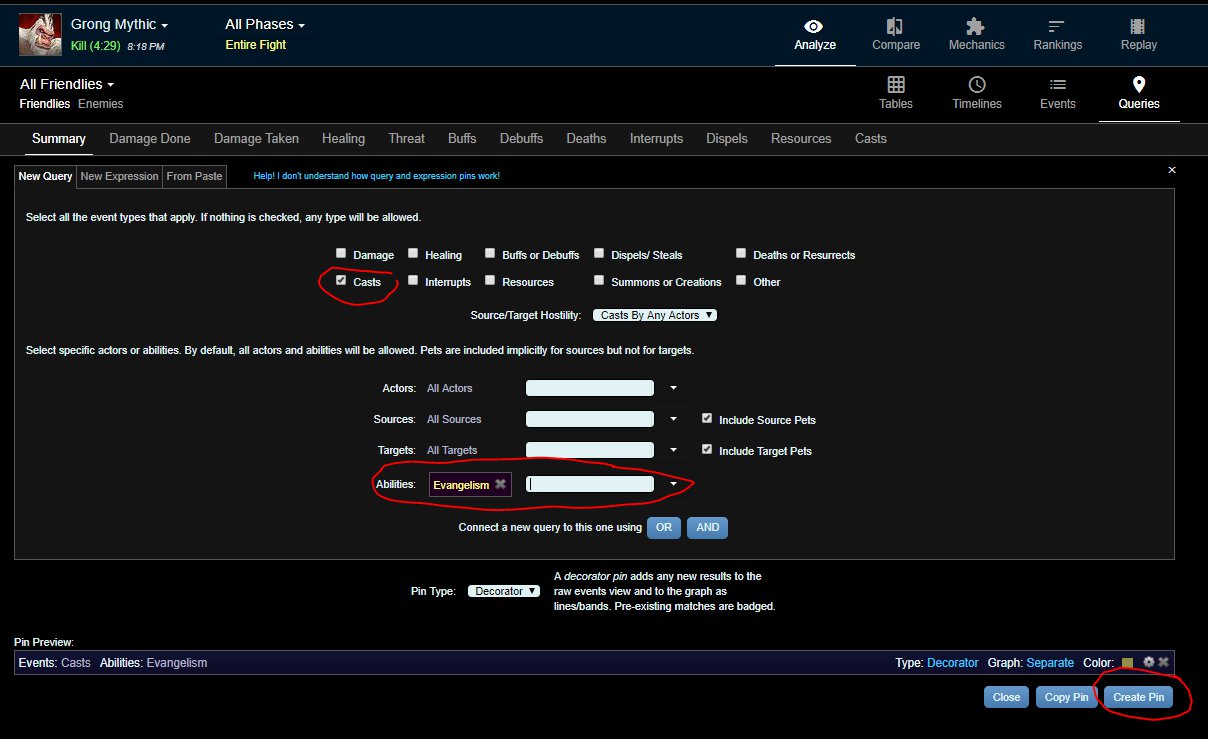
same window. This time, we are going to check off the "Casts" check box instead
of the "Damage" one, and we will type "Evangelism" into the "Abilities" box
instead of "Tantrum".
Evangelism, in
relation to Tantrum. Start by clicking on the Queries button again within the
same window. This time, we are going to check off the "Casts" check box instead
of the "Damage" one, and we will type "Evangelism" into the "Abilities" box
instead of "Tantrum".
The results of this query should look like the following.
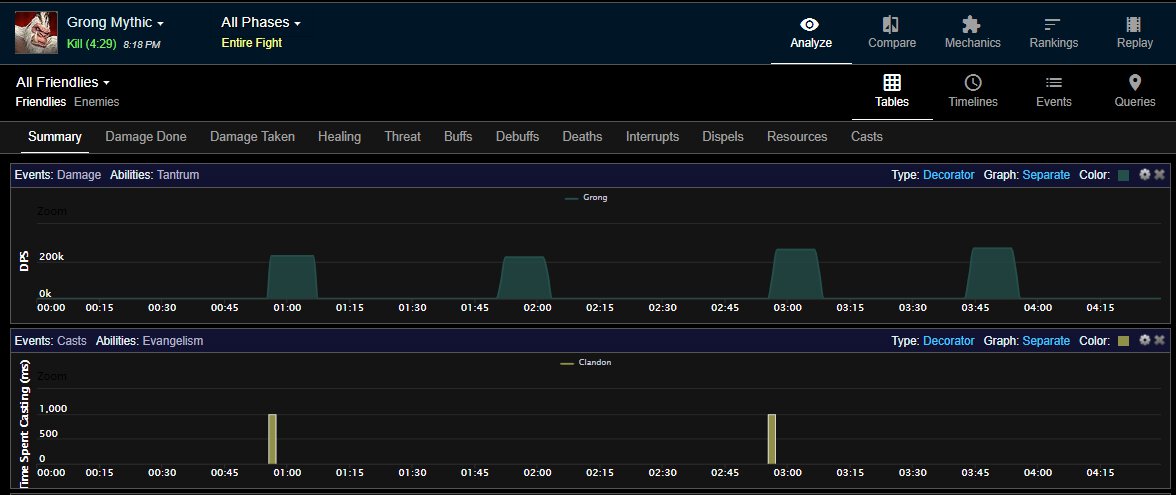
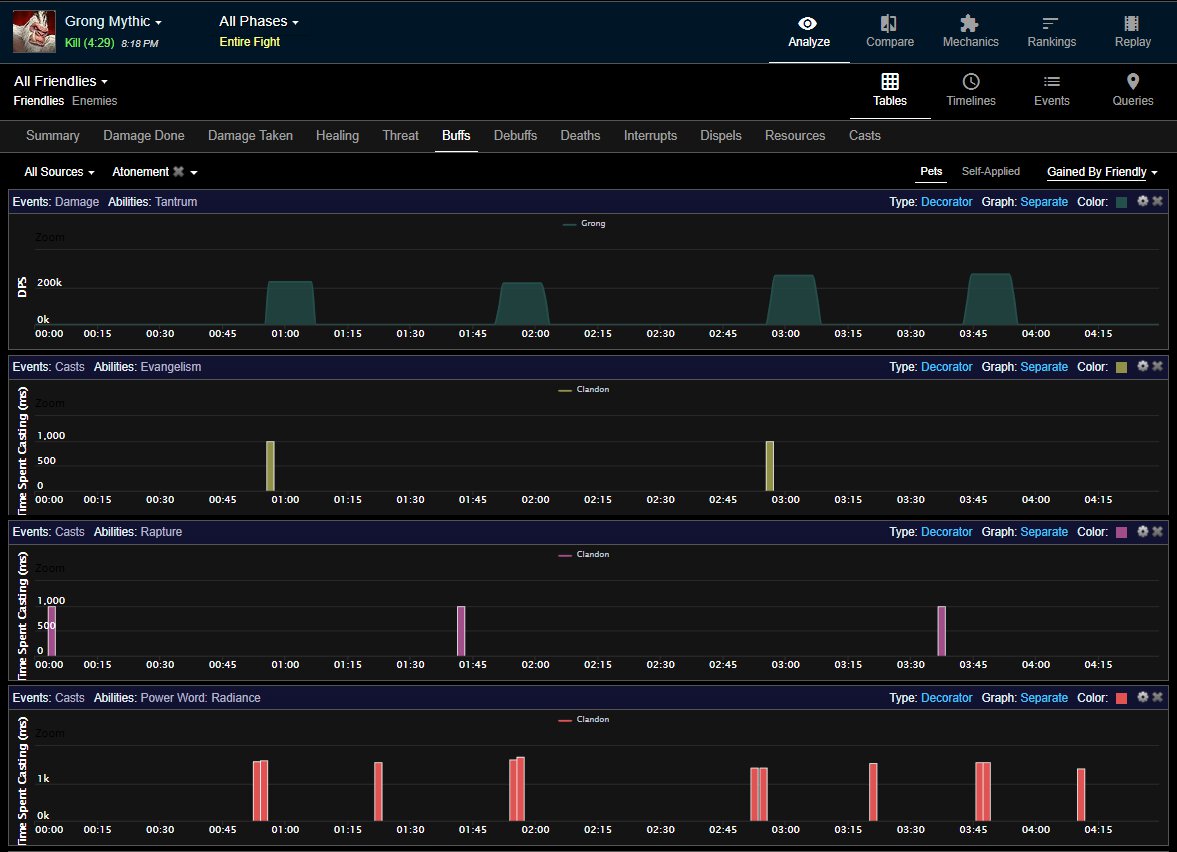
With these two graphs lined up, I can get a good idea of when I used my
major cooldown, ![]() Evangelism, during this encounter. Now, we will repeat the
process I completed for Evangelism for
Evangelism, during this encounter. Now, we will repeat the
process I completed for Evangelism for ![]() Rapture and
Rapture and
![]() Power Word: Radiance. You should get a graph that looks like the
following.
Power Word: Radiance. You should get a graph that looks like the
following.
The last thing I want to add to this chart to give me a good picture of how
well I did is my ![]() Atonement count in relation to the rest of the
information displayed. Click "Buffs" towards the top and select "Atonement"
on the drop-down shown below. Scroll to the bottom of the screen and click
"Stacked".
Atonement count in relation to the rest of the
information displayed. Click "Buffs" towards the top and select "Atonement"
on the drop-down shown below. Scroll to the bottom of the screen and click
"Stacked".


The results should look like the following:
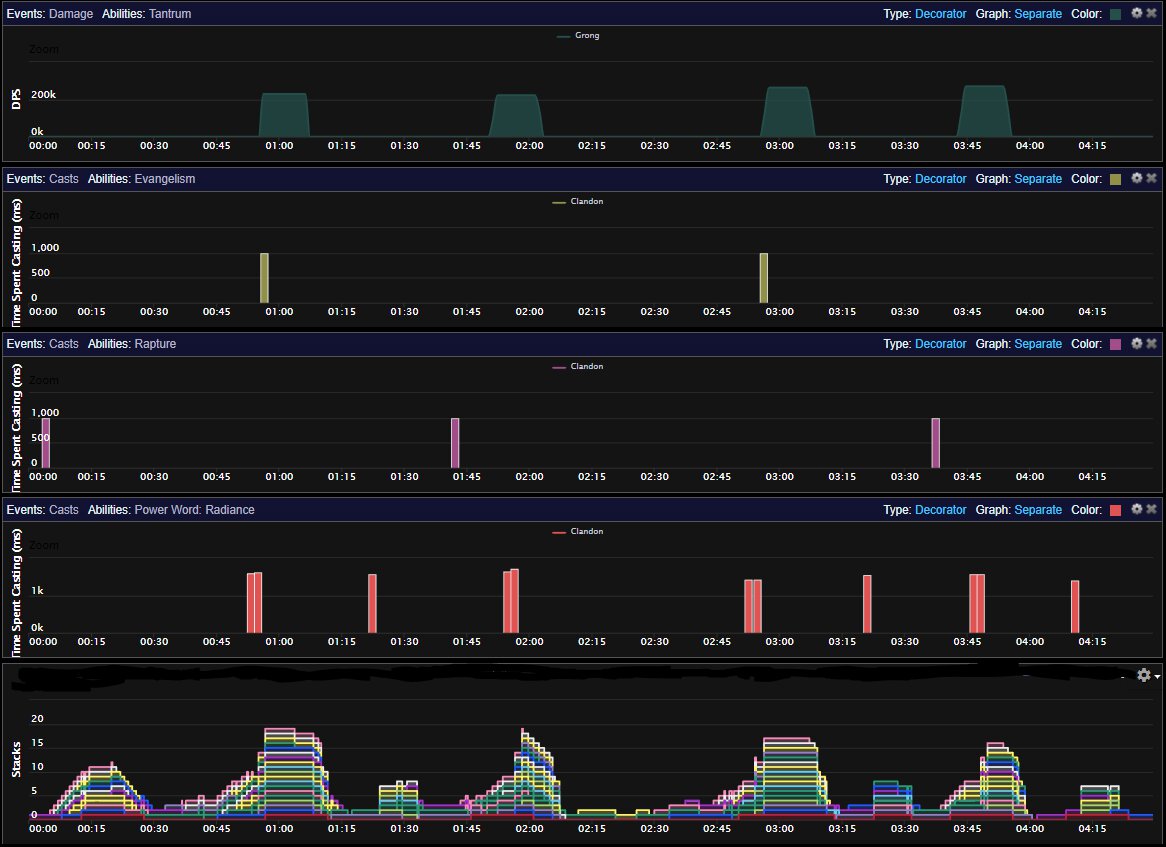
Using this result, I can examine if I used my cooldowns and abilities at the
proper time and did not miss any uses that I should have gotten off. For example,
in the example log I have been using here, I missed ![]() Power Word: Radiance
casts in the following locations.
Power Word: Radiance
casts in the following locations.
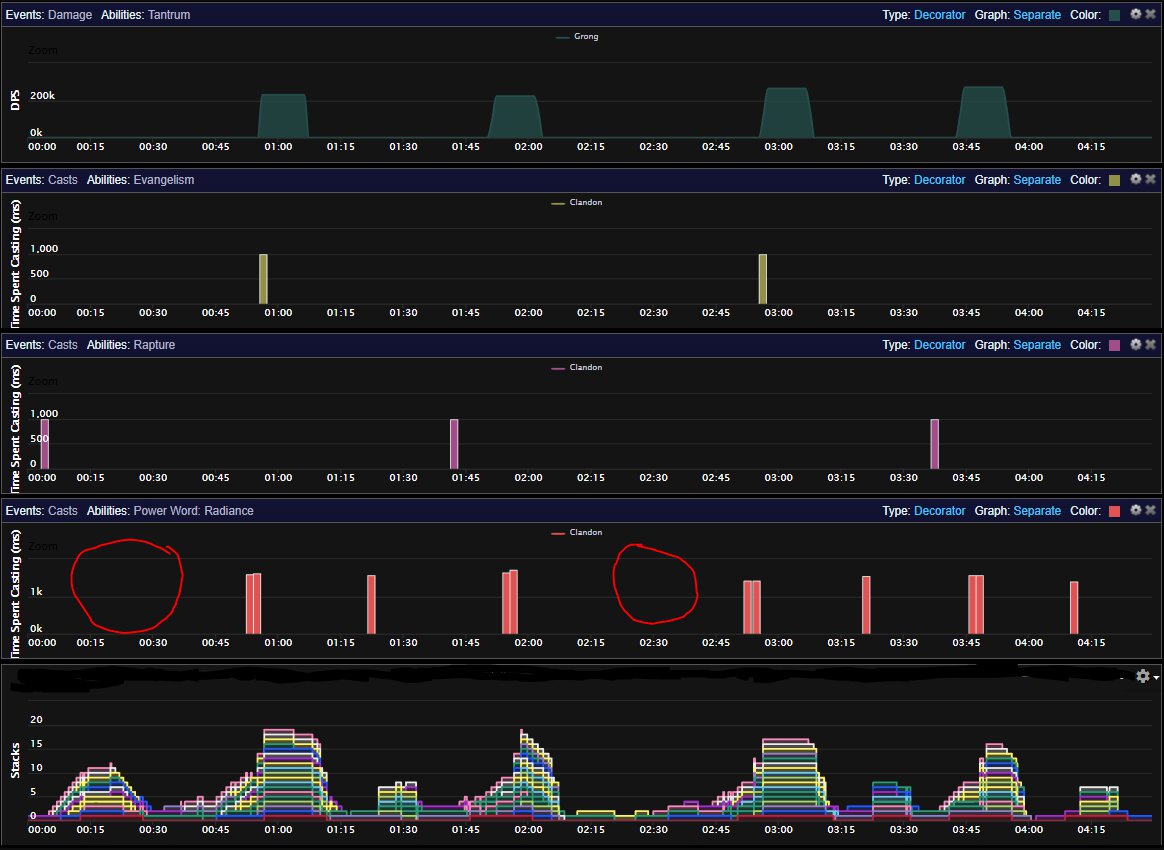
This is just a small example of how you can analyze your own performance within WarcraftLogs. Give these steps a try and poke around within the software to familiarize yourself with the tool. It will continue to be a valuable resource for the near future, so it is worth investing time into learning.
Log Analysis From Others
The final option for log analysis is approaching knowledgeable Discipline Priests who are happy to look over your logs for you. While this can be daunting to do at first, the rewards are more than worth putting yourself out there for and absorbing the constructive criticism that comes your way. For having others review your logs, we suggest visiting the #discipline channel on the Warcraft Priests Discord.
Changelog
- 16 Mar. 2026: Reviewed for Season 1 release.
- 26 Feb. 2026: Updated for Midnight release.
- 10 Feb. 2026: Updated for Midnight pre-patch.
- 30 Nov. 2025: Reviewed for Patch 11.2.7.
- 05 Oct. 2025: Reviewed for Patch 11.2.5.
- 04 Aug. 2025: Reviewed for Patch 11.2.
- 15 Jun. 2025: Reviewed for Patch 11.1.7.
- 21 Apr. 2025: Reviewed for Patch 11.1.5.
- 24 Feb. 2025: Updated for Patch 11.1.
- 15 Dec. 2024: Updated for Patch 11.0.7.
- 21 Oct. 2024: Reviewed for Patch 11.0.5.
- 09 Sep. 2024: Reviewed for The War Within Season 1.
- 21 Aug. 2024: Updated for The War Within Release.
- 23 Jul. 2024: Reviewed for The War Within Pre-Patch.
- 07 May 2024: Reviewed for 10.2.7.
- 22 Apr. 2024: Updated for Season 4.
- 27 Mar. 2024: Reviewed for Patch 10.2.6
- 15 Jan. 2024: Reviewed for Patch 10.2.5.
- 06 Nov. 2023: Reviewed for Patch 10.2.
- 04 Sep. 2023: Reviewed for Patch 10.1.7
- 10 Jul. 2023: Reviewed for Patch 10.1.5.
- 01 May 2023: Updated for Patch 10.0.7.
- 24 Jan. 2023: Reviewed for Patch 10.0.5.
- 11 Dec. 2022: Reviewed for Dragonflight Season 1.
- 28 Nov. 2022: Reviewed for Dragonflight launch.
- 25 Oct. 2022: Updated for Dragonflight pre-patch.
More Priest Guides
Guides from Other Classes

This guide is written and maintained by Clandon, Healer in Vindicatum and Owner of Warcraft Priests Class Discord. You can often find him streaming on Twitch or by checking out his Youtube channel.
- Frost DK and Arms Buffs, Guardian Nerfs: Additional Class Tuning, March 24th
- 5 Dungeons Changed: Mythic+ Tuning With the March 24th Reset
- Fastest Way to Complete Saltheril’s Soiree Cleanup in WoW Midnight
- Where Does Your Spec Stand? Week 1 DPS and Popularity Rankings Revealed
- Every Class Change Coming in Tomorrow’s (Extended) March 24th Maintenance
- New Trial of Style 2026 Rewards: Don’t Miss the Silver Chainkini Before It’s Gone!
- Class Tuning, Cheaper Housing, Performance Improvements, Faster Rares, Delve Tuning: Midnight Weekly Hotfix Summary, March 16 – 23
- Monk on Top: The Best Tanks for Midnight Mythic+ and Raid Season 1


