Kil'jaeden Guide for Tomb of Sargeras
Table of Contents
General Information
Welcome to our World of Warcraft encounter guide for Kil'jaeden in Tomb of Sargeras. We will teach you everything you need to know to defeat the boss in every difficulty.
On this particular page, we will give you a short overview of the fight as well as a list of things to watch out for (include LFR tips when applicable).
The other pages of our Kil'jaeden guide can be accessed from the table of contents on the right.
Contents
To make it easy to navigate the guide, we have split it into 3 pages:
- Abilities: read about the encounter abilities;
- Normal/Heroic Strategy/Tactics: find out how to defeat the encounter in Normal and Heroic modes;
- Mythic Strategy: learn how to handle the new mechanics and increased difficulty of Mythic mode.
Lore
Since striking the bargain that chased the draenei into the stars, Kil'jaeden believed the Legion could not be stopped. Yet, none of his deceptions have prevented you from reaching this critical moment. Infuriated that Sargeras' promise of victory has never come to pass, the demon lord prepares to face you himself, for a final battle that will shape Azeroth's destiny forever.
Outline
Kil'jaeden is a 5-phase encounter, sporting 3 main phases and 2 intermissions. The fight takes place on his Legion command ship and becomes progressively more difficult as the fight continues. Throughout the battle, the ship will make its way towards Argus, the main base of operations of the Legion itself. This is a true "final boss"; complex and multifaceted, with extraordinarily punishing mechanical and numbers checks, Kil'jaeden is the ultimate test of coordination and skill for raid groups to conquer.
Here is a preview of the fight on Heroic difficult from the PTR:
TL;DR
Tanks
- Perform a taunt swap when
 Felclaws reaches 5+ stacks. On Heroic and
above tanks must also keep Kil'jaeden faced away from other raid members at all
times to avoid the frontal cleave.
Felclaws reaches 5+ stacks. On Heroic and
above tanks must also keep Kil'jaeden faced away from other raid members at all
times to avoid the frontal cleave. - Intercept
 Armageddon Hail, the largest missile, when
 Armageddon is being cast.
Healers
- Heal the Hopeless Reflections to minimize the damage the raid
receives from
 Hopelessness.
 - Be ready to heal through
 Armageddon Blast if a meteor is missed
by the raid.
Armageddon Blast if a meteor is missed
by the raid. - Have appropriate raid healing ready for Erupting Reflections and
their casts of
 Erupting Dreadflame.
 - Spot heal recipients of
 Bursting Dreadflame and
be ready with cooldowns (if necessary) for
Bursting Dreadflame and
be ready with cooldowns (if necessary) for  Focused Dreadflame.
 - Ensure the raid is healthy for
 Rupturing Singularity.
 - Be careful not to expend excess Mana during
 Choking Shadow,
but ensure none of the raid is killed by
Choking Shadow,
but ensure none of the raid is killed by  Destabilized Shadowsoul
and
Destabilized Shadowsoul
and  Illidan's Sightless Gaze.
 - Be ready to surgically heal anyone hit by
 Demonic Obelisk.
 - Have raid healing ready during
 Darkness of a Thousand Souls to
ensure no one dies from
Darkness of a Thousand Souls to
ensure no one dies from  Gravity Squeeze.
 - Spot heal the recipients of
 Flaming Orb to ensure that the
Flaming Detonation does not cause lethal damage.
Flaming Orb to ensure that the
Flaming Detonation does not cause lethal damage.
DPS
- Eliminate all Reflections as fast as possible.
- Eliminate all Shadowsouls as fast as possible.
All Players
- Stand close to Rupturing Singularity without being inside of the
effect to avoid being knocked off the platform.
- Take turns soaking Armageddon Rain to avoid reaching 2 stacks
of the debuff (unless you are able to remove the debuff through immunities
such as
 Cloak of Shadows). Ensure none of these meteors land to avoid
deaths to Armageddon Blast.
Cloak of Shadows). Ensure none of these meteors land to avoid
deaths to Armageddon Blast. - Ensure no allies are within 15 yards if you are afflicted by the
Bursting Dreadflame debuff.
- Stack in a line to split the damage received from Focused Dreadflame.
On Heroic and higher this also triggers a Focused Dreadburst, preventing
any soaking players from being within 5 yards of each other while soaking
without risking death.
- Stack inside Tear Rift when Darkness of a Thousand Souls is
being cast to avoid being killed.
- Kite Flaming Orbs to the far reaches of the arena to minimize
the size of the Flaming Detonation.
Positioning
Positioning is the key element to success on this encounter. Being caught out of place at the wrong time will spell doom for the entire raid group.
Phase One
- Stay behind the boss at all times on Heroic difficulty or higher unless you are the active tank.
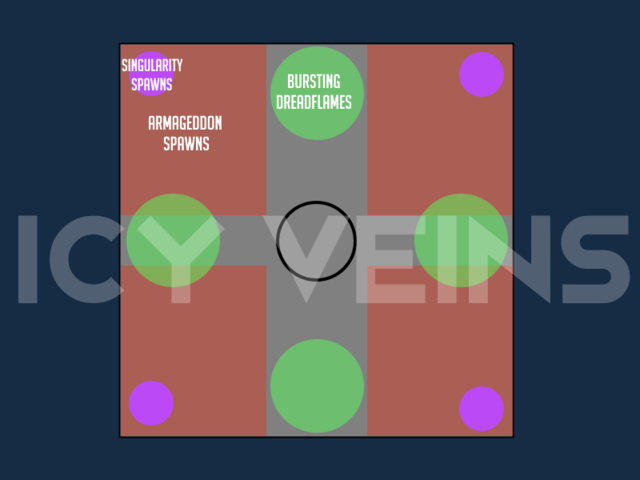
- Assign 3-5 players to each corner of the room to soak Armageddon Rain.
- Stack near Rupturing Singularity when it spawns in the center to avoid being
knocked off the platform.
- The inactive tank should soak Armageddon Hail, or a player with
Physical damage immunities.
Phase Two
- Loosely spread in the center, allowing you to quickly fan out for
Bursting Dreadflame.
- Continue to soak Armageddon as in Phase One.
- Rupturing Singularity now spawns at the corners of the platform
instead of the center.
- Ensure the damage from Focused Dreadflame is split by at
least 6 people. On Heroic and higher each player must be at least 5 yards
apart to avoid splash damage from Focused Dreadburst.
Phase Three
The third phase is similar to Phase One, however, you will know need
to deal with ![]() Bursting Dreadflame and
Bursting Dreadflame and ![]() Focused Dreadflame,
which are handled in the same fashion as in Phase Two.
Focused Dreadflame,
which are handled in the same fashion as in Phase Two.
Phase Four
Phase Four, and the second intermission, is quite unique. The raid
is blanketed by ![]() Deceiver's Veil. The raid should find
Lord Illidan Stormrage as quickly as possible and receive
Deceiver's Veil. The raid should find
Lord Illidan Stormrage as quickly as possible and receive
![]() Illidan's Sightless Gaze. When you receive the sightless gaze debuff,
kill all Shadowsouls as quickly as possible. Once all of the adds
are killed the final Phase begins.
Illidan's Sightless Gaze. When you receive the sightless gaze debuff,
kill all Shadowsouls as quickly as possible. Once all of the adds
are killed the final Phase begins.
Phase Five
The final phase features the ![]() Bursting Dreadflame,
Bursting Dreadflame, ![]() Focused Dreadflame,
and
Focused Dreadflame,
and ![]() Felclaws mechanics found in Phases One, Two, and Three. The big
mechanic of this phase is
Felclaws mechanics found in Phases One, Two, and Three. The big
mechanic of this phase is ![]() Darkness of a Thousand Souls, which will kill any
players hit that are not affected by
Darkness of a Thousand Souls, which will kill any
players hit that are not affected by ![]() Tear Rift. To counter this, the
entire raid must stand in the active rift (which spawn in corners of the room)
by the time the cast ends.
Tear Rift. To counter this, the
entire raid must stand in the active rift (which spawn in corners of the room)
by the time the cast ends. ![]() Flaming Orbs will also spawn and chase players.
These must be taken to the edges of the room as they will leave fire pools behind,
which are reduced in size based on length of time the orb has traveled.
Flaming Orbs will also spawn and chase players.
These must be taken to the edges of the room as they will leave fire pools behind,
which are reduced in size based on length of time the orb has traveled.
Bloodlust/Heroism/Time Warp
We advise you to use ![]() Bloodlust/
Bloodlust/![]() Heroism/
Heroism/![]() Time Warp
in the final phase, as this is the longest and most punishing part of the
fight. Raid damage throughout this phase is also quite high, giving the
cooldown dual benefit as a damage and healing cooldown.
Time Warp
in the final phase, as this is the longest and most punishing part of the
fight. Raid damage throughout this phase is also quite high, giving the
cooldown dual benefit as a damage and healing cooldown.
Changelog
- 11 Sep. 2017 (mythic page): Page added.
- 20 Jun. 2017 (this page): Guide added.
- Farming Cobalt Assembly Rep Has Never Been Easier — 200% Bonus Now Active
- Nightfall Event Bugged After Patch 11.1.5—Here’s How to Tell and What to Do
- Customize Blizzard’s Cooldown Manager in Patch 11.1.5 With This Simple Addon
- 9.6 Million Gold Discount: Another Zulian Tiger From BMAH Box
- Season of Discovery Hotfixes: April 23rd
- Liberation of Undermine Tuning: Mug’Zee Nerf
- Personal Cooldowns Gone from Resource Bar Fix Coming
- A 12-Year Secret Revealed: Three NPC Tributes to a Player