Madness of Deathwing Detailed Strategy Guide (Heroic Mode included)
Table of Contents
Introduction
This guide is intended to provide a comprehensive description of the encounter with Madness of Deathwing in Dragon Soul. It is targeted at anyone who desires to understand the fight mechanics.
This guide is updated for World of Warcraft WoD 6.1.2.
The Madness of Deathwing is the 8th and final boss encounter of the Dragon Soul raid. If successful, raids will, at long last, bring an end to Deathwing, the Destroyer.
The fight contains a large variety of adds, spells, and mechanics, but it is, ultimately, not difficult to understand or execute. Tanks, healers, and DPS players will, at certain times, have a lot of pressure placed on them to perform well.
The five Aspects aid your raid during this encounter, although, as the fight progresses, they become effectively disabled, making it increasingly difficult for your raid. Though, they do come back to help you kill Deathwing, at the very end.
We found the encounter to be extremely engaging, even if we would have liked to be given the chance of fighting Deathwing alone, without the help of the aspects.
General Information
Health Pool
| Difficulty | Deathwing | Arm Tentacle / Wing Tentacle | Mutated Corruption |
|---|---|---|---|
| 10-man | 25M | 28M | 11M |
| 10-man heroic | 29M | 38.1M | 17.1M |
| 25-man | 76M | 84M | 34M |
| 25-man heroic | 87M | 114.6M | 49M |
| LFR | 57M | 63M | 25M |
| Difficulty | Elementium Bolt | Corrupting Parasite | Blistering Tentacle | Regenerative Blood |
|---|---|---|---|---|
| 10-man | 829k | — | 165k | 664k |
| 10-man heroic | 950k | 3M | 236kk | 1.26M |
| 25-man | 2.5M | — | 498k | 2M |
| 25-man heroic | 2.8M | 9M | 710k | 4.1M |
| LFR | 1.5M | — | 373k | 1.5M |
| Difficulty | Elementium Terror | Elementium Fragment | Congealing Blood |
|---|---|---|---|
| 10-man | 2.9M | 1.2M | — |
| 10-man heroic | 3.2M | 1.6M | 944k |
| 25-man | 8.7M | 1.2M | — |
| 25-man heroic | 10M | 1.7M | 3.2M |
| LFR | 6.5M | 871k | — |
Enrage Timer
Several times during the fight, Deathwing will start casting
![]() Cataclysm. This gives you one minute to finish killing a certain unit.
Failing to do so will inevitably result in a wipe.
Cataclysm. This gives you one minute to finish killing a certain unit.
Failing to do so will inevitably result in a wipe.
Deathwing also has a 15 minute hard enrage timer.
Raid Composition
| Difficulty | Tanks | Healers | DPS |
|---|---|---|---|
| 10-man | 1-2 | 3 | 5-6 |
| 10-man heroic | 1-2 | 3 | 5-6 |
| 25-man | 1-2 | 6-7 | 17 |
| 25-man heroic | 2 | 6-7 | 16-17 |
| LFR | 1 | 6-7 | 17 |
Loot
Mounts
| Difficulty | Mount |
|---|---|
| LFR | None |
| 10-man Normal | Reins of the Blazing Drake |
| 25-man Normal | Reins of the Blazing Drake |
| 10-man Heroic | Life-Binder's Handmaiden |
| 25-man Heroic | Life-Binder's Handmaiden |
Weapons
| Item Name | Type | Main Stats/Effect |
|---|---|---|
| Rathrak, the Poisonous Mind (LFR, Heroic) | Dagger | Intellect/Additional Damage |
| Ti'tahk, the Steps of Time (LFR, Heroic) | Staff | Intellect/Haste to Allies |
| Maw of the Dragonlord (LFR, Heroic) | Main-Hand Mace | Intellect/AoE Healing |
| Blade of the Unmaker (LFR, Heroic) | 1.8 One-Hand Dagger | Agility |
| No'Kaled, the Elements of Death (LFR, Heroic) | One-Hand Axe | Agility/Additional Damage |
| Kiril, Fury of Beasts (LFR, Heroic) | Polearm | Agility |
| Vishanka, Jaws of the Earth (LFR, Heroic) | Bow | Agility/Additional Damage |
| Gurthalak, Voice of the Deeps (LFR, Heroic) | Two-Hand Sword | Strength/Damage |
| Souldrinker (LFR, Heroic) | One-Hand Sword | Strength/Drain Life |
Overview of the Fight
The Madness of Deathwing encounter is a two phase fight.
 During Phase One,
you will have to defeat 4 of Deathwing's limbs (two wings and two arms).
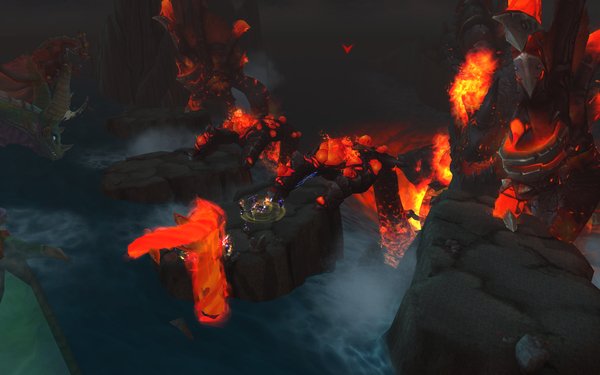
This part takes place on 4 different platforms, surrounded by water. Each of
Deathwing's limbs rests on one platform, and your raid will have to travel
to every platform and kill all the limbs in order to make it to Phase Two.
During Phase One,
you will have to defeat 4 of Deathwing's limbs (two wings and two arms).
This part takes place on 4 different platforms, surrounded by water. Each of
Deathwing's limbs rests on one platform, and your raid will have to travel
to every platform and kill all the limbs in order to make it to Phase Two.
During Phase Two, your raid will have to burn Deathwing's head, who will have crashed next to one of the platforms (where the entire phase is spent). At the same time, your raid will have to regularly kill two types of adds. Deathwing's health will initially be at 20% and he will deal increasing raid damage as he nears death.
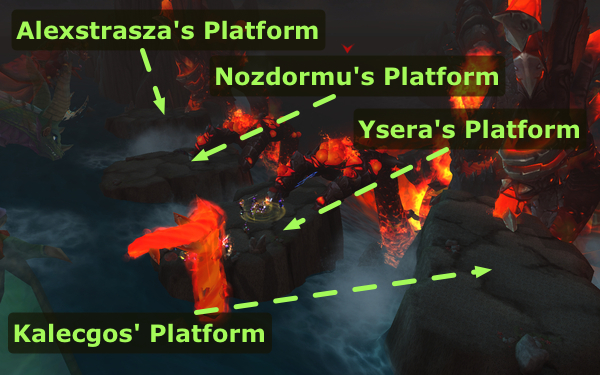 Throughout the fight, your raid will have assistance from the four dragon
Aspects (though, Thrall also offers a minimal contribution). Each Aspect is
flying over one of the four platforms, resulting in the following naming
conventions for the platforms in this guide:
Throughout the fight, your raid will have assistance from the four dragon
Aspects (though, Thrall also offers a minimal contribution). Each Aspect is
flying over one of the four platforms, resulting in the following naming
conventions for the platforms in this guide:
- Leftmost platform: Alexstrasza's Platform;
- Middle-left platform: Nozdormu's Platform;
- Midle-right platform: Ysera's Platform;
- Rightmost platform: Kalecgos' Platform.
Each of the Aspects offers the raid a specific buff (such as increased health) and uses a specific ability.
- In Phase One, once an Aspect's platform has been cleared of Deathwing's limb, that Aspect will cease to assist the raid and focus solely on attacking Deathwing. This means that Phase One becomes increasingly difficult as you progress, and your raid will have to choose the order in which to clear the platform carefully.
- In Phase Two, the Aspects are once again fighting alongside your raid and they resume their assistance.
Buffs Provided by the Aspects
 During Phase One, all the buffs, except for Thrall's, only last until
the platform of the respective Aspect has been cleansed of Deathwing's
limb, at which time the Aspect
will begin assaulting Deathwing and will cease to aid your raid until Phase
Two begins. Thrall's buff lasts for the entire duration of the encounter.
During Phase One, all the buffs, except for Thrall's, only last until
the platform of the respective Aspect has been cleansed of Deathwing's
limb, at which time the Aspect
will begin assaulting Deathwing and will cease to aid your raid until Phase
Two begins. Thrall's buff lasts for the entire duration of the encounter.
Thrall's Buff
Thrall's buff is the least noticeable one: he grants your raid
![]() Carrying Winds for the entire duration of the fight. This allows you to
move back and forth between two adjacent platforms. To do so, simply run or
jump off your current platform in the direction you wish to go. Additionally,
following each jump, you will gain a 60% movement speed increase for 10
seconds (this buff stacks twice).
Carrying Winds for the entire duration of the fight. This allows you to
move back and forth between two adjacent platforms. To do so, simply run or
jump off your current platform in the direction you wish to go. Additionally,
following each jump, you will gain a 60% movement speed increase for 10
seconds (this buff stacks twice).
This buff does not play any evident role in the fight, and it simply allows you to move around freely between platforms.
Ysera's Buff
![]() Ysera's Presence is a passive buff that increases all healing done by
20%.
Ysera's Presence is a passive buff that increases all healing done by
20%.
![]() Dream is an ability that Ysera grants to all raid members. Players
receive an extra action button, with a 30 second cooldown. Using this ability
grants the player 50% damage reduction for 5 seconds.
Dream is an ability that Ysera grants to all raid members. Players
receive an extra action button, with a 30 second cooldown. Using this ability
grants the player 50% damage reduction for 5 seconds.
This ability can be keybound from the Key Bindings Menu (it is called ExtraActionButton1 and it is located in the Action Bar Functions section). The button may may not display properly (or at all) if you are using any action bar add-ons, although this does not affect the aforementioned key-binding's efficiency. Alternatively, you can use the following macro:
- /click ExtraActionButton1
Clicking this macro (which, of course, can be keybound), has the same effect as clicking the Dream button.
Alexstrasza's Buff
![]() Alexstrasza's Presence is a passive buff that increases maximum health
by 20%.
Alexstrasza's Presence is a passive buff that increases maximum health
by 20%.
Alexstrasza's ability varies from Phase One to Phase Two:
 Cauterize (Phase One) destroys all Blistering Tentacles
(adds that spawn at certain times during Phase One);
Cauterize (Phase One) destroys all Blistering Tentacles
(adds that spawn at certain times during Phase One);- Cauterize (Phase Two) lowers the damage done by
 Corrupted Blood (Deathwing's unique ability during Phase Two).
Nozdormu's Buff
![]() Nozdormu's Presence is a passive buff that increases your haste by
20%.
Nozdormu's Presence is a passive buff that increases your haste by
20%.
 Nozdormu's active ability is
 ![]() Time Zone, which places a type of
protective bubble on the platform where the raid is currently fighting. This
causes the Elementium Bolt (a type of projectile NPC that flies towards
the raid) to be greatly slowed down, giving your raid more time to kill it. It
also reduces the attack speed of any enemies within the zone by 50%.
Time Zone, which places a type of
protective bubble on the platform where the raid is currently fighting. This
causes the Elementium Bolt (a type of projectile NPC that flies towards
the raid) to be greatly slowed down, giving your raid more time to kill it. It
also reduces the attack speed of any enemies within the zone by 50%.
Kalecgos' Buff
![]() Kalecgos' Presence is a passive buff that increases damage dealt by
20%.
Kalecgos' Presence is a passive buff that increases damage dealt by
20%.
Additionally, Kalecgos imbues your raid with ![]() Spellweaver, which
causes all attacks to deal 23,000 amount of Arcane damage to enemies within 6
yards.
Spellweaver, which
causes all attacks to deal 23,000 amount of Arcane damage to enemies within 6
yards.
Phase One
Phase One is started by talking to Thrall, located on Ysera's platform.
 On each of the 4 platforms, your raid must perform the same set of tasks
to destroy Deathwing's limb. Depending on the platform, the Deathwing's limb
is either an Arm Tentacle or a Wing Tentacle. Out of the 4 limbs,
2 are Arm Tentacles (Nozdormu's Platform and Ysera's Platform)
and 2 are Wing Tentacles (Alexstrasza's Platform and Kalecgos' Platform).
The only differences between these two types of adds are their name
and their visual appearance. Other than that, they cast the same abilities
and have the same amount of health.
On each of the 4 platforms, your raid must perform the same set of tasks
to destroy Deathwing's limb. Depending on the platform, the Deathwing's limb
is either an Arm Tentacle or a Wing Tentacle. Out of the 4 limbs,
2 are Arm Tentacles (Nozdormu's Platform and Ysera's Platform)
and 2 are Wing Tentacles (Alexstrasza's Platform and Kalecgos' Platform).
The only differences between these two types of adds are their name
and their visual appearance. Other than that, they cast the same abilities
and have the same amount of health.
The strategy remains very similar from one platform to the other, just that the mechanics of the fight will be increasingly harder to deal with, as you progressively lose the buffs granted by the dragon Aspects (when you kill the limb on their platform, they go fight Deathwing himself and stop buffing the raid).
Enemies, Abilities and Their Interaction
During this phase, you will have to defeat several types of adds, in a specific order and fashion, so that you can eventually destroy all of Deathwing's limbs. Below, we will list every add you encounter during Phase One, all of their abilities and the way in which they interact.
Deathwing
Deathwing does not exist, during Phase One, as an attackable NPC. He does however use a few abilities and your raid will need to destroy his limbs, either an Arm Tentacle or a Wing Tentacle, depending on the platform.
 Assault Aspects is an ability that Deathwing casts on the dragon
Aspect on whose platform the most raid members are located. This ability
simply determines on which platform the adds will spawn (the one where most
of your raid is located) and is a means of allowing you to choose the order
in which to tackle the platforms.
Assault Aspects is an ability that Deathwing casts on the dragon
Aspect on whose platform the most raid members are located. This ability
simply determines on which platform the adds will spawn (the one where most
of your raid is located) and is a means of allowing you to choose the order
in which to tackle the platforms.-
 Elementium Bolt is a projectile that Deathwing fires at the
platform where your raid is currently located, 45 seconds after he
has finished casting Assault Aspects. Upon reaching the platform, the Elementium
Bolt will deal massive Fire damage to the entire raid with
Elementium Bolt is a projectile that Deathwing fires at the
platform where your raid is currently located, 45 seconds after he
has finished casting Assault Aspects. Upon reaching the platform, the Elementium
Bolt will deal massive Fire damage to the entire raid with
 Elementium Blast. This initial hit deals less damage the farther away
players are from the impact zone. 5.2 seconds after landing, Elementium
Blast will tick again, for yet another massive Fire damage hit. This NPC
cannot be tanked, and it does not melee. It has a small health
pool and your DPS players can and should try to kill it before it lands.
Elementium Blast. This initial hit deals less damage the farther away
players are from the impact zone. 5.2 seconds after landing, Elementium
Blast will tick again, for yet another massive Fire damage hit. This NPC
cannot be tanked, and it does not melee. It has a small health
pool and your DPS players can and should try to kill it before it lands.  Cataclysm is an ability that Deathwing begins casting 2 minutes after
he has chosen an Aspect to assault. It has a 60 second cast time, at the end
of which you will wipe (it deals 1.5M damage). The only way to stop this
cast is to kill the Arm Tentacle or the Wing Tentacle present on
the platform where you are fighting.
Cataclysm is an ability that Deathwing begins casting 2 minutes after
he has chosen an Aspect to assault. It has a 60 second cast time, at the end
of which you will wipe (it deals 1.5M damage). The only way to stop this
cast is to kill the Arm Tentacle or the Wing Tentacle present on
the platform where you are fighting.

Arm Tentacles and Wing Tentacles
Arm Tentacles and Wing Tentacles are the limbs of Deathwing (they look like tentacles) that you need to destroy during Phase One. These adds do not melee and cannot be tanked. In order to clear a platform, your raid will have to kill the limb attached to the platform.
Deathwing's limbs have a high amount of health, and your raid will have to deal with different kinds of adds before the limbs can be finished off.
Arm Tentacles and Wing Tentacles do the following:
-
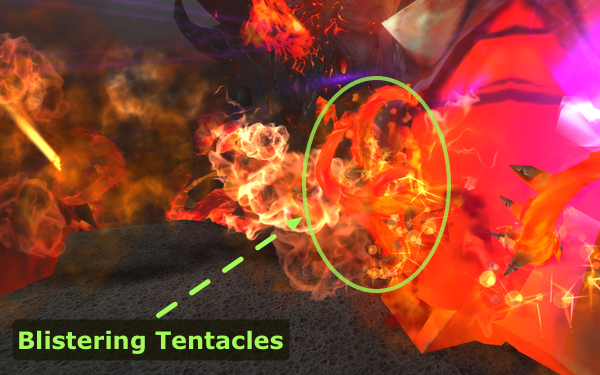
 At 70 and 40% health, they spawn several Blistering Tentacles.
These adds are immune to AoE damage, and they deal increasing raid damage, by
stacking
At 70 and 40% health, they spawn several Blistering Tentacles.
These adds are immune to AoE damage, and they deal increasing raid damage, by
stacking  Blistering Heat on raid members.
- If Alexstrasza's platform is still active, then her
Cauterize (Phase One) ability will quickly kill all of the Blistering
Tentacles.
- Otherwise, your raid will have to single-target them down.
- If Alexstrasza's platform is still active, then her
- 90 seconds after engaging a Tentacle, it will begin to hemorrhage. This will spawn 6 Regenerative Blood adds.
- For the entire duration of their existence, the tentacles will deal a
small amount of damage to the raid, every 2 seconds ( Burning Blood). This
damage is greater the lower the tentacle's health is.
Regenerative Blood
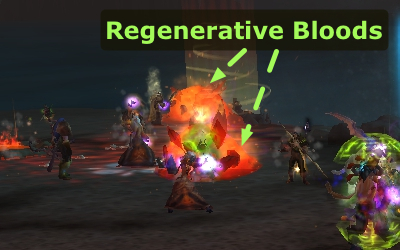 6 Regenerative Bloods are spawned by Arm Tentacles and
Wing Tentacles 90 seconds after they have been engaged. These small adds have normal
aggro tables and have fairly weak melee attacks.
6 Regenerative Bloods are spawned by Arm Tentacles and
Wing Tentacles 90 seconds after they have been engaged. These small adds have normal
aggro tables and have fairly weak melee attacks.
Their attacks stack ![]() Degenerative Bite on the tank. This eventually
overwhelms the healers.
Degenerative Bite on the tank. This eventually
overwhelms the healers.
Regenerative Bloods have an energy bar with a maximum capacity of 100, which starts empty and fills at a rate of 10 energy per second. Each time the bar reaches 100 energy, the respective Blood will be healed to full health (50% health in LFR difficulty).
These adds are easy to AoE as long as Kalecgos is up (thanks to the
damage-splashing ability, ![]() Spellweaver, that he imbues raid members
with).
Spellweaver, that he imbues raid members
with).
Mutated Corruption
 Mutated Corruption is a tentacle add that spawns 10 seconds after
Deathwing assaults an aspect (when the raid has just started the fight
or switched to a new platform). It has two abilities:
Mutated Corruption is a tentacle add that spawns 10 seconds after
Deathwing assaults an aspect (when the raid has just started the fight
or switched to a new platform). It has two abilities:
 Impale is a massively damaging attack that the
Mutated Corruption performs on the main tank. It deals an immense amount of
Phsyical damage (260,000 in LFR and 400,000 in 10 and 25-man difficulty), for
which the tank will have to use defensive cooldowns. Additionally, tanks can
make use of Ysera's
Impale is a massively damaging attack that the
Mutated Corruption performs on the main tank. It deals an immense amount of
Phsyical damage (260,000 in LFR and 400,000 in 10 and 25-man difficulty), for
which the tank will have to use defensive cooldowns. Additionally, tanks can
make use of Ysera's  Dream to survive this attack, while she is
still active.
Dream to survive this attack, while she is
still active. Crush is a very damaging AoE attack that the
Mutated Corruption uses regularly. It will target a random raid member, and
damage everyone in a line between the Corruption and the target for a high
amount of Physical damage (65,000 in LFR and 100,000 in 10 and 25-man
difficulty).
Crush is a very damaging AoE attack that the
Mutated Corruption uses regularly. It will target a random raid member, and
damage everyone in a line between the Corruption and the target for a high
amount of Physical damage (65,000 in LFR and 100,000 in 10 and 25-man
difficulty).
Strategy
The strategy for Phase One consists in clearing each of the 4 platforms. A platform is cleared when the respective Arm Tentacle or Wing Tentacle (Deathwing's limb) is killed. In order to do this, the raid must perform a series of tasks. Fortunately, these tasks are identical between all 4 platforms, so the fight is not very difficult to understand.
Platform Order
The first thing that your raid must decide on is the order in which to clear the platforms. This will determine the order in which you will lose the buffs from the Aspects, and which of the buffs you will get to keep until the final platform.
While it is possible to successfully complete the phase by clearing the platforms in any order, we will only detail the order that we recommend as being optimal:
- Ysera's Platform;
- Alexstrasza's Platform.
- Nozdormu's Platform;
- Kalecgos' Platform.
Before starting the encounter, you should position your entire raid on Ysera's platform (where you land after parachuting down from Deathwing's back), and speak with Thrall to pull the boss.
Clearing a Platform
 The first thing you will notice, when clearing a platform, is the
massive Arm Tentacle or Wing Tentacle right in
front of you. Your DPS players should immediately begin attacking it, and
you should try to do as much damage as possible to it before the
Mutated Corruption appears. Then the raid encounter will follow
these steps:
The first thing you will notice, when clearing a platform, is the
massive Arm Tentacle or Wing Tentacle right in
front of you. Your DPS players should immediately begin attacking it, and
you should try to do as much damage as possible to it before the
Mutated Corruption appears. Then the raid encounter will follow
these steps:
- After 10 seconds, a Mutated Corruption will appear.
- The tanks should position themselves towards the back of the platform and they should be ready to taunt the Mutated Corruption as soon as it spawns. When this happens, all DPS players should switch to it and burn it down.
- Tanks and healers will have to pay special attention to the
Impale cast and make sure that the tank is protected
against this. This can be done in one of several ways (or a combination of
them):
- Tanks can use damage reducing defensive cooldowns.
- Healers can use damage reducing cooldowns on the tanks, or
 Guardian Spirit.
- In case the tank does not have any way of surviving another Impale, the off-tank should taunt and use one of their own cooldowns.
- At a certain point, while DPS-ing the Mutated Corruption, Deathwing will
launch an Elementium Bolt towards the platform.
-
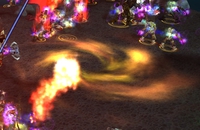 The exact location when
the Elementium Bolt will land is marked by a golden swirling void zone.
Everyone should move away from the impact spot, as the damage that the Bolt
does, when landing, is greater to players closer to it.
The exact location when
the Elementium Bolt will land is marked by a golden swirling void zone.
Everyone should move away from the impact spot, as the damage that the Bolt
does, when landing, is greater to players closer to it. - Prepare for the massive damage to the raid that the Bolt deals
when it lands (through Elementium Blast). Defensive cooldowns such as
 Power Word: Barrier and
  Devotion Aura are useful here.
Anti-Magic Zone is also an extremely useful cooldown that can be used for
every single Elementium Bolt.
Devotion Aura are useful here.
Anti-Magic Zone is also an extremely useful cooldown that can be used for
every single Elementium Bolt. - The Elementium Bolt must be destroyed as soon as possible. The
idea is to kill it between the moment when it lands and the moment when
Elementium Blast ticks again, 5.2 seconds after landing.
-
- After the Bolt is dead, players should return to the Mutated Corruption and finish it off, then switch back to the Arm Tentacle.
- After 90 seconds, the Arm Tentacle will spawn 6 Regenerative Bloods. Your raid should simply AoE these adds down (while tanking them close to the Arm Tentacle).
- It is likely that before the Arm Tentacle or Wing Tentacle dies,
Deathwing will have started casting Cataclysm, but there should be ample
time to finish off the Tentacle.
- Note that when Deathwing is casting Cataclysm, the Tentacle takes 100% increased damage, as the Aspect on whose platform you are standing begins to attack it.

Ysera's Platform
On Ysera's Platform, you can make use of the following:
- To deal with Impale, tanks can
make use of Ysera's Dream ability (50% damage reduction).
- DPS players can kill the Elementium Bolt before it lands,
thanks to Nozdormu's
 Time Zone.
 - Keep the Regenerative Bloods within Nozdormu's Time Zone,
as this will slow down their attacks.
Alexstrasza's Platform
With Ysera dead, your raid will have to cope with the loss of 20%
increased healing and ![]() Dream, although this does not affect
the strategy of the encounter at all.
Dream, although this does not affect
the strategy of the encounter at all.
Nozdormu's Platform
The loss of Alexstrasza's buff will mean that your raid has lost the 20% health increase. Additionally, your raid will now have to manually kill the Blistering Tentacles each time they spawn. As these adds are immune to AoE, you will have to use single target attacks against them.
It is very important that all the Blistering Tentacles are killed in a timely fashion (before the next set spawns), thus allowing for the debuff that they apply to wear off.
Equally importantly, your raid should make sure not to bring the Tentacle to 70% (or close to it) until after the Mutated Corruption and the Elementium Bolt have been dealt with. Otherwise, you risk having Blistering Tentacles spawn at the same time as another raid-damaging ability is going on, most likely causing a wipe.
Other than this, nothing else changes, although healers will have to pay
special attention to tanks (for ![]() Impale), as the tanks'
health will be considerably lower.
Impale), as the tanks'
health will be considerably lower.
Kalecgos' Platform
This platform will be the most difficult one by far. The loss of Nozdormu's buffs means that the Elementium Bolt will hit the platform much sooner (totally unslowed) and will likely have time to pulse once or twice after it has landed, dealing absolutely massive damage to the raid. Healers must be on top of their game here, and a mix of defensive cooldowns should be used.
Additionally, with the absence of the ![]() Time Zone, the
Regenerative Blood adds will deal more damage to the tank.
Time Zone, the
Regenerative Blood adds will deal more damage to the tank.
Finally, both DPS players and healers will have lower output here, due to the loss of the 20% haste buff granted by Nozdormu.
Phase Two
Phase Two is a rather simple burn phase. Once all the 4 platforms are cleared, Deathwing will slump forward and his head will land, helpless, on Ysera's platform. The phase starts with Deathwing at 20% of his health, and ends when he has been killed by your raid.
Abilities
During this phase, Deathwing does not perform melee attacks and only has a
single ability: ![]() Corrupted Blood.
This ability deals fire damage every 2 seconds to the entire raid. When Deathwing's
health reaches 15%, 10%, and 5%, the damage dealt by Corrupted Blood increases.
Corrupted Blood.
This ability deals fire damage every 2 seconds to the entire raid. When Deathwing's
health reaches 15%, 10%, and 5%, the damage dealt by Corrupted Blood increases.
Throughout the phase, Deathwing will spawn two types of adds: Elementium Fragments and Elementium Terrors:
- Elementium Fragments are spawned every 90 seconds, 3 at a time in 10-man difficulty
and 8 at a time in 25-man and LFR difficulties. These small tentacles cannot be tanked
and have very little health. They cast
 Shrapnel, which deals a high amount of
physical damage to random raid members.
Shrapnel, which deals a high amount of
physical damage to random raid members. - Elementium Terrors are spawned every 90 seconds, 2 at a time.
These big adds must be tanked and inflict a stacking debuff on the tank:
 Tetanus.
The first wave of Elementium Fragments comes 10 seconds into Phase Two, while the first wave of Elementium Terrors comes 40 seconds into Phase Two.
Strategy
The strategy for Phase Two is quite simple. Your raid should begin the phase by burning Deathwing. Because the damage that he deals to the raid increases progressively when he reaches 15%, 10% and 5% health, your raid should stop DPS before the 10% threshold, finish off any adds and then proceed to burning Deathwing.
Healers will have to deal with the increasing raid damage from Corrupted Blood. Especially after Deathwing reaches 10% health, healing will become extremely difficult and any available cooldowns should be used.
The adds spawned during this phase should be dealt with as follows:
- Elementium Terrors should simply
be picked up (each by one of the tanks) and DPSed down before the stacking
Tetanus kills the tanks. It is ideal to tank these in the
Time Zone provided by Nozdormu.
- Elementium Fragments are the most deadly aspect of the phase. They
must be killed with utmost urgency. They will target random players with their
Shrapnel ability. Targeted players will notice a debuff that they
receive. When this debuff expires, they will receive a massive amount of
damage. Players should use the Dream ability just as the debuff is
about to wear off.
Essentially, the DPS priority in this phase is:
- Elementium Fragments;
- Elementium Terrors;
- Deathwing.
Once the second set of Elementium Terrors have been killed, Deathwing should have around 11% health and your raid should execute an all-out DPS burn on him, ignoring the next set of Elementium Fragments.
Single Tanking
It is possible to use a single tank for the entire duration of the
encounter. In Phase Two, if this tank is a Paladin, they can use
![]() Divine Shield (followed by a quick /cancelaura Divine Shield, possibly in
a macro) to get rid of the stacks of
Divine Shield (followed by a quick /cancelaura Divine Shield, possibly in
a macro) to get rid of the stacks of ![]() Tetanus.
Tetanus.
When to Use Bloodlust/Heroism/Time Warp?
There are two important parts of the fight where using
![]() Bloodlust,
Bloodlust, ![]() Heroism, or
Heroism, or ![]() Time Warp will greatly help.
Time Warp will greatly help.
You can use Bloodlust, Heroism, or Time Warp during Phase One, to help your
raid clear the 4th platform, either to help you kill the Mutated Corruption
faster or to help you finish the Arm or Wing Tentacle before Deathwing finishes
casting ![]() Cataclysm.
Cataclysm.
You can use Bloodlust, Heroism, or Time Warp during Phase Two, when Deathwing's health reaches 10%, to shorten the period during which your raid will take increased damage. In this case, you can also use Bloodlust, Heroism, or Time Warp right at the start, as there will be enough time for the 10-minute debuff to drop.
Tier 13 4-piece Tank Set Bonuses
Tanks can use their 4-Part tier 13 set bonuses (all of which offer either damage reduction or increased health to the raid) at certain key points, in order to help the healers deal with the high amounts of raid damage. Specifically, these bonuses are of use:
- When an Elementium Bolt is landing (i.e., after Nozdormu's buffs are gone);
- When Blistering Tentacles are active (especially after Alexstrasza's buffs are gone);
- During Phase Two, after Deathwing is below 10% health.
Keep in mind that these cooldowns can only be used at the expense of the tank's own major defensive cooldown (as they are, in fact, one and the same), and as such they may not always be available.
Furthermore, it is ideal that these cooldowns be worked into a cooldown rotation by the raid leader, and not just used freely.
Learning the Fight
Despite the many enemies and abilities that this encounter presents, you should not be alarmed. The fight is easy to learn and quite easy to execute as well.
The best way to practice Phase One (the only difficult part of the encounter) is to simply try to perfect your play on the very first platform. Once all raid members are familiar with their duties, repeating the process on the other platforms, even with the loss of buffs, will prove a much easier task than it may appear.
Heroic Mode
The Heroic mode of Madness of Deathwing is an extremely challenging and difficult encounter. However, if you have come this far (especially past Spine of Deathwing), then you will succeed with enough patience and perseverance.
Differences from Normal Mode
While the structure of the fight is very similar to what you are used to from normal mode, there are quite a few changes in Heroic. They can be best categorised like this:
- increased health and damage;
- new mechanics.
Increased Health and Damage
All the enemies in the encounter have their health increased, compared to
Normal mode. Moreover, a large number of abilities deal increased damage. The
most problematic of these increases is the damage increase of
![]() Impale. The exact changes are:
Impale. The exact changes are:
- Elementium Blast now deals 468,000 damage on impact and another
468,000 damage every 5.2 seconds, up from 390,000 damage (both on impact and
afterwards) in Normal mode.
 Degenerative Bite now deals 1,800 damage per second, per stack in
10-man difficulty and 2,400 damage per second, per stack in 25-man
difficulty, up from 1,500 and 2,000 damage respectively.
Degenerative Bite now deals 1,800 damage per second, per stack in
10-man difficulty and 2,400 damage per second, per stack in 25-man
difficulty, up from 1,500 and 2,000 damage respectively.- Blistering Heat now deals 3,750 damage every 2 seconds, up from
2,500 in Normal mode.
- Crush now deals 130,000 damage, up from
100,000 damage in Normal mode.
- Impale now deals 840,000 damage in 10-man difficulty
and 1,200,000 damage in 25-man difficulty, up from 400,000 in both
difficulties.
- Shrapnel now deals 400,000 damage, up from 200,000 damage in
Normal mode.
- Tetanus now deals 72,000 damage on application and then another
24,000 damage per second, per stack in 10-man difficulty and 96,000 damage
on application and 36,000 damage per second, per stack in 25-man difficulty,
up from 60,000/20,000 and 80,000/30,000 respectively.
New Mechanics
There are two mechanics that are entirely new in Heroic mode. We present them below.
-
 Corrupting Parasite is a rather complex mechanic that will occur
twice on every platform during Phase One, once at around the same time that
the Mutated Corruption spawns and once again 60 seconds later.
It begins with Corrupting Parasite, a 10-second debuff cast by
Deathwing on a random raid member. This debuff deals increasing Shadow
damage, for a total of roughly 300,000 over the course of its duration. When
the debuff wears off, an NPC with the same name will spawn at the location of
the afflicted raid member.
Corrupting Parasite is a rather complex mechanic that will occur
twice on every platform during Phase One, once at around the same time that
the Mutated Corruption spawns and once again 60 seconds later.
It begins with Corrupting Parasite, a 10-second debuff cast by
Deathwing on a random raid member. This debuff deals increasing Shadow
damage, for a total of roughly 300,000 over the course of its duration. When
the debuff wears off, an NPC with the same name will spawn at the location of
the afflicted raid member.
-
Corrupting Parasite is the enemy NPC that spawns when Corrupting Parasite
wears off. The Corrupting Parasite has 3M health in 10-man difficulty and 9M
in 25-man difficulty. It has no aggro table, it does not melee, it can be
killed, and Alexstrasza's Cauterize (Phase One) will damage it
for a small amount of its life. When it spawns, it deals 250,000 Fire damage to all raid members
within 10 yards of its location (excluding the raid member who was affected
by the debuff). After this, the Corrupting Parasite will begin channeling
 Unstable Corruption.
-
Unstable Corruption is a 10 second cast, at the end of which the
Corrupting Parasite will deal 10% of its remaining health as damage to the
entire raid. If the Parasite is inside the Time-Zone provided by Nozdormu, its
cast time is increased by 50%. After casting Unstable Corruption, the
Corrupting Parasite will despawn.
-
-
Corrupting Parasite is the enemy NPC that spawns when
- Congealing Bloods are adds that spawn during Phase Two. They spawn when Deathwing reaches 15%, 10%, and 5% health, but if Deathwing's health does not reach 15% within a minute of entering the phase, or 10% or 5% within a minute of reaching 15% and 10% respectively, the bloods will spawn regardless of his health. Each spawn is comprised of 9 Congealing Bloods. They have 950,000 health each in 10-man difficulty and 3.2M in 25-man difficulty. They perform no action other than slowly moving towards Deathwing. They have no aggro table and they are killable. Deathwing regains 1% of his total health every time a Congealing Blood reaches him.
Strategy
The strategy for the encounter remains unchanged for the most part. In this section, we will provide all the necessary information for obtaining a kill.
Preliminary Clarifications
The same platform order that we recommend for Normal mode should still be used (Ysera > Alexstrasza > Nozdormu > Kalecgos).
While it is possible to use a 1-tank strategy (especially in 10-man difficulty), it is not a requirement and, we feel, it is not the optimal way to complete the encounter.
The healing requirements are quite intense, and as such 3 healers are needed in 10-man difficulty and 6 or 7 are needed in 25-man difficulty.
Phase One: Corrupting Parasite
The ![]() Corrupting Parasite is the only notable change in all of Phase
One. The way to handle the Parasite is rather simple:
Corrupting Parasite is the only notable change in all of Phase
One. The way to handle the Parasite is rather simple:
- The player who receives the debuff should move into the Time Zone
and should receive ample healing.
- Other raid members should make sure they are not within 10 yards of this player.
- When the debuff wears off and the Parasite NPC spawns, it should be quickly killed.
The second Parasite of every platform will spawn around the same time as the Regenerative Bloods. It is most efficient to move the Bloods on top of the Parasite and AoE them there. If the Parasite is still alive when the Bloods are dead, it can be single targeted down.
Note that, especially in 10-man difficulty, you do not have to kill the Parasite in order to be safe. You must only bring it low enough that 10% of its health will not be problematic. This means that you can have the Parasite at around 30% health in 10-man difficulty and 10% health in 25-man difficulty and still survive.
Finally, on the last platform (Kalecgos' platform), you should position the Corrupting Parasite near the Mutated Corruption, thus allowing melee DPS to cleave both of them together. Doing this is not a problem, as you no longer have Nozdormu's Time Zone so you no longer have constraints regarding where to position the Parasite. Just make sure that no one is within 10 yards of the Parasite's spawn location.
Phase One: Impale
![]() Impale deals a massive amount of damage in Heroic
mode, namely 840,000 Physical damage in 10-man difficulty and 1,200,000 Physical
damage in 25-man difficulty. As you can tell from these numbers, it will be
quite difficult for your tanks to survive the damage. You will have to ensure
that the tank is using a major cooldown for every one of the Impales (and that
the off-tank taunts off so that a tank never takes an Impale while already
having the debuff from a previous Impale). For the first platform, your tanks
can simply use
Impale deals a massive amount of damage in Heroic
mode, namely 840,000 Physical damage in 10-man difficulty and 1,200,000 Physical
damage in 25-man difficulty. As you can tell from these numbers, it will be
quite difficult for your tanks to survive the damage. You will have to ensure
that the tank is using a major cooldown for every one of the Impales (and that
the off-tank taunts off so that a tank never takes an Impale while already
having the debuff from a previous Impale). For the first platform, your tanks
can simply use ![]() Dream together with a minor cooldown. Tanks should also
not hesitate to ask for external cooldowns from healers.
Dream together with a minor cooldown. Tanks should also
not hesitate to ask for external cooldowns from healers.
It is important to note that invulnerabilities and abilities that allow
players to bypass dying (such as ![]() Ardent Defender or
Ardent Defender or ![]() Guardian Spirit)
will not work against Impale. The ability must be survived by simply reducing
the damage taken.
Guardian Spirit)
will not work against Impale. The ability must be survived by simply reducing
the damage taken.
One way that works well is by having a Shadow Priest using ![]() Dispersion.
To engineer this, you should have the Shadow Priest be the closest player to
the Mutated Corruption right before it is about to cast Impale, and having the
tank move out of range of the Corruption. This will cause it to cast Impale on
the nearest target, the Shadow Priest.
Dispersion.
To engineer this, you should have the Shadow Priest be the closest player to
the Mutated Corruption right before it is about to cast Impale, and having the
tank move out of range of the Corruption. This will cause it to cast Impale on
the nearest target, the Shadow Priest.
Phase Two
During Phase Two, the only notable difference is the spawning of Congealing Bloods at 15%, 10% and 5% of Deathwing's health. These adds will have to be AoE'd down before they reach the boss. This is not difficult as their health is rather low and they move slowly. They will always spawn at the back of the platform (the exact place varies) and their spawning location is indicated by a ground effect for about 2 seconds before they become targetable.
A useful way to maximise DPS during this phase is not to DPS the
Elementium Terrors right away, and instead wait until the Congealing
Bloods have spawned and then AoE all of the adds together. Doing so will give
you more DPS time on Deathwing and will allow you to make use of
![]() Spellweaver on the Elementium Terrors. They will most likely still be
alive after the Congealing Bloods die (their health is much higher) so they
will require single-targeting.
Spellweaver on the Elementium Terrors. They will most likely still be
alive after the Congealing Bloods die (their health is much higher) so they
will require single-targeting.
You can have your tanks simply tank the Elementium Terrors normally (in the
![]() Time Zone) until it is time to kill them, or have one tank take both and
then have the other tank taunt off them in order to have the stacks of
Time Zone) until it is time to kill them, or have one tank take both and
then have the other tank taunt off them in order to have the stacks of
![]() Tetanus drop off.
Tetanus drop off.
When Deathwing is about to reach 5%, you should stop DPSing any Terrors that may spawn, and simply burn down Deathwing. The raid damage will be high, as will the tank damage, so you should use all cooldowns.
Achievement: Chromatic Champion
The ![]() Chromatic Champion achievement is part of the
Chromatic Champion achievement is part of the
![]() Glory of the Dragon Soul Raider meta-achievement. The achievement is very
straightforward; it requires you to defeat the Madness of Deathwing encounter
after having started the fight on each of the 4 platforms. Naturally, this
means that the achievement will have to be completed over the course of 4
separate kills, so it will take at least 4 weeks.
Glory of the Dragon Soul Raider meta-achievement. The achievement is very
straightforward; it requires you to defeat the Madness of Deathwing encounter
after having started the fight on each of the 4 platforms. Naturally, this
means that the achievement will have to be completed over the course of 4
separate kills, so it will take at least 4 weeks.
Below, we will give you the recommended platform orders for each of the 4 starting platforms:
- Ysera > Alexstrasza > Nozdormu > Kalecgos;
- Alexstrasza > Ysera > Nozdormu > Kalecgos;
- Nozdormu > Ysera > Alexstrasza > Kalecgos;
- Kalecgos > Ysera > Nozdormu > Alexstrasza.
The first three orders should not pose any problems to your raid, with the possible exception of starting with Nozdormu, which will put a rather high strain of your healers due to the damage from Elementium Bolt.
The most problematic order will be the final one. The more gear you have, the easier this will be, so we advise you to leave it for last, as by then your raid will have obtained much more gear from Tier 13.
In this order, your raid will have to kill the Regenerative Bloods by single-targeting them down on all platforms except for the very first one, due to the loss of Kalecgos' AoE buff. For this purpose, we recommend that all DPS players in your raid always target the same Regenerative Blood as a designated player. The easiest way to do this is by use of a /assist Player macro (where Player is replaced by the player's name).
Using this macro will change your target to the target of the respective player. You should keybind this macro to a convenient button and use it each time the Blood you are targeting is about to die.
Concluding Remarks
This concludes the encounter guide for the Madness of Deathwing. The fight presents many interesting challenges for raiders, not so much from the enemy abilities, but more from the synergy and combination of the buffs granted by the Aspects. We feel that this makes the encounter feel quite unique, and the extra power that the Aspects grant you truly makes you feel like you are part of something greater.
While we would have wished to be able to fight Deathwing head on, we find this to be a fitting ending to The Destroyer.
If you've followed us this far, then you have, most likely, completed everything that Tier 13 and Cataclysm had to offer in terms of raiding. We hope that you have found our guides useful and enjoyable, and that you will continue to follow us into the new expansion!
As always, we would be pleased to read any feedback that you have (typos, suggestions, praise, etc.) by e-mail or in a comment below.
- Gate Opening Quest Issues, Blackwing Lair Resets, and War Effort Start: Phase 5 Launch Questions and Issues
- WoW Classic 20th Anniversary Edition Phase 5 Now Live
- Drowning in Old Loot During Collector’s Bounty? This WoW Addon Sorts Items by Expansion
- Big Rogue and Warlock Changes! Latest WoW PTR Build Focuses on Two Classes
- Build, Decorate, Team Up: WoW’s New Housing Neighborhoods Are More Than Just Yards
- Mount Drops Surge During Collector’s Bounty Event — The Numbers Are Wild
- The True Doubleagent: Player Stuck as Pandaren After Race Changing to Tauren
- Non-Arcane Mages Fall: Season 2 Week 18 Mythic+ DPS Logs