Maiden of Vigilance Guide for Tomb of Sargeras
Table of Contents
General Information
Welcome to our World of Warcraft encounter guide for Maiden of Vigilance in Tomb of Sargeras. We will teach you everything you need to know to defeat the boss in every difficulty.
On this particular page, we will give you a short overview of the fight as well as a list of things to watch out for (include LFR tips when applicable).
The other pages of our Maiden of Vigilance guide can be accessed from the table of contents on the right.
Contents
To make it easy to navigate the guide, we have split it into 3 pages:
- Abilities: read about the encounter abilities;
- Normal/Heroic Strategy/Tactics: find out how to defeat the encounter in Normal and Heroic modes;
- Mythic Strategy: learn how to handle the new mechanics and increased difficulty of Mythic mode.
Lore
The Maiden of Vigilance is the seventh boss housed in the Tomb of Sargeras.
Charged by Aegwynn to defend the Tomb of Sargeras, the Maiden of Vigilance has stood watch for hundreds of years. Yet, the guardian did not forsee what effect the avatar's seeping fel energy would have on this titan construct. Slowly warped by this maleficence, the Maiden now seeks to destroy any in her path.
Outline
The fight against the Maiden of Vigilance is comprised of 2 phases. The first phase, Divide and Conquer, encompasses the main part of the encounter. The second phase, Watcher's Wrath, will serve as an intermission of sorts where the Maiden will jump away and shield herself, absorbing a fixed amount of damage and beginning a channel than deals increasing damage with each tick, finally wiping the raid unavoidably at 30 stacks. If the raid manages to break the shield in time, the channel can be interrupted and the first phase resumes. Overall this constitutes a simple but punishing encounter that requires clean mechanical play and strong numbers output.
Here is a preview from the LFR version of the fight on PTR:
TL;DR
Infusion
The Maiden of Vigilance will infuse each raid member with either
![]() Light Infusion or
Light Infusion or ![]() Fel Infusion. Taking damage from an ability
that does not match your
Fel Infusion. Taking damage from an ability
that does not match your ![]() Infusion will trigger
Infusion will trigger ![]() Unstable Soul.
Unstable Soul.
Everyone
- Avoid taking any damage from abilities of the opposite
 Infusion or
 Unstable Soul will be triggered.
 - Jump into the pit in the center of the room if you are affected by the
Unstable Soul debuff to avoid damaging the raid (due to
 Aegwynn's Ward).
 - Collect
 Essence Fragments matching your Infusion during
Phase 2 to stack a damage and healing buff to help break the
Essence Fragments matching your Infusion during
Phase 2 to stack a damage and healing buff to help break the  Titanic Bulwark.
 - Help the tanks soak the frontal cleave matching your Infusion.
Tanks
- Perform a taunt swap when the Maiden switches between
 Hammer of Creation
and
Hammer of Creation
and  Hammer of Obliteration so that the current tank has a debuff matching
the current hammer (
Hammer of Obliteration so that the current tank has a debuff matching
the current hammer ( Fel Infusion for Obliteration and
  Light Infusion
for Creation).
Light Infusion
for Creation). - Ensure players of the correct debuffs are in the conal cleave from the
Hammer of Creation and Hammer of Obliteration.
Healers
- Coordinate healing cooldowns as the damage from
 Wrath of the Creators
increases.
Wrath of the Creators
increases. - Be ready to perform surgical healing when
 Mass Instability occurs.
DPS
- Prepare cooldowns to quickly break Titanic Bulwark in Phase 2.
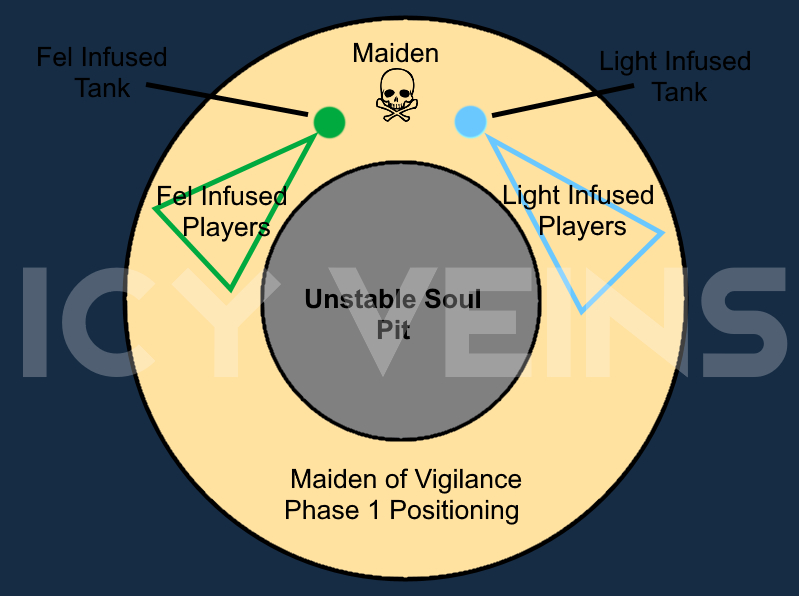
Positioning
Positioning during Phase 1 is determined by the ![]() Infusion debuff.
The raid should place markers on either side of the boss designating a
Infusion debuff.
The raid should place markers on either side of the boss designating a
![]() Fel Infusion side and a
Fel Infusion side and a ![]() Light Infusion. Once
Light Infusion. Once ![]() Infusion
is cast, all players should form a loose spread on their designated side of
the room. The tanks will trade the boss back and forth as the Maiden swaps
between her hammers, allowing the raid to easily split the cleaves without
necessitating movement.
Infusion
is cast, all players should form a loose spread on their designated side of
the room. The tanks will trade the boss back and forth as the Maiden swaps
between her hammers, allowing the raid to easily split the cleaves without
necessitating movement.
During Phase 2, the boss will leap away, stunning players momentarily. The
Maiden will shield herself and begin a channel, increasing in intensity with
each tick that will wipe that raid after it reaches 30 stacks. The raid must
collect ![]() Essence Fragments to boost their damage and healing and break
the shield. Once the
Essence Fragments to boost their damage and healing and break
the shield. Once the ![]() Titanic Bulwark is broken, the channel can be
interrupted and Phase 1 positioning resumes.
Titanic Bulwark is broken, the channel can be
interrupted and Phase 1 positioning resumes.
Bloodlust/Heroism/Time Warp
We advise you to use ![]() Bloodlust/
Bloodlust/![]() Heroism/
Heroism/![]() Time Warp
on the pull for maximum damage, however, it can also be used during the first
Time Warp
on the pull for maximum damage, however, it can also be used during the first
![]() Wrath of the Creators if your group is struggling to break the shield.
Either usage is acceptable, although on the pull usage is favoured if safely
cracking
Wrath of the Creators if your group is struggling to break the shield.
Either usage is acceptable, although on the pull usage is favoured if safely
cracking ![]() Titanic Bulwark is consistent.
Titanic Bulwark is consistent.
Changelog
- 06 Aug. 2017 (mythic page): Mythic page added.
- 14 May 2017 (this page): Guide added.


- Shadow, Arms, and More: Big Post-Mythic Class Tuning Details Announced!
- Recraft Crests Lost Bug Is Fixed, Blizzard Working on Restoration, If Possible
- Several WoW Promotion Items Joining the Trading Post in 12.0.5
- The First RWF Week Is Done! All Bosses Cleared on a Thursday! Liquid Down Crown and Head to 7/9
- Are You Taller Than Your Character? WoW’s Wild Height Scale Revealed
- Alnseer Nerf, Voidspire Adjustments, Very Rare Item Levels Fixed, Dungeon Finder Spec Gold Rewards Tuned: Midnight Hotfixes, Match 26th
- Where Is The Horde? The Question Midnight’s Newest Chapter Has Players Asking
- WoW’s FOMO Problem Is Getting Worse — Miss It Once, Lose It Forever