Sha of Anger Detailed Strategy Guide
Table of Contents
Introduction
This guide is intended to provide a comprehensive description of the encounter with Sha of Anger in Pandaria. It is targeted at anyone who desires to understand the fight mechanics.
This guide is updated for World of Warcraft WoD 6.1.2.
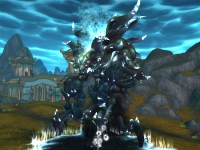
The Sha of Anger is a non-instanced raid encounter, also known as a world boss. The encounter is a two-phase fight of relative simplicity.
The Sha of Anger can be found in one of several possible spawn points in Kun-Lai Summit.
General Information
| Health | Enrage Timer | Raid Composition | ||
|---|---|---|---|---|
| Tanks | Healers | DPS | ||
| 261M | Unknown | 2-3 | 6-9 | 15-29 |
Loot
The Sha of Anger drops Legs and Hands items from the Tier 14 sets, in the same manner as the bosses from Baradin Hold used to do for previous tiers.
In addition, the Sha of Anger drops a rare mount, ![]() Reins of the Heavenly Onyx Cloud Serpent,
and a cache of gold:
Reins of the Heavenly Onyx Cloud Serpent,
and a cache of gold: ![]() Cache of Sha-Touched Gold.
Cache of Sha-Touched Gold.
Spawn Locations and Nearby Mobs
The Sha of Anger will spawn in one of the following 3 locations.
- in the south of Kun-Lai Summit, between the Gate of August Celestials and the Shado-Pan Retreat;
- on the Burlap Trail, east of Kota Basecamp;
- south of One Keg.
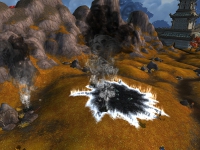
The Sha of Anger only spawns in the large Sha void zones that you find in the aforementioned areas, as illustrated by the screenshot below (in which the Sha is about to spawn).
The Sha of Anger has a low respawn timer of roughly 15 minutes.
Additionally, the Sha of Anger transforms the area's native mobs into its own (elite) trash. You should kill this trash before attempting to dispose of the boss.
Overview of the Fight
 The encounter against the Sha of Anger consists of two phases that alternate
throughout the fight, which we will refer to as Phase One: Growing Anger
and Phase Two: Unleashed Wrath. The phases are determined by the state
of the boss' rage bar, which increases and decreases in a steady and
predictable manner. During each phase, the boss uses an ability specific to
that phase, as well as two abilities common to both phases.
Common Abilities
Regardless of the state of his rage bar (and, therefore, the phase of fight), the boss will make use of two abilities.
-

 Seethe punishes the raid if no player is within melee range
of the boss. If this happens, the boss will deal a large amount of Shadow
damage to his main aggro target, at the same time increasing the amount of
Shadow damage that that target takes.
  Endless Rage is an ability that the Sha of Anger uses
roughly every 30 seconds. The ability targets the locations of several
players, and, a few seconds later deals 100,000 Shadow damage to players within
3 yards of the location. Moreover, the ability summons two things at the
location where it lands:
Endless Rage is an ability that the Sha of Anger uses
roughly every 30 seconds. The ability targets the locations of several
players, and, a few seconds later deals 100,000 Shadow damage to players within
3 yards of the location. Moreover, the ability summons two things at the
location where it lands:- Ire, a small add that does nothing but melee its highest aggro target.
 Bitter Thoughts, a harmful cloud which prevents players who are inside
it from casting any spells or performing any actions except for moving.
Dealing with Seethe is very easy, and it simply involves making sure that the tank is within melee range of the boss at all times.
Dealing with Endless Rage is equally easy, if a bit more complex.
- Players should move away from the locations where Endless Rage will land (they are pre-signalled by a graphical effect).
- Players should move out of any Bitter Thoughts they may find themselves in.
- The off-tank(s) should tank the Ires, while your raid AoEs them. As we will see below, it is also feasible to kite the Ires.
Phase One: Growing Anger
The boss' rage bar starts out empty, and increases to full capacity over a period of 50 seconds. During this time, the boss is in Phase One. Once the rage bar is full, the phase ends.
Abilities
During Phase One, the boss uses a single ability (in addition to the common abilities listed above).
![]() Growing Anger is a debuff that the boss places on 3 random raid
members (the main tank is not excluded from this). The debuff lasts for 6
seconds, and at the end of the debuff, the affected players and any other
players within 5 yards of them become mind controlled
(
Growing Anger is a debuff that the boss places on 3 random raid
members (the main tank is not excluded from this). The debuff lasts for 6
seconds, and at the end of the debuff, the affected players and any other
players within 5 yards of them become mind controlled
(![]() Aggressive Behavior) by the boss for 30 seconds, or until they reach
50% health. While mind controlled, players have their health and damage
increased by 200%.
Aggressive Behavior) by the boss for 30 seconds, or until they reach
50% health. While mind controlled, players have their health and damage
increased by 200%.
Strategy
The strategy for Phase One revolves around handling the mind control most efficiently. The first step is to ensure that the mind control does not affect more than the 3 debuffed players. This means that as soon as Growing Anger is cast, the affected raid members should move out of the raid.
Afterwards, you have two options.
- You can damage the affected players until they reach 50% health, which breaks the mind-control.
- You can crowd-control them and wait for the mind control to expire after 30 seconds.
A useful tip for dealing with Growing Anger is to have all raid members use their most powerful crowd-control spells right before Growing Anger is cast, so that it cannot be used while mind-controlled. Spells such as AoE fears are particularly harmful.
This phase does not present the healers with an overwhelming amount of raid damage, but it does create a lot of confusion, especially considering that the fighting area will be filled with Bitter Thoughts clouds and, possibly, adds.
Phase Two: Unleashed Wrath
When the Sha of Anger's rage bar reaches maximum capacity (100), the boss will enter Phase Two, during which time his rage bar is drained over 25 seconds.. The phase ends when the bar reaches 0 rage.
Abilities
During Phase Two, the boss uses a single ability (in addition to the common abilities listed above).
![]() Unleashed Wrath is a raid-wide damaging spell. The boss will deal a
large amount of Shadow damage to 10 random raid members every 2 seconds, for
the 25-second duration of the phase.
Unleashed Wrath is a raid-wide damaging spell. The boss will deal a
large amount of Shadow damage to 10 random raid members every 2 seconds, for
the 25-second duration of the phase.
Strategy
The strategy for Phase Two is all about surviving the rather intense and
sustained raid damage. Your raid cannot stack together, due to the AoE damage
dealt by ![]() Endless Rage, and because of the Bitter Thoughts
clouds.
Endless Rage, and because of the Bitter Thoughts
clouds.
This will be the most intense period of the fight, and your healers should use their raid cooldowns at this time.
When to Use Heroism/Bloodlust/Time Warp
It is best to use ![]() Heroism/
Heroism/![]() Bloodlust/
Bloodlust/![]() Time Warp when no
mind control (
Time Warp when no
mind control (![]() Growing Anger and
Growing Anger and ![]() Aggressive Behavior) is near.
Therefore, we recommend using it right after Phase Two begins.
Aggressive Behavior) is near.
Therefore, we recommend using it right after Phase Two begins.
Raid Composition
Given the fact that this is a world boss, you can utilize a raid group of up to 40 members in order to defeat it. Moreover, the boss can be damaged even by players outside of the raid group (although they will not be eligible for loot).
This poses the problem of how many raid members are actually needed to defeat the Sha of Anger. We would make the following comments:
- Tanks: You will need 1 tank for the Sha of Anger, and at least one tank for the adds. You can utilise two off-tanks if you desire.
- Healers: Raid damage can become quite brutal, and the more healers your raid has, the better. Therefore, we would advise a minimum of 6 healers, and as many as 9, depending on your raid size and gear level.
- DPS: The encounter requires a reasonably high amount of DPS for several reasons (killing the adds in time, breaking the mind control), so the more DPS players you have, the easier the fight becomes. We recommend at least 15 DPS players.
Corpse Running/Avoiding Wipes
Because the fight does not take place in an instanced environment, it is possible for dead raid members to release spirit and run back to the place where they died and resurrect. This is a good way for your raid to replenish its numbers. Keep in mind the following things:
- After 2 resurrections in quick succession, you will have to wait for 2 minutes before you can resurrect again.
- When you resurrect, you come back with 50% of your maximum health. It is best that healers are prepared ahead of time to heal you.
- It is best to group up (in ghost form) and resurrect at the same time, rather than each one individually. This gives you a better chance to recover.
If a large portion of your raid dies, remaining raid members should attempt to delay a wipe for as long as possible, to give the dead raid members a chance to run back.
Learning the Fight
The fight against the Sha of Anger is very simple. As long as your raid members understand to spread out when a mind control is about to occur, and as long as they do not stand in the Bitter Thoughts, defeating the boss is simply a matter of practice.
Concluding Remarks
This concludes the Sha of Anger guide. As you can tell, this encounter is simple, yet intense. It will strain your healers and your DPS players, and your raid must have good coordination to defeat it. If you have any comments or suggestions, we would love to hear from you on our forums, or via e-mail.
- Blizzard Breaks Silence on Puzzling Cartel Chips in Patch 11.1.5
- Chalice Quest NPC Rewards Temporarily Disabled Disabled in Season of Discovery
- Has The Catalyst Killed Raiding or Improved the Game? WoW Heroic Raid Progression Since Legion
- Undercoin Transfers Now Possible on 11.1.5 PTR — Bug or Feature?
- The Music of Azeroth: Community’s Favorite Soundscapes
- This Hunter Transmog Turned Heads on Reddit—and Here’s the Full Item List
- What’s Still in Your Bags? Players Reveal the Weirdest Items They Can’t Delete
- Two Mounts Drop in the Scarlet Enclave Raid — Here’s Where to Get Them

